
Owner's Manual
Page 22
... airbag. crash, the belt could be torn from your lap. Protecting Children Additional Precautions to Parents Never hold on your arms during a collision or hard braking. If you could press deep into the dashboard and crush the child. The National Highway Traffic Safety Administration and Transport Canada recommend that all ages...
... airbag. crash, the belt could be torn from your lap. Protecting Children Additional Precautions to Parents Never hold on your arms during a collision or hard braking. If you could press deep into the dashboard and crush the child. The National Highway Traffic Safety Administration and Transport Canada recommend that all ages...
Owner's Manual
Page 57
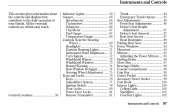
... ...87 Rear Seat Access ...87 Head Restraints ...89 Folding Rear Seat ...90 Power Windows ...92 Moonroof ...94 Mirrors ...95 Adjusting the Power Mirrors ...95 Parking Brake ...96 Glove Box ...97 Beverage Holder ...98 Console Compartment ...98 Coin Box ...99 Center Pocket ...99 Accessory Power Socket ...99 Coat Hook ...100 Interior Lights... Controls Control Locations ...58 57 Instruments and Controls This section gives information about the controls and displays that contribute to the daily operation of your Honda.
... ...87 Rear Seat Access ...87 Head Restraints ...89 Folding Rear Seat ...90 Power Windows ...92 Moonroof ...94 Mirrors ...95 Adjusting the Power Mirrors ...95 Parking Brake ...96 Glove Box ...97 Beverage Holder ...98 Console Compartment ...98 Coin Box ...99 Center Pocket ...99 Accessory Power Socket ...99 Coat Hook ...100 Interior Lights... Controls Control Locations ...58 57 Instruments and Controls This section gives information about the controls and displays that contribute to the daily operation of your Honda.

Owner's Manual
Page 58
... INDICATOR (P. 64) LOW OIL PRESSURE INDICATOR (P. 278) TRUNK-OPEN INDICATOR (P. 63) SIDE AIRBAG OFF INDICATOR (P. 61) CRUISE CONTROL INDICATOR (P. 63) LOW FUEL INDICATOR (P. 63) PARKING BRAKE AND BRAKE SYSTEM INDICATOR (P. 62) CHARGING SYSTEM INDICATOR (P. 279) HIGH BEAM INDICATOR (P. 63) SHIFT LEVER POSITION INDICATOR 2 (LX,EX) 1 2 MALFUNCTION INDICATOR LAMP (P. 280) MAINTENANCE REQUIRED INDICATOR...
... INDICATOR (P. 64) LOW OIL PRESSURE INDICATOR (P. 278) TRUNK-OPEN INDICATOR (P. 63) SIDE AIRBAG OFF INDICATOR (P. 61) CRUISE CONTROL INDICATOR (P. 63) LOW FUEL INDICATOR (P. 63) PARKING BRAKE AND BRAKE SYSTEM INDICATOR (P. 62) CHARGING SYSTEM INDICATOR (P. 279) HIGH BEAM INDICATOR (P. 63) SHIFT LEVER POSITION INDICATOR 2 (LX,EX) 1 2 MALFUNCTION INDICATOR LAMP (P. 280) MAINTENANCE REQUIRED INDICATOR...
Owner's Manual
Page 59
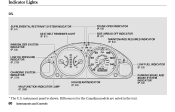
instrument panel is shown. Indicator Lights DX SUPPLEMENTAL RESTRAINT SYSTEM INDICATOR (P. 61) SEAT BELT REMINDER LIGHT (P. 61) IMMOBILIZER SYSTEM INDICATOR (P. 64) LOW OIL PRESSURE INDICATOR (P. 278) TRUNK-OPEN INDICATOR (P. 63) SIDE AIRBAG OFF INDICATOR (P. 61) MAINTENANCE REQUIRED INDICATOR (P. 64) LOW FUEL INDICATOR (P. 63) PARKING BRAKE AND BRAKE SYSTEM INDICATOR (P. 62) CHARGING SYSTEM INDICATOR (P. 279) HIGH BEAM INDICATOR (P. 63) MALFUNCTION INDICATOR LAMP (P. 280) The U.S. Differences for the Canadian models are noted in the text. 60 Instruments and Controls
instrument panel is shown. Indicator Lights DX SUPPLEMENTAL RESTRAINT SYSTEM INDICATOR (P. 61) SEAT BELT REMINDER LIGHT (P. 61) IMMOBILIZER SYSTEM INDICATOR (P. 64) LOW OIL PRESSURE INDICATOR (P. 278) TRUNK-OPEN INDICATOR (P. 63) SIDE AIRBAG OFF INDICATOR (P. 61) MAINTENANCE REQUIRED INDICATOR (P. 64) LOW FUEL INDICATOR (P. 63) PARKING BRAKE AND BRAKE SYSTEM INDICATOR (P. 62) CHARGING SYSTEM INDICATOR (P. 279) HIGH BEAM INDICATOR (P. 63) MALFUNCTION INDICATOR LAMP (P. 280) The U.S. Differences for the Canadian models are noted in the text. 60 Instruments and Controls
Owner's Manual
Page 61
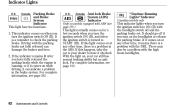
...to START (III). If it means there is a problem with the headlight switch off if you turn the ignition switch to check the parking brake. Canada U.S. Driving with the high beam headlights. 62 Instruments and Controls For complete information, see page 192 . There may also be a ... DRL. If the indicator remains lit after you turn the ignition switch ON (II). It should go off and the parking brake set. Indicator Lights Parking Brake and Brake System Indicator This light has two functions: U.S. If this happens, take the car to your car still has normal...
...to START (III). If it means there is a problem with the headlight switch off if you turn the ignition switch to check the parking brake. Canada U.S. Driving with the high beam headlights. 62 Instruments and Controls For complete information, see page 192 . There may also be a ... DRL. If the indicator remains lit after you turn the ignition switch ON (II). It should go off and the parking brake set. Indicator Lights Parking Brake and Brake System Indicator This light has two functions: U.S. If this happens, take the car to your car still has normal...
Owner's Manual
Page 70
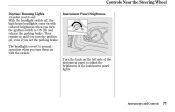
Instruments and Controls 71 They remain on with reduced brightness when you set the parking brake. The headlights revert to normal operation when you turn them on until you turn the ignition off , the high beam headlights come on the left side of the instrument panel to ON (II) and release the parking brake. Turn the knob on with the switch. Controls Near the Steering Wheel Daytime Running Lights Canadian models only Instrument Panel Brightness With the headlight switch off , even if you turn the ignition switch to adjust the brightness of the instrument panel lights.
Instruments and Controls 71 They remain on with reduced brightness when you set the parking brake. The headlights revert to normal operation when you turn them on until you turn the ignition off , the high beam headlights come on the left side of the instrument panel to ON (II) and release the parking brake. Turn the knob on with the switch. Controls Near the Steering Wheel Daytime Running Lights Canadian models only Instrument Panel Brightness With the headlight switch off , even if you turn the ignition switch to adjust the brightness of the instrument panel lights.

Owner's Manual
Page 90
... 171 . Do not put any heavy items on the top of the release. Loose items can fly forward and cause injury if you have to brake hard. RELEASE To release the seat-back from inside the trunk, pull the release under the trunk panel. Push the seat-back down and the...
... 171 . Do not put any heavy items on the top of the release. Loose items can fly forward and cause injury if you have to brake hard. RELEASE To release the seat-back from inside the trunk, pull the release under the trunk panel. Push the seat-back down and the...
Owner's Manual
Page 95
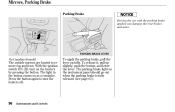
... on the heaters by pressing the button. To release it, pull up fully. Mirrors, Parking Brake Parking Brake Driving the car with the parking brake applied can damage the rear brakes and axles. Press the button again to remove fog and frost. With the ignition switch ON (II), turn the heaters off. The light... in the button comes on as a reminder. PARKING BRAKE LEVER On Canadian Si model The outside mirrors are heated to turn on the instrument panel should go out when the parking...
... on the heaters by pressing the button. To release it, pull up fully. Mirrors, Parking Brake Parking Brake Driving the car with the parking brake applied can damage the rear brakes and axles. Press the button again to remove fog and frost. With the ignition switch ON (II), turn the heaters off. The light... in the button comes on as a reminder. PARKING BRAKE LEVER On Canadian Si model The outside mirrors are heated to turn on the instrument panel should go out when the parking...
Owner's Manual
Page 156
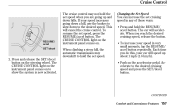
... car will speed up and down to the desired speed. The car will cancel the cruise control. When you are going down a hill, use the brakes to slow down hills. The CRUISE CONTROL light on the instrument panel comes on the steering wheel. CONTINUED Comfort and Convenience Features 157 Changing the...
... car will speed up and down to the desired speed. The car will cancel the cruise control. When you are going down a hill, use the brakes to slow down hills. The CRUISE CONTROL light on the instrument panel comes on the steering wheel. CONTINUED Comfort and Convenience Features 157 Changing the...
Owner's Manual
Page 157
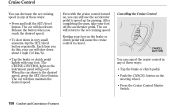
...will return to cancel. The car will then maintain the desired speed. Press the Cruise Control Master Switch. 158 Comfort and Convenience Features Tap the brake or clutch pedal lightly with the cruise control turned on the instrument panel will cause the cruise control to the set cruising speed in any... of these ways: Tap the brake or clutch pedal. To slow down about 1 mph (1.6 km/h). After completing the pass, take your foot. Push the CANCEL button on the...
...will return to cancel. The car will then maintain the desired speed. Press the Cruise Control Master Switch. 158 Comfort and Convenience Features Tap the brake or clutch pedal lightly with the cruise control turned on the instrument panel will cause the cruise control to the set cruising speed in any... of these ways: Tap the brake or clutch pedal. To slow down about 1 mph (1.6 km/h). After completing the pass, take your foot. Push the CANCEL button on the...
Owner's Manual
Page 158
... go out and the car will accelerate to the same cruising speed as before. Cruise Control When you push the CANCEL button, or tap the brake or clutch pedal, the CRUISE CONTROL light on , and the car will begin to slow down. You can use the system again, refer to above...
... go out and the car will accelerate to the same cruising speed as before. Cruise Control When you push the CANCEL button, or tap the brake or clutch pedal, the CRUISE CONTROL light on , and the car will begin to slow down. You can use the system again, refer to above...
Owner's Manual
Page 160
... for service. 162 Before Driving If you drive during the first 600 miles (1,000 km). Use of 86 or higher. New brakes need to mechanical damage. Do not change the oil until the recommended time or mileage interval shown in the maintenance schedule. Gasoline Your... may deteriorate and the Malfunction Indicator Lamp on unleaded gasoline with an overhauled or exchanged engine, or when the brakes are relined. This contributes to operate on your authorized Honda dealer for the first 200 miles (300 km). In Canada, some gasolines contain an octane-enhancing additive called ...
... for service. 162 Before Driving If you drive during the first 600 miles (1,000 km). Use of 86 or higher. New brakes need to mechanical damage. Do not change the oil until the recommended time or mileage interval shown in the maintenance schedule. Gasoline Your... may deteriorate and the Malfunction Indicator Lamp on unleaded gasoline with an overhauled or exchanged engine, or when the brakes are relined. This contributes to operate on your authorized Honda dealer for the first 200 miles (300 km). In Canada, some gasolines contain an octane-enhancing additive called ...

Owner's Manual
Page 162
.... 2. The hood will pop up until it clicks several times. Lift the hood. 164 Before Driving Shift to Park or Neutral and set the parking brake. Service Station Procedures 5.
.... 2. The hood will pop up until it clicks several times. Lift the hood. 164 Before Driving Shift to Park or Neutral and set the parking brake. Service Station Procedures 5.

Owner's Manual
Page 166
... allows the engine to ''warm-up'' a cold engine by driving moderately. Frequent cleaning helps your car uses extra fuel. Rapid acceleration, abrupt cornering, and hard braking use . You can improve fuel economy by letting it in the highest gear that affect the fuel mileage you get better fuel economy. Turn off...
... allows the engine to ''warm-up'' a cold engine by driving moderately. Frequent cleaning helps your car uses extra fuel. Rapid acceleration, abrupt cornering, and hard braking use . You can improve fuel economy by letting it in the highest gear that affect the fuel mileage you get better fuel economy. Turn off...
Owner's Manual
Page 167
... radios, and low-powered audio systems should not interfere with proper car operation or performance. Accessories and Modifications Modifying your car, or installing some non-Honda accessories, can make any modifications or add any accessories, be hurt or killed. Before you to deploy. Before installing any accessory: Make sure the accessory... with the operation of your car, or even cause the airbags to personalize your car's computer-controlled systems, such as the SRS and anti-lock brake system. Before Driving 169
... radios, and low-powered audio systems should not interfere with proper car operation or performance. Accessories and Modifications Modifying your car, or installing some non-Honda accessories, can make any modifications or add any accessories, be hurt or killed. Before you to deploy. Before installing any accessory: Make sure the accessory... with the operation of your car, or even cause the airbags to personalize your car's computer-controlled systems, such as the SRS and anti-lock brake system. Before Driving 169

Owner's Manual
Page 168
... handling, and interfere with a different overall diameter. This could make your car, or install wheels and tires with the operation of the car's anti-lock brakes and other raised object, which could prevent the airbag from inflating properly. 170 Before Driving Any object attached to drive. If a side airbag inflates, a cup... unsafe and illegal to or placed on the covers marked ''SRS AIRBAG,'' in any objects over the outside edge of a front seat-back, with a non-Honda seat cover for example, could cause your airbags to deploy.
... handling, and interfere with a different overall diameter. This could make your car, or install wheels and tires with the operation of the car's anti-lock brakes and other raised object, which could prevent the airbag from inflating properly. 170 Before Driving Any object attached to drive. If a side airbag inflates, a cup... unsafe and illegal to or placed on the covers marked ''SRS AIRBAG,'' in any objects over the outside edge of a front seat-back, with a non-Honda seat cover for example, could cause your airbags to deploy.

Owner's Manual
Page 173
...operate the 5-speed manual and automatic transmissions. Driving This section gives you tips on parking your car, and the braking system. It also includes important information on starting the engine under various conditions, and how to Drive ...176 Starting... ...184 Continuously Variable Transmission (CVT) ...185 Maximum Allowable Speed ...187 Parking ...188 Parking Tips ...188 The Braking System...189 Brake Wear Indicators ...189 Brake System Design...190 Anti-lock Brakes ...190 Important Safety Reminders ...191 ABS Indicator ...192 Driving in Bad Weather ...193 Towing a Trailer ...194 ...
...operate the 5-speed manual and automatic transmissions. Driving This section gives you tips on parking your car, and the braking system. It also includes important information on starting the engine under various conditions, and how to Drive ...176 Starting... ...184 Continuously Variable Transmission (CVT) ...185 Maximum Allowable Speed ...187 Parking ...188 Parking Tips ...188 The Braking System...189 Brake Wear Indicators ...189 Brake System Design...190 Anti-lock Brakes ...190 Important Safety Reminders ...191 ABS Indicator ...192 Driving in Bad Weather ...193 Towing a Trailer ...194 ...
Owner's Manual
Page 175
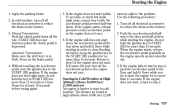
Automatic Transmission: 5. If the engine starts, release pressure on the brake pedal. 4. If the engine still does not start, press the accelerator pedal all electrical accessories to the problem. Return to step 2. Pause for at high ... hold the key in Park. If the engine does not start in step 2, push the accelerator pedal to the START (III) position. Apply the parking brake. 2. Press on the accelerator pedal so the engine does not race. 6. If the engine fails to start right away, do not hold it there while...
Automatic Transmission: 5. If the engine starts, release pressure on the brake pedal. 4. If the engine still does not start, press the accelerator pedal all electrical accessories to the problem. Return to step 2. Pause for at high ... hold the key in Park. If the engine does not start in step 2, push the accelerator pedal to the START (III) position. Apply the parking brake. 2. Press on the accelerator pedal so the engine does not race. 6. If the engine fails to start right away, do not hold it there while...

Owner's Manual
Page 176
... to the next gear, and let the pedal up can cause loss of the forward gears for a few seconds before downshifting. This extra braking can damage the transmission by shifting to a full stop before you maintain a safe speed and prevent your foot on the clutch pedal. On...When slowing down a steep hill. Use extra care when driving on slippery surfaces. If you crash, you are not shifting, do not rest your brakes from Fifth to shift into one of control on slippery surfaces. 178 Driving 5-speed Manual Transmission Come to a lower gear. Before downshifting, make sure...
... to the next gear, and let the pedal up can cause loss of the forward gears for a few seconds before downshifting. This extra braking can damage the transmission by shifting to a full stop before you maintain a safe speed and prevent your foot on the clutch pedal. On...When slowing down a steep hill. Use extra care when driving on slippery surfaces. If you crash, you are not shifting, do not rest your brakes from Fifth to shift into one of control on slippery surfaces. 178 Driving 5-speed Manual Transmission Come to a lower gear. Before downshifting, make sure...

Owner's Manual
Page 179
... turning off or starting the engine. To shift out of the shift lever to N Do this: Press the brake pedal and press the release button. Press the release button on the brake pedal, and keep your foot off the accelerator pedal. The shift lever has six positions. Press the release button... To shift from: P to R R to P N to R D3 to 2 2 to D3 D3 to D D to N D to D3 N to D R to move it. It must press on the brake pedal and have your foot off the accelerator pedal. Park (P) This position mechanically locks the transmission. CONTINUED Driving 181 Move the lever. When you must...
... turning off or starting the engine. To shift out of the shift lever to N Do this: Press the brake pedal and press the release button. Press the release button on the brake pedal, and keep your foot off the accelerator pedal. The shift lever has six positions. Press the release button... To shift from: P to R R to P N to R D3 to 2 2 to D3 D3 to D D to N D to D3 N to D R to move it. It must press on the brake pedal and have your foot off the accelerator pedal. Park (P) This position mechanically locks the transmission. CONTINUED Driving 181 Move the lever. When you must...


