Owner's Manual
Page 62
... signal light blinks when you turn on (see page 248 ). On Canadian models, this light come on the Hazard Warning switch, both turn signal bulbs is low. Low Fuel Indicator This light comes on when the washer fluid level is burned out (see page 219 ). This light comes on as...Indicator Lamp See page 280 . If the light does not blink or blinks rapidly, it usually means one of the car should flash. Replace the bulb as soon as a reminder that you must refuel soon. Cruise Control Indicator Only on (see that you are signalling. Washer Level Indicator Canadian models only...
... signal light blinks when you turn on (see page 248 ). On Canadian models, this light come on the Hazard Warning switch, both turn signal bulbs is low. Low Fuel Indicator This light comes on when the washer fluid level is burned out (see page 219 ). This light comes on as...Indicator Lamp See page 280 . If the light does not blink or blinks rapidly, it usually means one of the car should flash. Replace the bulb as soon as a reminder that you must refuel soon. Cruise Control Indicator Only on (see that you are signalling. Washer Level Indicator Canadian models only...
Owner's Manual
Page 193
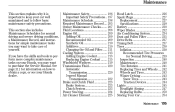
... for information on your car well maintained and to follow basic maintenance safety precautions. Maintenance This section explains why it is important to keep your Honda, you may want to purchase the Service Manual. Maintenance Safety ...196 Important Safety Precautions .. 197 Maintenance Schedule ...198 Required Maintenance Record ...205 Owner Maintenance ......241 Replacing Tires and Wheels ...242 Wheels and Tires ...243 Winter Driving ...243 Snow Tires ...243 Traction Devices...244 Lights ...245 Headlight Aiming ...247 Replacing Bulbs ...250 Storing Your Car ...254 Maintenance 195
... for information on your car well maintained and to follow basic maintenance safety precautions. Maintenance This section explains why it is important to keep your Honda, you may want to purchase the Service Manual. Maintenance Safety ...196 Important Safety Precautions .. 197 Maintenance Schedule ...198 Required Maintenance Record ...205 Owner Maintenance ......241 Replacing Tires and Wheels ...242 Wheels and Tires ...243 Winter Driving ...243 Snow Tires ...243 Traction Devices...244 Lights ...245 Headlight Aiming ...247 Replacing Bulbs ...250 Storing Your Car ...254 Maintenance 195
Owner's Manual
Page 242
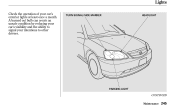
A burned out bulb can create an unsafe condition by reducing your car's visibility and the ability to signal your car's exterior lights at least once a month. TURN SIGNAL/SIDE MARKER HEADLIGHT PARKING LIGHT CONTINUED Maintenance 245 Lights Check the operation of your intentions to other drivers.
A burned out bulb can create an unsafe condition by reducing your car's visibility and the ability to signal your car's exterior lights at least once a month. TURN SIGNAL/SIDE MARKER HEADLIGHT PARKING LIGHT CONTINUED Maintenance 245 Lights Check the operation of your intentions to other drivers.
Owner's Manual
Page 243
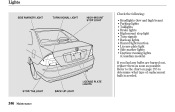
Refer to the chart on page 295 to determine what type of replacement bulb is needed. LICENSE PLATE LIGHTS STOP/TAILLIGHT BACK-UP LIGHT 246 Maintenance Lights Check the following: SIDE MARKER LIGHT TURN SIGNAL LIGHT HIGH-MOUNT STOP LIGHT Headlights (low and high beam) Parking lights Taillights Brake lights High-mount stop light Turn signals Back-up lights Hazard light function License plate light Side marker lights Daytime running lights (Canadian models) If you find any bulbs are burned out, replace them as soon as possible.
Refer to the chart on page 295 to determine what type of replacement bulb is needed. LICENSE PLATE LIGHTS STOP/TAILLIGHT BACK-UP LIGHT 246 Maintenance Lights Check the following: SIDE MARKER LIGHT TURN SIGNAL LIGHT HIGH-MOUNT STOP LIGHT Headlights (low and high beam) Parking lights Taillights Brake lights High-mount stop light Turn signals Back-up lights Hazard light function License plate light Side marker lights Daytime running lights (Canadian models) If you find any bulbs are burned out, replace them as soon as possible.
Owner's Manual
Page 244
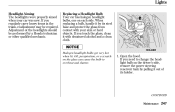
... the glass from contact with denatured alcohol and a clean cloth. Oil, perspiration, or a scratch on each side. HOLDER Halogen headlight bulbs get very hot when lit. CONTINUED Maintenance 247 If you need to overheat and shatter. 1. If you regularly carry heavy items in the... trunk, readjustment may be performed by a Honda technician or other qualified mechanic. Replacing a Headlight Bulb Your car has halogen headlight bulbs, one on the glass can cause the bulb to change the headlight bulb on the driver's side, remove the power steering reservoir tank ...
... the glass from contact with denatured alcohol and a clean cloth. Oil, perspiration, or a scratch on each side. HOLDER Halogen headlight bulbs get very hot when lit. CONTINUED Maintenance 247 If you need to overheat and shatter. 1. If you regularly carry heavy items in the... trunk, readjustment may be performed by a Honda technician or other qualified mechanic. Replacing a Headlight Bulb Your car has halogen headlight bulbs, one on the glass can cause the bulb to change the headlight bulb on the driver's side, remove the power steering reservoir tank ...
Owner's Manual
Page 245
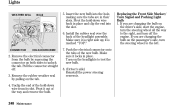
... connector straight off the engine. Push the electrical connector onto the tabs of the headlight assembly. Lights WEATHER SEAL BULB 5. Install the rubber seal over the back of the new bulb. CONNECTOR HOLD-DOWN WIRE 2. Remove the electrical connector from its slot. Make sure it out of the hold ...pulling on the headlights to unlock the tab. Unclip the end of the way and remove the bulb. 7. it is marked ''TOP.'' Replacing the Front Side Marker/ Turn Signal and Parking Light Bulb 1. Pivot it locks in their slots. Pivot the hold -down wire back in place and clip...
... connector straight off the engine. Push the electrical connector onto the tabs of the headlight assembly. Lights WEATHER SEAL BULB 5. Install the rubber seal over the back of the new bulb. CONNECTOR HOLD-DOWN WIRE 2. Remove the electrical connector from its slot. Make sure it out of the hold ...pulling on the headlights to unlock the tab. Unclip the end of the way and remove the bulb. 7. it is marked ''TOP.'' Replacing the Front Side Marker/ Turn Signal and Parking Light Bulb 1. Pivot it locks in their slots. Pivot the hold -down wire back in place and clip...
Owner's Manual
Page 246
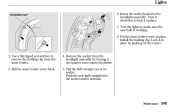
Push the new bulb straight into the headlight assembly. Insert the socket back into the socket until it bottoms. Maintenance 249 Install the holding clip from the headlight assembly ... it in place by turning it in place. Remove the socket from the inner fender. 3. Test the lights to remove the holding clip. Pull the bulb straight out of its socket. Put the inner fender cover in place. 7. Pull the inner fender cover back. 4. Lights HOLDING CLIP 6. Turn it clockwise to...
Push the new bulb straight into the headlight assembly. Insert the socket back into the socket until it bottoms. Maintenance 249 Install the holding clip from the headlight assembly ... it in place by turning it in place. Remove the socket from the inner fender. 3. Test the lights to remove the holding clip. Pull the bulb straight out of its socket. Put the inner fender cover in place. 7. Pull the inner fender cover back. 4. Lights HOLDING CLIP 6. Turn it clockwise to...

Owner's Manual
Page 247
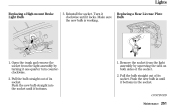
... trunk. Remove the screw in Fenders) 4. Test the lights to make sure the new bulb is burned out: stop/taillight/side marker light or turn counterclockwise. 8. Reinstall the trunk lining. Lights Replacing Rear Bulbs (in the center of the fastener on the side of the trunk lining. Push the ...new bulb straight into the light assembly by turning it locks. 6. Make sure it bottoms. 5. Pull the bulb straight out of the two...
... trunk. Remove the screw in Fenders) 4. Test the lights to make sure the new bulb is burned out: stop/taillight/side marker light or turn counterclockwise. 8. Reinstall the trunk lining. Lights Replacing Rear Bulbs (in the center of the fastener on the side of the trunk lining. Push the ...new bulb straight into the light assembly by turning it locks. 6. Make sure it bottoms. 5. Pull the bulb straight out of the two...
Owner's Manual
Page 248
... bottoms in until it one-quarter turn counterclockwise. 2. Pull the bulb straight out of the socket. 2. Push the new bulb in the socket. Make sure the new bulb is working. Replacing a Rear License Plate Bulb 1. Push the new bulb straight into the socket until it locks. Remove the socket from ...the light assembly by squeezing the tabs on both sides of its socket. Pull the bulb straight out of its socket. CONTINUED Maintenance 251 Open the trunk and remove the socket from the light assembly by turning it bottoms. ...
... bottoms in until it one-quarter turn counterclockwise. 2. Pull the bulb straight out of the socket. 2. Push the new bulb in the socket. Make sure the new bulb is working. Replacing a Rear License Plate Bulb 1. Push the new bulb straight into the socket until it locks. Remove the socket from ...the light assembly by squeezing the tabs on both sides of its socket. Pull the bulb straight out of its socket. CONTINUED Maintenance 251 Open the trunk and remove the socket from the light assembly by turning it bottoms. ...

Owner's Manual
Page 249
Lights 3. Remove the trunk light assembly by pushing it in until it bottoms. 3. Push the new bulb straight into the hole, right side first. Pull the bulb straight out of the assembly. 2. Reinstall the socket back in place by using a small flat-tipped screwdriver to pry carefully on the left side until it latches. Turn on the left edge of the holder. Put the light assembly back into the holder until it snaps into place. 252 Maintenance Replacing the Trunk Light Bulb 1. Push on the parking lights and check that the new bulb is working. 4.
Lights 3. Remove the trunk light assembly by pushing it in until it bottoms. 3. Push the new bulb straight into the hole, right side first. Pull the bulb straight out of the assembly. 2. Reinstall the socket back in place by using a small flat-tipped screwdriver to pry carefully on the left side until it latches. Turn on the left edge of the holder. Put the light assembly back into the holder until it snaps into place. 252 Maintenance Replacing the Trunk Light Bulb 1. Push on the parking lights and check that the new bulb is working. 4.

Owner's Manual
Page 250
... lens in the middle with a fingernail file or a small flat-tip screwdriver. Remove the bulb by carefully prying on the edge of the housing around the lens. Push the new bulb into the metal tabs. Lights Replacing Bulbs in place. Do not pry on the edge between the lenses. 2. Snap the lens back... the same way, they do not use the same type of its metal tabs. 3. Maintenance 253 Remove the lens by pulling it straight out of bulbs. 1.
... lens in the middle with a fingernail file or a small flat-tip screwdriver. Remove the bulb by carefully prying on the edge of the housing around the lens. Push the new bulb into the metal tabs. Lights Replacing Bulbs in place. Do not pry on the edge between the lenses. 2. Snap the lens back... the same way, they do not use the same type of its metal tabs. 3. Maintenance 253 Remove the lens by pulling it straight out of bulbs. 1.
Owner's Manual
Page 309
...282 Wear Indicators ...189 Braking System...189 Break-in, New Car ...162 Brightness Control, Instruments ...71 Brights, Headlights ...70 Bulb Replacement Back-up Lights ...251 Brake Lights...250 Ceiling Light ...253 Front Parking Lights ...248 Front Side Marker Lights...248 Headlights ...251 License Plate Lights ...251 Rear Side Marker Lights ...250 Specifications ...294 Spotlights ...253 Trunk Light ...252 Turn Signal Lights ...248 Bulbs, Halogen ...247 CONTINUED B Battery Charging System Indicator...62, 278 Jump Starting ...273 Maintenance ...230 Specifications ...294 Before Driving ...161 ...
...282 Wear Indicators ...189 Braking System...189 Break-in, New Car ...162 Brightness Control, Instruments ...71 Brights, Headlights ...70 Bulb Replacement Back-up Lights ...251 Brake Lights...250 Ceiling Light ...253 Front Parking Lights ...248 Front Side Marker Lights...248 Headlights ...251 License Plate Lights ...251 Rear Side Marker Lights ...250 Specifications ...294 Spotlights ...253 Trunk Light ...252 Turn Signal Lights ...248 Bulbs, Halogen ...247 CONTINUED B Battery Charging System Indicator...62, 278 Jump Starting ...273 Maintenance ...230 Specifications ...294 Before Driving ...161 ...
Owner's Manual
Page 312
... Hazard Warning Flashers...74 Headlights Daytime Running Lights...71 High Beam Indicator ...63 Reminder Beeper ...70 Replacing Halogen Bulbs ...250 Turning on ...70 Head Restraints ...88 Heating and Cooling ...104 High Altitude, Starting at ...177 High-Low Beam Switch ...70 High-mount Brake Light......
... Hazard Warning Flashers...74 Headlights Daytime Running Lights...71 High Beam Indicator ...63 Reminder Beeper ...70 Replacing Halogen Bulbs ...250 Turning on ...70 Head Restraints ...88 Heating and Cooling ...104 High Altitude, Starting at ...177 High-Low Beam Switch ...70 High-mount Brake Light......

Owner's Manual
Page 314
...Lower Anchorages ...42 R Radiator Overheating ...275 Radio/CD/Cassette Sound System ...112, 124, 136 Readiness Codes ...281, 303 Rear Lights, Bulb Replacement ...250, 251 Rear Seat, Folding ...90 Rear View Mirror ...95 Rear Window Defogger ...74 Reclining the Seat Backs ...86 Recommended ...Lights ...59 Remote Transmitter ...81 Replacement Information Air Cleaner Element ...225 Engine Coolant...215 Engine Oil and Filter ...211 Fuses ...285 Light Bulbs ...247 Schedule ...198 Spark Plugs...227 Timing Belt ...237 Tires ...242 Wiper Blades ...232 Replacing Seat Belts After a Crash ...47 Reserve...
...Lower Anchorages ...42 R Radiator Overheating ...275 Radio/CD/Cassette Sound System ...112, 124, 136 Readiness Codes ...281, 303 Rear Lights, Bulb Replacement ...250, 251 Rear Seat, Folding ...90 Rear View Mirror ...95 Rear Window Defogger ...74 Reclining the Seat Backs ...86 Recommended ...Lights ...59 Remote Transmitter ...81 Replacement Information Air Cleaner Element ...225 Engine Coolant...215 Engine Oil and Filter ...211 Fuses ...285 Light Bulbs ...247 Schedule ...198 Spark Plugs...227 Timing Belt ...237 Tires ...242 Wiper Blades ...232 Replacing Seat Belts After a Crash ...47 Reserve...
Owner's Manual
Page 315
... the Clock ...117, 129, 141 Shift Lever Position Indicator ...180 Shift Lock Release ...184 Side Airbags ...10, 50 Side Marker Lights, Bulb Replacement in ...248, 250 Signaling Turns ...72 Snow Tires ...243 Solvent-type Cleaners ...257 Sound System...112, 124, 136 Spare Tire Inflating...254 Supplemental Restraint System...10, 48 Servicing ...53 SRS Indicator...51, 61 System Components...44 Synthetic Oil ...210 T Tachometer ...66 Taillights, Changing Bulbs in ...250, 251 Taking Care of the Unexpected .. 263 Tape Player ...118, 131, 151 Technical Descriptions DOT Tire Quality Grading ...296 ...
... the Clock ...117, 129, 141 Shift Lever Position Indicator ...180 Shift Lock Release ...184 Side Airbags ...10, 50 Side Marker Lights, Bulb Replacement in ...248, 250 Signaling Turns ...72 Snow Tires ...243 Solvent-type Cleaners ...257 Sound System...112, 124, 136 Spare Tire Inflating...254 Supplemental Restraint System...10, 48 Servicing ...53 SRS Indicator...51, 61 System Components...44 Synthetic Oil ...210 T Tachometer ...66 Taillights, Changing Bulbs in ...250, 251 Taking Care of the Unexpected .. 263 Tape Player ...118, 131, 151 Technical Descriptions DOT Tire Quality Grading ...296 ...

