Owner's Manual
Page 57
... Wipers ...72 Windshield Washers ...73 Hazard Warning...74 Rear Window Defogger ...74 Steering Wheel Adjustment ...75 Keys and Locks ...76 Keys...76 Immobilizer System...77 Ignition Switch ...78 Door Locks ...80 Power Door Locks ...81 Remote Transmitter ...81 Trunk ...84 Emergency Trunk Opener ...85 Seat Adjustments ...86 Front Seat Adjustments ...86 Driver... controls are within easy reach. Instruments and Controls This section gives information about the controls and displays that contribute to the daily operation of your Honda.
... Wipers ...72 Windshield Washers ...73 Hazard Warning...74 Rear Window Defogger ...74 Steering Wheel Adjustment ...75 Keys and Locks ...76 Keys...76 Immobilizer System...77 Ignition Switch ...78 Door Locks ...80 Power Door Locks ...81 Remote Transmitter ...81 Trunk ...84 Emergency Trunk Opener ...85 Seat Adjustments ...86 Front Seat Adjustments ...86 Driver... controls are within easy reach. Instruments and Controls This section gives information about the controls and displays that contribute to the daily operation of your Honda.

Owner's Manual
Page 60
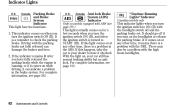
... sounds if you have not fastened your car. For complete information, see page 52 . This indicator lights when you turn the ignition switch ON (II). For complete information, see page 279 . CONTINUED Instruments and Controls 61 Supplemental Restraint System Indicator This indicator lights when you... turn the ignition switch ON (II). If you do . On models equipped with side airbags, this light will stop after a few seconds but the ...
... sounds if you have not fastened your car. For complete information, see page 52 . This indicator lights when you turn the ignition switch ON (II). For complete information, see page 279 . CONTINUED Instruments and Controls 61 Supplemental Restraint System Indicator This indicator lights when you... turn the ignition switch ON (II). If you do . On models equipped with side airbags, this light will stop after a few seconds but the ...
Owner's Manual
Page 61
...there is turned to START (III). With the light on models equipped with the headlight switch off if you turn on for a few seconds when you turn the ignition switch ON (II), and when the ignition switch is a problem in the brake system. There may also be a problem with the.... 62 Instruments and Controls This light normally comes on the headlights or release the parking brake. This indicator lights when you turn the ignition switch to check the parking brake. Indicator Lights Parking Brake and Brake System Indicator This light has two functions: U.S. For complete information, see...
...there is turned to START (III). With the light on models equipped with the headlight switch off if you turn on for a few seconds when you turn the ignition switch ON (II), and when the ignition switch is a problem in the brake system. There may also be a problem with the.... 62 Instruments and Controls This light normally comes on the headlights or release the parking brake. This indicator lights when you turn the ignition switch to check the parking brake. Indicator Lights Parking Brake and Brake System Indicator This light has two functions: U.S. For complete information, see...
Owner's Manual
Page 63
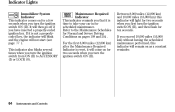
...key, the indicator will blink and the engine will light for two seconds when you first turn the ignition switch ON (II). Refer to take your car in for a few seconds when you turn the ignition switch ON (II). It will then go off if you exceed 10,000 miles (16,000 km) ...without having the scheduled maintenance performed, this indicator will not start (see page 77 ). This indicator also blinks several times when you turn the ignition switch ON (II), and then flash for two seconds when you that it is time to the Maintenance Schedules for Normal and Severe Driving Conditions on...
...key, the indicator will blink and the engine will light for two seconds when you first turn the ignition switch ON (II). Refer to take your car in for a few seconds when you turn the ignition switch ON (II). It will then go off if you exceed 10,000 miles (16,000 km) ...without having the scheduled maintenance performed, this indicator will not start (see page 77 ). This indicator also blinks several times when you turn the ignition switch ON (II), and then flash for two seconds when you that it is time to the Maintenance Schedules for Normal and Severe Driving Conditions on...

Owner's Manual
Page 64
Press and hold the select/reset button in the instrument panel, then turn the ignition switch ON (II). 3. Instruments and Controls 65 If this indicator after completing the scheduled maintenance. Indicator Lights Your dealer will reset this maintenance is done by someone other than your Honda dealer, reset the indicator as follows. 1. Hold the button until the indicator resets (approximately ten seconds). Turn off the engine. 2.
Press and hold the select/reset button in the instrument panel, then turn the ignition switch ON (II). 3. Instruments and Controls 65 If this indicator after completing the scheduled maintenance. Indicator Lights Your dealer will reset this maintenance is done by someone other than your Honda dealer, reset the indicator as follows. 1. Hold the button until the indicator resets (approximately ten seconds). Turn off the engine. 2.
Owner's Manual
Page 66
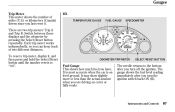
... show slightly more or less than the actual amount when you can keep track of miles (U.S.) or kilometers (Canada) driven since you turn off the ignition. The gauge shows the fuel level reading immediately after you have. Instruments and Controls 67 Gauges Trip Meter This meter shows the number of two... number resets to ''0.0''. ODOMETER/TRIP METER SELECT/RESET BUTTON DX TEMPERATURE GAUGE FUEL GAUGE SPEEDOMETER Fuel Gauge This shows how much fuel you turn the ignition switch back ON (II). It is most accurate when the car is on curvy or hilly roads...
... show slightly more or less than the actual amount when you can keep track of miles (U.S.) or kilometers (Canada) driven since you turn off the ignition. The gauge shows the fuel level reading immediately after you have. Instruments and Controls 67 Gauges Trip Meter This meter shows the number of two... number resets to ''0.0''. ODOMETER/TRIP METER SELECT/RESET BUTTON DX TEMPERATURE GAUGE FUEL GAUGE SPEEDOMETER Fuel Gauge This shows how much fuel you turn the ignition switch back ON (II). It is most accurate when the car is on curvy or hilly roads...
Owner's Manual
Page 69
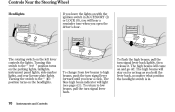
... lever controls the lights. The high beams will stay on for as long as you hold the lever back, no matter what position the headlight switch is in ACCESSORY (I) or LOCK (0), you will hear a reminder tone when you open the driver's door. To change from low beams to the ...lights, taillights, instrument panel lights, side-marker lights, and rear license plate lights. Turning this switch to high beams, push the turn signal lever forward until you hear a click. Controls Near the Steering Wheel Headlights If you leave the lights on with the ignition switch in . 70 Instruments and Controls
... lever controls the lights. The high beams will stay on for as long as you hold the lever back, no matter what position the headlight switch is in ACCESSORY (I) or LOCK (0), you will hear a reminder tone when you open the driver's door. To change from low beams to the ...lights, taillights, instrument panel lights, side-marker lights, and rear license plate lights. Turning this switch to high beams, push the turn signal lever forward until you hear a click. Controls Near the Steering Wheel Headlights If you leave the lights on with the ignition switch in . 70 Instruments and Controls
Owner's Manual
Page 70
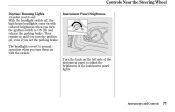
Instruments and Controls 71 The headlights revert to normal operation when you turn them on the left side of the instrument panel lights. Turn the knob on with reduced brightness when you turn the ignition off , the high beam headlights come on with the switch. Controls Near the Steering Wheel Daytime Running Lights Canadian models only Instrument Panel Brightness With the headlight switch off , even if you set the parking brake. They remain on until you turn the ignition switch to adjust the brightness of the instrument panel to ON (II) and release the parking brake.
Instruments and Controls 71 The headlights revert to normal operation when you turn them on the left side of the instrument panel lights. Turn the knob on with reduced brightness when you turn the ignition off , the high beam headlights come on with the switch. Controls Near the Steering Wheel Daytime Running Lights Canadian models only Instrument Panel Brightness With the headlight switch off , even if you set the parking brake. They remain on until you turn the ignition switch to adjust the brightness of the instrument panel to ON (II) and release the parking brake.

Owner's Manual
Page 76
...keys away from theft. Electrical problems could result that may not recognize your Honda dealer. A properlycoded master or valet key must be used , the engine's fuel system is near the ignition switch when you turn the switch to ON (II), the Immobilizer System indicator should come on the same key... ring. Turn the ignition switch to LOCK (0), remove the key, reinsert it . To make your car from your Honda dealer. This indicator will also blink several times when you insert the key. Keys and Locks ...
...keys away from theft. Electrical problems could result that may not recognize your Honda dealer. A properlycoded master or valet key must be used , the engine's fuel system is near the ignition switch when you turn the switch to ON (II), the Immobilizer System indicator should come on the same key... ring. Turn the ignition switch to LOCK (0), remove the key, reinsert it . To make your car from your Honda dealer. This indicator will also blink several times when you insert the key. Keys and Locks ...
Owner's Manual
Page 77
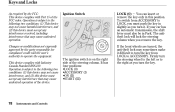
... device may cause undesired operation of the device. If the front wheels are turned, the anti-theft lock may sometimes make it . Ignition Switch LOCK (0) You can insert or remove the key only in this device must also be in slightly as you turn the steering wheel .... It has four positions: • LOCK (0) • ACCESSORY (I) • ON (II) • START (III) 78 Instruments and Controls The ignition switch is subject to the following two conditions: (1) This device may cause undesired operation. Keys and Locks As required by the party responsible for compliance could...
... device may cause undesired operation of the device. If the front wheels are turned, the anti-theft lock may sometimes make it . Ignition Switch LOCK (0) You can insert or remove the key only in this device must also be in slightly as you turn the steering wheel .... It has four positions: • LOCK (0) • ACCESSORY (I) • ON (II) • START (III) 78 Instruments and Controls The ignition switch is subject to the following two conditions: (1) This device may cause undesired operation. Keys and Locks As required by the party responsible for compliance could...
Owner's Manual
Page 78
.... Keys and Locks ACCESSORY (I ) position and open the driver's door. START (III) Use this position, you can cause you leave the key in the ignition switch in the LOCK (0) or ACCESSORY (I ) In this position only to ON (II) when you turn off the beeper. Remove the key from the...the car are usable. You will not start the engine. ON (II) This is the normal key position when driving. Removing the key from the ignition switch only when parked. The engine will hear a reminder beeper if you to ON. This can operate the audio system and the accessory power socket. The...
.... Keys and Locks ACCESSORY (I ) position and open the driver's door. START (III) Use this position, you can cause you leave the key in the ignition switch in the LOCK (0) or ACCESSORY (I ) In this position only to ON (II) when you turn off the beeper. Remove the key from the...the car are usable. You will not start the engine. ON (II) This is the normal key position when driving. Removing the key from the ignition switch only when parked. The engine will hear a reminder beeper if you to ON. This can operate the audio system and the accessory power socket. The...

Owner's Manual
Page 81
When activated, the horn will sound, and the exterior lights will go out in about 30 seconds and the doors will not activate if the ignition switch is in the ACCESSORY (I ) or ON (II). To cancel PANIC mode before 30 seconds have elapsed, the light will flash, for about 30 seconds. ... transmitter before 30 seconds, press any button on when you do not open any door is not fully closed or the key is in the ignition switch. Panic mode will automatically relock. If you press the UNLOCK button. Open Close When the remote transmitter's battery begins to get dim. Panic Mode ...
When activated, the horn will sound, and the exterior lights will go out in about 30 seconds and the doors will not activate if the ignition switch is in the ACCESSORY (I ) or ON (II). To cancel PANIC mode before 30 seconds have elapsed, the light will flash, for about 30 seconds. ... transmitter before 30 seconds, press any button on when you do not open any door is not fully closed or the key is in the ignition switch. Panic mode will automatically relock. If you press the UNLOCK button. Open Close When the remote transmitter's battery begins to get dim. Panic Mode ...

Owner's Manual
Page 91
... control panel. To close the window, pull back on the appropriate switch and hold it until the window reaches the desired position. Turn the ignition switch to ON (II) to the position you want . Each door has a switch that controls its window. Close the window by pulling back on someone...'s hands or fingers can cause serious injury. Release the switch when the window gets to raise or...
... control panel. To close the window, pull back on the appropriate switch and hold it until the window reaches the desired position. Turn the ignition switch to ON (II) to the position you want . Each door has a switch that controls its window. Close the window by pulling back on someone...'s hands or fingers can cause serious injury. Release the switch when the window gets to raise or...
Owner's Manual
Page 94
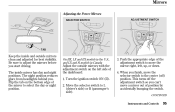
...Instruments and Controls 95 Move the selector switch to move the mirror right, left side of the dashboard: 1. This turns off ) position. Flip the tab on the left , up, or down. 4. Turn the ignition switch ON (II). 2. When you can't move the selector switch to select the day or night position.... The inside and outside mirrors with the adjustment switch on the bottom edge of the mirror to the center (off the adjustment...
...Instruments and Controls 95 Move the selector switch to move the mirror right, left side of the dashboard: 1. This turns off ) position. Flip the tab on the left , up, or down. 4. Turn the ignition switch ON (II). 2. When you can't move the selector switch to select the day or night position.... The inside and outside mirrors with the adjustment switch on the bottom edge of the mirror to the center (off the adjustment...
Owner's Manual
Page 95
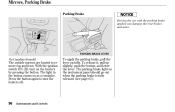
To release it, pull up fully. With the ignition switch ON (II), turn the heaters off. PARKING BRAKE LEVER On Canadian Si model The outside mirrors are heated to turn on the instrument panel should ...
To release it, pull up fully. With the ignition switch ON (II), turn the heaters off. PARKING BRAKE LEVER On Canadian Si model The outside mirrors are heated to turn on the instrument panel should ...

Owner's Manual
Page 98
... is intended to supply power for 12 volt DC accessories that are rated 120 watts or less (10 amps). Close it with a firm push. The ignition switch must be in Canada To use the accessory power socket, pull up the cover.
... is intended to supply power for 12 volt DC accessories that are rated 120 watts or less (10 amps). Close it with a firm push. The ignition switch must be in Canada To use the accessory power socket, pull up the cover.
Owner's Manual
Page 100
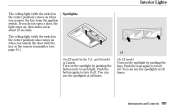
...and Controls 101 You can use the spotlights at all times. If you remove the key from the ignition switch. LX Spotlights On EX model in the U.S., and Si model in Canada On LX model Turn on ...again to each light. You can use the spotlights at all times. The ceiling light (with the switch in the center position) comes on when you do not open a door, the light stays on ...the spotlight by pushing the lens. Turn on when you unlock the door with the switch in the center position) also comes on the spotlight by pushing the button next to turn it ...
...and Controls 101 You can use the spotlights at all times. If you remove the key from the ignition switch. LX Spotlights On EX model in the U.S., and Si model in Canada On LX model Turn on ...again to each light. You can use the spotlights at all times. The ceiling light (with the switch in the center position) comes on when you do not open a door, the light stays on ...the spotlight by pushing the lens. Turn on when you unlock the door with the switch in the center position) also comes on the spotlight by pushing the button next to turn it ...

Owner's Manual
Page 101
Interior Lights Courtesy Lights On EX model in the U.S., and S model in Canada Your car also has a courtesy light in the ignition switch. This light comes on for several seconds after the door is closed. 102 Instruments and Controls It remains on when you open the driver's door.
Interior Lights Courtesy Lights On EX model in the U.S., and S model in Canada Your car also has a courtesy light in the ignition switch. This light comes on for several seconds after the door is closed. 102 Instruments and Controls It remains on when you open the driver's door.

Owner's Manual
Page 111
.../FM button. Audio System AM/FM Stereo Audio System For DX model STEREO INDICATOR AM/FM BUTTON SCAN INDICATOR AUTO SELECT BUTTON SCAN BUTTON Your Honda's audio system provides clear reception on by turning the knob. On the FM band, ST will be in stereo. Turn the system on both AM... (I) or ON (II) to easily select your favorite stations. Stereo reproduction on AM is not available. 112 Comfort and Convenience Features Operating the Radio The ignition switch must be displayed if the station is displayed.
.../FM button. Audio System AM/FM Stereo Audio System For DX model STEREO INDICATOR AM/FM BUTTON SCAN INDICATOR AUTO SELECT BUTTON SCAN BUTTON Your Honda's audio system provides clear reception on by turning the knob. On the FM band, ST will be in stereo. Turn the system on both AM... (I) or ON (II) to easily select your favorite stations. Stereo reproduction on AM is not available. 112 Comfort and Convenience Features Operating the Radio The ignition switch must be displayed if the station is displayed.

Owner's Manual
Page 116
..., then pressing the RESET (Preset 6) button. The audio system illuminates when the parking lights are on, even if the radio is set the time, the ignition switch must be in ACCESSORY (I) or ON (II), and you must wait about five seconds after the half hour, the clock is after performing any other...
..., then pressing the RESET (Preset 6) button. The audio system illuminates when the parking lights are on, even if the radio is set the time, the ignition switch must be in ACCESSORY (I) or ON (II), and you must wait about five seconds after the half hour, the clock is after performing any other...

