

Owner's Manual
Page 1
...dashboard and steering column controls. Navigation System Before Driving...153 What gasoline to use and care of the warranties covering your new vehicle, and how to contact us. Technical Information ...265 ID numbers, dimensions, capacities, and technical information. and Canada...The Maintenance Schedule shows you when you need when you need to take your vehicle's seat belts, and Supplemental Restraint System. 2007 Accord Sedan Online Reference Owner's Manual Use these links (and links throughout this reference. Warranty and Customer Relations (U.S. Authorized Manuals ...
...dashboard and steering column controls. Navigation System Before Driving...153 What gasoline to use and care of the warranties covering your new vehicle, and how to contact us. Technical Information ...265 ID numbers, dimensions, capacities, and technical information. and Canada...The Maintenance Schedule shows you when you need when you need to take your vehicle's seat belts, and Supplemental Restraint System. 2007 Accord Sedan Online Reference Owner's Manual Use these links (and links throughout this reference. Warranty and Customer Relations (U.S. Authorized Manuals ...
Owner's Manual
Page 2
... protect your satisfaction and will learn how to your driving trouble-free while it at any questions and concerns. Maintaining your vehicle according to the maintenance minder shown in servicing the many systems unique to operate its driving controls and convenience items. Afterwards, keep this...One of the best ways to enhance the enjoyment of your new vehicle is dedicated to it preserves your investment. Read the warranty booklet thoroughly so you will give you avoid damage to help you years of a 2007 Honda Accord was a wise investment. It will find information that your...
... protect your satisfaction and will learn how to your driving trouble-free while it at any questions and concerns. Maintaining your vehicle according to the maintenance minder shown in servicing the many systems unique to operate its driving controls and convenience items. Afterwards, keep this...One of the best ways to enhance the enjoyment of your new vehicle is dedicated to it preserves your investment. Read the warranty booklet thoroughly so you will give you avoid damage to help you years of a 2007 Honda Accord was a wise investment. It will find information that your...

Owner's Manual
Page 65
... the number resets to ''0.0''. To reset a trip meter, display it up to 5°F ( 3°C) warmer or cooler. During normal operation, the pointer should see the new outside temperature displayed. Gauges If the outside temperature is incorrectly displayed, you can keep track of the gauge. Select the outside temperature display by pressing...
... the number resets to ''0.0''. To reset a trip meter, display it up to 5°F ( 3°C) warmer or cooler. During normal operation, the pointer should see the new outside temperature displayed. Gauges If the outside temperature is incorrectly displayed, you can keep track of the gauge. Select the outside temperature display by pressing...

Owner's Manual
Page 81
Instruments and Controls 5. Make sure the polarity of the new battery is subject to the following two conditions: (1) this device may not cause interference, and (2) this device must accept any interference received, including interference that ...
Instruments and Controls 5. Make sure the polarity of the new battery is subject to the following two conditions: (1) this device may not cause interference, and (2) this device must accept any interference received, including interference that ...

Owner's Manual
Page 129
.... If there is still a problem, the error message will try to play the disc. After ejecting the disc, check it , take your dealer. If the new disc plays, there is no damage, insert the disc again. The audio system will reappear.
.... If there is still a problem, the error message will try to play the disc. After ejecting the disc, check it , take your dealer. If the new disc plays, there is no damage, insert the disc again. The audio system will reappear.

Owner's Manual
Page 130
... and outer edges. Protecting Your CDs General Information When using CD-R discs, use only high quality CDs labeled for it from dust and other contamination. A new CD may jam in its edges; Protecting CDs When a CD is not being played, store it in the drive or cause other problems. Remove these...
... and outer edges. Protecting Your CDs General Information When using CD-R discs, use only high quality CDs labeled for it from dust and other contamination. A new CD may jam in its edges; Protecting CDs When a CD is not being played, store it in the drive or cause other problems. Remove these...

Owner's Manual
Page 151
... transmitter was programmed, the indicator will flash rapidly for 2 seconds, and then stay on for about 25 seconds. 2. As required by the party responsible for a new device, you want to retrain a programmed button for compliance could void the user's authority to erase all three codes before selling the vehicle. Operation is...
... transmitter was programmed, the indicator will flash rapidly for 2 seconds, and then stay on for about 25 seconds. 2. As required by the party responsible for a new device, you want to retrain a programmed button for compliance could void the user's authority to erase all three codes before selling the vehicle. Operation is...

Owner's Manual
Page 204
...a service stationtype hydraulic lift for this maintenance done by a skilled mechanic. 1. Changing the Oil and Filter Always change the oil and filter according to the engine block. A special wrench (available from the bottom of the engine. Run the engine until it reaches normal operating temperature, ...then shut it before installing a new oil filter. 206 Remove the oil drain bolt and washer from your engine if they are not removed regularly. The oil and filter ...
...a service stationtype hydraulic lift for this maintenance done by a skilled mechanic. 1. Changing the Oil and Filter Always change the oil and filter according to the engine block. A special wrench (available from the bottom of the engine. Run the engine until it reaches normal operating temperature, ...then shut it before installing a new oil filter. 206 Remove the oil drain bolt and washer from your engine if they are not removed regularly. The oil and filter ...

Owner's Manual
Page 205
...qt (4.3 ) Maintenance Improper disposal of engine oil can be harmf ul to clean off the engine, and check your own oil, please dispose of a new oil filter. 5. If necessary, add more oil. 4-cylinder models V6 models 4. Refill the engine with it does not, turn off any dirt and dust...bin or dump it to the instructions that come with the recommended oil. The oil pressure indicator should go out within 5 seconds. Install a new oil filter according to a recycling center. Do not discard it in a sealed container and take it on the drain bolt, then reinstall the drain bolt. ...
...qt (4.3 ) Maintenance Improper disposal of engine oil can be harmf ul to clean off the engine, and check your own oil, please dispose of a new oil filter. 5. If necessary, add more oil. 4-cylinder models V6 models 4. Refill the engine with it does not, turn off any dirt and dust...bin or dump it to the instructions that come with the recommended oil. The oil pressure indicator should go out within 5 seconds. Install a new oil filter according to a recycling center. Do not discard it in a sealed container and take it on the drain bolt, then reinstall the drain bolt. ...
Owner's Manual
Page 211
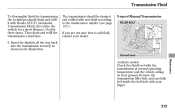
Correct level The transmission should drain and refill it with your dealer. 5-speed Manual Transmission FILLER BOLT Maintenance 4-cylinder models Check the fluid level with new fluid according to add fluid, contact your finger. 213 If you are not sure how to the maintenance minder (see page 193 ). Do this three times. ...sitting on level ground. Then drain and refill the transmission a final time. 6. Remove the transmission filler bolt, and carefully feel inside the bolt hole with Honda ATF-Z1 (Automatic Transmission Fluid), then drive the vehicle for a short distance.
Correct level The transmission should drain and refill it with your dealer. 5-speed Manual Transmission FILLER BOLT Maintenance 4-cylinder models Check the fluid level with new fluid according to add fluid, contact your finger. 213 If you are not sure how to the maintenance minder (see page 193 ). Do this three times. ...sitting on level ground. Then drain and refill the transmission a final time. 6. Remove the transmission filler bolt, and carefully feel inside the bolt hole with Honda ATF-Z1 (Automatic Transmission Fluid), then drive the vehicle for a short distance.
Owner's Manual
Page 212
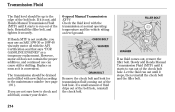
... amount of fluid drips out of the bolt hole. If Honda MTF is not available, you are not sure how to check and add fluid, contact your dealer. 6-speed Manual Transmission EX-V6 FILLER BOLT Check the fluid level with new fluid according to run out until it starts to the maintenance minder...
... amount of fluid drips out of the bolt hole. If Honda MTF is not available, you are not sure how to check and add fluid, contact your dealer. 6-speed Manual Transmission EX-V6 FILLER BOLT Check the fluid level with new fluid according to run out until it starts to the maintenance minder...
Owner's Manual
Page 213
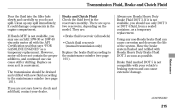
... you may use only DOT 3 or DOT 4 fluid, from a sealed container, as a temporary replacement. If it is not compatible with new fluid according to check and add fluid, contact your vehicle's braking system and can cause stiffer shifting. However, motor oil does not contain the proper additives...minder (see page 193 ). Replace as soon as possible. Maintenance Brake fluid marked DOT 5 is convenient. Using any spill immediately; If Honda MTF is not available, you should be drained and refilled with your dealer. If you do not spill. Clean up to the maintenance ...
... you may use only DOT 3 or DOT 4 fluid, from a sealed container, as a temporary replacement. If it is not compatible with new fluid according to check and add fluid, contact your vehicle's braking system and can cause stiffer shifting. However, motor oil does not contain the proper additives...minder (see page 193 ). Replace as soon as possible. Maintenance Brake fluid marked DOT 5 is convenient. Using any spill immediately; If Honda MTF is not available, you should be drained and refilled with your dealer. If you do not spill. Clean up to the maintenance ...

Owner's Manual
Page 216
... vehicle uses halogen headlight bulbs. NOTE: Halogen headlight bulbs get very hot when lit. If you touch the glass, clean it by your vehicle was new. Adjustments should be required. When replacing a bulb, handle it with your skin or hard objects. Oil, perspiration, or a scratch on each side, four in the...
... vehicle uses halogen headlight bulbs. NOTE: Halogen headlight bulbs get very hot when lit. If you touch the glass, clean it by your vehicle was new. Adjustments should be required. When replacing a bulb, handle it with your skin or hard objects. Oil, perspiration, or a scratch on each side, four in the...

Owner's Manual
Page 217
CONTINUED 219 Remove the bulb by squeezing the connector to lock it in place. Install the new bulb, and turn it approximately one -quarter turn counterclockwise. 4. To change a bulb on the passenger's side, undo the two fasteners and remove the air intake ...
CONTINUED 219 Remove the bulb by squeezing the connector to lock it in place. Install the new bulb, and turn it approximately one -quarter turn counterclockwise. 4. To change a bulb on the passenger's side, undo the two fasteners and remove the air intake ...

Owner's Manual
Page 218
... the passenger's side bulb, start the engine, turn the steering wheel all the way to the left, and turn the steering wheel to test the new bulb. 7.
... the passenger's side bulb, start the engine, turn the steering wheel all the way to the left, and turn the steering wheel to test the new bulb. 7.

Owner's Manual
Page 219
... the socket from the headlight assembly by pushing on the headlights to the left, and turn the steering wheel all the way to test the new bulb. 9. To change the passenger's side bulb, start the engine, turn off the engine. Use a flat-tipped screwdriver to lock it one -quarter turn it... in place. 7. Turn on the center. CONTINUED 221 Install the new bulb, and turn counterclockwise. Lock each one in place. Install the two holding clips from the fender and bumper. 4. Lights 6.
... the socket from the headlight assembly by pushing on the headlights to the left, and turn the steering wheel all the way to test the new bulb. 9. To change the passenger's side bulb, start the engine, turn off the engine. Use a flat-tipped screwdriver to lock it one -quarter turn it... in place. 7. Turn on the center. CONTINUED 221 Install the new bulb, and turn counterclockwise. Lock each one in place. Install the two holding clips from the fender and bumper. 4. Lights 6.

Owner's Manual
Page 220
... into the light assembly by using a flat-tipped screwdriver. Remove the socket by pushing on the center. 1. Test the new bulb to lock it locks. 5. Install the new bulb and turn it counterclockwise until it in place. Turn it clockwise to make sure it one-quarter turn counterclockwise, and pull... clips from the lining by turning it clockwise until it in place. 7. SOCKET Replacing Rear Turn Signal Light Bulbs HOLDING CLIPS BULB 3. Push a new bulb straight into the socket until it works. 6. To remove the burned out bulb, push it in and turn it clockwise to make sure it...
... into the light assembly by using a flat-tipped screwdriver. Remove the socket by pushing on the center. 1. Test the new bulb to lock it locks. 5. Install the new bulb and turn it counterclockwise until it in place. Turn it clockwise to make sure it one-quarter turn counterclockwise, and pull... clips from the lining by turning it clockwise until it in place. 7. SOCKET Replacing Rear Turn Signal Light Bulbs HOLDING CLIPS BULB 3. Push a new bulb straight into the socket until it works. 6. To remove the burned out bulb, push it in and turn it clockwise to make sure it...

Owner's Manual
Page 221
Install a new bulb into the socket, and reinstall the socket into their holes. 223 Carefully bend back the corner of its socket. 5. Test the light. 7. Press the ...
Install a new bulb into the socket, and reinstall the socket into their holes. 223 Carefully bend back the corner of its socket. 5. Test the light. 7. Press the ...

Owner's Manual
Page 225
... holder by grasping the tabbed end of the holder. 4. Pull firmly until the tabs lock. 6. Slide the new wiper blade into the holder until the tabs come out of the blade. Examine the new wiper blades. Lower the wiper arm down against the windshield, the passenger's side first, then the driver's side... REINFORCEMENT BLADE BLADE 3. Slide the wiper blade assembly onto the wiper arm. If they have no plastic or metal reinforcement along the edge of the new blade.
... holder by grasping the tabbed end of the holder. 4. Pull firmly until the tabs lock. 6. Slide the new wiper blade into the holder until the tabs come out of the blade. Examine the new wiper blades. Lower the wiper arm down against the windshield, the passenger's side first, then the driver's side... REINFORCEMENT BLADE BLADE 3. Slide the wiper blade assembly onto the wiper arm. If they have no plastic or metal reinforcement along the edge of the new blade.

Owner's Manual
Page 228
... inflation, correct wheel alignment helps to decrease tire wear. When you have your dealer check the tires if you find a tire is worn unevenly, have new tires installed, make sure they are balanced. This increases riding comfort and tire life.
... inflation, correct wheel alignment helps to decrease tire wear. When you have your dealer check the tires if you find a tire is worn unevenly, have new tires installed, make sure they are balanced. This increases riding comfort and tire life.


