
Owner's Manual
Page 1
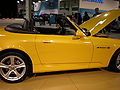
...thoroughly so you understand the coverages and are certain you avoid damage to help you will be pleased with your selection of the 2009 Honda S2000. Several warranties protect your rights and responsibilities. When your vehicle needs maintenance, keep in mind that is intended to your vehicle....shown on your purchase of one of the most sophisticated and technologically-advanced sports cars in the world. Your Honda dealer is dedicated to your new vehicle is specially trained in servicing the many systems unique to it preserves your driving trouble-free while it at...
...thoroughly so you understand the coverages and are certain you avoid damage to help you will be pleased with your selection of the 2009 Honda S2000. Several warranties protect your rights and responsibilities. When your vehicle needs maintenance, keep in mind that is intended to your vehicle....shown on your purchase of one of the most sophisticated and technologically-advanced sports cars in the world. Your Honda dealer is dedicated to your new vehicle is specially trained in servicing the many systems unique to it preserves your driving trouble-free while it at...
Owner's Manual
Page 5
..., and how to order manuals and other convenience features. and Canada only) A summary of the warranties covering your new vehicle, and how to operate the heating and air conditioning system, the audio system, and other technical literature. only) How to contact us for...Your Vehicle at a Glance A quick reference to your vehicle. Refer to the main controls in this manual. Driving The proper way to the fuel pump. 2 2009 S2000 Index Service Information Summary A summary of the information you need when you need to take your vehicle's seat belts, an overview of your vehicle to...
..., and how to order manuals and other convenience features. and Canada only) A summary of the warranties covering your new vehicle, and how to operate the heating and air conditioning system, the audio system, and other technical literature. only) How to contact us for...Your Vehicle at a Glance A quick reference to your vehicle. Refer to the main controls in this manual. Driving The proper way to the fuel pump. 2 2009 S2000 Index Service Information Summary A summary of the information you need when you need to take your vehicle's seat belts, an overview of your vehicle to...
Owner's Manual
Page 58
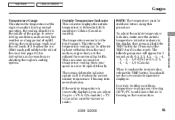
...middle of uphill driving, the reading may take several minutes. NOTE: The temperature must be in U.S. Instruments and Controls 2009 S2000 55 models) or Celsius (Canadian models). This can be affected by heat reflection from the road surface, engine heat,...1 second each: 0, 1, 2, 3, 4, 5, 5, 4, 3, 2, 1, 0 (U.S.) or 0, 1, 2, 3, 3, 2, 1, 0 (Canada). During normal operation, the reading should see the new outside temperature. The sensor delays the indicator update until it reaches the desired value, release the TRIP button. In certain weather conditions, temperature readings near...
...middle of uphill driving, the reading may take several minutes. NOTE: The temperature must be in U.S. Instruments and Controls 2009 S2000 55 models) or Celsius (Canadian models). This can be affected by heat reflection from the road surface, engine heat,...1 second each: 0, 1, 2, 3, 4, 5, 5, 4, 3, 2, 1, 0 (U.S.) or 0, 1, 2, 3, 3, 2, 1, 0 (Canada). During normal operation, the reading should see the new outside temperature. The sensor delays the indicator update until it reaches the desired value, release the TRIP button. In certain weather conditions, temperature readings near...
Owner's Manual
Page 71
... and (2) this device must accept any interference that may cause undesired operation of the device. Battery type: CR2025 68 2009 S2000 Changes or modifications not expressly approved by turning it counterclockwise with a coin. If it clockwise. Align the mark on the...not cause interference, and (2) this device must accept any interference received, including interference that may cause undesired operation. Insert a new battery with Industry Canada Standard RSS-210. Always confirm local regulations for compliance could void the user's authority to operate the ...
... and (2) this device must accept any interference that may cause undesired operation of the device. Battery type: CR2025 68 2009 S2000 Changes or modifications not expressly approved by turning it counterclockwise with a coin. If it clockwise. Align the mark on the...not cause interference, and (2) this device must accept any interference received, including interference that may cause undesired operation. Insert a new battery with Industry Canada Standard RSS-210. Always confirm local regulations for compliance could void the user's authority to operate the ...
Owner's Manual
Page 120
... use. Play only standard round CDs. Wipe across the CD from dust and other contamination. To clean a CD, use a clean soft cloth. A new CD may jam in its edges; Odd-shaped CDs may be used by rubbing the inner and outer edges with contamination from fingerprints, liquids, and...Handle your CDs properly to insert foreign objects in this roughness can cause the CD to not play properly or possibly jam in the drive. 2009 S2000 117 The small plastic pieces causing this unit. never touch either surface. These, along with the side of direct sunlight and extreme heat. ...
... use. Play only standard round CDs. Wipe across the CD from dust and other contamination. To clean a CD, use a clean soft cloth. A new CD may jam in its edges; Odd-shaped CDs may be used by rubbing the inner and outer edges with contamination from fingerprints, liquids, and...Handle your CDs properly to insert foreign objects in this roughness can cause the CD to not play properly or possibly jam in the drive. 2009 S2000 117 The small plastic pieces causing this unit. never touch either surface. These, along with the side of direct sunlight and extreme heat. ...
Owner's Manual
Page 123
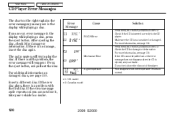
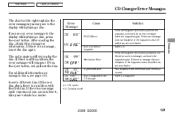
... problem with the first disc. For additional information on the right explains the error messages you cannot clear it for damage or deformation. If the new disc plays, there is no damage, insert the disc again. Check the CD for damage or deformation. If the CD cannot be pulled out ...or the error message does not disappear after the CD is inserted correctly in the CD player. model 2 : Canadian model 120 2009 S2000 If the error message cycle repeats and you may see an error message in the display while playing a disc. Press the EJECT button, and pull...
... problem with the first disc. For additional information on the right explains the error messages you cannot clear it for damage or deformation. If the new disc plays, there is no damage, insert the disc again. Check the CD for damage or deformation. If the CD cannot be pulled out ...or the error message does not disappear after the CD is inserted correctly in the CD player. model 2 : Canadian model 120 2009 S2000 If the error message cycle repeats and you may see an error message in the display while playing a disc. Press the EJECT button, and pull...
Owner's Manual
Page 124
... the CD magazine 1 Mechanical Error 2 1 High temperature No CD magazine in the CD changer 1 : U.S. If the new disc plays, there is still a problem, the error message will try to normal. Insert CD. model 2 : Canadian model 2009 S2000 121 After ejecting the disc, check it , take your dealer. If there is no damage, insert...
... the CD magazine 1 Mechanical Error 2 1 High temperature No CD magazine in the CD changer 1 : U.S. If the new disc plays, there is still a problem, the error message will try to normal. Insert CD. model 2 : Canadian model 2009 S2000 121 After ejecting the disc, check it , take your dealer. If there is no damage, insert...

Owner's Manual
Page 175
... the oil drain bolt and washer from your work. 172 2009 S2000 Drain the oil into an appropriate container. 3. Install the engine oil fill cap. Remove the oil filter, and let the remaining oil drain. A special wrench (available from the bottom of a new oil filter. 6. Engine oil change capacity (including filter): 5.1 US qt...
... the oil drain bolt and washer from your work. 172 2009 S2000 Drain the oil into an appropriate container. 3. Install the engine oil fill cap. Remove the oil filter, and let the remaining oil drain. A special wrench (available from the bottom of a new oil filter. 6. Engine oil change capacity (including filter): 5.1 US qt...
Owner's Manual
Page 179
...it securely. CORRECT LEVEL Check the fluid level with the API Certification seal that says ''FOR GASOLINE ENGINES'' as it is not, add Honda Manual Transmission Fluid (MTF) until it is convenient. If you may use can cause stiffer shifting. Remove the transmission filler bolt, and ...on the information display. Main Menu Table Of Contents Manual Transmission Fluid FILLER BOLT Put a new washer on the filler bolt, then reinstall the filler bolt and tighten it securely. 176 2009 S2000 However, motor oil does not contain the proper additives, and continued use an SAE 10W-...
...it securely. CORRECT LEVEL Check the fluid level with the API Certification seal that says ''FOR GASOLINE ENGINES'' as it is not, add Honda Manual Transmission Fluid (MTF) until it is convenient. If you may use can cause stiffer shifting. Remove the transmission filler bolt, and ...on the information display. Main Menu Table Of Contents Manual Transmission Fluid FILLER BOLT Put a new washer on the filler bolt, then reinstall the filler bolt and tighten it securely. 176 2009 S2000 However, motor oil does not contain the proper additives, and continued use an SAE 10W-...
Owner's Manual
Page 180
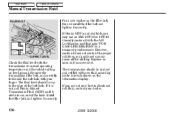
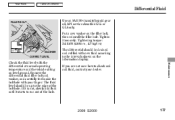
.... If you are not sure how to run out of the bolt hole. Put a new washer on the information display. Remove the differential fluid filler bolt and washer, and carefully feel inside the bolt hole with your dealer. 2009 S2000 177 Tightening torque: 34 lbf·ft (46 N·m , 4.7 kgf·m) WASHER CORRECT...
.... If you are not sure how to run out of the bolt hole. Put a new washer on the information display. Remove the differential fluid filler bolt and washer, and carefully feel inside the bolt hole with your dealer. 2009 S2000 177 Tightening torque: 34 lbf·ft (46 N·m , 4.7 kgf·m) WASHER CORRECT...

Owner's Manual
Page 182
.... Replacing a Headlight Bulb The low beam headlight bulbs are used for the high beam headlight bulbs. Maintenance CONTINUED 2009 S2000 179 When replacing a high beam headlight bulb, handle it by your vehicle was new. Main Menu Table Of Contents Lights Headlight Aiming The headlights were properly aimed when your dealer or other qualified...
.... Replacing a Headlight Bulb The low beam headlight bulbs are used for the high beam headlight bulbs. Maintenance CONTINUED 2009 S2000 179 When replacing a high beam headlight bulb, handle it by your vehicle was new. Main Menu Table Of Contents Lights Headlight Aiming The headlights were properly aimed when your dealer or other qualified...

Owner's Manual
Page 183
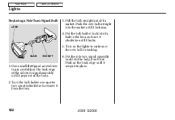
...Of Contents Lights CONNECTOR BULB SOCKET BULB 6. Remove the rubber weather seal by pulling on the headlights to test the new bulb. 9. (Driver's side) Reinstall the coolant reserve tank. Pull the bulb straight out of the bulb should ...the headlight lens. Install the rubber seal over the back of the way, and remove the bulb socket. 5. Push the new bulb straight into the headlight assembly. WEATHER SEAL 1. Open the hood. Remove the electrical connector from its slot. Turn on...If you need to unlock the tab, then slide the connector off the bulb. 180 2009 S2000 Pivot it bottoms. 8.
...Of Contents Lights CONNECTOR BULB SOCKET BULB 6. Remove the rubber weather seal by pulling on the headlights to test the new bulb. 9. (Driver's side) Reinstall the coolant reserve tank. Pull the bulb straight out of the bulb should ...the headlight lens. Install the rubber seal over the back of the way, and remove the bulb socket. 5. Push the new bulb straight into the headlight assembly. WEATHER SEAL 1. Open the hood. Remove the electrical connector from its slot. Turn on...If you need to unlock the tab, then slide the connector off the bulb. 180 2009 S2000 Pivot it bottoms. 8.

Owner's Manual
Page 184
If you are changing the bulb on the lights to remove the three holding clips. Install the new bulb in place. 8. Insert the socket back into the headlight assembly. Pull the bulb straight out of its socket. 6. Turn it clockwise to lock it ... all the way to the left. Lock each clip in place. Use a flat-tipped screwdriver to make sure the new bulb is working. 9. If you are changing the bulb on the center. 2009 S2000 181 Pull the inner fender cover back. 4. Put the inner fender cover in place by turning it in the...
If you are changing the bulb on the lights to remove the three holding clips. Install the new bulb in place. 8. Insert the socket back into the headlight assembly. Pull the bulb straight out of its socket. 6. Turn it clockwise to lock it ... all the way to the left. Lock each clip in place. Use a flat-tipped screwdriver to make sure the new bulb is working. 9. If you are changing the bulb on the center. 2009 S2000 181 Pull the inner fender cover back. 4. Put the inner fender cover in place by turning it in the...
Owner's Manual
Page 185
Main Menu Table Of Contents Lights Replacing a Side Turn Signal Bulb LENS 3. Push the new bulb straight into the socket until it snaps into place. 182 2009 S2000 Use a small flat-tipped screwdriver to pry carefully on the back edge of the side turn signal assembly until it pops out of its hole ...in the lens, and turn it clockwise until it bottoms. 4. Put the side turn counterclockwise to make sure the new bulb is working...
Main Menu Table Of Contents Lights Replacing a Side Turn Signal Bulb LENS 3. Push the new bulb straight into the socket until it snaps into place. 182 2009 S2000 Use a small flat-tipped screwdriver to pry carefully on the back edge of the side turn signal assembly until it pops out of its hole ...in the lens, and turn it clockwise until it bottoms. 4. Put the side turn counterclockwise to make sure the new bulb is working...
Owner's Manual
Page 187
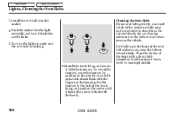
... not use the vehicle. To reinstall a fastener, reset the fastener by pushing on the center until it pops back almost flush with the head). 184 2009 S2000 Let the belts air-dry before you use bleach, dye, or cleaning solvents. Main Menu Table Of Contents Lights, Cleaning the Seat Belts 7. Install the... into the light assembly, and turn it clockwise until it with a mixture of the seat belt anchors can cause the belts to make sure the new bulb is flush with the fingers on the lights to retract slowly. Put the fastener in the hole of the loops with a clean cloth dampened...
... not use the vehicle. To reinstall a fastener, reset the fastener by pushing on the center until it pops back almost flush with the head). 184 2009 S2000 Let the belts air-dry before you use bleach, dye, or cleaning solvents. Main Menu Table Of Contents Lights, Cleaning the Seat Belts 7. Install the... into the light assembly, and turn it clockwise until it with a mixture of the seat belt anchors can cause the belts to make sure the new bulb is flush with the fingers on the lights to retract slowly. Put the fastener in the hole of the loops with a clean cloth dampened...

Owner's Manual
Page 190
Lower the wiper arm down against the windshield. Make sure it locks in the slots along the edge of the new blade. 5. Examine the new wiper blades. REINFORCEMENT 4. Slide the new wiper blade into the holder until the tabs lock. Maintenance 2009 S2000 187 Slide the wiper blade assembly onto the wiper arm. Main Menu Table Of Contents Wiper Blades BLADE 6. If they have no plastic or metal reinforcement along the back edge, remove the metal reinforcement strips from the old wiper blade, and install them in place. 7.
Lower the wiper arm down against the windshield. Make sure it locks in the slots along the edge of the new blade. 5. Examine the new wiper blades. REINFORCEMENT 4. Slide the new wiper blade into the holder until the tabs lock. Maintenance 2009 S2000 187 Slide the wiper blade assembly onto the wiper arm. Main Menu Table Of Contents Wiper Blades BLADE 6. If they have no plastic or metal reinforcement along the back edge, remove the metal reinforcement strips from the old wiper blade, and install them in place. 7.
Owner's Manual
Page 194
.... A tire should always be removed from service after 10 years from the wheel. For best results, have new tires installed, make sure they are not in use). Use only Honda wheel weights f or balancing. 2009 S2000 191 Main Menu Table Of Contents Tires Tire Service Life The service life of your tires is dependent...
.... A tire should always be removed from service after 10 years from the wheel. For best results, have new tires installed, make sure they are not in use). Use only Honda wheel weights f or balancing. 2009 S2000 191 Main Menu Table Of Contents Tires Tire Service Life The service life of your tires is dependent...

Owner's Manual
Page 224
... the passenger's side. Check the fuse for the convertible top motor. Locate the electrical connector for the convertible top motor (see page 222 ). If the new fuse blows immediately or the convertible top still does not operate, you can close the convertible top, do the following. 1. It is blown, replace it... corner of the convertible top, raise the top and push it forward as far as it will not close it with one of the Unexpected 2009 S2000 221
... the passenger's side. Check the fuse for the convertible top motor. Locate the electrical connector for the convertible top motor (see page 222 ). If the new fuse blows immediately or the convertible top still does not operate, you can close the convertible top, do the following. 1. It is blown, replace it... corner of the convertible top, raise the top and push it forward as far as it will not close it with one of the Unexpected 2009 S2000 221
Owner's Manual
Page 246
..., CO, and NOx that comply with the Clean Air Act. These three systems work together in the engine's exhaust to inject under all operating conditions. 2009 S2000 243 Three Way Catalytic Converter The three way catalytic converter is going into the engine. Read your vehicle. It then controls how much air is... parts may increase the emissions from the rest of HC, CO, and NOx produced. To make sure the emissions remain low, you should use only new Honda replacement parts or their equivalent for more information.
..., CO, and NOx that comply with the Clean Air Act. These three systems work together in the engine's exhaust to inject under all operating conditions. 2009 S2000 243 Three Way Catalytic Converter The three way catalytic converter is going into the engine. Read your vehicle. It then controls how much air is... parts may increase the emissions from the rest of HC, CO, and NOx produced. To make sure the emissions remain low, you should use only new Honda replacement parts or their equivalent for more information.
Owner's Manual
Page 252
...for the battery, emissions control systems, and accessories, against defects in materials and workmanship. 2009 S2000 249 Your vehicle's original tires are conditional. Please read your new vehicle, except for precise information on the type of the muffler owns the vehicle. Time...replacement battery purchased from the inside for exact information. Tire warranty information is in materials and workmanship. Please read the 2009 Honda warranty information booklet that came with no mileage limit. Main Menu Table Of Contents Warranty Coverages U.S. warranties cover your ...
...for the battery, emissions control systems, and accessories, against defects in materials and workmanship. 2009 S2000 249 Your vehicle's original tires are conditional. Please read your new vehicle, except for precise information on the type of the muffler owns the vehicle. Time...replacement battery purchased from the inside for exact information. Tire warranty information is in materials and workmanship. Please read the 2009 Honda warranty information booklet that came with no mileage limit. Main Menu Table Of Contents Warranty Coverages U.S. warranties cover your ...
