
Owner's Manual
Page 91
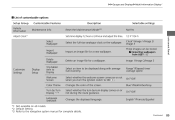
Selectable settings No/Yes 12 h*2/24 h Clock*2/Image 1/Image 2/ Image 3 Three images can be displayed along with average fuel economy. Import an image file for a new wallpaper. 2 Importing wallpapers from USB P. 92 Instrument Panel Delete an image file for complete details. Select whether the welcome screen comes on or not when ...
Selectable settings No/Yes 12 h*2/24 h Clock*2/Image 1/Image 2/ Image 3 Three images can be displayed along with average fuel economy. Import an image file for a new wallpaper. 2 Importing wallpapers from USB P. 92 Instrument Panel Delete an image file for complete details. Select whether the welcome screen comes on or not when ...
Owner's Manual
Page 166
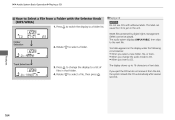
... to a list of text data. Rotate to jam in that folder. 4. Text data appears on the display under the following circumstances: • When you select a new folder, file, or track. • When you change the display to a folder list. 1 Playing a CD NOTICE Do not use CDs with the Selector Knob (MP3...
... to a list of text data. Rotate to jam in that folder. 4. Text data appears on the display under the following circumstances: • When you select a new folder, file, or track. • When you change the display to a folder list. 1 Playing a CD NOTICE Do not use CDs with the Selector Knob (MP3...
Owner's Manual
Page 183
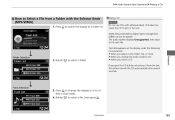
...) 1. WMA files protected by digital rights management (DRM) cannot be played. Text data appears on the display under the following circumstances: • When you select a new folder, file, or track. • When you change the display to CD. • When you eject the CD but do not remove it from a Folder...
...) 1. WMA files protected by digital rights management (DRM) cannot be played. Text data appears on the display under the following circumstances: • When you select a new folder, file, or track. • When you change the display to CD. • When you eject the CD but do not remove it from a Folder...
Owner's Manual
Page 207
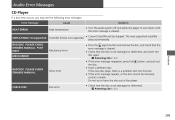
... message is cleared. Press the (eject) button and remove the disc, and check that the error message is a problem with the first disc. If the new disc plays, there is cleared. Check that the disc is not damaged or deformed. 2 Protecting CDs P. 212 CHECK DISC Disc error ● 205 Current track...
... message is cleared. Press the (eject) button and remove the disc, and check that the error message is a problem with the first disc. If the new disc plays, there is cleared. Check that the disc is not damaged or deformed. 2 Protecting CDs P. 212 CHECK DISC Disc error ● 205 Current track...
Owner's Manual
Page 220
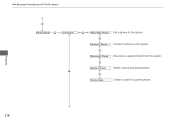
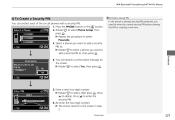
Pairing Code Create a code for a paired phone. uu Bluetooth® HandsFreeLink® * u HFL Menus Phone Setup Connection Add a New Phone Pair a phone to the system. Connect a Phone Connect a phone to the system. Disconnect Phone Disconnect a paired phone from the system. 218 Features Delete a Phone Delete a previously paired phone.
Pairing Code Create a code for a paired phone. uu Bluetooth® HandsFreeLink® * u HFL Menus Phone Setup Connection Add a New Phone Pair a phone to the system. Connect a Phone Connect a phone to the system. Disconnect Phone Disconnect a paired phone from the system. 218 Features Delete a Phone Delete a previously paired phone.
Owner's Manual
Page 221
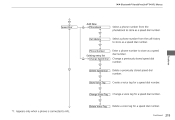
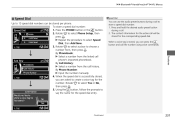
... Speed Dial Store Voice Tag Change Voice Tag Change a voice tag for a speed dial number. Continued 219 uu Bluetooth® HandsFreeLink® * u HFL Menus Add New Speed Dial *1 Phonebook Select a phone number from the call history to store as a speed dial number. Create a voice tag for a speed dial number. Select a phone...
... Speed Dial Store Voice Tag Change Voice Tag Change a voice tag for a speed dial number. Continued 219 uu Bluetooth® HandsFreeLink® * u HFL Menus Add New Speed Dial *1 Phonebook Select a phone number from the call history to store as a speed dial number. Create a voice tag for a speed dial number. Select a phone...

Owner's Manual
Page 224
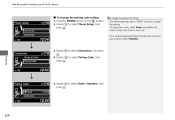
Rotate to select Add a New Phone, then press . Rotate to select Connection, then press . 4. u If a prompt appears asking to connect to select Phone Setup, then press . Rotate to a phone, select No and proceed with step 2. 3. u The screen changes to the system) 1. uu Bluetooth® HandsFreeLink® * u HFL Menus ■ To pair a cell phone (when a phone has already been paired to Select Location. 222 Features 5. Press the PHONE button or the button. 2. Rotate to select Empty, then press .
Rotate to select Add a New Phone, then press . Rotate to select Connection, then press . 4. u If a prompt appears asking to connect to select Phone Setup, then press . Rotate to a phone, select No and proceed with step 2. 3. u The screen changes to the system) 1. uu Bluetooth® HandsFreeLink® * u HFL Menus ■ To pair a cell phone (when a phone has already been paired to Select Location. 222 Features 5. Press the PHONE button or the button. 2. Rotate to select Empty, then press .
Owner's Manual
Page 226
Rotate to select Fixed or Random, then press . To create your own, select Fixed, and delete the current code, then enter a new one. Rotate to select Phone Setup, then press . 1 To change the pairing code setting The default pairing code is "0000" until you pair a phone, select ...
Rotate to select Fixed or Random, then press . To create your own, select Fixed, and delete the current code, then enter a new one. Rotate to select Phone Setup, then press . 1 To change the pairing code setting The default pairing code is "0000" until you pair a phone, select ...
Owner's Manual
Page 228
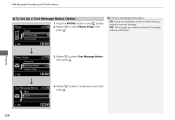
Rotate to select a mode you want, then press . Rotate to select Phone Setup, then press . 1 To Set Up a Text Message Notice Option ON: A pop-up notification comes on every time you receive is stored in the system without notification. 3. OFF: The message you receive a new text message. Rotate to select Text Message Notice, then press . 226 Features 4. Press the PHONE button or the button. 2. uu Bluetooth® HandsFreeLink® * u HFL Menus ■ To Set Up a Text Message Notice Option 1.
Rotate to select a mode you want, then press . Rotate to select Phone Setup, then press . 1 To Set Up a Text Message Notice Option ON: A pop-up notification comes on every time you receive is stored in the system without notification. 3. OFF: The message you receive a new text message. Rotate to select Text Message Notice, then press . 226 Features 4. Press the PHONE button or the button. 2. uu Bluetooth® HandsFreeLink® * u HFL Menus ■ To Set Up a Text Message Notice Option 1.
Owner's Manual
Page 229
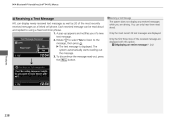
... the phone is already security PIN protected, you want to add a security PIN to enter the current security PIN before clearing the PIN or creating a new one. Enter a new four-digit number. Press to the screen in step 2. u The screen returns to enter the security PIN. 6.
... the phone is already security PIN protected, you want to add a security PIN to enter the current security PIN before clearing the PIN or creating a new one. Enter a new four-digit number. Press to the screen in step 2. u The screen returns to enter the security PIN. 6.
Owner's Manual
Page 233
... the button, follow the prompts to select Yes or No, then press . 5. Continued 231 Features Rotate to select a place to select Speed Dial, then Add New. 3. Rotate to say the name for the number. Press and hold the desired audio preset button during a call will be stored per phone. Press the...
... the button, follow the prompts to select Yes or No, then press . 5. Continued 231 Features Rotate to select a place to select Speed Dial, then Add New. 3. Rotate to say the name for the number. Press and hold the desired audio preset button during a call will be stored per phone. Press the...
Owner's Manual
Page 240
... any received messages while you of the received message are displayed. A pop-up appears and notifies you are driving. Only the first three lines of a new text message. 2.
... any received messages while you of the received message are displayed. A pop-up appears and notifies you are driving. Only the first three lines of a new text message. 2.

Owner's Manual
Page 281
...your vehicle, or on information on . TOP TIER Detergent Gasoline meets a new gasoline standard jointly established by leading automotive manufacturers to meet the needs of today's advanced engines. In Canada, visit www.honda.ca for additional information on top tier gasoline, visit www.toptiergas.com. In...1 Fuel Information NOTICE ■ Top tier detergent gasoline Because the level of detergency and additives in gasoline vary in the market, Honda endorses the use of gasoline that does NOT contain harmful manganese-based fuel additives such as having met "TOP TIER Detergent Gasoline" ...
...your vehicle, or on information on . TOP TIER Detergent Gasoline meets a new gasoline standard jointly established by leading automotive manufacturers to meet the needs of today's advanced engines. In Canada, visit www.honda.ca for additional information on top tier gasoline, visit www.toptiergas.com. In...1 Fuel Information NOTICE ■ Top tier detergent gasoline Because the level of detergency and additives in gasoline vary in the market, Honda endorses the use of gasoline that does NOT contain harmful manganese-based fuel additives such as having met "TOP TIER Detergent Gasoline" ...
Owner's Manual
Page 305
... u If it is not stuck to the contact surface of the engine block, and install a new oil filter. u Apply a light coat of the remaining oil. 6. Remove the oil filter and dispose of new engine oil to replace the oil filter. u If necessary, add more engine oil. 1 Changing ... and dust adhering to the engine contact surface. u Tightening torque: 30 lbf∙ft (40 N∙m, 4.0 kgf∙m) 9. When installing the new oil filter, follow the instructions supplied with the oil filter. uu Maintenance Under the Hood u Changing the Engine Oil and Oil Filter Oil Filter 5. Check...
... u If it is not stuck to the contact surface of the engine block, and install a new oil filter. u Apply a light coat of the remaining oil. 6. Remove the oil filter and dispose of new engine oil to replace the oil filter. u If necessary, add more engine oil. 1 Changing ... and dust adhering to the engine contact surface. u Tightening torque: 30 lbf∙ft (40 N∙m, 4.0 kgf∙m) 9. When installing the new oil filter, follow the instructions supplied with the oil filter. uu Maintenance Under the Hood u Changing the Engine Oil and Oil Filter Oil Filter 5. Check...
Owner's Manual
Page 308
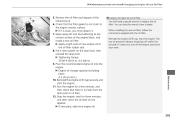
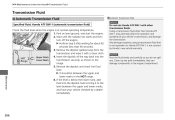
... the Lower Mark Range image. 5. uu Maintenance Under the Hood u Transmission Fluid Transmission Fluid ■ Automatic Transmission Fluid Specified fluid: Honda ATF DW-1 (automatic transmission fluid) Check the fluid level when the engine is not covered by a dealer immediately. 1 Automatic Transmission ...6. Clean up any . u Perform step 3 after waiting for about 60 seconds (less than Honda ATF DW-1 may adversely affect the operation and durability of your vehicle checked by Honda's new vehicle warranty. u It should be between the upper and lower marks, and have your vehicle's...
... the Lower Mark Range image. 5. uu Maintenance Under the Hood u Transmission Fluid Transmission Fluid ■ Automatic Transmission Fluid Specified fluid: Honda ATF DW-1 (automatic transmission fluid) Check the fluid level when the engine is not covered by a dealer immediately. 1 Automatic Transmission ...6. Clean up any . u Perform step 3 after waiting for about 60 seconds (less than Honda ATF DW-1 may adversely affect the operation and durability of your vehicle checked by Honda's new vehicle warranty. u It should be between the upper and lower marks, and have your vehicle's...

Owner's Manual
Page 311
... its base, and protect the glass from contact with denatured alcohol and a clean cloth. However, if you regularly carry heavy items in the rain. Insert a new bulb. Maintenance Bulb Continued 309 Remove the rubber weather seal. The exterior lights' inside the lenses, have the aiming readjusted at a dealer or by the...
... its base, and protect the glass from contact with denatured alcohol and a clean cloth. However, if you regularly carry heavy items in the rain. Insert a new bulb. Maintenance Bulb Continued 309 Remove the rubber weather seal. The exterior lights' inside the lenses, have the aiming readjusted at a dealer or by the...
Owner's Manual
Page 313
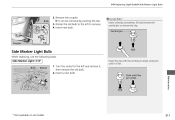
... pushing the tab. 3. Side Marker Light: 3 CP Bulb Socket Insert the clip with the central pin raised, and push until the pin is flat. 1. Insert new bulb. 1 Fog Light Bulbs * Insert a flat-tip screwdriver, lift and remove the central pin to remove. 4. Maintenance * Not available on all models 311 Central pin...
... pushing the tab. 3. Side Marker Light: 3 CP Bulb Socket Insert the clip with the central pin raised, and push until the pin is flat. 1. Insert new bulb. 1 Fog Light Bulbs * Insert a flat-tip screwdriver, lift and remove the central pin to remove. 4. Maintenance * Not available on all models 311 Central pin...
Owner's Manual
Page 314
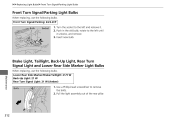
... the light assembly out of the rear pillar. 312 Push in the old bulb, rotate to the left and remove it unlocks, and remove. 3. Insert new bulb. Turn the socket to remove the bolts. 2. Brake Light, Taillight, Back-Up Light, Rear Turn Signal Light and Lower Rear Side Marker Light Bulbs...
... the light assembly out of the rear pillar. 312 Push in the old bulb, rotate to the left and remove it unlocks, and remove. 3. Insert new bulb. Turn the socket to remove the bolts. 2. Brake Light, Taillight, Back-Up Light, Rear Turn Signal Light and Lower Rear Side Marker Light Bulbs...
Owner's Manual
Page 315
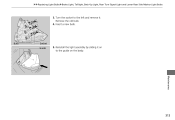
Reinstall the light assembly by sliding it . Bulb Socket Guide 5. Insert a new bulb. uu Replacing Light Bulbs u Brake Light, Taillight, Back-Up Light, Rear Turn Signal Light and Lower Rear Side Marker Light Bulbs 3. Turn the socket to the left and remove it on to the guide on the body. 313 Maintenance Remove the old bulb. 4.
Reinstall the light assembly by sliding it . Bulb Socket Guide 5. Insert a new bulb. uu Replacing Light Bulbs u Brake Light, Taillight, Back-Up Light, Rear Turn Signal Light and Lower Rear Side Marker Light Bulbs 3. Turn the socket to the left and remove it on to the guide on the body. 313 Maintenance Remove the old bulb. 4.
Owner's Manual
Page 316
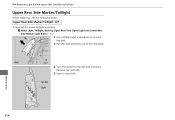
Bolt 4. Pull the light assembly out of the rear pillar. Turn the socket to remove the bolt. 3. Maintenance Socket Bulb 314 Upper Rear Side Marker/Taillight: 3CP 1. Insert a new bulb. Remove the lower taillight assembly. 2 Brake Light, Taillight, Back-Up Light, Rear Turn Signal Light and Lower Rear Side Marker Light Bulbs P. 312 2. Remove the old bulb. 5. uu Replacing Light Bulbs u Upper Rear Side Marker/Taillight Upper Rear Side Marker/Taillight When replacing, use the following bulbs. Use a Phillip-head screwdriver to the left and remove it.
Bolt 4. Pull the light assembly out of the rear pillar. Turn the socket to remove the bolt. 3. Maintenance Socket Bulb 314 Upper Rear Side Marker/Taillight: 3CP 1. Insert a new bulb. Remove the lower taillight assembly. 2 Brake Light, Taillight, Back-Up Light, Rear Turn Signal Light and Lower Rear Side Marker Light Bulbs P. 312 2. Remove the old bulb. 5. uu Replacing Light Bulbs u Upper Rear Side Marker/Taillight Upper Rear Side Marker/Taillight When replacing, use the following bulbs. Use a Phillip-head screwdriver to the left and remove it.


