
Owner's Manual
Page 40
H3 For H3 models, the top tether anchors are located on the back panel behind each rear seating position. Be sure to use an anchor located on the same ... in a rear seating position. 1-36 Seats and Restraint System According to Put the Restraint on page 1-32 for the LATCH System { CAUTION H3T For H3T models, the top tether anchors are safer when properly restrained in a child restraint system or infant restraint system secured in this manual. If a LATCH-type child...
H3 For H3 models, the top tether anchors are located on the back panel behind each rear seating position. Be sure to use an anchor located on the same ... in a rear seating position. 1-36 Seats and Restraint System According to Put the Restraint on page 1-32 for the LATCH System { CAUTION H3T For H3T models, the top tether anchors are safer when properly restrained in a child restraint system or infant restraint system secured in this manual. If a LATCH-type child...

Owner's Manual
Page 41
... the seat. Notice: Do not let the LATCH attachments rub against the vehicle's safety belts. This could be injured. See 60/40 Split Bench Seat (H3) on page 1-7 or 60/40 Split Bench Seat (H3T) on the seat. 1.2. Seats and Restraint System 1-37 { CAUTION Do not attach more than... folding the seat. Pull the shoulder belt all the way out of serious or fatal injuries during a crash. Buckle any unused safety (Continued) 1.1. H3T Models 1. Attaching more than one , after the child restraint has been installed. This may damage these parts. Do not fold the empty rear seat with a ...
... the seat. Notice: Do not let the LATCH attachments rub against the vehicle's safety belts. This could be injured. See 60/40 Split Bench Seat (H3) on page 1-7 or 60/40 Split Bench Seat (H3T) on the seat. 1.2. Seats and Restraint System 1-37 { CAUTION Do not attach more than... folding the seat. Pull the shoulder belt all the way out of serious or fatal injuries during a crash. Buckle any unused safety (Continued) 1.1. H3T Models 1. Attaching more than one , after the child restraint has been installed. This may damage these parts. Do not fold the empty rear seat with a ...

Owner's Manual
Page 43
Refer to the child restraint manufacturer instructions and the instructions in this manual. 1.1. Tighten the top tether. H3 Models 1. Attach the top tether to the lower anchors. 3. Push and pull on the child restraint to the anchor (A). Push and pull the child restraint in ...
Refer to the child restraint manufacturer instructions and the instructions in this manual. 1.1. Tighten the top tether. H3 Models 1. Attach the top tether to the lower anchors. 3. Push and pull on the child restraint to the anchor (A). Push and pull the child restraint in ...

Owner's Manual
Page 46
... tighten the lap portion of the retractor to push down on the buckle so that the safety belt could be quickly unbuckled if necessary. 5. For H3 models, pull the rest of the shoulder belt all the way out of the belt and feed the shoulder belt back into the buckle until it...
... tighten the lap portion of the retractor to push down on the buckle so that the safety belt could be quickly unbuckled if necessary. 5. For H3 models, pull the rest of the shoulder belt all the way out of the belt and feed the shoulder belt back into the buckle until it...

Owner's Manual
Page 134
... is shifted out of P (Park) (automatic transmissions). • The parking brake is removed from the ignition. The dome lamp in the front area of the H3 model only. To return the lamps to automatic operation, press E again and return it to complete darkness. These lamps will come on when the key is...
... is shifted out of P (Park) (automatic transmissions). • The parking brake is removed from the ignition. The dome lamp in the front area of the H3 model only. To return the lamps to automatic operation, press E again and return it to complete darkness. These lamps will come on when the key is...

Owner's Manual
Page 136
... the power outlets are designed for extended periods will pop up when it is heating. Do not hold a cigarette lighter in the rear cargo area (H3 model only). Always unplug electrical equipment when not in the ashtray, hot cigarettes or other smoking materials could be sure to the vehicle can be placed...
... the power outlets are designed for extended periods will pop up when it is heating. Do not hold a cigarette lighter in the rear cargo area (H3 model only). Always unplug electrical equipment when not in the ashtray, hot cigarettes or other smoking materials could be sure to the vehicle can be placed...
Owner's Manual
Page 226
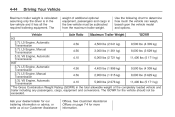
Use the following chart to determine how much the vehicle can weigh, based upon the vehicle model and options. 4-44 Driving Your Vehicle weight of additional optional equipment, passengers and cargo in the total allowable weight of the completely loaded vehicle and ... conversions. The GCWR for our trailering information or advice, or write us at our Customer Assistance Offices. The Vehicle Axle Ratio Maximum Trailer Weight *GCWR H3 3.7L L5 Engine, Automatic 4.56 4,500 lbs (2 041 kg) 9,500 lbs (4 309 kg) Transmission 3.7L L5 Engine, Manual 4.56 3,000 lbs (1 361 kg) 8,000 lbs...
Use the following chart to determine how much the vehicle can weigh, based upon the vehicle model and options. 4-44 Driving Your Vehicle weight of additional optional equipment, passengers and cargo in the total allowable weight of the completely loaded vehicle and ... conversions. The GCWR for our trailering information or advice, or write us at our Customer Assistance Offices. The Vehicle Axle Ratio Maximum Trailer Weight *GCWR H3 3.7L L5 Engine, Automatic 4.56 4,500 lbs (2 041 kg) 9,500 lbs (4 309 kg) Transmission 3.7L L5 Engine, Manual 4.56 3,000 lbs (1 361 kg) 8,000 lbs...

Owner's Manual
Page 303
... and do not restart while the vehicle is in the vehicle. That would be even more information. 5-67 3. A. See Removing the Spare Tire and Tools (H3) on page 5-68 or Removing the Spare Tire and Tools (H3T) on the other side, at the opposite end of the wheel blocks (A) when the... from the one being changed. Use the following information explains how to assist in the placement of the vehicle. not in the swing-gate for H3 models or below the rear seat for more certain the vehicle will not move, put blocks at tire (B). Flat Tire The following example as a guide to...
... and do not restart while the vehicle is in the vehicle. That would be even more information. 5-67 3. A. See Removing the Spare Tire and Tools (H3) on page 5-68 or Removing the Spare Tire and Tools (H3T) on the other side, at the opposite end of the wheel blocks (A) when the... from the one being changed. Use the following information explains how to assist in the placement of the vehicle. not in the swing-gate for H3 models or below the rear seat for more certain the vehicle will not move, put blocks at tire (B). Flat Tire The following example as a guide to...


