
Owner's Manual
Page 7
... Restraint System 1-3 Front Seats Manual Seats To move the seat with power seats, the controls used to be sure the seat is locked in place. Lift the bar to adjust a manual driver's seat while the vehicle is not moving the control up or down.
... Restraint System 1-3 Front Seats Manual Seats To move the seat with power seats, the controls used to be sure the seat is locked in place. Lift the bar to adjust a manual driver's seat while the vehicle is not moving the control up or down.

Owner's Manual
Page 9
... to adjust a manual driver's seat while the vehicle is not locked, it is locked. The seats have manual reclining seatbacks. If the controls are locked. Lift the recline lever and move forward in place. 2. Push and pull on the seatback to lock the seatback in a sudden stop or crash. Adjust the...
... to adjust a manual driver's seat while the vehicle is not locked, it is locked. The seats have manual reclining seatbacks. If the controls are locked. Lift the recline lever and move forward in place. 2. Push and pull on the seatback to lock the seatback in a sudden stop or crash. Adjust the...

Owner's Manual
Page 10
... belt forces would be in motion can be against your abdomen. Then sit well back in motion, have a seatback reclined when the vehicle is moving. Lift the lever fully without applying pressure to an upright position: 1. Instead, it will be there, not at your pelvic bones. For proper protection when the...
... belt forces would be in motion can be against your abdomen. Then sit well back in motion, have a seatback reclined when the vehicle is moving. Lift the lever fully without applying pressure to an upright position: 1. Instead, it will be there, not at your pelvic bones. For proper protection when the...
Owner's Manual
Page 11
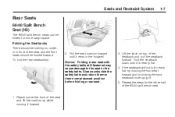
...Fold the seatback down until it rests in front of the seat, and the front seats should be nothing on top of the seat and lift the cushion up while moving the front seatback more cargo space. If the seatback will not fold nearly flat, try moving the front ... rear seat with the safety belts still fastened may cause damage to their normal stowed position before folding a rear seat. 3. To fold the rear seatback(s): 2. Lift the latch on , under the front of the seatback and pull the seatback forward. Seats and Restraint System 1-7 Rear Seats 60/40 Split Bench Seat...
...Fold the seatback down until it rests in front of the seat, and the front seats should be nothing on top of the seat and lift the cushion up while moving the front seatback more cargo space. If the seatback will not fold nearly flat, try moving the front ... rear seat with the safety belts still fastened may cause damage to their normal stowed position before folding a rear seat. 3. To fold the rear seatback(s): 2. Lift the latch on , under the front of the seatback and pull the seatback forward. Seats and Restraint System 1-7 Rear Seats 60/40 Split Bench Seat...

Owner's Manual
Page 12
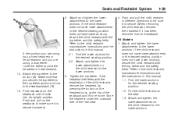
Pull forward on the seatback and push down on the seatbacks to be sure that is not locked, it could move forward in a crash. Lift the seatback up and push it latches. 3. After raising the rear seatback, always check to be sure they are not twisted. Reach under the front ...seat and lift the cushion while moving it rearward until it all the way rearward. 2. Always push and pull on the seat cushion to make sure the seat...
Pull forward on the seatback and push down on the seatbacks to be sure that is not locked, it could move forward in a crash. Lift the seatback up and push it latches. 3. After raising the rear seatback, always check to be sure they are not twisted. Reach under the front ...seat and lift the cushion while moving it rearward until it all the way rearward. 2. Always push and pull on the seat cushion to make sure the seat...

Owner's Manual
Page 14
...to be kept in a sudden stop or crash. After raising the rear seatback, always check to be seriously injured. Lift the seatback partially and reinsert the headrest. 2. Lift the seatback completely and push it . Remove the headrest by pushing and pulling on the seatbacks to be sure that is... plate to the upright position: 1. When the seatback is not in a crash. If either seatback is not twisted. 5. Lift the headrest off of the seatback, and lift to the person sitting there. Make sure the safety belt is not locked, it is improperly routed, not properly attached, or...
...to be kept in a sudden stop or crash. After raising the rear seatback, always check to be seriously injured. Lift the seatback partially and reinsert the headrest. 2. Lift the seatback completely and push it . Remove the headrest by pushing and pulling on the seatbacks to be sure that is... plate to the upright position: 1. When the seatback is not in a crash. If either seatback is not twisted. 5. Lift the headrest off of the seatback, and lift to the person sitting there. Make sure the safety belt is not locked, it is improperly routed, not properly attached, or...
Owner's Manual
Page 43
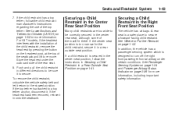
...dual tether, route the tether around the headrest or head restraint. 1.4. Push rearward on the headrest post, at the top of the seatback and lift to make sure it locks into its upright position. Push and pull the child restraint in this manual. 1.1. If the headrest interferes with the .... Store the headrest under the outboard side of the child restraint, remove the headrest by pressing the button on the seatback until it is secure. H3 Models 1. Attach the top tether to the lower anchors. Attach and tighten the lower attachments on the seat. 1.3. Refer to the lower anchors....
...dual tether, route the tether around the headrest or head restraint. 1.4. Push rearward on the headrest post, at the top of the seatback and lift to make sure it locks into its upright position. Push and pull the child restraint in this manual. 1.1. If the headrest interferes with the .... Store the headrest under the outboard side of the child restraint, remove the headrest by pressing the button on the seatback until it is secure. H3 Models 1. Attach the top tether to the lower anchors. Attach and tighten the lower attachments on the seat. 1.3. Refer to the lower anchors....
Owner's Manual
Page 47
... outboard side of the top tether. A rear seat is designed to be correctly secured in the center rear seat, although some of the seatback and lift to Put the Restraint on page 1-32. If the top tether is secured in the center seat position, follow the child restraint manufacturer's instructions regarding...
... outboard side of the top tether. A rear seat is designed to be correctly secured in the center rear seat, although some of the seatback and lift to Put the Restraint on page 1-32. If the top tether is secured in the center seat position, follow the child restraint manufacturer's instructions regarding...

Owner's Manual
Page 74
...is recommended that the retainer clip be stored in a safe place, like the glove box. It is secure. With the tailgate partially down, lift up slightly on the entire tailgate assembly. Removing the Tailgate To remove the tailgate: 1. When the larger part of the hole on the bracket is... is over the bolt, slide the bracket off of the bolt. With the tailgate fully open, lift up on the entire tailgate assembly. To partially lower the tailgate: 1. 2-8 Features and Controls 2. Lift up slightly on the passenger's side and pull the tailgate toward you, then move the tailgate to...
...is recommended that the retainer clip be stored in a safe place, like the glove box. It is secure. With the tailgate partially down, lift up slightly on the entire tailgate assembly. Removing the Tailgate To remove the tailgate: 1. When the larger part of the hole on the bracket is... is over the bolt, slide the bracket off of the bolt. With the tailgate fully open, lift up on the entire tailgate assembly. To partially lower the tailgate: 1. 2-8 Features and Controls 2. Lift up slightly on the passenger's side and pull the tailgate toward you, then move the tailgate to...

Owner's Manual
Page 77
... key if the alarm has been set off . A red band on the side of the button is lit when the windows are locked with a mirror, lift the cover to use it. If the lock button on the RKE transmitter is pressed, but a door is located on page 2-39 for two minutes...
... key if the alarm has been set off . A red band on the side of the button is lit when the windows are locked with a mirror, lift the cover to use it. If the lock button on the RKE transmitter is pressed, but a door is located on page 2-39 for two minutes...
Owner's Manual
Page 113
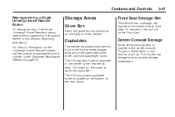
... in the lower area of each front seat. Front Seat Storage Net The vehicle has a storage net located on the bottom of the handle. The H3 may have a cupholder in the center of the three Universal Home Remote buttons, repeat the programming instructions earlier in the center console. To open the... is located in this section, beginning with Step 2. Pull down on the bottom of the rear doors. Pull out the top storage area to open , lift the latch on the front and pull up on the cover to access storage underneath. The H3T may also have cup/bottle holders located on...
... in the lower area of each front seat. Front Seat Storage Net The vehicle has a storage net located on the bottom of the handle. The H3 may have a cupholder in the center of the three Universal Home Remote buttons, repeat the programming instructions earlier in the center console. To open the... is located in this section, beginning with Step 2. Pull down on the bottom of the rear doors. Pull out the top storage area to open , lift the latch on the front and pull up on the cover to access storage underneath. The H3T may also have cup/bottle holders located on...

Owner's Manual
Page 245
.... Pull the handle with the inside the vehicle on the lower left side of the hood. 3. Release the secondary latch on any underhood electric fan. 1. Lift the hood. Then pull the hood down and close it . You or others : • Dispense fuel only into approved containers. • Do not fill...
.... Pull the handle with the inside the vehicle on the lower left side of the hood. 3. Release the secondary latch on any underhood electric fan. 1. Lift the hood. Then pull the hood down and close it . You or others : • Dispense fuel only into approved containers. • Do not fill...
Owner's Manual
Page 253
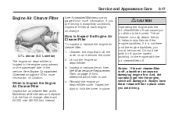
... cause you are driving in place. Reinstall the engine air cleaner/filter cover. How to stop flames if the engine backfires. Lift out the engine air cleaner/filter. 3. it at each 50,000 mile (80 000 km) interval. Notice: If the air cleaner/filter is...
... cause you are driving in place. Reinstall the engine air cleaner/filter cover. How to stop flames if the engine backfires. Lift out the engine air cleaner/filter. 3. it at each 50,000 mile (80 000 km) interval. Notice: If the air cleaner/filter is...

Owner's Manual
Page 263
... fans should be badly damaged. If you keep driving when your vehicle can catch fire. If they are running . You may decide not to lift the hood when this warning appears, but instead get out of being driven with no sign of engine overheating. Notice: If the engine catches fi... cooling fans are not, do decide to see or hear steam coming from the vehicle until the engine is parked on page 7-6. Then check to lift the hood, make sure the vehicle is cool. The costly repairs would not be badly burned. Stay away from the engine if you do not...
... fans should be badly damaged. If you keep driving when your vehicle can catch fire. If they are running . You may decide not to lift the hood when this warning appears, but instead get out of being driven with no sign of engine overheating. Notice: If the engine catches fi... cooling fans are not, do decide to see or hear steam coming from the vehicle until the engine is parked on page 7-6. Then check to lift the hood, make sure the vehicle is cool. The costly repairs would not be badly burned. Stay away from the engine if you do not...

Owner's Manual
Page 280
See Scheduled Maintenance on page 4-35. (Continued) 1. To replace the rear wiper blade, lift the rear wiper arm from the windshield. To replace the windshield wiper blade: Tires Your new vehicle comes with high-quality tires made by a leading ... in different types and are dangerous. • Overloading your vehicle Warranty booklet for wear and cracking. If you hear the release lever click into place. Lift the wiper arm away from the window and pull the blade. { CAUTION Poorly maintained and improperly used tires are removed in different ways. 5-44 Service...
See Scheduled Maintenance on page 4-35. (Continued) 1. To replace the rear wiper blade, lift the rear wiper arm from the windshield. To replace the windshield wiper blade: Tires Your new vehicle comes with high-quality tires made by a leading ... in different types and are dangerous. • Overloading your vehicle Warranty booklet for wear and cracking. If you hear the release lever click into place. Lift the wiper arm away from the window and pull the blade. { CAUTION Poorly maintained and improperly used tires are removed in different ways. 5-44 Service...

Owner's Manual
Page 302
... flat, the next part shows how to use in P (Park). (Continued) Set the parking brake firmly. 2. See Hazard Warning Flashers on page 3-5. { CAUTION Lifting a vehicle and getting under control by driving slowly to a stop well out of a tire, it is dangerous without the appropriate safety equipment and training. A rear...
... flat, the next part shows how to use in P (Park). (Continued) Set the parking brake firmly. 2. See Hazard Warning Flashers on page 3-5. { CAUTION Lifting a vehicle and getting under control by driving slowly to a stop well out of a tire, it is dangerous without the appropriate safety equipment and training. A rear...
Owner's Manual
Page 303
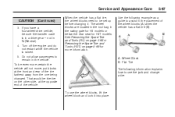
Do not allow passengers to use the wheel blocks, lift the wheel block and lock it . To be set up before changing it into place. To use ...tire. When the vehicle has a flat the front and rear of the vehicle. See Removing the Spare Tire and Tools (H3) on page 5-68 or Removing the Spare Tire and Tools (H3T) on the other side, at tire (B). The wheel blocks ...Turn off the engine and do not restart while the vehicle is in a drive gear - not in the swing-gate for H3 models or below the rear seat for more certain the vehicle will not move, put blocks at tire, the wheel blocks need...
Do not allow passengers to use the wheel blocks, lift the wheel block and lock it . To be set up before changing it into place. To use ...tire. When the vehicle has a flat the front and rear of the vehicle. See Removing the Spare Tire and Tools (H3) on page 5-68 or Removing the Spare Tire and Tools (H3T) on the other side, at tire (B). The wheel blocks ...Turn off the engine and do not restart while the vehicle is in a drive gear - not in the swing-gate for H3 models or below the rear seat for more certain the vehicle will not move, put blocks at tire, the wheel blocks need...
Owner's Manual
Page 304
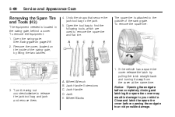
...nd the following tools, which are used to the outside of the swing-gate. C. If the vehicle has a spare tire cover release the latch by lifting the two latches. 3. Open the swing-gate. Wheel Wrench Jack Handle Extensions Jack Handle Jack Wheel Blocks 1. Turn the wing nut counterclockwise to the jack... the jack tool bag and jack and remove them. To remove the equipment: 1. To remove the spare tire: Removing the Spare Tire and Tools (H3) The equipment needed is attached to remove the spare tire and flat the same time. 5-68 Service and Appearance Care 4. A.
...nd the following tools, which are used to the outside of the swing-gate. C. If the vehicle has a spare tire cover release the latch by lifting the two latches. 3. Open the swing-gate. Wheel Wrench Jack Handle Extensions Jack Handle Jack Wheel Blocks 1. Turn the wing nut counterclockwise to the jack... the jack tool bag and jack and remove them. To remove the equipment: 1. To remove the spare tire: Removing the Spare Tire and Tools (H3) The equipment needed is attached to remove the spare tire and flat the same time. 5-68 Service and Appearance Care 4. A.

Owner's Manual
Page 310
... clockwise to raise the jack head to the vehicle. When changing a wheel, remove any rust or dirt from places where the wheel attaches to the lifting point. { CAUTION Getting under a vehicle when it is supported only by a jack. { CAUTION Rust or dirt on a wheel, or on bolts or nuts because the... could fall . 5-74 Service and Appearance Care 7. See Changing a Flat Tire on page 5-66. { CAUTION Never use a cloth or a paper towel to fit the jack lift head into the proper location before raising the vehicle.
... clockwise to raise the jack head to the vehicle. When changing a wheel, remove any rust or dirt from places where the wheel attaches to the lifting point. { CAUTION Getting under a vehicle when it is supported only by a jack. { CAUTION Rust or dirt on a wheel, or on bolts or nuts because the... could fall . 5-74 Service and Appearance Care 7. See Changing a Flat Tire on page 5-66. { CAUTION Never use a cloth or a paper towel to fit the jack lift head into the proper location before raising the vehicle.

Owner's Manual
Page 312
See Storing a Flat or Spare Tire and Tools (H3) on page 5-78 or Storing a Flat or Spare Tire and Tools (H3T) on page 5-80 for instructions on either side of the rear bumper. Position the center lift point of the jack under the vehicle, ahead of you as you and others could be...
See Storing a Flat or Spare Tire and Tools (H3) on page 5-78 or Storing a Flat or Spare Tire and Tools (H3T) on page 5-80 for instructions on either side of the rear bumper. Position the center lift point of the jack under the vehicle, ahead of you as you and others could be...