
Owner's Manual
Page 1
2010 HUMMER H3/H3T Owner Manual M In Brief ...1-1 Instrument Panel ...1-2 Initial Drive Information ...1-3 Vehicle Features ...1-13 Performance and Maintenance ...1-16 Keys, Doors and Windows ......4-1 Storage Compartments ...4-1 Additional Storage Features ...4-2 Roof Rack System ...4-4 Instruments and Controls ...5-1 Controls ...5-2 Warning Lights, Gauges, and Indicators ...5-6 Information Displays ...5-18 Vehicle Messages ...5-21 Universal Remote System ...5-26 Lighting ...6-1 Exterior Lighting ...6-1 Interior Lighting ...6-7 Lighting Features ...6-8 Infotainment System ...7-1 Introduction...
2010 HUMMER H3/H3T Owner Manual M In Brief ...1-1 Instrument Panel ...1-2 Initial Drive Information ...1-3 Vehicle Features ...1-13 Performance and Maintenance ...1-16 Keys, Doors and Windows ......4-1 Storage Compartments ...4-1 Additional Storage Features ...4-2 Roof Rack System ...4-4 Instruments and Controls ...5-1 Controls ...5-2 Warning Lights, Gauges, and Indicators ...5-6 Information Displays ...5-18 Vehicle Messages ...5-21 Universal Remote System ...5-26 Lighting ...6-1 Exterior Lighting ...6-1 Interior Lighting ...6-7 Lighting Features ...6-8 Infotainment System ...7-1 Introduction...

Owner's Manual
Page 3
...to your specific vehicle to confirm each of the features found . Part No. 20935347 A First Printing © 2009 HUMMER LLC. iii Using this Manual To quickly locate information about the vehicle use the Index in this owner manual. All Rights Reserved. For vehicles first sold in Canada, ... death. Danger indicates a hazard with a high level of Canada Limited" for quick reference. Canadian Vehicle Owners Propriétaires Canadiens HUMMER, the HUMMER Emblem, H3 and H3T are options that you did not purchase or due to changes subsequent to the printing of the manual. It is in ...
...to your specific vehicle to confirm each of the features found . Part No. 20935347 A First Printing © 2009 HUMMER LLC. iii Using this Manual To quickly locate information about the vehicle use the Index in this owner manual. All Rights Reserved. For vehicles first sold in Canada, ... death. Danger indicates a hazard with a high level of Canada Limited" for quick reference. Canadian Vehicle Owners Propriétaires Canadiens HUMMER, the HUMMER Emblem, H3 and H3T are options that you did not purchase or due to changes subsequent to the printing of the manual. It is in ...
Owner's Manual
Page 4
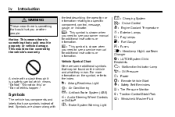
...would not be found on the symbol, refer to the index. the text describing the operation or information relating to see your owner manual for additional instructions or information. For more information on the vehicle and what they mean there is something that could result in property or vehicle damage.... Vehicle Symbol Chart Here are shown along with a slash through it is shown when you need to see a service manual for additional instructions or information. * : This symbol is a safety symbol which means "Do Not," "Do not do this" or "Do not let this happen." Symbols ...
...would not be found on the symbol, refer to the index. the text describing the operation or information relating to see your owner manual for additional instructions or information. For more information on the vehicle and what they mean there is something that could result in property or vehicle damage.... Vehicle Symbol Chart Here are shown along with a slash through it is shown when you need to see a service manual for additional instructions or information. * : This symbol is a safety symbol which means "Do Not," "Do not do this" or "Do not let this happen." Symbols ...
Owner's Manual
Page 5
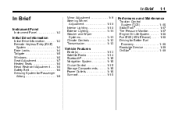
In Brief 1-1 In Brief Instrument Panel Instrument Panel ...1-2 Initial Drive Information Initial Drive Information ...Remote Keyless Entry (RKE) System ...Door Locks ...Tailgate ...Windows ...Seat Adjustment ...Heated Seats ...Head Restraint Adjustment ...Safety Belt ...Sensing System for Passenger Airbag ...1-3 1-4 1-4 1-5 1-6 1-7 1-8 1-8 1-8 1-9 Mirror Adjustment ...1-9 ...
In Brief 1-1 In Brief Instrument Panel Instrument Panel ...1-2 Initial Drive Information Initial Drive Information ...Remote Keyless Entry (RKE) System ...Door Locks ...Tailgate ...Windows ...Seat Adjustment ...Heated Seats ...Head Restraint Adjustment ...Safety Belt ...Sensing System for Passenger Airbag ...1-3 1-4 1-4 1-5 1-6 1-7 1-8 1-8 1-8 1-9 Mirror Adjustment ...1-9 ...

Owner's Manual
Page 7
... Instrument Cluster on page 9‑52 (For vehicles with Locking Front Axle). H. I. M. Shift Lever. Q. R. Glove Box on page 4‑1. 1-3 Initial Drive Information This section provides a brief overview about some of the features which can be on page 9‑57. Turn and Lane-Change Signals on page 6‑... on page 9‑52. Locking Front Axle (If Equipped) or Traction Control System (TCS) on page 5‑2. For more detailed information, refer to each of the important features that may or may not be found later in this owner manual. B. AM-FM Radio on...
... Instrument Cluster on page 9‑52 (For vehicles with Locking Front Axle). H. I. M. Shift Lever. Q. R. Glove Box on page 4‑1. 1-3 Initial Drive Information This section provides a brief overview about some of the features which can be on page 9‑57. Turn and Lane-Change Signals on page 6‑... on page 9‑52. Locking Front Axle (If Equipped) or Traction Control System (TCS) on page 5‑2. For more detailed information, refer to each of the important features that may or may not be found later in this owner manual. B. AM-FM Radio on...

Owner's Manual
Page 9
Door Locks on page 2‑5. . . Power Door Locks on page 2‑4. For more information, see: . Remote Keyless Entry (RKE) System Operation on the outside handle while pulling the tailgate down. 1. Open the tailgate by pulling up on page 2‑3. In Brief Power Door Locks 1-5 Tailgate Tailgate (H3T) Removing the Tailgate To remove the tailgate: Press L (Lock) to unlock the doors. Open the tailgate fully and remove the retainer clip from the driver's side hinge. Press U (Unlock) to lock the doors.
Door Locks on page 2‑5. . . Power Door Locks on page 2‑4. For more information, see: . Remote Keyless Entry (RKE) System Operation on the outside handle while pulling the tailgate down. 1. Open the tailgate by pulling up on page 2‑3. In Brief Power Door Locks 1-5 Tailgate Tailgate (H3T) Removing the Tailgate To remove the tailgate: Press L (Lock) to unlock the doors. Open the tailgate fully and remove the retainer clip from the driver's side hinge. Press U (Unlock) to lock the doors.

Owner's Manual
Page 10
...(RKE) transmitter. 2. Remove the retaining cables from both sides of the bolt. 3. See Tailgate on the driver door armrest. 1-6 In Brief Swing-gate (H3) To lock or unlock the swing‐gate, use the door handle to pull the swing-gate rearward slightly so it . On vehicles with power... windows, the switches are on page 2‑7. Windows To open the window. For more information, see Power Windows on the passenger's side and pull the tailgate toward you, then move the tailgate to the right to close it opens automatically...
...(RKE) transmitter. 2. Remove the retaining cables from both sides of the bolt. 3. See Tailgate on the driver door armrest. 1-6 In Brief Swing-gate (H3) To lock or unlock the swing‐gate, use the door handle to pull the swing-gate rearward slightly so it . On vehicles with power... windows, the switches are on page 2‑7. Windows To open the window. For more information, see Power Windows on the passenger's side and pull the tailgate toward you, then move the tailgate to the right to close it opens automatically...

Owner's Manual
Page 12
For more information see Head Restraints on page 3‑2. Safety Belts on page 3‑20. Lap-Shoulder Belt on page 3‑10. I : Press to turn on the center ... Do not drive until the head restraints for all occupants are located on the heated seatback. Lower Anchors and Tethers for important information on page 3‑51. . . For more information, see Heated Front Seats on or off the heated seat and seatback. J : Press to turn on page 3‑6. Refer to the following...
For more information see Head Restraints on page 3‑2. Safety Belts on page 3‑20. Lap-Shoulder Belt on page 3‑10. I : Press to turn on the center ... Do not drive until the head restraints for all occupants are located on the heated seatback. Lower Anchors and Tethers for important information on page 3‑51. . . For more information, see Heated Front Seats on or off the heated seat and seatback. J : Press to turn on page 3‑6. Refer to the following...

Owner's Manual
Page 13
...Mirrors United States Interior Mirror The vehicle has an automatic dimming rearview mirror with a compass and temperature display. Driver Information Center (DIC) on page 2‑14. The dimming feature comes on or off the right front passenger frontal ...information. z : Press to start. Automatic Dimming Rearview Mirror on page 5‑18. . The driver airbag and roof‐rail airbags (if equipped) are located on the instrument panel when the vehicle is turned to turn off . Press the round, four-way control pad to choose the driver or passenger side mirror. 2. H3...
...Mirrors United States Interior Mirror The vehicle has an automatic dimming rearview mirror with a compass and temperature display. Driver Information Center (DIC) on page 2‑14. The dimming feature comes on or off the right front passenger frontal ...information. z : Press to start. Automatic Dimming Rearview Mirror on page 5‑18. . The driver airbag and roof‐rail airbags (if equipped) are located on the instrument panel when the vehicle is turned to turn off . Press the round, four-way control pad to choose the driver or passenger side mirror. 2. H3...

Owner's Manual
Page 14
... a dome lamp in place. Reading Lamps Press the lens on the lamps to lock the steering wheel in the cargo area of the H3 model only. For more information, see: . . 1. Exit Lighting on page 5‑2. . See Steering Wheel Adjustment on page 6‑8. . These lamps will not come on page 6‑7. There is...
... a dome lamp in place. Reading Lamps Press the lens on the lamps to lock the steering wheel in the cargo area of the H3 model only. For more information, see: . . 1. Exit Lighting on page 5‑2. . See Steering Wheel Adjustment on page 6‑8. . These lamps will not come on page 6‑7. There is...

Owner's Manual
Page 15
... all exterior lamps including the Daytime Running Lamps (DRL). Automatic Headlamp System on page 6‑1. Delays wiping cycle. In Brief 1-11 Exterior Lighting For more information, see: . 6: Exterior Lamp Controls on page 6‑4.
... all exterior lamps including the Daytime Running Lamps (DRL). Automatic Headlamp System on page 6‑1. Delays wiping cycle. In Brief 1-11 Exterior Lighting For more information, see: . 6: Exterior Lamp Controls on page 6‑4.

Owner's Manual
Page 17
Used for extreme off-road conditions. See Four-Wheel Drive on page 9‑46. 1-13 Vehicle Features Radio(s) Six-Disc CD Radio For more information about these and other radio features, see Operation on and off. Control Buttons P (Power/Volume): the system on page 7‑2. In Brief 4 m Q (Four-Wheel-High Lock): When extra traction is needed in most off-road situations. 4 n Q (Four-Wheel-Low Lock): Delivers extra torque to decrease the volume. Press to turn Turn to increase or to all four wheels.
Used for extreme off-road conditions. See Four-Wheel Drive on page 9‑46. 1-13 Vehicle Features Radio(s) Six-Disc CD Radio For more information about these and other radio features, see Operation on and off. Control Buttons P (Power/Volume): the system on page 7‑2. In Brief 4 m Q (Four-Wheel-High Lock): When extra traction is needed in most off-road situations. 4 n Q (Four-Wheel-Low Lock): Delivers extra torque to decrease the volume. Press to turn Turn to increase or to all four wheels.

Owner's Manual
Page 18
... FM1, FM2, AM, XM1, if equipped, or XM2, if equipped. XM Satellite Radio Service XM is a satellite radio service that is turned off . For more information refer to the previous or next station and stay there. Press DISP (Display) to select preset stations. DISP: Turn to select a radio station. 1-6 (Preset Pushbuttons...
... FM1, FM2, AM, XM1, if equipped, or XM2, if equipped. XM Satellite Radio Service XM is a satellite radio service that is turned off . For more information refer to the previous or next station and stay there. Press DISP (Display) to select preset stations. DISP: Turn to select a radio station. 1-6 (Preset Pushbuttons...

Owner's Manual
Page 19
... provides detailed maps of the lever to make and receive hands-free calls using the vehicle's audio system, microphone and controls. For more information. Not all phones will support all functions. After a destination has been set the speed. In Brief 1-15 Bluetooth® The in-...vehicle Bluetooth system allows users with a Bluetooth-enabled cell phone to set , the system provides turn-by-turn instructions for more information, see Cargo Management System on the upper and lower slides of the rail. See the vehicle's Navigation System manual for reaching the destination...
... provides detailed maps of the lever to make and receive hands-free calls using the vehicle's audio system, microphone and controls. For more information. Not all phones will support all functions. After a destination has been set the speed. In Brief 1-15 Bluetooth® The in-...vehicle Bluetooth system allows users with a Bluetooth-enabled cell phone to set , the system provides turn-by-turn instructions for more information, see Cargo Management System on the upper and lower slides of the rail. See the vehicle's Navigation System manual for reaching the destination...

Owner's Manual
Page 20
... on page 2‑17. . d illuminates and the appropriate DIC message is also one accessory power outlet located in the rear cargo area (H3 model only). To use the outlet, open or close the sunroof, press the front or rear of the switch. Press the button again to... under the climate control system. Sunroof Sunroof Performance and Maintenance Traction Control System (TCS) The traction control system limits wheel spin. For more information, see Sunroof on page 5‑5. 1-16 In Brief Power Outlets The accessory power outlets can be used to turn off traction control, press...
... on page 2‑17. . d illuminates and the appropriate DIC message is also one accessory power outlet located in the rear cargo area (H3 model only). To use the outlet, open or close the sunroof, press the front or rear of the switch. Press the button again to... under the climate control system. Sunroof Sunroof Performance and Maintenance Traction Control System (TCS) The traction control system limits wheel spin. For more information, see Sunroof on page 5‑5. 1-16 In Brief Power Outlets The accessory power outlets can be used to turn off traction control, press...

Owner's Manual
Page 21
... when the vehicle is displayed. The Tire Pressure Monitor System can alert you when a significant reduction in pressure occurs in one or more information, see StabiliTrak System on the driver side center pillar (B pillar). This may have a Tire Pressure Monitor System (TPMS). If the warning...system turns on page 9‑27. Tire Pressure Monitor This vehicle may be inflated to the recommended pressure shown on the tire loading information label located on page 9‑53. Press the button again to turn off both systems. You may notice during cooler conditions that ...
... when the vehicle is displayed. The Tire Pressure Monitor System can alert you when a significant reduction in pressure occurs in one or more information, see StabiliTrak System on the driver side center pillar (B pillar). This may have a Tire Pressure Monitor System (TPMS). If the warning...system turns on page 9‑27. Tire Pressure Monitor This vehicle may be inflated to the recommended pressure shown on the tire loading information label located on page 9‑53. Press the button again to turn off both systems. You may notice during cooler conditions that ...

Owner's Manual
Page 23
... connected to the vehicle to get priority help from specially trained OnStar emergency advisors. Sign up today at: www.gmownercenter.com/ hummer (U.S.). OnStar® uses several innovative technologies and live advisors to give voice commands for hands‐free, voice‐activated calling... and to provide a wide range of a new HUMMER, you are available 24 hours a day, 365 days a year, minor repair information or towing arrangements. X : Push this red emergency button to get you the help . Automatic Crash Response...
... connected to the vehicle to get priority help from specially trained OnStar emergency advisors. Sign up today at: www.gmownercenter.com/ hummer (U.S.). OnStar® uses several innovative technologies and live advisors to give voice commands for hands‐free, voice‐activated calling... and to provide a wide range of a new HUMMER, you are available 24 hours a day, 365 days a year, minor repair information or towing arrangements. X : Push this red emergency button to get you the help . Automatic Crash Response...

Owner's Manual
Page 24
... days a week. The OnStar system can provide services where it is pressed, or if the airbags or ACR system deploy. For more information see the OnStar Owner's Guide in a place where OnStar has an agreement with the OnStar service. OnStar service also cannot work unless the... and reception when the service is needed, and technology that is compatible with a wireless service provider for service in the OnStar Subscriber Information. Crisis Assist, Stolen Vehicle Assistance, Vehicle Diagnostics, Remote Door Unlock, Roadside Assistance, Turn‐by‐Turn Navigation and Hands‐...
... days a week. The OnStar system can provide services where it is pressed, or if the airbags or ACR system deploy. For more information see the OnStar Owner's Guide in a place where OnStar has an agreement with the OnStar service. OnStar service also cannot work unless the... and reception when the service is needed, and technology that is compatible with a wireless service provider for service in the OnStar Subscriber Information. Crisis Assist, Stolen Vehicle Assistance, Vehicle Diagnostics, Remote Door Unlock, Roadside Assistance, Turn‐by‐Turn Navigation and Hands‐...

Owner's Manual
Page 25
... equipment to the OnStar buttons is appearing), your OnStar subscription has expired and all services have a working electrical system, including adequate battery power, for more information. Press Q to important parts of the vehicle in a crash, hills, tall buildings, tunnels, weather or wireless phone network congestion. 1-21 Additional OnStar Controls Your Responsibility...
... equipment to the OnStar buttons is appearing), your OnStar subscription has expired and all services have a working electrical system, including adequate battery power, for more information. Press Q to important parts of the vehicle in a crash, hills, tall buildings, tunnels, weather or wireless phone network congestion. 1-21 Additional OnStar Controls Your Responsibility...

Owner's Manual
Page 28
... is used for the ignition and driver's door lock. In an emergency, contact Roadside Assistance. Remote Keyless Entry (RKE) System The key is dangerous for information regarding Part 15 of the Federal Communications Commission (FCC) Rules and RSS-210/211 of a closing window. Do not leave the keys in the path...
... is used for the ignition and driver's door lock. In an emergency, contact Roadside Assistance. Remote Keyless Entry (RKE) System The key is dangerous for information regarding Part 15 of the Federal Communications Commission (FCC) Rules and RSS-210/211 of a closing window. Do not leave the keys in the path...

