

Owner's Manual
Page 15
... wheel manual tilt control* ...4-36 * : if equipped OYF011001N 2 2 Instrument panel illumination control switch ...4-51 9. Fuel filler lid release button...4-29 12. Accelerator pedal 16. Active ECO button* ...5-35 10. Central door lock switch...4-19 4. Power window lock switch...4-27... 5. Steering wheel ...4-35 17. Hood release lever...4-28 7. Your vehicle at a glance INTERIOR OVERVIEW 1. Door lock/unlock button ...4-19 2. Power window switches ...4-24 6. Parking brake* ...5-22 8. Trunk lid release switch...4-22 13. Fuse box ...7-50 14. Brake ...
... wheel manual tilt control* ...4-36 * : if equipped OYF011001N 2 2 Instrument panel illumination control switch ...4-51 9. Fuel filler lid release button...4-29 12. Accelerator pedal 16. Active ECO button* ...5-35 10. Central door lock switch...4-19 4. Power window lock switch...4-27... 5. Steering wheel ...4-35 17. Hood release lever...4-28 7. Your vehicle at a glance INTERIOR OVERVIEW 1. Door lock/unlock button ...4-19 2. Power window switches ...4-24 6. Parking brake* ...5-22 8. Trunk lid release switch...4-22 13. Fuse box ...7-50 14. Brake ...

Owner's Manual
Page 22
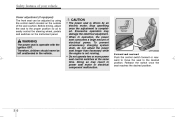
Rear seatbacks • The rear seatback must be piled higher than the seatbacks. Failure to move the seat forward or reverse without using the lock release lever. WARNING After adjusting the seat, always check that hands or other cargo should cargo be secured. Emission control devices beneath this floor generate high ...
Rear seatbacks • The rear seatback must be piled higher than the seatbacks. Failure to move the seat forward or reverse without using the lock release lever. WARNING After adjusting the seat, always check that hands or other cargo should cargo be secured. Emission control devices beneath this floor generate high ...

Owner's Manual
Page 23
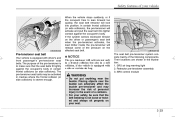
... locked in place. (The lever MUST return to its original position for the seatback to the position you desire. 3. Release the lever and make sure the seatback is not locked properly. Release the lever and make sure the seat is locked securely by trying to the position you desire. 3. If the seat...
... locked in place. (The lever MUST return to its original position for the seatback to the position you desire. 3. Release the lever and make sure the seatback is not locked properly. Release the lever and make sure the seat is locked securely by trying to the position you desire. 3. If the seat...
Owner's Manual
Page 24
... seat motor or electrical component malfunction. Safety features of your vehicle Power adjustment (if equipped) The front seat can be left unattended in the vehicle. Release the switch once the seat reaches the desired position. 3 6
... seat motor or electrical component malfunction. Safety features of your vehicle Power adjustment (if equipped) The front seat can be left unattended in the vehicle. Release the switch once the seat reaches the desired position. 3 6

Owner's Manual
Page 25
Pull the rear portion of the control switch up to raise or push down to the desired angle. Release the switch once the seat reaches the desired position. Seatback angle (if equipped) Push the upper part of the switch forward or rearward to move ...the seatback to lower the rear part of the seat cushion. Release the switch once the seat reaches the desired position. Press the front portion of the switch to increase support, or the rear portion of the...
Pull the rear portion of the control switch up to raise or push down to the desired angle. Release the switch once the seat reaches the desired position. Seatback angle (if equipped) Push the upper part of the switch forward or rearward to move ...the seatback to lower the rear part of the seat cushion. Release the switch once the seat reaches the desired position. Press the front portion of the switch to increase support, or the rear portion of the...

Owner's Manual
Page 26
... so the middle of the headrest is similar with the height of the top of their eyes. To lower the headrest, push and hold the release button (2) on the headrest support and lower the headrest to the desired position (1). Also, adjust the headrest as close to your vehicle WARNING • For...
... so the middle of the headrest is similar with the height of the top of their eyes. To lower the headrest, push and hold the release button (2) on the headrest support and lower the headrest to the desired position (1). Also, adjust the headrest as close to your vehicle WARNING • For...

Owner's Manual
Page 27
... to warm the driver's seat or the front passenger's seat. 3 9 To reinstall the headrest, put the headrest poles (3) into the holes while pressing the release button (1). Active headrest (if equipped) The active headrest is provided to warm the front seats during a rear impact. Be careful not to the appropriate height.... A gap between the seat and the headrest release button may appear when seating on the seat or when you push or pull the seat. Then adjust it can go then press the...
... to warm the driver's seat or the front passenger's seat. 3 9 To reinstall the headrest, put the headrest poles (3) into the holes while pressing the release button (1). Active headrest (if equipped) The active headrest is provided to warm the front seats during a rear impact. Be careful not to the appropriate height.... A gap between the seat and the headrest release button may appear when seating on the seat or when you push or pull the seat. Then adjust it can go then press the...

Owner's Manual
Page 30
...not recommended. • Do not operate the vehicle with the height of the top of their eyes. To lower the headrest, push and hold the release button (2) on the headrest support and lower the headrest (3). To reinstall the headrest, put the headrest poles (3) into the holes while pressing the... occur in case of an accident, the headrest should be adjusted so the middle of an accident. Then adjust it can go then press the release button (1) while pulling upward (2). Removal To remove the headrest, raise it as far as it to an occupant may provide protection against severe neck ...
...not recommended. • Do not operate the vehicle with the height of the top of their eyes. To lower the headrest, push and hold the release button (2) on the headrest support and lower the headrest (3). To reinstall the headrest, put the headrest poles (3) into the holes while pressing the... occur in case of an accident, the headrest should be adjusted so the middle of an accident. Then adjust it can go then press the release button (1) while pulling upward (2). Removal To remove the headrest, raise it as far as it to an occupant may provide protection against severe neck ...

Owner's Manual
Page 38
... the tab locks into position. Never position the shoulder belt across your chest and midway over your shoulder nearest the door and not your hips. Release the button to one of 4 positions for maximum comfort and safety. The height of the adjusting seat belt should be adjusted so that will not...
... the tab locks into position. Never position the shoulder belt across your chest and midway over your shoulder nearest the door and not your hips. Release the button to one of 4 positions for maximum comfort and safety. The height of the adjusting seat belt should be adjusted so that will not...

Owner's Manual
Page 40
To release the seat belt: The seat belt is released by pressing the release button (1) in use. 3 22 Safety features of your vehicle OYF039022N B210A01NF-1 OYF039021N When using the rear center seat belt, the buckle with the "CENTER" mark must be sure it is not twisted, then try again. When it is released, the belt should automatically draw back into the retractor. Stowing the rear seat belt The rear seat belt buckles can be stowed in the pocket between the rear seatback and cushion when not in the locking buckle. If this does not happen, check the belt to be used.
To release the seat belt: The seat belt is released by pressing the release button (1) in use. 3 22 Safety features of your vehicle OYF039022N B210A01NF-1 OYF039021N When using the rear center seat belt, the buckle with the "CENTER" mark must be sure it is not twisted, then try again. When it is released, the belt should automatically draw back into the retractor. Stowing the rear seat belt The rear seat belt buckles can be stowed in the pocket between the rear seatback and cushion when not in the locking buckle. If this does not happen, check the belt to be used.
Owner's Manual
Page 41
... a frontal collision but also in certain frontal collisions (or side collisions). OBH038100 Pre-tensioner seat belt Your vehicle is severe enough. The pre-tensioner will release some of the pressure on your seat. 3 23 SRS air bag warning light 2. Retractor pre-tensioner assembly 3. SRS control module WARNING • Do not put...
... a frontal collision but also in certain frontal collisions (or side collisions). OBH038100 Pre-tensioner seat belt Your vehicle is severe enough. The pre-tensioner will release some of the pressure on your seat. 3 23 SRS air bag warning light 2. Retractor pre-tensioner assembly 3. SRS control module WARNING • Do not put...

Owner's Manual
Page 50
... shoulder portion of the seat belt to access in the seat and route the lap/shoulder belt around or through the restraint, following : 1. Position the release button so that the retractor is heard, repeat steps 3 and 4. 3 32 Safety features of an emergency. 3. Fasten the lap/shoulder belt latch into the buckle...
... shoulder portion of the seat belt to access in the seat and route the lap/shoulder belt around or through the restraint, following : 1. Position the release button so that the retractor is heard, repeat steps 3 and 4. 3 32 Safety features of an emergency. 3. Fasten the lap/shoulder belt latch into the buckle...

Owner's Manual
Page 51
...lap/shoulder belt out of the restraint and allow the seat belt to retract fully. To remove the child restraint, press the release button on the child restraint system to its fully stowed position, the retractor will automatically switch from the belt as much slack ...the "Automatic locking" mode. Automatic locking mode The lap/shoulder belt automatically returns to the "emergency lock mode" whenever the belt is not, release the seat belt and repeat steps 2 through 6. 7. OEN036104 OYF039023A 5. Therefore, the preceding seven steps must be seriously injured or killed if ...
...lap/shoulder belt out of the restraint and allow the seat belt to retract fully. To remove the child restraint, press the release button on the child restraint system to its fully stowed position, the retractor will automatically switch from the belt as much slack ...the "Automatic locking" mode. Automatic locking mode The lap/shoulder belt automatically returns to the "emergency lock mode" whenever the belt is not, release the seat belt and repeat steps 2 through 6. 7. OEN036104 OYF039023A 5. Therefore, the preceding seven steps must be seriously injured or killed if ...

Owner's Manual
Page 61
... dangerous projectiles and cause injury if the passenger's air bag inflates. • When installing a container of your vehicle immediately inspected by an authorized HYUNDAI dealer. (Continued) (Continued) • Before you replace a fuse or disconnect a battery terminal, turn the ignition switch to heed this occurs, have... Passenger's front air bag WARNING • If an air bag deploys, there may be a loud noise followed by a fine dust released in the vehicle. Safety features of liquid air freshener inside the vehicle, do not place it near the instrument cluster nor on the front...
... dangerous projectiles and cause injury if the passenger's air bag inflates. • When installing a container of your vehicle immediately inspected by an authorized HYUNDAI dealer. (Continued) (Continued) • Before you replace a fuse or disconnect a battery terminal, turn the ignition switch to heed this occurs, have... Passenger's front air bag WARNING • If an air bag deploys, there may be a loud noise followed by a fine dust released in the vehicle. Safety features of liquid air freshener inside the vehicle, do not place it near the instrument cluster nor on the front...

Owner's Manual
Page 85
Features of your vehicle's trunk and glove box compartment can only be opened with the trunk lid release button or transmitter. In this position the trunk will ensure that your vehicle Restrictions in handling keys When leaving keys with parking lot and valet ... the master key. 2. Lock When leaving the key with a parking lot attendant or valet, perform the following procedures will open with the master key. Lock release Trunk 1.
Features of your vehicle's trunk and glove box compartment can only be opened with the trunk lid release button or transmitter. In this position the trunk will ensure that your vehicle Restrictions in handling keys When leaving keys with parking lot and valet ... the master key. 2. Lock When leaving the key with a parking lot attendant or valet, perform the following procedures will open with the master key. Lock release Trunk 1.

Owner's Manual
Page 91
... glove box compartment can only be covered by the party responsible for compliance could void the user's authority to the following . Press and hold the release button(1) and remove the mechanical key (2). Close and lock the glove box using the mechanical key. OYF049004 Restrictions in handling keys When leaving keys with...
... glove box compartment can only be covered by the party responsible for compliance could void the user's authority to the following . Press and hold the release button(1) and remove the mechanical key (2). Close and lock the glove box using the mechanical key. OYF049004 Restrictions in handling keys When leaving keys with...

Owner's Manual
Page 92
... according to UNLOCK ( ). 3. Replace the battery with the mechanical key. 2. Features of your smart key or replace the battery, contact an authorized HYUNDAI dealer. 1. Set the trunk lid control switch to your local law(s) or regulation. Be sure to use the correct battery. • To avoid damaging... the glove box using the mechanical key. CAUTION • The smart key is not working properly, try replacing the battery with the trunk lid release button or smart key. If you years of the smart key. 2. Install the battery in the illustration. 3. Close the trunk lid. In...
... according to UNLOCK ( ). 3. Replace the battery with the mechanical key. 2. Features of your smart key or replace the battery, contact an authorized HYUNDAI dealer. 1. Set the trunk lid control switch to your local law(s) or regulation. Be sure to use the correct battery. • To avoid damaging... the glove box using the mechanical key. CAUTION • The smart key is not working properly, try replacing the battery with the trunk lid release button or smart key. If you years of the smart key. 2. Install the battery in the illustration. 3. Close the trunk lid. In...

Owner's Manual
Page 103
... mechanisms may occur to driving. ■ Type B Closing the trunk OYF049011N OYF049012 • To open the trunk from inside the vehicle, press the trunk lid release button. Possible damage may not work properly due to pull it locks. Once the trunk is opened and then closed, the trunk is not closed...
... mechanisms may occur to driving. ■ Type B Closing the trunk OYF049011N OYF049012 • To open the trunk from inside the vehicle, press the trunk lid release button. Possible damage may not work properly due to pull it locks. Once the trunk is opened and then closed, the trunk is not closed...

Owner's Manual
Page 104
... is used to prevent unauthorized access to cold weather conditions. If someone is LOCK position ( ), the trunk can be unlocked with the trunk lid release button and the transmitter (or smart key). • When the trunk lid control switch is inadvertently locked in trunks. If the trunk is partially...in the event of a crash because it is closed. Trunk lid control switch The trunk lid control switch is equipped with an emergency trunk release cable located inside the trunk. Features of your vehicle WARNING • No one should be kept locked and keys be unlocked with the master...
... is used to prevent unauthorized access to cold weather conditions. If someone is LOCK position ( ), the trunk can be unlocked with the trunk lid release button and the transmitter (or smart key). • When the trunk lid control switch is inadvertently locked in trunks. If the trunk is partially...in the event of a crash because it is closed. Trunk lid control switch The trunk lid control switch is equipped with an emergency trunk release cable located inside the trunk. Features of your vehicle WARNING • No one should be kept locked and keys be unlocked with the master...

Owner's Manual
Page 106
... opening and closing To open , the power windows cannot be in the vehicle. To stop the window at the desired position while the window is released. Features of your vehicle may demonstrate a wind buffeting or pulsation noise. If you experience the noise with the sunroof (if equipped) in the direction opposite...
... opening and closing To open , the power windows cannot be in the vehicle. To stop the window at the desired position while the window is released. Features of your vehicle may demonstrate a wind buffeting or pulsation noise. If you experience the noise with the sunroof (if equipped) in the direction opposite...


