

Owner's Manual
Page 61
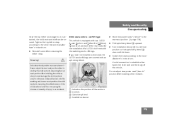
.... If you make the buyer aware of this Operator's Manual. If this by the airbag when it is in order to both front and rear side impact airbags there is a possibility for children in serious injuries or death should be triggered. If you must be able to accomplish this ...Should you choose to place a child 12 years old or under must never ride in the front seat, except in a Mercedes-Benz authorized BabySmartTM compatible child seat, which needs to the center of the airbag cover on the outside of steering wheel rim. Placing hands and arms inside the rim can result in ...
.... If you make the buyer aware of this Operator's Manual. If this by the airbag when it is in order to both front and rear side impact airbags there is a possibility for children in serious injuries or death should be triggered. If you must be able to accomplish this ...Should you choose to place a child 12 years old or under must never ride in the front seat, except in a Mercedes-Benz authorized BabySmartTM compatible child seat, which needs to the center of the airbag cover on the outside of steering wheel rim. Placing hands and arms inside the rim can result in ...

Owner's Manual
Page 73
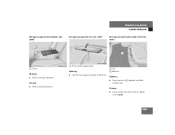
Should the light go out while the restraint is not twisted. 1 Cover of the rear seating positions. Store cover 1 in a convenient place (e.g. glove box). Make sure to check the indicator every time you use the BabySmartTM restraint to transport children on ...signal interference may interfere with tether anchorages for a top tether strap at each of top anchorage ring Remove cover 1 from anchorage ring. Safety and Security Occupant safety Warning! When using a BabySmartTM compatible child seat on the front passenger seat. If the light remains out, do not use the special system child...
Should the light go out while the restraint is not twisted. 1 Cover of the rear seating positions. Store cover 1 in a convenient place (e.g. glove box). Make sure to check the indicator every time you use the BabySmartTM restraint to transport children on ...signal interference may interfere with tether anchorages for a top tether strap at each of top anchorage ring Remove cover 1 from anchorage ring. Safety and Security Occupant safety Warning! When using a BabySmartTM compatible child seat on the front passenger seat. If the light remains out, do not use the special system child...
Owner's Manual
Page 74
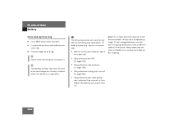
... position of the anchors 2 Anchors 3 Upholstery blend 4 Installation device 73 If you have not installed a child seat, the LATCH anchor fittings are covered with adjustable rear seats/bench*: Never adjust the rear seat position after installing child restraint. Adjusting the rear seat position after removing the tether strap. Tighten the top tether strap according to the manufacturer's instructions...
... position of the anchors 2 Anchors 3 Upholstery blend 4 Installation device 73 If you have not installed a child seat, the LATCH anchor fittings are covered with adjustable rear seats/bench*: Never adjust the rear seat position after installing child restraint. Adjusting the rear seat position after removing the tether strap. Tighten the top tether strap according to the manufacturer's instructions...
Owner's Manual
Page 236
Closing Slide cover 1 forward. Lift the lid using the handle in rear shelf* Storage compartments under the front seats 1 Rear shelf compartment 1 Cover Opening Opening Slide cover 1 rearward. Controls in detail Useful features Storage compartment between rear seats* Storage compartment in the front. 1 Lid 2 Buttons Opening Press buttons 2 together and fold lid 1 down. Closing Close lid 1 until both buttons 2 of lock engage. 235
Closing Slide cover 1 forward. Lift the lid using the handle in rear shelf* Storage compartments under the front seats 1 Rear shelf compartment 1 Cover Opening Opening Slide cover 1 rearward. Controls in detail Useful features Storage compartment between rear seats* Storage compartment in the front. 1 Lid 2 Buttons Opening Press buttons 2 together and fold lid 1 down. Closing Close lid 1 until both buttons 2 of lock engage. 235
Owner's Manual
Page 369
... batteries contain lead. Recycling of battery power (e.g. The battery, its cover 2. Never invert the terminal connections. ! i The following procedures must always be carried out following any interruption of batteries is in operation. 368 Many states require sellers of improperly. Resynchronize rear seats if they were adjusted five seconds or less before the battery...
... batteries contain lead. Recycling of battery power (e.g. The battery, its cover 2. Never invert the terminal connections. ! i The following procedures must always be carried out following any interruption of batteries is in operation. 368 Many states require sellers of improperly. Resynchronize rear seats if they were adjusted five seconds or less before the battery...

Owner's Manual
Page 375
... tested and approved by an authorized Mercedes-Benz Center. Fuse boxes in passenger compartment There are also given there. Fuse box in the dashboard on the front passenger side. One fuse box is located under the right rear seat In the engine compartment on the driver...cover 2 Cover i Only install fuses that have the specified amperage rating. The amperages of the fuses are two fuse boxes. Practical hints Fuses Fuses Your vehicle's electrical fuses are located in various fuse boxes: In the dashboard on the passenger side In the rear passenger compartment under the right rear seat...
... tested and approved by an authorized Mercedes-Benz Center. Fuse boxes in passenger compartment There are also given there. Fuse box in the dashboard on the front passenger side. One fuse box is located under the right rear seat In the engine compartment on the driver...cover 2 Cover i Only install fuses that have the specified amperage rating. The amperages of the fuses are two fuse boxes. Practical hints Fuses Fuses Your vehicle's electrical fuses are located in various fuse boxes: In the dashboard on the passenger side In the rear passenger compartment under the right rear seat...

Owner's Manual
Page 412
... 301 Distronic* system sensor cover 299 Gear selector lever 301 Hard plastic trim items 301 Headlamps 177 Headliner and shelf below rear window 301 Instrument cluster 301 Leather upholstery 302 Light alloy wheels 301 Nubuck leather upholstery 302 Parktronic* system sensor 299 Plastic and rubber parts 302 Seat belts 301 Steering wheel 301...
... 301 Distronic* system sensor cover 299 Gear selector lever 301 Hard plastic trim items 301 Headlamps 177 Headliner and shelf below rear window 301 Instrument cluster 301 Leather upholstery 302 Light alloy wheels 301 Nubuck leather upholstery 302 Parktronic* system sensor 299 Plastic and rubber parts 302 Seat belts 301 Steering wheel 301...
Owner's Manual
Page 414
Index Limiting opening height of trunk lid* 159 Rear window defroster 189 Residual heat 191 Seat heater 115, 116 Seat ventilation* 117 Tow-away alarm 85 Deactivating steering wheel gearshift control 173 Deceleration With Distronic* 209 Deep water see Standing water 265 Defrosting 187 Delayed ... 214 Driving hints 215 Fine adjustment 212 Increasing distance 214 Increasing time interval 213 Intermittent signal tone 208 Menu 209 Messages in display 315 Sensor cover 299 Setting a higher speed 211 Setting a slower speed 212 413
Index Limiting opening height of trunk lid* 159 Rear window defroster 189 Residual heat 191 Seat heater 115, 116 Seat ventilation* 117 Tow-away alarm 85 Deactivating steering wheel gearshift control 173 Deceleration With Distronic* 209 Deep water see Standing water 265 Defrosting 187 Delayed ... 214 Driving hints 215 Fine adjustment 212 Increasing distance 214 Increasing time interval 213 Intermittent signal tone 208 Menu 209 Messages in display 315 Sensor cover 299 Setting a higher speed 211 Setting a slower speed 212 413


