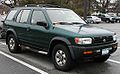
Owner's Manual
Page 15
...is convenient, preferably before the fuel gauge reaches "E". Do not continue driving if the belt is correct: Have the warning system checked by a NISSAN dealer. There should be a small reserve of low engine oil pressure. This light warns of fuel remaining in the tank when the fuel gauge ..." section. See "Engine oil" in the "Pre-driving checks and adjustments" section for about six seconds unless the driver's seat belt is securely fastened. Seat belt reminder light If the level is below the MINIMUM mark on the brake fluid reservoir, do not drive until the driver's seat...
...is convenient, preferably before the fuel gauge reaches "E". Do not continue driving if the belt is correct: Have the warning system checked by a NISSAN dealer. There should be a small reserve of low engine oil pressure. This light warns of fuel remaining in the tank when the fuel gauge ..." section. See "Engine oil" in the "Pre-driving checks and adjustments" section for about six seconds unless the driver's seat belt is securely fastened. Seat belt reminder light If the level is below the MINIMUM mark on the brake fluid reservoir, do not drive until the driver's seat...
Owner's Manual
Page 16
...188; Malfunction indicator light comes on may indicate a potential emission control problem. Have the vehicle inspected by your NISSAN dealer. If the transfer control is not secured in any drive position while the automatic transmission selector lever is on steady - An emission control system malfunction has... the Malfunction indicator light comes on in the "P" position, the transmission will disengage and the wheel will continue to have your NISSAN dealer for repair. The Malfunction indicator light will come on steady or blinks while the engine is running , it may damage the...
...188; Malfunction indicator light comes on may indicate a potential emission control problem. Have the vehicle inspected by your NISSAN dealer. If the transfer control is not secured in any drive position while the automatic transmission selector lever is on steady - An emission control system malfunction has... the Malfunction indicator light comes on in the "P" position, the transmission will disengage and the wheel will continue to have your NISSAN dealer for repair. The Malfunction indicator light will come on steady or blinks while the engine is running , it may damage the...
Owner's Manual
Page 17
...details on . (after 7 seconds) 3. Have the vehicle inspected by informing the dealer of the doors and/or back door is not closed securely while the ignition key is as necessary could lead to poor driveability, reduced fuel economy, and possible damage to the emission control system, which ...caused the engine to have your nearest authorized NISSAN dealer. 1. The supplemental air bag light does not come on when the tire carrier is not closed securely while the ignition key is "ON". 1-12 Door open warning light (If so equipped)...
...details on . (after 7 seconds) 3. Have the vehicle inspected by informing the dealer of the doors and/or back door is not closed securely while the ignition key is as necessary could lead to poor driveability, reduced fuel economy, and possible damage to the emission control system, which ...caused the engine to have your nearest authorized NISSAN dealer. 1. The supplemental air bag light does not come on when the tire carrier is not closed securely while the ignition key is "ON". 1-12 Door open warning light (If so equipped)...

Owner's Manual
Page 30
SPA0346A ¼ Make sure the luggage board closes securely. SIC0598 ¼ Do not drive with the board removed. 1-25 LUGGAGE BOARD AND BOX ¼ Do not place valuable items in the luggage side console box. ¼ Keep luggage side console box lids closed securely when being used.
SPA0346A ¼ Make sure the luggage board closes securely. SIC0598 ¼ Do not drive with the board removed. 1-25 LUGGAGE BOARD AND BOX ¼ Do not place valuable items in the luggage side console box. ¼ Keep luggage side console box lids closed securely when being used.

Owner's Manual
Page 36
... opener without these standards became effective for models manufactured on . THE INTEGRATED HomeLinkTM TRANSMITTER: ¼ will operate garage doors, gates, home/ office lighting systems and security systems by federal safety standards (these features increases the risk of up to three individual hand-held transmitters into one built-in device. ADJUSTABLE SHOCK...
... opener without these standards became effective for models manufactured on . THE INTEGRATED HomeLinkTM TRANSMITTER: ¼ will operate garage doors, gates, home/ office lighting systems and security systems by federal safety standards (these features increases the risk of up to three individual hand-held transmitters into one built-in device. ADJUSTABLE SHOCK...
Owner's Manual
Page 37
... step 3. 2. Note to Canadian users: Prior to flash rapidly (approximately 20 seconds). Your vehicle's engine should be turned off while programming your garage door or security gate will open and close (if the transmitter is indicated by the rapidly flashing indicator light. Test the Integrated HomeLinkTM Transmitter by holding and press...
... step 3. 2. Note to Canadian users: Prior to flash rapidly (approximately 20 seconds). Your vehicle's engine should be turned off while programming your garage door or security gate will open and close (if the transmitter is indicated by the rapidly flashing indicator light. Test the Integrated HomeLinkTM Transmitter by holding and press...

Owner's Manual
Page 45
Remove the screw and open the lid. 2. Insert the batteries as follows: 1. Close the lid securely and install the screw. 4. Always confirm local regulations for any reason other than approx. 49 ft (15 m). ¼ When one of the doors is waterproof; ...
Remove the screw and open the lid. 2. Insert the batteries as follows: 1. Close the lid securely and install the screw. 4. Always confirm local regulations for any reason other than approx. 49 ft (15 m). ¼ When one of the doors is waterproof; ...
Owner's Manual
Page 46
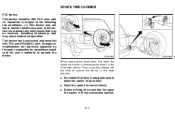
... the open position. ¼ Be certain that may cause undesired operation. Operation is firmly closed and latched. 2-7 Then insert the stopper into the hole to secure the carrier in the illustration above. SPARE TIRE CARRIER FCC Notice: This device complies with FCC and DOC/MDC rules. This device has been tested...
... the open position. ¼ Be certain that may cause undesired operation. Operation is firmly closed and latched. 2-7 Then insert the stopper into the hole to secure the carrier in the illustration above. SPARE TIRE CARRIER FCC Notice: This device complies with FCC and DOC/MDC rules. This device has been tested...

Owner's Manual
Page 47
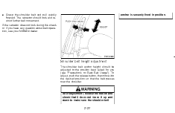
To lock the back door, push it down securely. ¼ Always check the back door has been closed securely to prevent it from opening while driving. ¼ Do not drive with the rear window open the back door. 3. Turn the key counterclockwise to open . ...
To lock the back door, push it down securely. ¼ Always check the back door has been closed securely to prevent it from opening while driving. ¼ Do not drive with the rear window open the back door. 3. Turn the key counterclockwise to open . ...

Owner's Manual
Page 48
Insert the assist bar into place. Raise the lever at the front of the hood. 4. Always check that the hood is closed and locked securely to prevent it locks into the slot in the front edge of the hood with the 2-9 The vehicle should only ever be operated with your ...
Insert the assist bar into place. Raise the lever at the front of the hood. 4. Always check that the hood is closed and locked securely to prevent it locks into the slot in the front edge of the hood with the 2-9 The vehicle should only ever be operated with your ...
Owner's Manual
Page 49
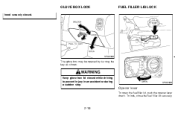
Keep glove box lid closed . SPA0389 Opener lever To open the fuel filler lid, push the opener lever down. To lock, close the fuel filler lid securely. 2-10 FUEL FILLER LID LOCK SPA0388 The glove box may be opened by turning the key as shown. GLOVE BOX LOCK hood securely closed while driving to prevent injury in an accident or during a sudden stop.
Keep glove box lid closed . SPA0389 Opener lever To open the fuel filler lid, push the opener lever down. To lock, close the fuel filler lid securely. 2-10 FUEL FILLER LID LOCK SPA0388 The glove box may be opened by turning the key as shown. GLOVE BOX LOCK hood securely closed while driving to prevent injury in an accident or during a sudden stop.

Owner's Manual
Page 51
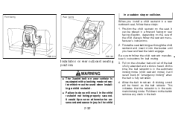
... move forward. If the seat is reclined, the risk of the vehicle. ¼ After adjustment, gently rock in the seat to make sure it is securely locked. The seat may move suddenly and could cause loss of control of sliding under the lap belt and being injured is obtained. Reclining Pull...
... move forward. If the seat is reclined, the risk of the vehicle. ¼ After adjustment, gently rock in the seat to make sure it is securely locked. The seat may move suddenly and could cause loss of control of sliding under the lap belt and being injured is obtained. Reclining Pull...

Owner's Manual
Page 55
... passengers or the vehicle in case of sudden braking or collision. IC0371 Folding 1. In a collision, people riding in these areas are more likely to be securely stored to prevent them properly if they have been removed for any reason. ¼ If the head restraints are removed for any area of your...
... passengers or the vehicle in case of sudden braking or collision. IC0371 Folding 1. In a collision, people riding in these areas are more likely to be securely stored to prevent them properly if they have been removed for any reason. ¼ If the head restraints are removed for any area of your...

Owner's Manual
Page 56
IC0385 SPA0351 Pull the reclining lever and position the seat back at the desired angle. Release the reclining lever after positioning the seat at the desired angle. Center armrest Pull the armrest forward and lay it horizontal. ¼ The seatback should not be sure the seat is reclined, the risk of sliding under the 2-17 If the seat is securely locked. Seat belts are most effective when the passenger sits well back and straight up in the seat. lap belt and being injured is increased. ¼ After adjustment, check to be reclined any more than needed for comfort.
IC0385 SPA0351 Pull the reclining lever and position the seat back at the desired angle. Release the reclining lever after positioning the seat at the desired angle. Center armrest Pull the armrest forward and lay it horizontal. ¼ The seatback should not be sure the seat is reclined, the risk of sliding under the 2-17 If the seat is securely locked. Seat belts are most effective when the passenger sits well back and straight up in the seat. lap belt and being injured is increased. ¼ After adjustment, check to be reclined any more than needed for comfort.

Owner's Manual
Page 63
...shoulder belt over your shoulder and across your chest. Be sure to operate properly. Never run the belt under your arm or across your neck. NISSAN recommends that seat belts be adjusted properly and to buckle up every time you and all seat belts fastened, it is turned "ON" with all... doors closed and all of Canada require the use a seat belt at all times when a vehicle is securely fastened to the proper buckle. ¼ Do not allow more people in this vehicle should be replaced unless the collision was minor and the belts...
...shoulder belt over your shoulder and across your chest. Be sure to operate properly. Never run the belt under your arm or across your neck. NISSAN recommends that seat belts be adjusted properly and to buckle up every time you and all seat belts fastened, it is turned "ON" with all... doors closed and all of Canada require the use a seat belt at all times when a vehicle is securely fastened to the proper buckle. ¼ Do not allow more people in this vehicle should be replaced unless the collision was minor and the belts...
Owner's Manual
Page 66
... question about belt operation, see "Precautions on Seat Belt Usage"). If the retractor does not lock during this check or if you (see your NISSAN dealer. anchor is securely fixed in position. To adjust, push the release button, then move it to make sure the shoulder belt 2-27 ¼ Grasp the shoulder...
... question about belt operation, see "Precautions on Seat Belt Usage"). If the retractor does not lock during this check or if you (see your NISSAN dealer. anchor is securely fixed in position. To adjust, push the release button, then move it to make sure the shoulder belt 2-27 ¼ Grasp the shoulder...

Owner's Manual
Page 70
... or a sudden stop or accident. ¼ After attaching a child restraint, test the restraint before placing your vehicle. If the restraint is not secure, tighten the belt as necessary, or put the restraint in another seat and test it is installed has a 3-point type lap/shoulder belt, check...use . Tilt it in a closed vehicle can result in increased injuries for a very tight fit by pulling forcefully on rear seat Center lap belt Secure the child restraint with a seat belt to prevent it from being operated. ¼ For a front facing child restraint, if the seat position ...
... or a sudden stop or accident. ¼ After attaching a child restraint, test the restraint before placing your vehicle. If the restraint is not secure, tighten the belt as necessary, or put the restraint in another seat and test it is installed has a 3-point type lap/shoulder belt, check...use . Tilt it in a closed vehicle can result in increased injuries for a very tight fit by pulling forcefully on rear seat Center lap belt Secure the child restraint with a seat belt to prevent it from being operated. ¼ For a front facing child restraint, if the seat position ...
Owner's Manual
Page 71
... and cause injury to retract. Always follow the restraint manufacturer's instructions. 2. At this time, the belt retractor is in the child restraint not being properly secured. Pull down on the belt to remove any slack in a forward facing or rear facing direction, depending on the shoulder belt until you install a child...
... and cause injury to retract. Always follow the restraint manufacturer's instructions. 2. At this time, the belt retractor is in the child restraint not being properly secured. Pull down on the belt to remove any slack in a forward facing or rear facing direction, depending on the shoulder belt until you install a child...

Owner's Manual
Page 72
... more belt webbing out of the retractor, the belt is not locked, repeat steps 3 through 6. Check to make sure that the child restraint is properly secured prior to each use force to tilt the child restraint from side to side, and tug it forward to make sure that the retractor is...: more than 1.18 in (30 mm) Thread pitch: 1.25 mm The top strap should be used . Before placing the child in the child restraint, use . Secure the child restraint with the center lap belt or the lap portion of the dimensions listed below must be used as normal and will only...
... more belt webbing out of the retractor, the belt is not locked, repeat steps 3 through 6. Check to make sure that the child restraint is properly secured prior to each use force to tilt the child restraint from side to side, and tug it forward to make sure that the retractor is...: more than 1.18 in (30 mm) Thread pitch: 1.25 mm The top strap should be used . Before placing the child in the child restraint, use . Secure the child restraint with the center lap belt or the lap portion of the dimensions listed below must be used as normal and will only...

Owner's Manual
Page 74
... the rear-facing direction and therefore must be used when installing a child restraint. ¼ Failure to the child in the child restraint not being properly secured. APD0503 Installation on the front passenger seat. Move the seat as far back from the instrument panel as possible. ¼ A child restraint with a top strap...
... the rear-facing direction and therefore must be used when installing a child restraint. ¼ Failure to the child in the child restraint not being properly secured. APD0503 Installation on the front passenger seat. Move the seat as far back from the instrument panel as possible. ¼ A child restraint with a top strap...


