
Owner's Manual
Page 1
2004 Pontiac Aztek Owner Manual Seats and Restraint Systems ...1-1 Front Seats ...1-2 Rear Seats ...1-6 Safety Belts ...1-12 Child Restraints ...1-39 Air Bag Systems ...1-61 Restraint System Check ...1-71...(s) ...3-64 M Driving Your Vehicle ...4-1 Your Driving, the Road, and Your Vehicle ...4-2 Towing ...4-34 Service and Appearance Care ...5-1 Service ...5-3 Fuel ...5-4 Checking Things Under the Hood ...5-10 All-Wheel Drive ...5-48 Bulb Replacement ...5-50 Windshield Wiper Blade Replacement ...5-56 Tires ...5-58 Appearance Care ...5-103 Vehicle Identification ...5-111 Electrical System...
2004 Pontiac Aztek Owner Manual Seats and Restraint Systems ...1-1 Front Seats ...1-2 Rear Seats ...1-6 Safety Belts ...1-12 Child Restraints ...1-39 Air Bag Systems ...1-61 Restraint System Check ...1-71...(s) ...3-64 M Driving Your Vehicle ...4-1 Your Driving, the Road, and Your Vehicle ...4-2 Towing ...4-34 Service and Appearance Care ...5-1 Service ...5-3 Fuel ...5-4 Checking Things Under the Hood ...5-10 All-Wheel Drive ...5-48 Bulb Replacement ...5-50 Windshield Wiper Blade Replacement ...5-56 Tires ...5-58 Appearance Care ...5-103 Vehicle Identification ...5-111 Electrical System...

Owner's Manual
Page 99
... it away from moving engine parts. How long should be plugged in a minimum of four hours prior to starting the engine, be damaged. Open the hood and unwrap the electrical cord. Usually, the coolant heater should you keep it was before to list everything here, we ask that particular area. If...
... it away from moving engine parts. How long should be plugged in a minimum of four hours prior to starting the engine, be damaged. Open the hood and unwrap the electrical cord. Usually, the coolant heater should you keep it was before to list everything here, we ask that particular area. If...
Owner's Manual
Page 131
...3-27. G. See Turn Signal/Multifunction Lever on page 3-15. See Exterior Lamps on page 3-13 and Interior Lamps on page 3-8. Hood Release. See Parking Brake on page 3-22. N. O. Shift Lever. See Accessory Power Outlets on page 2-25. See Fuses and ... page 3-19. T. Accessory Power Outlet. R. Side Outlets. Parking Brake. Horn. S. D. See Instrument Panel Switchbank on page 3-7. J. C. See Hood Release on page 3-6. Floor Console Fuse Block. W. Cupholders and Ashtray. Side Outlets. The main components of the instrument panel are the following: A. ...
...3-27. G. See Turn Signal/Multifunction Lever on page 3-15. See Exterior Lamps on page 3-13 and Interior Lamps on page 3-8. Hood Release. See Parking Brake on page 3-22. N. O. Shift Lever. See Accessory Power Outlets on page 2-25. See Fuses and ... page 3-19. T. Accessory Power Outlet. R. Side Outlets. Parking Brake. Horn. S. D. See Instrument Panel Switchbank on page 3-7. J. C. See Hood Release on page 3-6. Floor Console Fuse Block. W. Cupholders and Ashtray. Side Outlets. The main components of the instrument panel are the following: A. ...

Owner's Manual
Page 156
Use the knob located in the center of the air flow. 3-30 Outlet Adjustment Operation Tips • Clear away any ice, snow or leaves from the air inlets on the hood that may block the flow of air into your vehicle. • Use of non-GM approved hood deflectors may adversely affect the performance of the system. • Keep the path under the front seats clear of objects to change the direction of the outlet, to help circulate the air inside your vehicle more effectively.
Use the knob located in the center of the air flow. 3-30 Outlet Adjustment Operation Tips • Clear away any ice, snow or leaves from the air inlets on the hood that may block the flow of air into your vehicle. • Use of non-GM approved hood deflectors may adversely affect the performance of the system. • Keep the path under the front seats clear of objects to change the direction of the outlet, to help circulate the air inside your vehicle more effectively.

Owner's Manual
Page 297
... ...5-4 Gasoline Octane ...5-4 Gasoline Specifications ...5-5 California Fuel ...5-5 Additives ...5-6 Fuels in Foreign Countries ...5-6 Filling Your Tank ...5-7 Filling a Portable Fuel Container ...5-9 Checking Things Under the Hood ...5-10 Hood Release ...5-11 Engine Compartment Overview ...5-12 Engine Oil ...5-13 Engine Air Cleaner/Filter ...5-18 Automatic Transaxle Fluid ...5-20 Engine Coolant ...5-22 Radiator Pressure Cap ...5-25...
... ...5-4 Gasoline Octane ...5-4 Gasoline Specifications ...5-5 California Fuel ...5-5 Additives ...5-6 Fuels in Foreign Countries ...5-6 Filling Your Tank ...5-7 Filling a Portable Fuel Container ...5-9 Checking Things Under the Hood ...5-10 Hood Release ...5-11 Engine Compartment Overview ...5-12 Engine Oil ...5-13 Engine Air Cleaner/Filter ...5-18 Automatic Transaxle Fluid ...5-20 Engine Coolant ...5-22 Radiator Pressure Cap ...5-25...

Owner's Manual
Page 306
Be careful not to drop or spill things that burn can start a fire. Checking Things Under the Hood {CAUTION: Things that will burn onto a hot engine. {CAUTION: An electric fan under the hood can get on hot engine parts and start up and injure you even when the engine is not running. You or others could be burned. Keep hands, clothing and tools away from any underhood electric fan. 5-10 These include liquids like fuel, oil, coolant, brake fluid, windshield washer and other fluids, and plastic or rubber.
Be careful not to drop or spill things that burn can start a fire. Checking Things Under the Hood {CAUTION: Things that will burn onto a hot engine. {CAUTION: An electric fan under the hood can get on hot engine parts and start up and injure you even when the engine is not running. You or others could be burned. Keep hands, clothing and tools away from any underhood electric fan. 5-10 These include liquids like fuel, oil, coolant, brake fluid, windshield washer and other fluids, and plastic or rubber.

Owner's Manual
Page 307
...'s side of the vehicle, pull up on the hood prop. 2. At the front of the vehicle. 2. Hood Release To open the hood, do the following : 3. Pull forward on the hood prop to relieve pressure on the center of the hood. Lift the hood to release it firmly. 1. To close... it from the slot in the underside of the hood, and push the secondary hood release to its storage clip. 5. Let the hood down and close the hood, do the following : 1. Remove the hood prop from its storage...
...'s side of the vehicle, pull up on the hood prop. 2. At the front of the vehicle. 2. Hood Release To open the hood, do the following : 3. Pull forward on the hood prop to relieve pressure on the center of the hood. Lift the hood to release it firmly. 1. To close... it from the slot in the underside of the hood, and push the secondary hood release to its storage clip. 5. Let the hood down and close the hood, do the following : 1. Remove the hood prop from its storage...

Owner's Manual
Page 308
Engine Compartment Overview When you lift the hood, you'll see these items: 5-12
Engine Compartment Overview When you lift the hood, you'll see these items: 5-12

Owner's Manual
Page 322
... is no coolant, your engine if it overheats, and get everyone away from an overheated engine can burn you badly, even if you open the hood. Stop your vehicle can catch fire. The costly repairs would not be badly burned. See "Overheated Engine Protection Operating Mode" in the Index for...
... is no coolant, your engine if it overheats, and get everyone away from an overheated engine can burn you badly, even if you open the hood. Stop your vehicle can catch fire. The costly repairs would not be badly burned. See "Overheated Engine Protection Operating Mode" in the Index for...

Owner's Manual
Page 323
... normally. If you still have the overheat warning, you 're parked. Also, see or hear no steam, the problem may decide not to lift the hood but see "Overheated Engine Protection Operating Mode" listed previously in this for long periods in a traffic jam, shift to NEUTRAL (N); If your air conditioner is...
... normally. If you still have the overheat warning, you 're parked. Also, see or hear no steam, the problem may decide not to lift the hood but see "Overheated Engine Protection Operating Mode" listed previously in this for long periods in a traffic jam, shift to NEUTRAL (N); If your air conditioner is...

Owner's Manual
Page 324
A. Electric Engine Cooling Fans C. Coolant Recovery Tank 5-28 The vehicle should be parked on a level surface. If the coolant inside the coolant recovery tank is not running and can start up even when the engine is boiling, do not do anything else until it 's safe to lift the hood, here's what you'll see: {CAUTION: An electric engine cooling fan under the hood can injure you. Radiator Pressure Cap B. Cooling System When you decide it cools down. Keep hands, clothing and tools away from any underhood electric fan.
A. Electric Engine Cooling Fans C. Coolant Recovery Tank 5-28 The vehicle should be parked on a level surface. If the coolant inside the coolant recovery tank is not running and can start up even when the engine is boiling, do not do anything else until it 's safe to lift the hood, here's what you'll see: {CAUTION: An electric engine cooling fan under the hood can injure you. Radiator Pressure Cap B. Cooling System When you decide it cools down. Keep hands, clothing and tools away from any underhood electric fan.
Owner's Manual
Page 339
... electric fan can start up to access your radio! 4. Unplug unnecessary accessories plugged into the cigarette lighter or in the accessory power outlet(s). Open the hoods and locate the batteries. Your vehicle has a remote positive (+) jump starting your vehicle. 3. Flip the cap up even when the engine is located under a tethered...
... electric fan can start up to access your radio! 4. Unplug unnecessary accessories plugged into the cigarette lighter or in the accessory power outlet(s). Open the hoods and locate the batteries. Your vehicle has a remote positive (+) jump starting your vehicle. 3. Flip the cap up even when the engine is located under a tethered...
Owner's Manual
Page 347
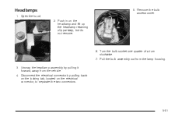
Turn the bulb socket one-quarter of a turn clockwise. 7. Disconnect the electrical connector by pulling it forward, away from the lamp housing. 3. Headlamps 1. Unsnap the headlamp assembly by pulling back on the locking tab, located on the headlamp and lift up the headlamp retaining clip partway, but do not remove. 5. Open the hood. 2. Push in on the electrical connector, to separate the two connectors. 5-51 Pull the bulb assembly out from the vehicle. 4. Remove the bulb access cover. 6.
Turn the bulb socket one-quarter of a turn clockwise. 7. Disconnect the electrical connector by pulling it forward, away from the lamp housing. 3. Headlamps 1. Unsnap the headlamp assembly by pulling back on the locking tab, located on the headlamp and lift up the headlamp retaining clip partway, but do not remove. 5. Open the hood. 2. Push in on the electrical connector, to separate the two connectors. 5-51 Pull the bulb assembly out from the vehicle. 4. Remove the bulb access cover. 6.

Owner's Manual
Page 349
... the plastic socket on the socket with the gaps in Step 2. 5-53 Push down until a click is heard (the tab popping back out). 8. Open the hood. 2. Front Turn Signal, Sidemarker and Parking Lamps 1.
... the plastic socket on the socket with the gaps in Step 2. 5-53 Push down until a click is heard (the tab popping back out). 8. Open the hood. 2. Front Turn Signal, Sidemarker and Parking Lamps 1.
Owner's Manual
Page 423
... that streak or miss areas of the windshield. (e) Make sure the safety belt reminder light and all key lock cylinders, hood latch assemblies, secondary latches, pivots, spring anchor and release pawl, hood and door hinges, rear folding seats and liftgate hinges. To help ensure proper operation, a pressure test of the cooling system...
... that streak or miss areas of the windshield. (e) Make sure the safety belt reminder light and all key lock cylinders, hood latch assemblies, secondary latches, pivots, spring anchor and release pawl, hood and door hinges, rear folding seats and liftgate hinges. To help ensure proper operation, a pressure test of the cooling system...
Owner's Manual
Page 428
..., in Canada 10953474). Usage Usage Key Lock Cylinders Carrier Assembly - Differential (Rear Drive Module) and Transfer Case (Power Transfer Unit) Hood Latch Assembly, Secondary Latch, Pivots, Spring Anchor and Release Pawl Hood and Door Hinges, Rear Folding Seat Weatherstrip Conditioning Fluid/Lubricant Multi-Purpose Lubricant, Superlube (GM Part No. U.S. 12346293, in Canada...
..., in Canada 10953474). Usage Usage Key Lock Cylinders Carrier Assembly - Differential (Rear Drive Module) and Transfer Case (Power Transfer Unit) Hood Latch Assembly, Secondary Latch, Pivots, Spring Anchor and Release Pawl Hood and Door Hinges, Rear Folding Seat Weatherstrip Conditioning Fluid/Lubricant Multi-Purpose Lubricant, Superlube (GM Part No. U.S. 12346293, in Canada...
Owner's Manual
Page 449
Check Engine Light ...3-39 Tire Pressure System ...5-67 Checking Coolant ...5-24 Checking Engine Oil ...5-13 Checking Things Under the Hood ...5-10 Checking Your Restraint Systems ...1-71 Chemical Paint Spotting ...5-109 Child Restraints Child Restraint Systems ...1-45 Infants and Young Children ...1-41 Lower Anchorages and Top ...
Check Engine Light ...3-39 Tire Pressure System ...5-67 Checking Coolant ...5-24 Checking Engine Oil ...5-13 Checking Things Under the Hood ...5-10 Checking Your Restraint Systems ...1-71 Chemical Paint Spotting ...5-109 Child Restraints Child Restraint Systems ...1-45 Infants and Young Children ...1-41 Lower Anchorages and Top ...
Owner's Manual
Page 453
... Parking Lamps ...5-53 Halogen Bulbs ...5-50 Headphones ...3-103 Head-Up Display (HUD) ...3-20 Heated Seats ...1-3 Highway Hypnosis ...4-26 Hill and Mountain Roads ...4-26 Hitches ...4-45 Hood Checking Things Under ...5-10 Release ...5-11 Horn ...3-7 How to Add Automatic Transaxle Fluid ...5-22 How to Add Coolant to the Coolant Recovery Tank ...5-30 How...
... Parking Lamps ...5-53 Halogen Bulbs ...5-50 Headphones ...3-103 Head-Up Display (HUD) ...3-20 Heated Seats ...1-3 Highway Hypnosis ...4-26 Hill and Mountain Roads ...4-26 Hitches ...4-45 Hood Checking Things Under ...5-10 Release ...5-11 Horn ...3-7 How to Add Automatic Transaxle Fluid ...5-22 How to Add Coolant to the Coolant Recovery Tank ...5-30 How...

