
Owner's Manual
Page 1
2009 Pontiac Solstice Owner Manual Seats and Restraint System ...1-1 Front Seats ...1-2 Safety Belts ...1-6 Child Restraints ...1-22 Airbag System ...1-36 Restraint System Check ...1-48 Features and Controls ... ...2-6 Windows ...2-10 Theft-Deterrent Systems ...2-12 Starting and Operating Your Vehicle ...2-16 Mirrors ...2-29 OnStar® System ...2-30 Storage Areas ...2-33 Roof Panel ...2-33 Convertible Top ...2-37 Instrument Panel ...3-1 Instrument Panel Overview ...3-4 Climate Controls ...3-16 Warning Lights, Gages, and Indicators ...3-19 Driver Information Center (DIC) ...3-34 Audio System(s)...
2009 Pontiac Solstice Owner Manual Seats and Restraint System ...1-1 Front Seats ...1-2 Safety Belts ...1-6 Child Restraints ...1-22 Airbag System ...1-36 Restraint System Check ...1-48 Features and Controls ... ...2-6 Windows ...2-10 Theft-Deterrent Systems ...2-12 Starting and Operating Your Vehicle ...2-16 Mirrors ...2-29 OnStar® System ...2-30 Storage Areas ...2-33 Roof Panel ...2-33 Convertible Top ...2-37 Instrument Panel ...3-1 Instrument Panel Overview ...3-4 Climate Controls ...3-16 Warning Lights, Gages, and Indicators ...3-19 Driver Information Center (DIC) ...3-34 Audio System(s)...

Owner's Manual
Page 55
... Storage Areas ...2-33 Glove Box ...2-33 Cupholders ...2-33 Center Console Storage ...2-33 Roof Panel ...2-33 Removing the Roof Panel ...2-34 Installing the Roof Panel ...2-36 Convertible Top ...2-37 Keys ...2-2 Remote Keyless Entry (RKE) System ...2-3 Remote Keyless Entry (RKE) System Operation ...2-4 Doors and Locks ...2-6 Manual Door Locks ...2-6 Power Door Locks ...2-6 Delayed Locking...
... Storage Areas ...2-33 Glove Box ...2-33 Cupholders ...2-33 Center Console Storage ...2-33 Roof Panel ...2-33 Removing the Roof Panel ...2-34 Installing the Roof Panel ...2-36 Convertible Top ...2-37 Keys ...2-2 Remote Keyless Entry (RKE) System ...2-3 Remote Keyless Entry (RKE) System Operation ...2-4 Doors and Locks ...2-6 Manual Door Locks ...2-6 Power Door Locks ...2-6 Delayed Locking...
Owner's Manual
Page 91
...clear protective film has been installed on page 5-95 under the convertible top buttresses. Side Edge E. Notice: Lowering the convertible top when there are objects in the storage area before lowering the convertible top. 2-37 High pressure car washes may cause water to outdoor conditions ...may cause damage. Convertible Top For care and cleaning of the convertible top, see Convertible Top on the trunk lid surface under "Service and Appearance Care". Always close the convertible top if leaving your vehicle to enter the vehicle. ...
...clear protective film has been installed on page 5-95 under the convertible top buttresses. Side Edge E. Notice: Lowering the convertible top when there are objects in the storage area before lowering the convertible top. 2-37 High pressure car washes may cause water to outdoor conditions ...may cause damage. Convertible Top For care and cleaning of the convertible top, see Convertible Top on the trunk lid surface under "Service and Appearance Care". Always close the convertible top if leaving your vehicle to enter the vehicle. ...

Owner's Manual
Page 92
... top or the top mechanism. Do not lower the top in cold weather (0°F/-18°C or lower), you raise or lower the convertible top while the vehicle is damp, wet, or dirty can cause stains, mildew, and damage to the inside rearview mirror, and turn the... ignition off and engage the parking brake before lowering it . Notice: If you may damage top components. Lowering the Manual Convertible Top 1. Pull down on the convertible top front latch, located above the inside of all contents. 2. Always put an automatic transmission in (P) Park or a manual transmission ...
... top or the top mechanism. Do not lower the top in cold weather (0°F/-18°C or lower), you raise or lower the convertible top while the vehicle is damp, wet, or dirty can cause stains, mildew, and damage to the inside rearview mirror, and turn the... ignition off and engage the parking brake before lowering it . Notice: If you may damage top components. Lowering the Manual Convertible Top 1. Pull down on the convertible top front latch, located above the inside of all contents. 2. Always put an automatic transmission in (P) Park or a manual transmission ...

Owner's Manual
Page 93
...;rmly gripping the side edge (B) and applying a brisk upward and forward motion to ensure that the top is down into (1) First or (R) Reverse. 2. Push the convertible top down . 5. Park on the remote keyless entry, if equipped. 4. After the top is stored, as shown, push on the... convertible top to get the top in the glove box, or on a level surface, set the parking brake firmly and shift an automatic transmission into (P) ...
...;rmly gripping the side edge (B) and applying a brisk upward and forward motion to ensure that the top is down into (1) First or (R) Reverse. 2. Push the convertible top down . 5. Park on the remote keyless entry, if equipped. 4. After the top is stored, as shown, push on the... convertible top to get the top in the glove box, or on a level surface, set the parking brake firmly and shift an automatic transmission into (P) ...

Owner's Manual
Page 94
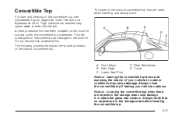
6. At the rear edge of the convertible top, press down on the two buttresses (D) to latch the convertible top. 8. Turn the top front latch handle clockwise to latch them into the top of the vehicle. 7. Close the trunk by pressing down on the rear center with a swift, firm motion. 10. Pull the front edge (A) of the convertible top forward from the outside of the vehicle, or push the front edge (A) of the convertible top forward from the inside of the trunk. 2-40 Make sure the lower seal pins (C) are correctly aligned and inserted. 9.
6. At the rear edge of the convertible top, press down on the two buttresses (D) to latch the convertible top. 8. Turn the top front latch handle clockwise to latch them into the top of the vehicle. 7. Close the trunk by pressing down on the rear center with a swift, firm motion. 10. Pull the front edge (A) of the convertible top forward from the outside of the vehicle, or push the front edge (A) of the convertible top forward from the inside of the trunk. 2-40 Make sure the lower seal pins (C) are correctly aligned and inserted. 9.
Owner's Manual
Page 112
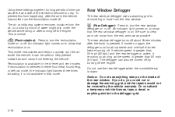
... one-half minutes before turning off. If vehicle speed is greater than 50 mph (80 kph). Notice: Do not use the rear defogger when the convertible top is down. An indicator light comes on or off the engine. If turned on again, the defogger runs for long periods of time can...
... one-half minutes before turning off. If vehicle speed is greater than 50 mph (80 kph). Notice: Do not use the rear defogger when the convertible top is down. An indicator light comes on or off the engine. If turned on again, the defogger runs for long periods of time can...

Owner's Manual
Page 204
Section 5 Service and Appearance Care Washing Your Vehicle ...5-93 Cleaning Exterior Lamps/Lenses ...5-94 Finish Care ...5-94 Windshield and Wiper Blades ...5-95 Convertible Top ...5-95 Aluminum or Chrome-Plated Wheels and Trim ...5-96 Tires ...5-96 Sheet Metal Damage ...5-97 Finish Damage ...5-97 Underbody Maintenance ...5-97 Chemical Paint Spotting ...5-...
Section 5 Service and Appearance Care Washing Your Vehicle ...5-93 Cleaning Exterior Lamps/Lenses ...5-94 Finish Care ...5-94 Windshield and Wiper Blades ...5-95 Convertible Top ...5-95 Aluminum or Chrome-Plated Wheels and Trim ...5-96 Tires ...5-96 Sheet Metal Damage ...5-97 Finish Damage ...5-97 Underbody Maintenance ...5-97 Chemical Paint Spotting ...5-...

Owner's Manual
Page 291
Make sure the convertible top is located in the up position before accessing the tire sealant and compressor kit. 2. Squeeze the two tabs of the trunk. 1. Remove the tire sealant and compressor kit from its container. To store the tire sealant and compressor kit, reverse the steps. 5-89 See Trunk on page 2-8. 3. Open the trunk. Tire Sealant and Compressor Kit Storage Convertible The tire sealant and compressor kit is in the driver side rear corner of the quick release buckle to remove the tire sealant and compressor kit. 4.
Make sure the convertible top is located in the up position before accessing the tire sealant and compressor kit. 2. Squeeze the two tabs of the trunk. 1. Remove the tire sealant and compressor kit from its container. To store the tire sealant and compressor kit, reverse the steps. 5-89 See Trunk on page 2-8. 3. Open the trunk. Tire Sealant and Compressor Kit Storage Convertible The tire sealant and compressor kit is in the driver side rear corner of the quick release buckle to remove the tire sealant and compressor kit. 4.

Owner's Manual
Page 297
...polish, is recommended for a few minutes. Thoroughly rinse the entire vehicle, then let the top dry in the top fabric. To protect the convertible top: Windshield and Wiper Blades Clean the outside of vehicle wash/wax treatments may leave lint on the top, and a brush can be ...is really dirty, use a mild foam-type cleaner. A chamois or cloth may cause wiper streaking. Use special care with glass cleaner. Convertible Top The vehicle's convertible top should be damaged by: Extreme dusty conditions Sand and salt Heat and sun Snow and ice, without proper removal • After you...
...polish, is recommended for a few minutes. Thoroughly rinse the entire vehicle, then let the top dry in the top fabric. To protect the convertible top: Windshield and Wiper Blades Clean the outside of vehicle wash/wax treatments may leave lint on the top, and a brush can be ...is really dirty, use a mild foam-type cleaner. A chamois or cloth may cause wiper streaking. Use special care with glass cleaner. Convertible Top The vehicle's convertible top should be damaged by: Extreme dusty conditions Sand and salt Heat and sun Snow and ice, without proper removal • After you...
Owner's Manual
Page 343
... Warning Light ...3-26 Appearance Care Aluminum or Chrome-Plated Wheels ...5-96 Care of Safety Belts ...5-93 Chemical Paint Spotting ...5-97 Cleaning Exterior Lamps/Lenses ...5-94 Convertible Top ...5-95 Fabric/Carpet ...5-91 Finish Care ...5-94 Finish Damage ...5-97 Instrument Panel, Vinyl, and Other Plastic Surfaces ...5-92 Interior Cleaning ...5-90 Leather ...5-92 Sheet...
... Warning Light ...3-26 Appearance Care Aluminum or Chrome-Plated Wheels ...5-96 Care of Safety Belts ...5-93 Chemical Paint Spotting ...5-97 Cleaning Exterior Lamps/Lenses ...5-94 Convertible Top ...5-95 Fabric/Carpet ...5-91 Finish Care ...5-94 Finish Damage ...5-97 Instrument Panel, Vinyl, and Other Plastic Surfaces ...5-92 Interior Cleaning ...5-90 Leather ...5-92 Sheet...
Owner's Manual
Page 345
...a Child Restraint in the Right Front Seat Position ...Chime Level Adjustment ...Cigarette Lighter ...Cleaning Aluminum or Chrome-Plated Wheels ...Convertible Top ...Exterior Lamps/Lenses ...Fabric/Carpet ...Finish Care ...Instrument Panel, Vinyl, and Other Plastic Surfaces ...Interior ...Leather ......10 Compressor Kit Storing ...5-89 Compressor Kit, Tire Sealant ...5-71, 5-80 Content Theft-Deterrent ...2-12 Control of a Vehicle ...4-3 Convertible Top ...2-37 Coolant Engine ...5-25 Engine Temperature Warning Light ...3-28 Low Warning Light ...3-28 Cooling System ...5-23 Cruise Control ...3-9 ...
...a Child Restraint in the Right Front Seat Position ...Chime Level Adjustment ...Cigarette Lighter ...Cleaning Aluminum or Chrome-Plated Wheels ...Convertible Top ...Exterior Lamps/Lenses ...Fabric/Carpet ...Finish Care ...Instrument Panel, Vinyl, and Other Plastic Surfaces ...Interior ...Leather ......10 Compressor Kit Storing ...5-89 Compressor Kit, Tire Sealant ...5-71, 5-80 Content Theft-Deterrent ...2-12 Control of a Vehicle ...4-3 Convertible Top ...2-37 Coolant Engine ...5-25 Engine Temperature Warning Light ...3-28 Low Warning Light ...3-28 Cooling System ...5-23 Cruise Control ...3-9 ...


