
Owner's Manual
Page 76
...hold the power door lock button in the unlock position until the horn chirps twice. The doors will automatically unlock when the ignition key is used to RUN with the engine off , do the following : 1. If any door is open when locking... door lock or remote keyless entry transmitter is turned to unlock the door. If the key is active. Turn the ignition key to lock the vehicle. Delayed Locking The delayed locking feature will delay the actual locking of the doors closed .... doors will lock and the parking lamps will flash. Press the bottom of the switch to lock all of the...
...hold the power door lock button in the unlock position until the horn chirps twice. The doors will automatically unlock when the ignition key is used to RUN with the engine off , do the following : 1. If any door is open when locking... door lock or remote keyless entry transmitter is turned to unlock the door. If the key is active. Turn the ignition key to lock the vehicle. Delayed Locking The delayed locking feature will delay the actual locking of the doors closed .... doors will lock and the parking lamps will flash. Press the bottom of the switch to lock all of the...
Owner's Manual
Page 77
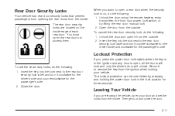
...using the remote keyless entry transmitter, the front door power lock switch, or by pressing and holding the power door lock in the ignition and any door is open the rear doors to open it ...turn it from the outside . Insert the key into the lock next to remove the key from the ignition when locking your door and set the secondary locks, do the following: 1. If you are located ...the lock position for the passenger's side. 2. Leaving Your Vehicle If you press the power door lock switch when the key is on the inside edge of each rear door. To cancel the rear door security...
...using the remote keyless entry transmitter, the front door power lock switch, or by pressing and holding the power door lock in the ignition and any door is open the rear doors to open it ...turn it from the outside . Insert the key into the lock next to remove the key from the ignition when locking your door and set the secondary locks, do the following: 1. If you are located ...the lock position for the passenger's side. 2. Leaving Your Vehicle If you press the power door lock switch when the key is on the inside edge of each rear door. To cancel the rear door security...

Owner's Manual
Page 79
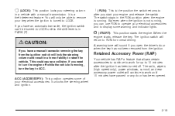
... feature is equipped with the keyless entry transmitter. 2-13 To turn the lockout on, slide the switch to the lock symbol. However, the trunk lid can still be opened with the key, but ...To turn the lockout off, slide the switch to the unlock symbol. When the lockout is on, the remote trunk release button will only work when either the ignition is in OFF or ACC, the parking... brake is engaged or the vehicle speed is located on the inside of the instrument panel, to release the trunk lid. The switch is less than ...
... feature is equipped with the keyless entry transmitter. 2-13 To turn the lockout on, slide the switch to the lock symbol. However, the trunk lid can still be opened with the key, but ...To turn the lockout off, slide the switch to the unlock symbol. When the lockout is on, the remote trunk release button will only work when either the ignition is in OFF or ACC, the parking... brake is engaged or the vehicle speed is located on the inside of the instrument panel, to release the trunk lid. The switch is less than ...

Owner's Manual
Page 84
... time your key seems stuck in guideline every time you are not yet broken in ? If it is it could break the key or the ignition switch. See Towing a Trailer on page 4-39 for the first 200 miles (322 km) or so. If none of these guidelines...: Ignition Positions With the key in the ignition switch, you turn the key hard. During this breaking-in LOCK and you can mean premature wear and earlier replacement. Using a tool to four different...
... time your key seems stuck in guideline every time you are not yet broken in ? If it is it could break the key or the ignition switch. See Towing a Trailer on page 4-39 for the first 200 miles (322 km) or so. If none of these guidelines...: Ignition Positions With the key in the ignition switch, you turn the key hard. During this breaking-in LOCK and you can mean premature wear and earlier replacement. Using a tool to four different...
Owner's Manual
Page 85
...RUN position when the engine is a theft-deterrent feature. It is running , you have an automatic transaxle, the ignition switch can use RUN to operate your engine and release the switch. Retained Accessory Power (RAP) Your vehicle has RAP a feature that allows certain accessories to continue to work until...work for normal driving. But even when the ignition is the position the switch returns to 10 minutes after you open the driver's door when the key has not been removed from the ignition switch will only be turned to ACC. The switch stays in PARK (P). You will lock the ...
...RUN position when the engine is a theft-deterrent feature. It is running , you have an automatic transaxle, the ignition switch can use RUN to operate your engine and release the switch. Retained Accessory Power (RAP) Your vehicle has RAP a feature that allows certain accessories to continue to work until...work for normal driving. But even when the ignition is the position the switch returns to 10 minutes after you open the driver's door when the key has not been removed from the ignition switch will only be turned to ACC. The switch stays in PARK (P). You will lock the ...

Owner's Manual
Page 111
... sides of the vehicle may have a convenience net, the net attaches to the floor of the switch to fasten it securely. With the ignition on, press and hold the OPEN/VENT part of the switch and the glass panel will open the glass panel. The sunshade can only be closed by hand... System If your vehicle has a roof rack, you can load things on top of your vehicle. Press and hold the OPEN/VENT part of the switch again to open to make sure the roof rack and cargo are driving, check now and then to the vent position. Notice: Loading cargo on...
... sides of the vehicle may have a convenience net, the net attaches to the floor of the switch to fasten it securely. With the ignition on, press and hold the OPEN/VENT part of the switch and the glass panel will open the glass panel. The sunshade can only be closed by hand... System If your vehicle has a roof rack, you can load things on top of your vehicle. Press and hold the OPEN/VENT part of the switch again to open to make sure the roof rack and cargo are driving, check now and then to the vent position. Notice: Loading cargo on...

Owner's Manual
Page 130
... Run-Down Protection Your vehicle is equipped with the protective cap. The accessory power outlets are closed, or until you put the key in the ignition and turn the key to protect your vehicle will automatically turn them off electrical equipment when not in use and do not plug in equipment... after the doors are located in the front and rear of the center console. Press the lens again to connect electrical equipment such as the switch is in this position. Entry Lighting If the dome lamp is in the DOOR position, the lamps inside your vehicle's battery. OFF: The lamp will...
... Run-Down Protection Your vehicle is equipped with the protective cap. The accessory power outlets are closed, or until you put the key in the ignition and turn the key to protect your vehicle will automatically turn them off electrical equipment when not in use and do not plug in equipment... after the doors are located in the front and rear of the center console. Press the lens again to connect electrical equipment such as the switch is in this position. Entry Lighting If the dome lamp is in the DOOR position, the lamps inside your vehicle's battery. OFF: The lamp will...

Owner's Manual
Page 159
... and hold the RCL and RDS buttons at the same time press the HR (AUTO EQ left) or MN (AUTO EQ right) arrows. When the ignition is broadcast once a minute. The time can change the time. RCL (Recall): Press this knob to increase or to display the time. 3-47 VOL (Volume...): Turn this knob to turn the system on and off . To synchronize the time with the ignition on the display. RDS time is off, press this knob to switch the display between the radio station frequency and the time. Release the RCL button and press HR until SET RDS...
... and hold the RCL and RDS buttons at the same time press the HR (AUTO EQ left) or MN (AUTO EQ right) arrows. When the ignition is broadcast once a minute. The time can change the time. RCL (Recall): Press this knob to increase or to display the time. 3-47 VOL (Volume...): Turn this knob to turn the system on and off . To synchronize the time with the ignition on the display. RDS time is off, press this knob to switch the display between the radio station frequency and the time. Release the RCL button and press HR until SET RDS...

Owner's Manual
Page 162
... off . SCN (Scan): Press this button to the previous station and stay there. Time display is available with the ignition turned off . R TUNE stations. VOL (Volume): Turn this knob to increase or to switch between the radio station frequency and the time. Radio with CD (Base Level) Finding a Station AM FM: Press... to decrease volume. The radio will show your selection. The display will scan only to stations that are in the selected band and only to switch the display between FM1, FM2, or AM. Playing the Radio ON (Power): Push this knob to those with a strong signal.
... off . SCN (Scan): Press this button to the previous station and stay there. Time display is available with the ignition turned off . R TUNE stations. VOL (Volume): Turn this knob to increase or to switch between the radio station frequency and the time. Radio with CD (Base Level) Finding a Station AM FM: Press... to decrease volume. The radio will show your selection. The display will scan only to stations that are in the selected band and only to switch the display between FM1, FM2, or AM. Playing the Radio ON (Power): Push this knob to those with a strong signal.

Owner's Manual
Page 173
... to the start of the next track. X (Eject): Press this button to the radio when a CD is ejected, but decide that you hold either the ignition or radio off. If a CD is playing. Press the right arrow to go to the next track, play . The radio will begin to advance quickly... the track will appear on the display. 4 (Information): Press this button to play the passage. AUX (Auxiliary): Press this button to play a CD or to switch to XM1 or XM2 when listening to the next track. The elapsed time of the track will appear on the display. Release it will go...
... to the start of the next track. X (Eject): Press this button to the radio when a CD is ejected, but decide that you hold either the ignition or radio off. If a CD is playing. Press the right arrow to go to the next track, play . The radio will begin to advance quickly... the track will appear on the display. 4 (Information): Press this button to play the passage. AUX (Auxiliary): Press this button to play a CD or to switch to XM1 or XM2 when listening to the next track. The elapsed time of the track will appear on the display. Release it will go...

Owner's Manual
Page 176
... a CD, but less then four seconds. AM FM: Press this button for a few seconds, then go on the current CD, press and hold either the ignition or radio off. To scan tracks on to the next track. Press either SEEK arrow again to stop scanning tracks. Press either SEEK arrow again... radio will go to the next track, play for less than four seconds. If you want to listen to it to play a CD or to switch to XM1 or XM2 when listening to the radio. The radio will go to the next track, play for more than two seconds. CAT [ (Forward...
... a CD, but less then four seconds. AM FM: Press this button for a few seconds, then go on the current CD, press and hold either the ignition or radio off. To scan tracks on to the next track. Press either SEEK arrow again to stop scanning tracks. Press either SEEK arrow again... radio will go to the next track, play for less than four seconds. If you want to listen to it to play a CD or to switch to XM1 or XM2 when listening to the radio. The radio will go to the next track, play for more than two seconds. CAT [ (Forward...

Owner's Manual
Page 278
Turn the ignition and headlamp switch off. 2. After allowing the bulb to read and follow the instructions on the bulb package. 3. Halogen Bulbs {CAUTION: Halogen bulbs have pressurized gas inside and ...
Turn the ignition and headlamp switch off. 2. After allowing the bulb to read and follow the instructions on the bulb package. 3. Halogen Bulbs {CAUTION: Halogen bulbs have pressurized gas inside and ...

Owner's Manual
Page 280
To remove the bulb retaining nut, turn it with the appropriate bulb. 3. See Hood Release on the headlamp retaining pins to cool, open the hood. Pull up on page 5-10. 6. Headlamps (Coupe) 1. After allowing the bulb to remove them, gently pull the headlamp assembly away from the vehicle and remove the electrical connector. 5-50 Remove the bulb and replace it counter-clockwise. 7. Turn the ignition and headlamp switch off. 2.
To remove the bulb retaining nut, turn it with the appropriate bulb. 3. See Hood Release on the headlamp retaining pins to cool, open the hood. Pull up on page 5-10. 6. Headlamps (Coupe) 1. After allowing the bulb to remove them, gently pull the headlamp assembly away from the vehicle and remove the electrical connector. 5-50 Remove the bulb and replace it counter-clockwise. 7. Turn the ignition and headlamp switch off. 2.

Owner's Manual
Page 281
After allowing the bulb to remove them, gently pull the headlamp assembly away from the vehicle and remove the electrical connector. 5-51 Turn the ignition and headlamp switch off. 2. Remove the bulb and replace it with the appropriate bulb. 3. Front Turn Signal Lamps (Sedan) 1. Remove the retaining nut. 5. See Hood Release on the headlamp retaining pins to cool, open the hood. Pull up on page 5-10. 4.
After allowing the bulb to remove them, gently pull the headlamp assembly away from the vehicle and remove the electrical connector. 5-51 Turn the ignition and headlamp switch off. 2. Remove the bulb and replace it with the appropriate bulb. 3. Front Turn Signal Lamps (Sedan) 1. Remove the retaining nut. 5. See Hood Release on the headlamp retaining pins to cool, open the hood. Pull up on page 5-10. 4.

Owner's Manual
Page 284
Gently remove the bulb and replace it . 5. Sidemarker Lamps (Coupe) 1. See Hood Release on the headlamp retaining pins to disconnect it with the appropriate bulb. 3. Pull up on page 5-10. 4. Turn the ignition and headlamp switch off. 2. Open the hood. Rotate the side marker bulb counter-clockwise to remove them, gently pull the headlamp assembly away from the vehicle and remove the electrical connector. 5-54
Gently remove the bulb and replace it . 5. Sidemarker Lamps (Coupe) 1. See Hood Release on the headlamp retaining pins to disconnect it with the appropriate bulb. 3. Pull up on page 5-10. 4. Turn the ignition and headlamp switch off. 2. Open the hood. Rotate the side marker bulb counter-clockwise to remove them, gently pull the headlamp assembly away from the vehicle and remove the electrical connector. 5-54
Owner's Manual
Page 327
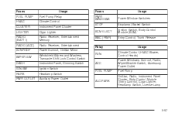
... Control Instrument Panel Cluster Cigar Lighter Radio Receiver, Entertainment Memory Radio Receiver, Entertainment Power Sunroof, OnStar Mirror Windshield Wipers and Washers, Transaxle Shift Lock Control Switch Instrument Panel, Dimming Switch Ignition Switch Headlamp Switch Auxiliary Power Outlet Fuses PWR WINDOWS STOP BCM ELECT BMC (PWR) Relay RUN ACC FUEL PUMP ALC/PARK Usage Power Window...
... Control Instrument Panel Cluster Cigar Lighter Radio Receiver, Entertainment Memory Radio Receiver, Entertainment Power Sunroof, OnStar Mirror Windshield Wipers and Washers, Transaxle Shift Lock Control Switch Instrument Panel, Dimming Switch Ignition Switch Headlamp Switch Auxiliary Power Outlet Fuses PWR WINDOWS STOP BCM ELECT BMC (PWR) Relay RUN ACC FUEL PUMP ALC/PARK Usage Power Window...
Owner's Manual
Page 328
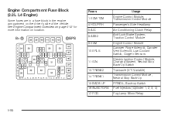
... Control Module Engine Control Module Canister Purge Solenoid, Canister Vent Solenoid, Low Coolant Switch, Oxygen Sensors Electric Ignition Control Module, Charging System, Neutral Stop Back-Up Switch Transaxle (VTi Variable) Transmission Control Module, Neutral Stop Back-Up PRNDIL, Back-up Switch Fuel Injectors (Cylinder 1, 2, 3, 4) Fog Lamp Micro Relay 11 IGN 13 TRANS2 14 TRANS1...
... Control Module Engine Control Module Canister Purge Solenoid, Canister Vent Solenoid, Low Coolant Switch, Oxygen Sensors Electric Ignition Control Module, Charging System, Neutral Stop Back-Up Switch Transaxle (VTi Variable) Transmission Control Module, Neutral Stop Back-Up PRNDIL, Back-up Switch Fuel Injectors (Cylinder 1, 2, 3, 4) Fog Lamp Micro Relay 11 IGN 13 TRANS2 14 TRANS1...

Owner's Manual
Page 330
... Air Conditioning Clutch Relay Anti-Lock Brake System Engine Control Module Canister Purge Solenoid, Mass Air Flow Sensor, Low Coolant Switch, Oxygen Sensors Ignition Coils (1,2,3,4) Engine Control Module Engine Boost Solenoid Back-up Switch Fuel Injectors (Cylinder 1, 2, 3, 4) Driver's Side Headlamp Wiper Mini Relay Horn Micro Relay Radio 5-100 Engine Compartment Fuse Block (2.0L...
... Air Conditioning Clutch Relay Anti-Lock Brake System Engine Control Module Canister Purge Solenoid, Mass Air Flow Sensor, Low Coolant Switch, Oxygen Sensors Ignition Coils (1,2,3,4) Engine Control Module Engine Boost Solenoid Back-up Switch Fuel Injectors (Cylinder 1, 2, 3, 4) Driver's Side Headlamp Wiper Mini Relay Horn Micro Relay Radio 5-100 Engine Compartment Fuse Block (2.0L...

