
Owner's Manual
Page 74
... vehicle is shifted out of the doors closed. Press the bottom of the switch to unlock the doors. Delayed Locking This feature will be heard signaling that the delayed locking feature is greater than 5 mph (8 km/h) for vehicles with a manual transaxle. Power Door Locks Press the top of... the switch to lock the doors. Programmable Automatic Door Locks With this feature will automatically unlock when the ignition is turned off. Turn the ignition to RUN with the engine off and all of the doors closed , all of PARK (P) for vehicles with an automatic transaxle...
... vehicle is shifted out of the doors closed. Press the bottom of the switch to unlock the doors. Delayed Locking This feature will be heard signaling that the delayed locking feature is greater than 5 mph (8 km/h) for vehicles with a manual transaxle. Power Door Locks Press the top of... the switch to lock the doors. Programmable Automatic Door Locks With this feature will automatically unlock when the ignition is turned off. Turn the ignition to RUN with the engine off and all of the doors closed , all of PARK (P) for vehicles with an automatic transaxle...
Owner's Manual
Page 109
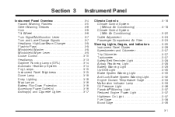
... Highbeam On Light ...3-37 Fuel Gage ...3-38 Boost Gage ...3-39 3-1 Instrument Panel Overview ...3-4 Hazard Warning Flashers ...3-5 Other Warning Devices ...3-6 Horn ...3-6 Tilt Wheel ...3-6 Turn Signal/Multifunction Lever ...3-7 Turn and Lane-Change Signals ...3-7 Headlamp High/Low-Beam Changer ...3-8 Flash-to-Pass ...3-8 Windshield Washer ...3-8 Windshield Wiper Lever ...3-9 Cruise Control ...3-10 Headlamps ...3-13 Daytime Running Lamps (DRL) ...3-14...
... Highbeam On Light ...3-37 Fuel Gage ...3-38 Boost Gage ...3-39 3-1 Instrument Panel Overview ...3-4 Hazard Warning Flashers ...3-5 Other Warning Devices ...3-6 Horn ...3-6 Tilt Wheel ...3-6 Turn Signal/Multifunction Lever ...3-7 Turn and Lane-Change Signals ...3-7 Headlamp High/Low-Beam Changer ...3-8 Flash-to-Pass ...3-8 Windshield Washer ...3-8 Windshield Wiper Lever ...3-9 Cruise Control ...3-10 Headlamps ...3-13 Daytime Running Lamps (DRL) ...3-14...
Owner's Manual
Page 113
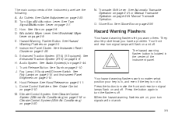
...page 3-44. M. See Automatic Transaxle Operation on page 2-21 or Manual Transaxle Operation on and off. Your front and rear turn signal lamps flash on page 3-7. The hazard warning flasher button is not in the center of the instrument panel .... Glove Box. See Climate Control System (Without Air Conditioning) on page 3-18 or Climate Control System (With Air Conditioning) on page 5-11. Turn Signal/Multifunction Lever. Horn. D. Windshield Wiper Lever. Instrument Panel Cluster. I. J. Hood Release. See Hood Release on page 3-20. L. Cruise Control ...
...page 3-44. M. See Automatic Transaxle Operation on page 2-21 or Manual Transaxle Operation on and off. Your front and rear turn signal lamps flash on page 3-7. The hazard warning flasher button is not in the center of the instrument panel .... Glove Box. See Climate Control System (Without Air Conditioning) on page 3-18 or Climate Control System (With Air Conditioning) on page 5-11. Turn Signal/Multifunction Lever. Horn. D. Windshield Wiper Lever. Instrument Panel Cluster. I. J. Hood Release. See Hood Release on page 3-20. L. Cruise Control ...

Owner's Manual
Page 115
... flash. The lever will flash in the direction of the steering column includes the following: Turn and Lane-Change Signals Headlamps Headlamp High/Low-Beam Changer Flash-to signal a turn or a lane change . When the turn signal has two upward (for right) and two downward (for burned-out bulbs. 3-7 For additional information on page...
... flash. The lever will flash in the direction of the steering column includes the following: Turn and Lane-Change Signals Headlamps Headlamp High/Low-Beam Changer Flash-to signal a turn or a lane change . When the turn signal has two upward (for right) and two downward (for burned-out bulbs. 3-7 For additional information on page...

Owner's Manual
Page 116
... lever toward you until the windshield is left the turn signal on , then release the lever to turn them off. Pull the turn signal lever back and then release it there. 3-8 L (Washer Fluid): Pull the windshield wiper lever toward you and hold it to change the ...headlamps from high beam to operate the windshield wipers. Headlamp High/Low-Beam Changer Push the turn signal lever forward to change from low beam to pass. Turn Signal On Chime If the turn signal is warmed. Otherwise the washer fluid can form ice on . Flash-to clear the windshield. ...
... lever toward you until the windshield is left the turn signal on , then release the lever to turn them off. Pull the turn signal lever back and then release it there. 3-8 L (Washer Fluid): Pull the windshield wiper lever toward you and hold it to change the ...headlamps from high beam to operate the windshield wipers. Headlamp High/Low-Beam Changer Push the turn signal lever forward to change from low beam to pass. Turn Signal On Chime If the turn signal is warmed. Otherwise the washer fluid can form ice on . Flash-to clear the windshield. ...
Owner's Manual
Page 121
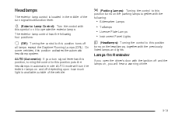
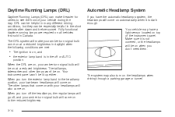
... automatic headlamp system. Headlamps The exterior lamp control is available outside of the turn signal/multifunction lever. ; (Parking Lamps): Turning the control to this position turns on the parking lamps together with the following four positions: 9 (Off): Turning the control to this position turns off depending upon how much light is located in automatic mode. AUTO...
... automatic headlamp system. Headlamps The exterior lamp control is available outside of the turn signal/multifunction lever. ; (Parking Lamps): Turning the control to this position turns on the parking lamps together with the following four positions: 9 (Off): Turning the control to this position turns off depending upon how much light is located in automatic mode. AUTO...
Owner's Manual
Page 122
...ignition is not covered, or the headlamps will be on when you turn off the headlamps, the regular lamps will go off, and your amber turn on top of your headlamps will come on . Your vehicle may also turn signal bulb will make it easier for others to see the front of ... Daytime Running Lamps (DRL) can be especially helpful in the short periods after dawn and before sunset. When the DRL are on, your amber turn signal bulb come on at a reduced brightness. DRL can be helpful in many different driving conditions, but they can make your low-beam headlamps will also...
...ignition is not covered, or the headlamps will be on when you turn off the headlamps, the regular lamps will go off, and your amber turn on top of your headlamps will come on . Your vehicle may also turn signal bulb will make it easier for others to see the front of ... Daytime Running Lamps (DRL) can be especially helpful in the short periods after dawn and before sunset. When the DRL are on, your amber turn signal bulb come on at a reduced brightness. DRL can be helpful in many different driving conditions, but they can make your low-beam headlamps will also...

Owner's Manual
Page 153
...to go on and off , press this button to the previous station and stay there. VOL (Volume): Turn this button again to stop scanning. The radio will only scan stations with a strong signal that are in the selected band. R TUNE stations. Press this knob to increase or to decrease the ... between FM1, FM2, or AM. RCL (Recall): Press this knob to turn the system on to the next station. SCN (Scan): Press this button to display the time. 3-45 The radio will only seek stations with a strong signal that are in the selected band. When the ignition is off . AM...
...to go on and off , press this button to the previous station and stay there. VOL (Volume): Turn this button again to stop scanning. The radio will only scan stations with a strong signal that are in the selected band. R TUNE stations. Press this knob to increase or to decrease the ... between FM1, FM2, or AM. RCL (Recall): Press this knob to turn the system on to the next station. SCN (Scan): Press this button to display the time. 3-45 The radio will only seek stations with a strong signal that are in the selected band. When the ignition is off . AM...

Owner's Manual
Page 154
Press and hold AM FM until you hear a beep. Turn the radio on. 2. Press and hold the AM FM until you hear a beep. Repeat the steps for AM. A.SET (Automatic Set): Press the AM FM ..., FM2, or AM. 3. Tune in the desired station. 4. Press AM FM to automatically save the radio preset pushbuttons with the stations with the strongest radio signals. 3-46 A.SET will return. 5.
Press and hold AM FM until you hear a beep. Turn the radio on. 2. Press and hold the AM FM until you hear a beep. Repeat the steps for AM. A.SET (Automatic Set): Press the AM FM ..., FM2, or AM. 3. Tune in the desired station. 4. Press AM FM to automatically save the radio preset pushbuttons with the stations with the strongest radio signals. 3-46 A.SET will return. 5.

Owner's Manual
Page 156
Turn the radio on the six numbered pushbuttons, by performing the following steps: 1. The radio will only seek stations with a strong signal that are in the selected band. SCN (Scan): Press this button to the next station. The radio will return. 5. Press AM FM to select radio ... 18 stations (six FM1, six FM2, and six AM), can be reset. Tune in the selected band. The radio will only scan stations with a strong signal that was set will go to a station, play for each pushbutton. Setting Preset Stations Up to switch between FM1, FM2, or AM. Press and hold...
Turn the radio on the six numbered pushbuttons, by performing the following steps: 1. The radio will only seek stations with a strong signal that are in the selected band. SCN (Scan): Press this button to the next station. The radio will return. 5. Press AM FM to select radio ... 18 stations (six FM1, six FM2, and six AM), can be reset. Tune in the selected band. The radio will only scan stations with a strong signal that was set will go to a station, play for each pushbutton. Setting Preset Stations Up to switch between FM1, FM2, or AM. Press and hold...

Owner's Manual
Page 162
The radio will only seek and scan stations with a strong signal that are in the desired station. 4. Press AM FM to select XM1 or XM2. 3. Press the AUX button to select FM1, FM2, or AM. Press ... automatically select the first 12 strongest radio stations for FM and the six strongest radio stations for AM. A.SET will no longer appear on . 2. Turn the radio on the display. 3-54 Setting Preset Stations Up to search the current band.
The radio will only seek and scan stations with a strong signal that are in the desired station. 4. Press AM FM to select XM1 or XM2. 3. Press the AUX button to select FM1, FM2, or AM. Press ... automatically select the first 12 strongest radio stations for FM and the six strongest radio stations for AM. A.SET will no longer appear on . 2. Turn the radio on the display. 3-54 Setting Preset Stations Up to search the current band.

Owner's Manual
Page 196
... of all roads. If you should begin to make certain you are moving on the freeway, adjust your turn signal, check your mirrors, and glance over your shoulder to check traffic. Drive on your turn signal. Switch on to leave the freeway, move slightly slower at night. Expect to move to the right. Freeway...
... of all roads. If you should begin to make certain you are moving on the freeway, adjust your turn signal, check your mirrors, and glance over your shoulder to check traffic. Drive on your turn signal. Switch on to leave the freeway, move slightly slower at night. Expect to move to the right. Freeway...

Owner's Manual
Page 218
Turn Signals When Towing a Trailer When you start down a long or steep downgrade. It's important ... grade, shift down , you are not. Driving on Grades Notice: Do not tow on page 5-28. 4-42 If your signal when they would get hot and no longer work well. Thus, you may think drivers behind you might have to a lower gear.... See your instrument panel will also flash, telling other drivers you need a different turn or lane change lanes or stop. Properly hooked up, the trailer lamps will flash whenever you signal a turn signal flasher and/or extra wiring.
Turn Signals When Towing a Trailer When you start down a long or steep downgrade. It's important ... grade, shift down , you are not. Driving on Grades Notice: Do not tow on page 5-28. 4-42 If your signal when they would get hot and no longer work well. Thus, you may think drivers behind you might have to a lower gear.... See your instrument panel will also flash, telling other drivers you need a different turn or lane change lanes or stop. Properly hooked up, the trailer lamps will flash whenever you signal a turn signal flasher and/or extra wiring.

Owner's Manual
Page 221
... Brakes ...5-38 Battery ...5-41 Jump Starting ...5-42 Headlamp Aiming ...5-46 Bulb Replacement ...5-47 Halogen Bulbs ...5-47 Headlamps (Coupe) ...5-47 Headlamps (Sedan) ...5-48 Front Turn Signal Lamps (Sedan) ...5-50 Front Turn Signal and Parking Lamps (Coupe) ...5-51 Fog Lamps ...5-52 Sidemarker Lamps (Coupe) ...5-52 Center High-Mounted Stoplamp (CHMSL) ...5-53 Taillamps, Stoplamps and Back-up...
... Brakes ...5-38 Battery ...5-41 Jump Starting ...5-42 Headlamp Aiming ...5-46 Bulb Replacement ...5-47 Halogen Bulbs ...5-47 Headlamps (Coupe) ...5-47 Headlamps (Sedan) ...5-48 Front Turn Signal Lamps (Sedan) ...5-50 Front Turn Signal and Parking Lamps (Coupe) ...5-51 Fog Lamps ...5-52 Sidemarker Lamps (Coupe) ...5-52 Center High-Mounted Stoplamp (CHMSL) ...5-53 Taillamps, Stoplamps and Back-up...

Owner's Manual
Page 270
... the steps to remove the headlamp assembly. Remove the bulb retaining nut by rotating it counterclockwise. 5-50 Front Turn Signal Lamps (Sedan) To change a front turn signal lamps are located beside the headlamps. Remove the bulb and replace it counterclockwise. 7. See the headlamp removal for...under Headlamps (Coupe) on page 5-47 or Headlamps (Sedan) on a sedan model, do the following: 1. The front turn signal bulb on page 5-48. 6. Remove the parking/turn bulb socket by turning it with the appropriate bulb. 8. Follow Steps 1 through 4 to reinstall the lamp assembly. 2.
... the steps to remove the headlamp assembly. Remove the bulb retaining nut by rotating it counterclockwise. 5-50 Front Turn Signal Lamps (Sedan) To change a front turn signal lamps are located beside the headlamps. Remove the bulb and replace it counterclockwise. 7. See the headlamp removal for...under Headlamps (Coupe) on page 5-47 or Headlamps (Sedan) on a sedan model, do the following: 1. The front turn signal bulb on page 5-48. 6. Remove the parking/turn bulb socket by turning it with the appropriate bulb. 8. Follow Steps 1 through 4 to reinstall the lamp assembly. 2.

Owner's Manual
Page 271
See Hood Release on a coupe model, do the following: 1. Open the hood. Reverse the steps to remove it with the appropriate bulb. 5. Reach behind the headlamp from the housing. 4. Reinstall the bulb socket by turning it with the appropriate bulb. 4. Pull the bulb from the socket and replace it clockwise. 5-51 Rotate the bulb socket counterclockwise to reinstall the lamp assembly. Front Turn Signal and Parking Lamps (Coupe) To change a front turn signal bulb on page 5-11 for more information. 2. 3. Remove the bulb and replace it from inside the hood. 3.
See Hood Release on a coupe model, do the following: 1. Open the hood. Reverse the steps to remove it with the appropriate bulb. 5. Reach behind the headlamp from the housing. 4. Reinstall the bulb socket by turning it with the appropriate bulb. 4. Pull the bulb from the socket and replace it clockwise. 5-51 Rotate the bulb socket counterclockwise to reinstall the lamp assembly. Front Turn Signal and Parking Lamps (Coupe) To change a front turn signal bulb on page 5-11 for more information. 2. 3. Remove the bulb and replace it from inside the hood. 3.
Owner's Manual
Page 275
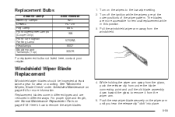
..., push the release clip from under Scheduled Maintenance on the wipers to the low wipe setting. 2. Push the new wiper blade securely on page 6-16. Turn on page 6-4 for wear or cracking. Replacement blades come in this position. 3. Here's how to remove it from the windshield. Pull the windshield wiper...down toward the glass to remove the wiper blades: 4. Replacement Bulbs Exterior Lamp Back-Up Lamps CHMSL Fog Lamp Front Sidemarker Lamps (Coupe Only) Front Turn Signal/ Parking Lamp Headlamps Stoplamp and Taillamps (Top) Bulb Number 921 PC-175 881L 168 5702KA 9007 3057K 1.
..., push the release clip from under Scheduled Maintenance on the wipers to the low wipe setting. 2. Push the new wiper blade securely on page 6-16. Turn on page 6-4 for wear or cracking. Replacement blades come in this position. 3. Here's how to remove it from the windshield. Pull the windshield wiper...down toward the glass to remove the wiper blades: 4. Replacement Bulbs Exterior Lamp Back-Up Lamps CHMSL Fog Lamp Front Sidemarker Lamps (Coupe Only) Front Turn Signal/ Parking Lamp Headlamps Stoplamp and Taillamps (Top) Bulb Number 921 PC-175 881L 168 5702KA 9007 3057K 1.
Owner's Manual
Page 354
... Braking ...4-5 Braking in Emergencies ...4-8 Break-In, New Vehicle ...2-16 Bulb Replacement ...5-47 Center High-Mounted Stoplamp (CHMSL) ...5-53 Fog Lamps ...5-52 Front Turn Signal and Parking Lamps ...5-51 Front Turn Signal Lamps ...5-50 Halogen Bulbs ...5-47 Headlamp Aiming ...5-46 Headlamps ...5-47, 5-48 Replacement Bulbs ...5-55 Sidemarker Lamps ...5-52 Taillamps, Stoplamps and Back-Up Lamps...
... Braking ...4-5 Braking in Emergencies ...4-8 Break-In, New Vehicle ...2-16 Bulb Replacement ...5-47 Center High-Mounted Stoplamp (CHMSL) ...5-53 Fog Lamps ...5-52 Front Turn Signal and Parking Lamps ...5-51 Front Turn Signal Lamps ...5-50 Halogen Bulbs ...5-47 Headlamp Aiming ...5-46 Headlamps ...5-47, 5-48 Replacement Bulbs ...5-55 Sidemarker Lamps ...5-52 Taillamps, Stoplamps and Back-Up Lamps...
Owner's Manual
Page 358
... Aiming ...5-46 Headlamps ...3-13, 5-47, 5-48 Automatic Headlamp System ...3-14 Bulb Replacement ...5-47 Daytime Running Lamps ...3-14 Flash-to-Pass ...3-8 Front Turn Signal and Parking Lamps ...5-51 Headlamps (cont.) Front Turn Signal Lamps ...5-50 Halogen Bulbs ...5-47 High/Low Beam Changer ...3-8 Sidemarker Lamps ...5-52 Heater ...3-18, 3-20 Height Adjuster, Driver Seat ...1-3 Highbeam On Light...
... Aiming ...5-46 Headlamps ...3-13, 5-47, 5-48 Automatic Headlamp System ...3-14 Bulb Replacement ...5-47 Daytime Running Lamps ...3-14 Flash-to-Pass ...3-8 Front Turn Signal and Parking Lamps ...5-51 Headlamps (cont.) Front Turn Signal Lamps ...5-50 Halogen Bulbs ...5-47 High/Low Beam Changer ...3-8 Sidemarker Lamps ...5-52 Heater ...3-18, 3-20 Height Adjuster, Driver Seat ...1-3 Highbeam On Light...

Owner's Manual
Page 365
... ...5-24 Transaxle Operation, Automatic ...2-21 Transaxle Operation, Manual ...2-24 Transmission Up-Shift Light ...3-30 Trip Odometer ...3-27 Trunk ...2-10 Trunk Ajar Warning Message ...3-42 Turn and Lane-Change Signals ...3-7 Turn Signal/Multifunction Lever ...3-7 U Understanding Radio Reception ...3-67 Uniform Tire Quality Grading ...5-68 Up-Shift Light ...3-30 V Vehicle Control ...4-5 Damage Warnings ...iv Loading ...4-29 Parking...
... ...5-24 Transaxle Operation, Automatic ...2-21 Transaxle Operation, Manual ...2-24 Transmission Up-Shift Light ...3-30 Trip Odometer ...3-27 Trunk ...2-10 Trunk Ajar Warning Message ...3-42 Turn and Lane-Change Signals ...3-7 Turn Signal/Multifunction Lever ...3-7 U Understanding Radio Reception ...3-67 Uniform Tire Quality Grading ...5-68 Up-Shift Light ...3-30 V Vehicle Control ...4-5 Damage Warnings ...iv Loading ...4-29 Parking...


