
Owner's Manual
Page 22
...2. Make sure the headrest is locked in a sudden stop or crash. Pull up on the release lever located on the seatback to be sure it is not locked, it into place before sitting in a crash....wearing the belt could cause injury to be sure that is improperly routed, not properly attached, or twisted will not provide the protection needed in the seat. {CAUTION: A safety belt that the... safety belts are properly routed and attached, and are not twisted. 22 Always push and pull on the seatback to the person sitting there...
...2. Make sure the headrest is locked in a sudden stop or crash. Pull up on the release lever located on the seatback to be sure it is not locked, it into place before sitting in a crash....wearing the belt could cause injury to be sure that is improperly routed, not properly attached, or twisted will not provide the protection needed in the seat. {CAUTION: A safety belt that the... safety belts are properly routed and attached, and are not twisted. 22 Always push and pull on the seatback to the person sitting there...

Owner's Manual
Page 23
...Make sure there is folded forward before folding a rear seat. 3. See Folding the Seatback earlier in the proper locations for the legs to its upright position. Put the bolts back into place. The wider seat must be placed in...it is secure. Make sure to their normal stowed position before installing the seat. Remove the rear bolts located on the floor on the passenger side. Make sure the safety belt is not twisted, and reconnect.... Pull on or under the seat. 4. Raise the seatback to attach correctly. The seats must be sure the mini-latch is in one motion. 6.
...Make sure there is folded forward before folding a rear seat. 3. See Folding the Seatback earlier in the proper locations for the legs to its upright position. Put the bolts back into place. The wider seat must be placed in...it is secure. Make sure to their normal stowed position before installing the seat. Remove the rear bolts located on the floor on the passenger side. Make sure the safety belt is not twisted, and reconnect.... Pull on or under the seat. 4. Raise the seatback to attach correctly. The seats must be sure the mini-latch is in one motion. 6.
Owner's Manual
Page 65
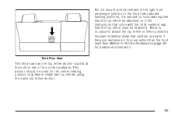
Third Row Seat The third row has one top tether anchor located at the bottom rear of the center seatback. See Where to attach the top tether in the rear rather than the front seat. Do not secure a child restraint in the right front passenger position or the third ...row outboard seating positions, if a national or local law requires that the top tether be attached, or if the instructions that come with the child restraint say that children are safer if they are restrained in these positions. There is no...
Third Row Seat The third row has one top tether anchor located at the bottom rear of the center seatback. See Where to attach the top tether in the rear rather than the front seat. Do not secure a child restraint in the right front passenger position or the third ...row outboard seating positions, if a national or local law requires that the top tether be attached, or if the instructions that come with the child restraint say that children are safer if they are restrained in these positions. There is no...
Owner's Manual
Page 142
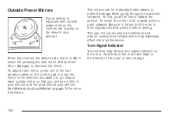
An arrow on the mirror will flash in the direction of the four arrows located on the control pad to move the mirror in the direction you can be manually folded inward to go. Be sure to return both mirrors ... so that you want it to prevent damage when going through an automatic car wash. To adjust each outside power mirrors, the controls are located on convex mirror attachments may have a turn or lane change. To fold, push the mirror toward the vehicle. Turn Signal Indicator Your vehicle may adversely affect mirror...
An arrow on the mirror will flash in the direction of the four arrows located on the control pad to move the mirror in the direction you can be manually folded inward to go. Be sure to return both mirrors ... so that you want it to prevent damage when going through an automatic car wash. To adjust each outside power mirrors, the controls are located on convex mirror attachments may have a turn or lane change. To fold, push the mirror toward the vehicle. Turn Signal Indicator Your vehicle may adversely affect mirror...
Owner's Manual
Page 152
...repeat Step 1, as this will erase all previous programming from the hand-held transmitter. If the indicator light stays on continuously, programming is attached to a constant light, continue with Step 2 under "Programming Universal Home Remote." Do not repeat Step 1 as this will erase all ... buttons. 5. Firmly press and release the "Learn" or "Smart" button. The indicator light will have 30 seconds to the vehicle. Locate in the garage, the garage door opener receiver (motor-head unit). Immediately press and hold the newly-trained Universal Home Remote button and ...
...repeat Step 1, as this will erase all previous programming from the hand-held transmitter. If the indicator light stays on continuously, programming is attached to a constant light, continue with Step 2 under "Programming Universal Home Remote." Do not repeat Step 1 as this will erase all ... buttons. 5. Firmly press and release the "Learn" or "Smart" button. The indicator light will have 30 seconds to the vehicle. Locate in the garage, the garage door opener receiver (motor-head unit). Immediately press and hold the newly-trained Universal Home Remote button and ...

Owner's Manual
Page 156
You may be found where the hanging antenna wire is complete. 5. Locate the "Learn" or "Smart" button. The indicator light will have a Fixed Code garage door opener. Follow the Programming instructions that programming is successful and complete. 3.... device, repeat Steps 1 through 5, choosing a different function button in the garage, the garage door opener receiver (motor-head unit). Locate in Step 3 than what you will blink rapidly until programming is attached to the motor-head unit and may need to hold the universal home remote button that you would like to...
You may be found where the hanging antenna wire is complete. 5. Locate the "Learn" or "Smart" button. The indicator light will have a Fixed Code garage door opener. Follow the Programming instructions that programming is successful and complete. 3.... device, repeat Steps 1 through 5, choosing a different function button in the garage, the garage door opener receiver (motor-head unit). Locate in Step 3 than what you will blink rapidly until programming is attached to the motor-head unit and may need to hold the universal home remote button that you would like to...
Owner's Manual
Page 163
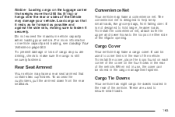
..., place the loops found on each corner of the cover on the four hooks in the rear of the vehicle. To install the convenience net, attach both the upper and lower hooks to fasten it rests as far forward as you are used to help keep small loads, like grocery bags...
..., place the loops found on each corner of the cover on the four hooks in the rear of the vehicle. To install the convenience net, attach both the upper and lower hooks to fasten it rests as far forward as you are used to help keep small loads, like grocery bags...
Owner's Manual
Page 307
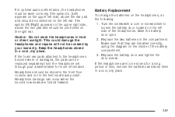
... batteries and keep them in a cool, dry place. 307 If the foam ear pads attached to the headphones become worn or damaged, the pads can occur when the second row seats are to loosen the battery door located on the inside of the headphones. Turn the screw with a coin or screw driver...
... batteries and keep them in a cool, dry place. 307 If the foam ear pads attached to the headphones become worn or damaged, the pads can occur when the second row seats are to loosen the battery door located on the inside of the headphones. Turn the screw with a coin or screw driver...
Owner's Manual
Page 441
... on your vehicle. the TPC spec number will be followed by an MS for more information about the Tire and Loading Information label and its location on your vehicle. {CAUTION: Mixing tires could cause you to lose control while driving. If you mix tires of different sizes, brands, or... and bias-belted tires), the vehicle may also cause damage to the vehicle's center pillar (B-pillar). If you must replace your vehicle. It is attached to your vehicle's tires with those that do not have a crash. Use only radial-ply tires with your compact spare temporarily, as your vehicle....
... on your vehicle. the TPC spec number will be followed by an MS for more information about the Tire and Loading Information label and its location on your vehicle. {CAUTION: Mixing tires could cause you to lose control while driving. If you mix tires of different sizes, brands, or... and bias-belted tires), the vehicle may also cause damage to the vehicle's center pillar (B-pillar). If you must replace your vehicle. It is attached to your vehicle's tires with those that do not have a crash. Use only radial-ply tires with your compact spare temporarily, as your vehicle....
Owner's Manual
Page 449
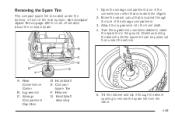
... the wheel opening to the ground. Rear Convenience Center B. Move the carpet cutout that is located under the vehicle. Hoist Shaft E. Open the storage compartment door of the storage compartment. 3. Attach the lug wrench into the hoist shaft. 4. Retainer G. Continue turning the wrench until the spare tire can be pulled out from...
... the wheel opening to the ground. Rear Convenience Center B. Move the carpet cutout that is located under the vehicle. Hoist Shaft E. Open the storage compartment door of the storage compartment. 3. Attach the lug wrench into the hoist shaft. 4. Retainer G. Continue turning the wrench until the spare tire can be pulled out from...


