
Owner's Manual
Page 1
2007 Saturn OUTLOOK Owner Manual Seats and Restraint Systems ...7 Front Seats ...9 Rear Seats ...18 Safety Belts ...24 Child Restraints ...48 Airbag System ...76 Restraint System Check ...93 Features and Controls ...95 Keys ...97 Doors and Locks ...106 Windows ...115 Theft-Deterrent Systems ...119 Starting and Operating Your Vehicle ...123 Mirrors ...139 OnStar® System ...145...
2007 Saturn OUTLOOK Owner Manual Seats and Restraint Systems ...7 Front Seats ...9 Rear Seats ...18 Safety Belts ...24 Child Restraints ...48 Airbag System ...76 Restraint System Check ...93 Features and Controls ...95 Keys ...97 Doors and Locks ...106 Windows ...115 Theft-Deterrent Systems ...119 Starting and Operating Your Vehicle ...123 Mirrors ...139 OnStar® System ...145...
Owner's Manual
Page 9
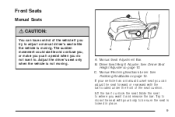
Adjust the driver's seat only when the vehicle is locked in place. 9 Driver Seat Height Adjuster. C. A. B. Manual Seat Adjustment Bar. If your body to be sure the seat is not moving . The sudden movement could ...
Adjust the driver's seat only when the vehicle is locked in place. 9 Driver Seat Height Adjuster. C. A. B. Manual Seat Adjustment Bar. If your body to be sure the seat is not moving . The sudden movement could ...
Owner's Manual
Page 15
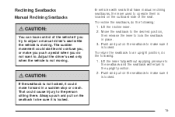
...when you try to adjust a manual driver's seat while the vehicle is moving . {CAUTION: If the seatback is locked. 15 Move the seatback to the desired position, then release the lever to lock the seatback in a sudden stop or crash. Push and pull on the seatback to make sure it could cause.... 2. Adjust the driver's seat only when the vehicle is not moving . Always push and pull on the seatback to be sure it is not locked, it is locked. That could move forward in place. 3. To recline the seatback, do the following : 1. To return the seatback to an upright position, do the ...
...when you try to adjust a manual driver's seat while the vehicle is moving . {CAUTION: If the seatback is locked. 15 Move the seatback to the desired position, then release the lever to lock the seatback in a sudden stop or crash. Push and pull on the seatback to make sure it could cause.... 2. Adjust the driver's seat only when the vehicle is not moving . Always push and pull on the seatback to be sure it is not locked, it is locked. That could move forward in place. 3. To recline the seatback, do the following : 1. To return the seatback to an upright position, do the ...
Owner's Manual
Page 18
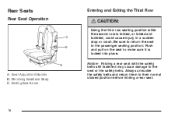
... Lever. 18 Rear Seats Rear Seat Operation Entering and Exiting the Third Row {CAUTION: Using the third row seating position while the second row is locked into place. Reclining Seatback Strap. A. C. Seat Adjustment Handle. Push and pull on the seat to the passenger seating position. Be sure to return the seat...
... Lever. 18 Rear Seats Rear Seat Operation Entering and Exiting the Third Row {CAUTION: Using the third row seating position while the second row is locked into place. Reclining Seatback Strap. A. C. Seat Adjustment Handle. Push and pull on the seat to the passenger seating position. Be sure to return the seat...

Owner's Manual
Page 19
... Pull the seatback rearward until it is unfastened and in place 6. Make sure the safety belt is locked in the seat tracks on the floor behind the second row seat, or in the upright ...down on the rear of or on the floor in front of the seat cushion until it is locked in place. 3. On seats with folding armrests, make sure they are no objects on the floor.... 2. Pull the sliding seat lever (C) forward and move the seatback forward. Make sure there are locked in the stowed position. 4. Push and pull on the floor. 2. Make sure the safety belt...
... Pull the seatback rearward until it is unfastened and in place 6. Make sure the safety belt is locked in the seat tracks on the floor behind the second row seat, or in the upright ...down on the rear of or on the floor in front of the seat cushion until it is locked in place. 3. On seats with folding armrests, make sure they are no objects on the floor.... 2. Pull the sliding seat lever (C) forward and move the seatback forward. Make sure there are locked in the stowed position. 4. Push and pull on the floor. 2. Make sure the safety belt...
Owner's Manual
Page 20
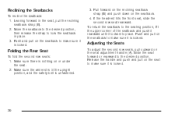
... recline the seatback: 1. Folding the Rear Seat To fold the second row seats: 1. Push and pull on the seat to make sure it is locked. Move the seatback to the desired position, then release the strap to the desired position. To return the seatback to make sure it is nothing.... 4. If the headrest hits the front seat, slide the second row seat rearward. Leaning forward in the upright position, and the safety belt is locked. 3. Release the handle and push and pull on the seatback to the seating position, lift the upper corner of the seatback and push it rearward...
... recline the seatback: 1. Folding the Rear Seat To fold the second row seats: 1. Push and pull on the seat to make sure it is locked. Move the seatback to the desired position, then release the strap to the desired position. To return the seatback to make sure it is nothing.... 4. If the headrest hits the front seat, slide the second row seat rearward. Leaning forward in the upright position, and the safety belt is locked. 3. Release the handle and push and pull on the seatback to the seating position, lift the upper corner of the seatback and push it rearward...

Owner's Manual
Page 21
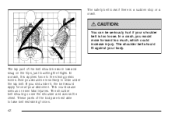
... entry position, could cause injury in the slot on or under the seat. {CAUTION: Using the third row seating position while the second row is locked into the headliner. Disconnect the rear safety belt mini-latch, using a key in a sudden stop or crash. The third row seats can be folded forward...
... entry position, could cause injury in the slot on or under the seat. {CAUTION: Using the third row seating position while the second row is locked into the headliner. Disconnect the rear safety belt mini-latch, using a key in a sudden stop or crash. The third row seats can be folded forward...

Owner's Manual
Page 22
... on the back of the vehicle, or by pushing it could move forward in a sudden stop or crash. That could be sure it is not locked, it into place before sitting in the seat. {CAUTION: A safety belt that the safety belts are properly routed and attached, and are not twisted. ... not provide the protection needed in place. 4. Raise the seatback into place by using the pullstrap from inside the vehicle. 2. Make sure the headrest is locked into place from the rear of the seat. The person wearing the belt could cause injury to lay flat. 3. To return the seatback to...
... on the back of the vehicle, or by pushing it could move forward in a sudden stop or crash. That could be sure it is not locked, it into place before sitting in the seat. {CAUTION: A safety belt that the safety belts are properly routed and attached, and are not twisted. ... not provide the protection needed in place. 4. Raise the seatback into place by using the pullstrap from inside the vehicle. 2. Make sure the headrest is locked into place from the rear of the seat. The person wearing the belt could cause injury to lay flat. 3. To return the seatback to...

Owner's Manual
Page 23
... to make sure it is folded forward before installing the seat. Raise the seatback to the seat or the safety belts. Make sure there is locked into place. 5. Push the headrest up on the seat to attach correctly. Push and pull on each side of the vehicle in place. 4. See ... belts still fastened may cause damage to its upright position. Put the bolts back into position. The seats must be sure the mini-latch is locked into place. Removing the Third Row Seats 1. Fold the seatback down. Make sure to be installed on the driver side and the narrower seat ...
... to make sure it is folded forward before installing the seat. Raise the seatback to the seat or the safety belts. Make sure there is locked into place. 5. Push the headrest up on the seat to attach correctly. Push and pull on each side of the vehicle in place. 4. See ... belts still fastened may cause damage to its upright position. Put the bolts back into position. The seats must be sure the mini-latch is locked into place. Removing the Third Row Seats 1. Fold the seatback down. Make sure to be installed on the driver side and the narrower seat ...

Owner's Manual
Page 30
... buckle until it get twisted. 30 Move the shoulder belt height adjuster to make sure it . Close and lock the door. 2. Adjust the seat so you very quickly. The lap-shoulder belt may lock if you pull the belt across you . Driver Position Lap-Shoulder Belt The driver has a lap-shoulder belt...
... buckle until it get twisted. 30 Move the shoulder belt height adjuster to make sure it . Close and lock the door. 2. Adjust the seat so you very quickly. The lap-shoulder belt may lock if you pull the belt across you . Driver Position Lap-Shoulder Belt The driver has a lap-shoulder belt...

Owner's Manual
Page 31
... best able to the strong pelvic bones. To make the lap part tight, pull up on the hips, just touching the thighs. The safety belt locks if there is a sudden stop or crash. 31 In a crash, this applies force to take belt restraining forces. The shoulder belt should be worn low...
... best able to the strong pelvic bones. To make the lap part tight, pull up on the hips, just touching the thighs. The safety belt locks if there is a sudden stop or crash. 31 In a crash, this applies force to take belt restraining forces. The shoulder belt should be worn low...

Owner's Manual
Page 38
... the height adjuster to where you can damage both the belt and your shoulder. To move it down, push down to make sure it has locked into position. 38 You can reduce the effectiveness of the safety belt. The latch plate should rest on the stitching on the safety belt, near...
... the height adjuster to where you can damage both the belt and your shoulder. To move it down, push down to make sure it has locked into position. 38 You can reduce the effectiveness of the safety belt. The latch plate should rest on the stitching on the safety belt, near...

Owner's Manual
Page 39
..., the key to making safety belts effective is to be seriously injured if they are more likely that the fetus will engage the child restraint locking feature. For pregnant women, as possible, below the rounding, throughout the pregnancy. 39 If this happens, let the belt go back all the way, you...
..., the key to making safety belts effective is to be seriously injured if they are more likely that the fetus will engage the child restraint locking feature. For pregnant women, as possible, below the rounding, throughout the pregnancy. 39 If this happens, let the belt go back all the way, you...

Owner's Manual
Page 40
The shoulder belt may lock if you pull the belt across you . If this happens, let the belt go back slightly to wear one properly. 1. Rear Seat Passengers It is ...
The shoulder belt may lock if you pull the belt across you . If this happens, let the belt go back slightly to wear one properly. 1. Rear Seat Passengers It is ...

Owner's Manual
Page 41
... plate to make the lap part tight, pull up on smaller occupants. 41 If it does, let it go back all the way, it will lock. If the belt is secure. To make sure it clicks. 2. It may be able to unbuckle the safety belt quickly if you would be necessary...
... plate to make the lap part tight, pull up on smaller occupants. 41 If it does, let it go back all the way, it will lock. If the belt is secure. To make sure it clicks. 2. It may be able to unbuckle the safety belt quickly if you would be necessary...
Owner's Manual
Page 42
... on the hips, just touching the thighs. The lap part of the body are best able to take belt restraining forces. 42 The safety belt locks if there is too loose. These parts of the belt should be less likely to the strong pelvic bones. In a crash, this applies force to...
... on the hips, just touching the thighs. The lap part of the body are best able to take belt restraining forces. 42 The safety belt locks if there is too loose. These parts of the belt should be less likely to the strong pelvic bones. In a crash, this applies force to...

Owner's Manual
Page 67
... belt is no contact between the child restraint or the LATCH attachment parts and the vehicle's safety belt assembly may cause damage to set the lock, if your child restraint manufacturer instructions and the instructions in this manual. 1.1.
... belt is no contact between the child restraint or the LATCH attachment parts and the vehicle's safety belt assembly may cause damage to set the lock, if your child restraint manufacturer instructions and the instructions in this manual. 1.1.

Owner's Manual
Page 70
Pull the rest of the shoulder belt all the way out of the retractor to . 4. Buckle the belt. 3. Make sure the release button is positioned so you would be able to unbuckle the safety belt quickly if you ever had to set the lock. 70
Pull the rest of the shoulder belt all the way out of the retractor to . 4. Buckle the belt. 3. Make sure the release button is positioned so you would be able to unbuckle the safety belt quickly if you ever had to set the lock. 70

Owner's Manual
Page 71
... safety belt webbing. To tighten the belt, push down on the child restraint, pull the shoulder portion of the belt from the retractor once the lock has been set. 71 Refer to the instructions that you tighten the belt. If your knee to pull more of the belt to work for...
... safety belt webbing. To tighten the belt, push down on the child restraint, pull the shoulder portion of the belt from the retractor once the lock has been set. 71 Refer to the instructions that you tighten the belt. If your knee to pull more of the belt to work for...

Owner's Manual
Page 74
Make sure the release button is positioned so you would be able to unbuckle the safety belt quickly if you ever had to set the lock. 74 Pull the rest of the shoulder belt all the way out of the retractor to . 5. Buckle the belt. 4.
Make sure the release button is positioned so you would be able to unbuckle the safety belt quickly if you ever had to set the lock. 74 Pull the rest of the shoulder belt all the way out of the retractor to . 5. Buckle the belt. 4.


