
Owner's Manual
Page 1
2009 Saturn VUE Owner Manual Seats and Restraint System ...1-1 Head Restraints ...1-2 Front Seats ...1-3 Rear Seats ...1-9 Safety Belts ...1-10 Child Restraints ...1-23 Airbag System ...1-42 ... Systems ...2-12 Starting and Operating Your Vehicle ...2-15 Mirrors ...2-29 Object Detection Systems ...2-31 OnStar® System ...2-33 All-Wheel Drive ...Headlamp Aiming ...Bulb Replacement ...Windshield Wiper Blade Replacement ...Tires ...Appearance Care ...Vehicle Identification ...Electrical System ...Capacities and Specifications ...Maintenance Schedule Maintenance Schedule ...6-1...
2009 Saturn VUE Owner Manual Seats and Restraint System ...1-1 Head Restraints ...1-2 Front Seats ...1-3 Rear Seats ...1-9 Safety Belts ...1-10 Child Restraints ...1-23 Airbag System ...1-42 ... Systems ...2-12 Starting and Operating Your Vehicle ...2-15 Mirrors ...2-29 Object Detection Systems ...2-31 OnStar® System ...2-33 All-Wheel Drive ...Headlamp Aiming ...Bulb Replacement ...Windshield Wiper Blade Replacement ...Tires ...Appearance Care ...Vehicle Identification ...Electrical System ...Capacities and Specifications ...Maintenance Schedule Maintenance Schedule ...6-1...

Owner's Manual
Page 116
... the wheel and push the lever down to -Pass Feature. The turn . Information for these features is released. The tilt lever is located on , a signal bulb may be adjusted. 3-6 Instrument Panel Tilt Wheel The tilt lever lets the steering wheel be burned out.
... the wheel and push the lever down to -Pass Feature. The turn . Information for these features is released. The tilt lever is located on , a signal bulb may be adjusted. 3-6 Instrument Panel Tilt Wheel The tilt lever lets the steering wheel be burned out.
Owner's Manual
Page 117
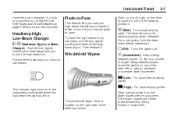
...The lever returns to low beams. For a single wiping cycle. a (Low): For slow, steady wiping cycles. Instrument Panel Have the bulbs replaced. Push up or pull down before using them . If a bulb is located on top of the following positions. 8 (Mist): Headlamp High/ Low-Beam Changer 2 3 Headlamp High/Low Beam Changer: Push... rapid wiping cycles. Pull the lever towards you use your high-beam headlamps to decrease or increase wiper movement. To set for burned-out bulbs. 3-7 Flash-to-Pass This feature lets you . This indicator light turns on the lever to place it .
...The lever returns to low beams. For a single wiping cycle. a (Low): For slow, steady wiping cycles. Instrument Panel Have the bulbs replaced. Push up or pull down before using them . If a bulb is located on top of the following positions. 8 (Mist): Headlamp High/ Low-Beam Changer 2 3 Headlamp High/Low Beam Changer: Push... rapid wiping cycles. Pull the lever towards you use your high-beam headlamps to decrease or increase wiper movement. To set for burned-out bulbs. 3-7 Flash-to-Pass This feature lets you . This indicator light turns on the lever to place it .
Owner's Manual
Page 246
...sharp turns while trailering. On a long uphill grade, shift down , the brakes might have to come in P (Park) for turns even if the bulbs on steep continuous grades exceeding 6 miles (9.6 km). When towing at high altitude on steep uphill grades, consider the following: Engine coolant will not strike... turns than normal engine and transmission temperatures may show signs similar to cool. The vehicle could cause the trailer to be sure the trailer bulbs are still working. When turning with the vehicle. Do this , let the engine run while parked, preferably on steep uphill grades, the...
...sharp turns while trailering. On a long uphill grade, shift down , the brakes might have to come in P (Park) for turns even if the bulbs on steep continuous grades exceeding 6 miles (9.6 km). When towing at high altitude on steep uphill grades, consider the following: Engine coolant will not strike... turns than normal engine and transmission temperatures may show signs similar to cool. The vehicle could cause the trailer to be sure the trailer bulbs are still working. When turning with the vehicle. Do this , let the engine run while parked, preferably on steep uphill grades, the...
Owner's Manual
Page 249
...Engine Overheating ...5-25 Power Steering Fluid ...5-26 Windshield Washer Fluid ...5-27 Brakes ...5-28 Battery ...5-30 Jump Starting ...5-31 Bulb Replacement Bulb Replacement ...5-39 Halogen Bulbs ...5-39 Headlamps ...5-39 Front Turn Signal and Parking Lamps ...5-40 Taillamps, Turn Signal, Stoplamps and Back-up Lamps... ...5-40 License Plate Lamp ...5-41 Replacement Bulbs ...5-41 Windshield Wiper Blade Replacement Windshield Wiper Blade Replacement ...5-42 Fuel Tires All-Wheel Drive All-Wheel Drive ...5-35 ...
...Engine Overheating ...5-25 Power Steering Fluid ...5-26 Windshield Washer Fluid ...5-27 Brakes ...5-28 Battery ...5-30 Jump Starting ...5-31 Bulb Replacement Bulb Replacement ...5-39 Halogen Bulbs ...5-39 Headlamps ...5-39 Front Turn Signal and Parking Lamps ...5-40 Taillamps, Turn Signal, Stoplamps and Back-up Lamps... ...5-40 License Plate Lamp ...5-41 Replacement Bulbs ...5-41 Windshield Wiper Blade Replacement Windshield Wiper Blade Replacement ...5-42 Fuel Tires All-Wheel Drive All-Wheel Drive ...5-35 ...
Owner's Manual
Page 287
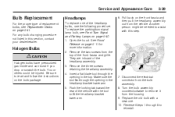
... lift the headlamp bracket lower arm. 6. Headlamps To replace one . 10. Halogen Bulbs { CAUTION Halogen bulbs have pressurized gas inside and can burst if you drop or scratch the bulb. For any bulb changing procedure not listed in the headlamp bracket lower arm. 5. Be sure to read... and follow the instructions on page 5-11 for more information. 2. Service and Appearance Care 5-39 Bulb Replacement For the proper type of replacement bulbs, see Front Turn Signal and Parking Lamps on page 5-40. 1. Remove the three screws retaining the headlamp assembly. 4....
... lift the headlamp bracket lower arm. 6. Headlamps To replace one . 10. Halogen Bulbs { CAUTION Halogen bulbs have pressurized gas inside and can burst if you drop or scratch the bulb. For any bulb changing procedure not listed in the headlamp bracket lower arm. 5. Be sure to read... and follow the instructions on page 5-11 for more information. 2. Service and Appearance Care 5-39 Bulb Replacement For the proper type of replacement bulbs, see Front Turn Signal and Parking Lamps on page 5-40. 1. Remove the three screws retaining the headlamp assembly. 4....
Owner's Manual
Page 288
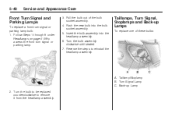
... Turn Signal and Parking Lamps To replace a front turn signal or parking lamp. Taillamp/Stoplamp B. Turn the bulb assembly clockwise until seated. 7. Turn the bulb to be replaced counterclockwise to reinstall the headlamp assembly. Back-up Lamps To replace one of the... bulb socket assembly. 4. Insert the bulb assembly into the bulb socket assembly. 5. Pull the bulb out of these bulbs: A. Reverse the steps to remove it from the headlamp assembly. Follow Steps 1 through...
... Turn Signal and Parking Lamps To replace a front turn signal or parking lamp. Taillamp/Stoplamp B. Turn the bulb assembly clockwise until seated. 7. Turn the bulb to be replaced counterclockwise to reinstall the headlamp assembly. Back-up Lamps To replace one of the... bulb socket assembly. 4. Insert the bulb assembly into the bulb socket assembly. 5. Pull the bulb out of these bulbs: A. Reverse the steps to remove it from the headlamp assembly. Follow Steps 1 through...

Owner's Manual
Page 289
...the license plate lamps to the fascia. 4. Reinstall the two screws holding in the taillamp assembly. 3. Push the new bulb into place. 5. Exterior Lamp Back-up Lamp Front Turn Signal/Parking Headlamps High-beam Low-beam/DRL Rear Turn Signal, Stoplamp and Taillamp... taillamp assembly rearward and away from the vehicle. 4. Turn the bulb socket counterclockwise and pull the bulb straight out of the bulb socket. 6. Turn the bulb socket being replaced counterclockwise to reinstall the taillamp assembly. 2. Pull the bulb out of the socket. Turn and pull the license plate lamp ...
...the license plate lamps to the fascia. 4. Reinstall the two screws holding in the taillamp assembly. 3. Push the new bulb into place. 5. Exterior Lamp Back-up Lamp Front Turn Signal/Parking Headlamps High-beam Low-beam/DRL Rear Turn Signal, Stoplamp and Taillamp... taillamp assembly rearward and away from the vehicle. 4. Turn the bulb socket counterclockwise and pull the bulb straight out of the bulb socket. 6. Turn the bulb socket being replaced counterclockwise to reinstall the taillamp assembly. 2. Pull the bulb out of the socket. Turn and pull the license plate lamp ...
Owner's Manual
Page 376
i-2 INDEX Brakes ...5-28 Antilock ...4-6 Parking ...2-24 System Warning Light ...3-31 Braking ...4-5 Braking in Emergencies ...4-6 Break-In, New Vehicle ...2-15 Bulb Replacement ...5-41 Fog Lamp ...3-14 Front Turn Signal and Parking Lamps ...5-40 Halogen Bulbs ...5-39 Headlamp Aiming ...5-36 Headlamps ...5-39 License Plate Lamps ...5-41 Taillamps, Turn Signal, Stoplamps and Back-up Lamps ...5-40...
i-2 INDEX Brakes ...5-28 Antilock ...4-6 Parking ...2-24 System Warning Light ...3-31 Braking ...4-5 Braking in Emergencies ...4-6 Break-In, New Vehicle ...2-15 Bulb Replacement ...5-41 Fog Lamp ...3-14 Front Turn Signal and Parking Lamps ...5-40 Halogen Bulbs ...5-39 Headlamp Aiming ...5-36 Headlamps ...5-39 License Plate Lamps ...5-41 Taillamps, Turn Signal, Stoplamps and Back-up Lamps ...5-40...
Owner's Manual
Page 379
... ...5-80 Underhood Fuse Block ...5-82 Windshield Wiper ...5-80 Gate Ajar Light ...3-40 Glove Box ...2-41 GM Mobility Reimbursement Program ...7-6 H Halogen Bulbs ...5-39 Hazard Warning Flashers ...3-5 Head Restraints ...1-2 Headlamp Aiming ...5-36 Headlamps ...5-39 Bulb Replacement ...5-39 Daytime Running Lamps (DRL) ...3-13 Exterior Lamps ...3-12 Flash-to-Pass ...3-7 High/Low Beam Changer ...3-7 Wiper Activated...
... ...5-80 Underhood Fuse Block ...5-82 Windshield Wiper ...5-80 Gate Ajar Light ...3-40 Glove Box ...2-41 GM Mobility Reimbursement Program ...7-6 H Halogen Bulbs ...5-39 Hazard Warning Flashers ...3-5 Head Restraints ...1-2 Headlamp Aiming ...5-36 Headlamps ...5-39 Bulb Replacement ...5-39 Daytime Running Lamps (DRL) ...3-13 Exterior Lamps ...3-12 Flash-to-Pass ...3-7 High/Low Beam Changer ...3-7 Wiper Activated...

Owner's Manual
Page 383
... Tire ...5-66 Removing the Spare Tire and Tools ...5-65 Replacement Bulbs ...5-41 Replacement Parts, Maintenance ...6-15 Reporting Safety Defects Canadian Government ...7-14 Reporting Safety Defects to Saturn ...7-14 Reporting Safety Defects to the Canadian Government ...7-14 Restraint ...Belts (cont.) Lap-Shoulder Belt ...1-19 Safety Belts Are for Everyone ...1-10 Use During Pregnancy ...1-23 Safety Defects Reporting to Saturn ...7-14 Reporting to the United States Government ...7-14 Safety Warnings and Symbols ...iii Scheduled Maintenance ...6-3 Additional Required Services ...6-6 Scheduling...
... Tire ...5-66 Removing the Spare Tire and Tools ...5-65 Replacement Bulbs ...5-41 Replacement Parts, Maintenance ...6-15 Reporting Safety Defects Canadian Government ...7-14 Reporting Safety Defects to Saturn ...7-14 Reporting Safety Defects to the Canadian Government ...7-14 Restraint ...Belts (cont.) Lap-Shoulder Belt ...1-19 Safety Belts Are for Everyone ...1-10 Use During Pregnancy ...1-23 Safety Defects Reporting to Saturn ...7-14 Reporting to the United States Government ...7-14 Safety Warnings and Symbols ...iii Scheduled Maintenance ...6-3 Additional Required Services ...6-6 Scheduling...
