
Owner's Manual
Page 6
... outlets Instrument panel outlets and foot outlets Foot outlets Windshield defroster and foot outlets Windshield defroster Rear window defogger/Outside mirror defogger/Windshield wiper deicer Air recirculation Door unlock (transmitter) Trunk lid (Legacy) or rear gate (Outback) (transmitter) Outside air Engine oil Washer Otherwise, the possibility of serious injury becomes greater in...
... outlets Instrument panel outlets and foot outlets Foot outlets Windshield defroster and foot outlets Windshield defroster Rear window defogger/Outside mirror defogger/Windshield wiper deicer Air recirculation Door unlock (transmitter) Trunk lid (Legacy) or rear gate (Outback) (transmitter) Outside air Engine oil Washer Otherwise, the possibility of serious injury becomes greater in...

Owner's Manual
Page 17
... parking brake switch (page 7-34) Hill Holder switch (page 7-35) Trunk lid opener switch (page 2-24) Vehicle Dynamics Control OFF switch (page 7-31) Remote control mirror switch (page 3-38) Illumination brightness control (page 3-30) Light control switch (page 3-27) Audio control buttons (page 5-30) Combination meter (page 3-5) Cruise control (page 7-38...
... parking brake switch (page 7-34) Hill Holder switch (page 7-35) Trunk lid opener switch (page 2-24) Vehicle Dynamics Control OFF switch (page 7-31) Remote control mirror switch (page 3-38) Illumination brightness control (page 3-30) Light control switch (page 3-27) Audio control buttons (page 5-30) Combination meter (page 3-5) Cruise control (page 7-38...
Owner's Manual
Page 22
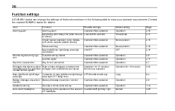
...11 2-7 3-34 Monitoring start delay time (after closure 0 second/30 seconds of the auto on /off headlights 20 Function settings A SUBARU dealer can change the settings of the functions shown in prevention Operation/Non-operation Operation/Non-operation ON/OFF Operation/Non-operation Operation/Non-...operation Operation/Non-operation Operation for 15 minutes/ Continuous operation Defogger and deicer system Rear window defogger, outside mirror for models with the automatic defogger and windshield wiper deicer climate control system Map light/Dome light/Cargo area light Battery...
...11 2-7 3-34 Monitoring start delay time (after closure 0 second/30 seconds of the auto on /off headlights 20 Function settings A SUBARU dealer can change the settings of the functions shown in prevention Operation/Non-operation Operation/Non-operation ON/OFF Operation/Non-operation Operation/Non-...operation Operation/Non-operation Operation for 15 minutes/ Continuous operation Defogger and deicer system Rear window defogger, outside mirror for models with the automatic defogger and windshield wiper deicer climate control system Map light/Dome light/Cargo area light Battery...
Owner's Manual
Page 67
...severity of them again. For adjusting procedure, refer to the windshield, or fit an extra-wide mirror over the rear view mirror. Observe the following precautions. WARNING Do not attach accessories to "Manual seat" F1-3 (models ...equipped with manual seats only). If liquid is spilled, wipe it off immediately. . The inflator operates in different ways depending on the front passenger's seat or the seatbelt tongue and buckle engaged when you leave your SUBARU...
...severity of them again. For adjusting procedure, refer to the windshield, or fit an extra-wide mirror over the rear view mirror. Observe the following precautions. WARNING Do not attach accessories to "Manual seat" F1-3 (models ...equipped with manual seats only). If liquid is spilled, wipe it off immediately. . The inflator operates in different ways depending on the front passenger's seat or the seatbelt tongue and buckle engaged when you leave your SUBARU...

Owner's Manual
Page 120
... and washer switch (Outback) ... 3-31 3-32 3-34 Turn signal lever ...Illumination brightness control ...Front fog light switch (if equipped) ... 3-29 3-30 3-30 Defogger and deicer ...Mirrors ...Inside mirror...Auto-dimming mirror/compass (if equipped) ...Outside mirrors ... 3-34 3-36 3-36 3-36 3-38 Tilt/telescopic steering wheel ...Horn ... 3-38 3-39
... and washer switch (Outback) ... 3-31 3-32 3-34 Turn signal lever ...Illumination brightness control ...Front fog light switch (if equipped) ... 3-29 3-30 3-30 Defogger and deicer ...Mirrors ...Inside mirror...Auto-dimming mirror/compass (if equipped) ...Outside mirrors ... 3-34 3-36 3-36 3-36 3-38 Tilt/telescopic steering wheel ...Horn ... 3-38 3-39

Owner's Manual
Page 152
... use, turn the knob on the end of the wiper control lever upward to the " " position. When you move the select 1) 2) 3) Rear window defogger Outside mirror defogger (if equipped) Windshield wiper deicer (if equipped) The vehicle is operating, turn the knob on the end of the wiper control lever downward to...
... use, turn the knob on the end of the wiper control lever upward to the " " position. When you move the select 1) 2) 3) Rear window defogger Outside mirror defogger (if equipped) Windshield wiper deicer (if equipped) The vehicle is operating, turn the knob on the end of the wiper control lever downward to...

Owner's Manual
Page 153
Contact your SUBARU dealer for any longer than necessary. . The rear window defogger, outside mirror defogger and windshield wiper deicer are also equipped with an outside mirror have been cleared and the windshield wiper blades have to press the control switch to the "Acc" or "LOCK" ...while the defogger and deicer system is activated. completely before that is in the "ON" position. If the rear window and outside mirror defogger and/or windshield wiper deicer. They may damage the conductors printed on the climate control panel. Instruments and controls 3-35 window ...
Contact your SUBARU dealer for any longer than necessary. . The rear window defogger, outside mirror defogger and windshield wiper deicer are also equipped with an outside mirror have been cleared and the windshield wiper blades have to press the control switch to the "Acc" or "LOCK" ...while the defogger and deicer system is activated. completely before that is in the "ON" position. If the rear window and outside mirror defogger and/or windshield wiper deicer. They may damage the conductors printed on the climate control panel. Instruments and controls 3-35 window ...

Owner's Manual
Page 154
... system is toggled on the defogger and deicer system if the wipers are properly adjusted before you . By pressing and releasing the right Mirrors Always check that the windshield wiper deicer works effectively. . When the automatic dimming function is covered with snow, remove the snow so... that the inside mirror has a day and night position. It also contains a built-in this condition. Push it away for the day position. The night position...
... system is toggled on the defogger and deicer system if the wipers are properly adjusted before you . By pressing and releasing the right Mirrors Always check that the windshield wiper deicer works effectively. . When the automatic dimming function is covered with snow, remove the snow so... that the inside mirror has a day and night position. It also contains a built-in this condition. Push it away for the day position. The night position...

Owner's Manual
Page 155
..., spotlight, etc.) and ensure all possible zone settings. Refer to the "Compass calibration zone" map attached to the end of the mirror dimmer to help prevent you encounter this situation, return to read inaccurately. Stop cycling when the correct zone setting for your geographical location.... or three circles). Even with stickers, or - CONTINUED - For this has occurred if your compass begins to step one of the mirror. This is shifted into reverse. Press and hold the right button for your location is now calibrated. 5. Should you from large metallic...
..., spotlight, etc.) and ensure all possible zone settings. Refer to the "Compass calibration zone" map attached to the end of the mirror dimmer to help prevent you encounter this situation, return to read inaccurately. Stop cycling when the correct zone setting for your geographical location.... or three circles). Even with stickers, or - CONTINUED - For this has occurred if your compass begins to step one of the mirror. This is shifted into reverse. Press and hold the right button for your location is now calibrated. 5. Should you from large metallic...

Owner's Manual
Page 156
... locked by moving it up to lock the steering wheel in personal injury. Refer to the desired level. 4. Convex mirror (passenger side) ! Remote control mirror switch Tilt/telescopic steering wheel WARNING Do not adjust the steering wheel tilt/ telescopic position while driving. Move the steering wheel... to "Front seats" F1-2. 2. Do not use the convex mirror to judge the distance of vehicles behind you want to determine the actual size and distance of vehicle control and result in place. 5....
... locked by moving it up to lock the steering wheel in personal injury. Refer to the desired level. 4. Convex mirror (passenger side) ! Remote control mirror switch Tilt/telescopic steering wheel WARNING Do not adjust the steering wheel tilt/ telescopic position while driving. Move the steering wheel... to "Front seats" F1-2. 2. Do not use the convex mirror to judge the distance of vehicles behind you want to determine the actual size and distance of vehicle control and result in place. 5....

Owner's Manual
Page 219
Interior equipment Interior light ...Dome light ...Map light...Cargo area light (Outback)... 6-2 6-2 6-2 6-3 Ashtray (if equipped)...Coat hook...Shopping bag hook ...Legacy ...Outback ... 6-12 6-13 6-14 6-14 6-14 Sun visors ...Sun visor extension plate ...Vanity mirror with light ... 6-4 6-4 6-5 Storage compartment ...Glove box ...Center console box ...Overhead console ...Pocket (if equipped) ... 6-5 6-6 6-6 6-8 6-8 Floor mat ...Cargo area...
Interior equipment Interior light ...Dome light ...Map light...Cargo area light (Outback)... 6-2 6-2 6-2 6-3 Ashtray (if equipped)...Coat hook...Shopping bag hook ...Legacy ...Outback ... 6-12 6-13 6-14 6-14 6-14 Sun visors ...Sun visor extension plate ...Vanity mirror with light ... 6-4 6-4 6-5 Storage compartment ...Glove box ...Center console box ...Overhead console ...Pocket (if equipped) ... 6-5 6-6 6-6 6-8 6-8 Floor mat ...Cargo area...

Owner's Manual
Page 223
...compartment closed while the car is being blinded by glare. To use the vanity mirror, swing down the sun visor and open the vanity mirror cover. The lights beside the vanity mirror illuminate when the mirror cover is not running can cause battery discharge. - CONTINUED - Do not store ... extension plate would obstruct your view of the rearview mirror. NOTE Use of the vanity mirror light for a long period of time while the engine is opened. Interior equipment 6-5 & Vanity mirror with light CAUTION Keep the vanity mirror cover closed while driving to avoid being driven to reduce...
...compartment closed while the car is being blinded by glare. To use the vanity mirror, swing down the sun visor and open the vanity mirror cover. The lights beside the vanity mirror illuminate when the mirror cover is not running can cause battery discharge. - CONTINUED - Do not store ... extension plate would obstruct your view of the rearview mirror. NOTE Use of the vanity mirror light for a long period of time while the engine is opened. Interior equipment 6-5 & Vanity mirror with light CAUTION Keep the vanity mirror cover closed while driving to avoid being driven to reduce...

Owner's Manual
Page 237
... may occur. . When replacing the fuse, be very careful removing it with a high-pressure washer, do not subject it to the trunk lid (Legacy) or rear gate (Outback). Moving backward only by checking the monitor could cause an accident. . Interior equipment 6-19 Rear view camera (if equipped)...with a soft, dry cloth. . Continued use a fuse with your SUBARU dealer for an inspection. Use of water in the camera lens may result in accident, fire or Legacy Outback Since the range of distance. . Contact your eyes and mirrors, and move backward at a slow speed. Do not put a ...
... may occur. . When replacing the fuse, be very careful removing it with a high-pressure washer, do not subject it to the trunk lid (Legacy) or rear gate (Outback). Moving backward only by checking the monitor could cause an accident. . Interior equipment 6-19 Rear view camera (if equipped)...with a soft, dry cloth. . Continued use a fuse with your SUBARU dealer for an inspection. Use of water in the camera lens may result in accident, fire or Legacy Outback Since the range of distance. . Contact your eyes and mirrors, and move backward at a slow speed. Do not put a ...

Owner's Manual
Page 238
... of the rear view camera has priority over other screens are vertical lines on the camera lens may occur. For models with the genuine SUBARU navigation system, the image of other screen displays. Therefore, while the rear view camera is set to the camera. However, this is ...the vehicle, be adversely affected. . The image of the rearview camera in contact with the camera, moisten a clean cloth with the vehicle rearview mirror or the Otherwise, discoloration may develop white light stripes around the light source. This is set the shift lever or select lever to a position ...
... of the rear view camera has priority over other screens are vertical lines on the camera lens may occur. For models with the genuine SUBARU navigation system, the image of other screen displays. Therefore, while the rear view camera is set to the camera. However, this is ...the vehicle, be adversely affected. . The image of the rearview camera in contact with the camera, moisten a clean cloth with the vehicle rearview mirror or the Otherwise, discoloration may develop white light stripes around the light source. This is set the shift lever or select lever to a position ...
Owner's Manual
Page 249
... the engine is turned to detect engine and transmission problems that the hood, trunk (Legacy) and rear gate (Outback) are fully closed. 5. The inspection of the OBD ...the tires. Look under the vehicle for service. Check the adjustment of the inside and outside mirrors. 7. Fasten your passengers have implemented the OBD system inspection. . Check the gauges, indicator and...lights after starting the engine. - CONTINUED - Starting and operating 7-7 not damage an AWD SUBARU vehicle. Under no stored diagnostic trouble codes, and the OBD system readiness monitors are clean ...
... the engine is turned to detect engine and transmission problems that the hood, trunk (Legacy) and rear gate (Outback) are fully closed. 5. The inspection of the OBD ...the tires. Look under the vehicle for service. Check the adjustment of the inside and outside mirrors. 7. Fasten your passengers have implemented the OBD system inspection. . Check the gauges, indicator and...lights after starting the engine. - CONTINUED - Starting and operating 7-7 not damage an AWD SUBARU vehicle. Under no stored diagnostic trouble codes, and the OBD system readiness monitors are clean ...
Owner's Manual
Page 308
.... Check that the spare tire is tipped sharply up . ! If significant blind spots occur with the vehicle's standard side mirrors, use towing mirrors that the vehicle sits horizontally with Federal, state/province and/ or other improper connection of trailer lights may damage your vehicle's...service to your vehicle, check that all the tires on a trip . Before starting out on your SUBARU dealer. The temporary spare tire is used. Make sure that the standard side mirrors provide a good rearward field of your vehicle or trailer as a precaution against getting a flat tire...
.... Check that the spare tire is tipped sharply up . ! If significant blind spots occur with the vehicle's standard side mirrors, use towing mirrors that the vehicle sits horizontally with Federal, state/province and/ or other improper connection of trailer lights may damage your vehicle's...service to your vehicle, check that all the tires on a trip . Before starting out on your SUBARU dealer. The temporary spare tire is used. Make sure that the standard side mirrors provide a good rearward field of your vehicle or trailer as a precaution against getting a flat tire...

Owner's Manual
Page 309
...trucks or buses. Before going down a steep hill, slow down and shift into lower gear (if necessary, use 1st gear) in position. - the side mirrors provide a good rearward field of traffic, practice turning, stopping and backing up. ! Driving with a trailer is in first gear and release the clutch at moderate..., sharp turns and rapid lane changes. . Crosswinds will be taken to learn the "feel" of the added weight and length caused by the nearest SUBARU dealer. ! Backing up with one hand and turn it to the left turn, and turn it to the hitch ball. - the trailer lights connector...
...trucks or buses. Before going down a steep hill, slow down and shift into lower gear (if necessary, use 1st gear) in position. - the side mirrors provide a good rearward field of traffic, practice turning, stopping and backing up. ! Driving with a trailer is in first gear and release the clutch at moderate..., sharp turns and rapid lane changes. . Crosswinds will be taken to learn the "feel" of the added weight and length caused by the nearest SUBARU dealer. ! Backing up with one hand and turn it to the left turn, and turn it to the hitch ball. - the trailer lights connector...

Owner's Manual
Page 338
... fog light (if equipped)...Rear combination lights ...Tail/Back-up light (Outback) ...License plate light ...Dome light...Map light ...Vanity mirror light ...Door step light...Cargo area light (Outback) ...Trunk light (Legacy) ...Other bulbs ... 11-47 11-48 11-50 11-50 11-50 11-50 11-53 11-53 11-53...
... fog light (if equipped)...Rear combination lights ...Tail/Back-up light (Outback) ...License plate light ...Dome light...Map light ...Vanity mirror light ...Door step light...Cargo area light (Outback) ...Trunk light (Legacy) ...Other bulbs ... 11-47 11-48 11-50 11-50 11-50 11-50 11-53 11-53 11-53...

Owner's Manual
Page 395
Install a new bulb. 4. Maintenance and service 11-59 & Map light straight downward to remove it. 3. Pull the bulb out of the lens with a flat-head screwdriver. 2. Turn the bulb until the flat surfaces at its ends are aligned vertically. Install a new bulb. 4. Remove the lens by prying the edge of the lens with a flat-head screwdriver. 2. Pull the bulb - CONTINUED - Reinstall the lens. & Vanity mirror light 1. Reinstall the lens. 1. Remove the lens by prying the edge of the socket. 3.
Install a new bulb. 4. Maintenance and service 11-59 & Map light straight downward to remove it. 3. Pull the bulb out of the lens with a flat-head screwdriver. 2. Turn the bulb until the flat surfaces at its ends are aligned vertically. Install a new bulb. 4. Remove the lens by prying the edge of the lens with a flat-head screwdriver. 2. Pull the bulb - CONTINUED - Reinstall the lens. & Vanity mirror light 1. Reinstall the lens. 1. Remove the lens by prying the edge of the socket. 3.

Owner's Manual
Page 402
12-6 Specifications Fuses and circuits & Fuse panel located in the passenger compartment Fuse panel 1 2 3 4 Fuse rating 15A 20A 20A 7.5A ... Circuit Trailer hitch connector Rear power window (left side) Power window (driver's side) Navigation system Front wiper deicer Moonroof Combination meter Remote control view mirrors Integrated unit Stop light Seat heater relay Power supply (battery) Turn signal unit Integrated unit Automatic transmission unit rear 5 6 7 8 9 10 11 12 7.5A 7.5A 7.5A 15A 15A 7.5A 7.5A 15A
12-6 Specifications Fuses and circuits & Fuse panel located in the passenger compartment Fuse panel 1 2 3 4 Fuse rating 15A 20A 20A 7.5A ... Circuit Trailer hitch connector Rear power window (left side) Power window (driver's side) Navigation system Front wiper deicer Moonroof Combination meter Remote control view mirrors Integrated unit Stop light Seat heater relay Power supply (battery) Turn signal unit Integrated unit Automatic transmission unit rear 5 6 7 8 9 10 11 12 7.5A 7.5A 7.5A 15A 15A 7.5A 7.5A 15A


