
Owners Manual
Page 50
...continual product improvement, we reserve the right to all models and explains all equipment, including options. Noise from the modification may not be modified with non-genuine Toyota products could affect its performance, safety or durability, and may find some explanations for ...are currently available in terms of printing. This is turned off, you may even violate governmental regulations. Modification with non-genuine Toyota products. Therefore, you may differ from under warranty. 22 PRIUS_U (OM47685U) DVD All specifications provided in this manual applies ...
...continual product improvement, we reserve the right to all models and explains all equipment, including options. Noise from the modification may not be modified with non-genuine Toyota products could affect its performance, safety or durability, and may find some explanations for ...are currently available in terms of printing. This is turned off, you may even violate governmental regulations. Modification with non-genuine Toyota products. Therefore, you may differ from under warranty. 22 PRIUS_U (OM47685U) DVD All specifications provided in this manual applies ...

Owners Manual
Page 255
... speed falls below the set speed is more than approximately 10 mph (16 km/h) below approximately 25 mph (40 km/h). l Enhanced VSC is detected. Distance options Long Medium Short n Radar sensor and grille cover Always keep the sensor and grille cover clean to ensure that the distances shown correspond to -vehicle...
... speed falls below the set speed is more than approximately 10 mph (16 km/h) below approximately 25 mph (40 km/h). l Enhanced VSC is detected. Distance options Long Medium Short n Radar sensor and grille cover Always keep the sensor and grille cover clean to ensure that the distances shown correspond to -vehicle...
Owners Manual
Page 604
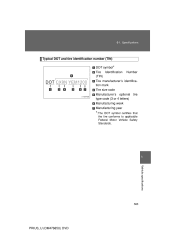
Specifications Typical DOT and tire identification number (TIN) DOT symbol* Tire Identification (TIN) Number Tire manufacturer's identification mark Tire size code Manufacturer's optional tire type code (3 or 4 letters) Manufacturing week Manufacturing year *:The DOT symbol certifies that the tire conforms to applicable Federal Motor Vehicle Safety Standards. 6 Vehicle specifications 583 PRIUS_U (OM47685U) DVD 6-1.
Specifications Typical DOT and tire identification number (TIN) DOT symbol* Tire Identification (TIN) Number Tire manufacturer's identification mark Tire size code Manufacturer's optional tire type code (3 or 4 letters) Manufacturing week Manufacturing year *:The DOT symbol certifies that the tire conforms to applicable Federal Motor Vehicle Safety Standards. 6 Vehicle specifications 583 PRIUS_U (OM47685U) DVD 6-1.
Owners Manual
Page 609
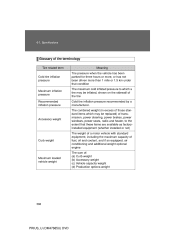
... to which a tire may be inflated, shown on the sidewall of : (a) Curb weight (b) Accessory weight (c) Vehicle capacity weight (d) Production options weight Maximum inflation pressure Recommended inflation pressure Accessory weight Curb weight Maximum loaded vehicle weight 588 PRIUS_U (OM47685U) DVD Specifications Glossary of tire terminology Tire... standard equipment, including the maximum capacity of fuel, oil and coolant, and if so equipped, air conditioning and additional weight optional engine The sum of the tire Cold tire inflation pressure recommended by a manufacturer.
... to which a tire may be inflated, shown on the sidewall of : (a) Curb weight (b) Accessory weight (c) Vehicle capacity weight (d) Production options weight Maximum inflation pressure Recommended inflation pressure Accessory weight Curb weight Maximum loaded vehicle weight 588 PRIUS_U (OM47685U) DVD Specifications Glossary of tire terminology Tire... standard equipment, including the maximum capacity of fuel, oil and coolant, and if so equipped, air conditioning and additional weight optional engine The sum of the tire Cold tire inflation pressure recommended by a manufacturer.

Owners Manual
Page 610
...that follows Distribution of occupants in a vehicle as specified in the third column of Table 1* below The combined weight of installed regular production options weighing over 5 lb. (2.3 kg) in excess of the standard items which they replace, not previously considered in curb weight or accessory...distance between rim flanges The rated cargo and luggage load plus 150 lb. (68 kg) times the vehicle's designated seating capacity Production options weight Rim Rim diameter (Wheel diameter) Rim size designation Rim type designation Rim width Vehicle capacity weight (Total load capacity) 6 Vehicle ...
...that follows Distribution of occupants in a vehicle as specified in the third column of Table 1* below The combined weight of installed regular production options weighing over 5 lb. (2.3 kg) in excess of the standard items which they replace, not previously considered in curb weight or accessory...distance between rim flanges The rated cargo and luggage load plus 150 lb. (68 kg) times the vehicle's designated seating capacity Production options weight Rim Rim diameter (Wheel diameter) Rim size designation Rim type designation Rim width Vehicle capacity weight (Total load capacity) 6 Vehicle ...
Navigation Manual
Page 16
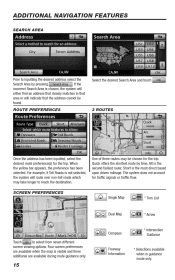
... traffic flow. The system does not account for the trip. ADDITIONAL NAVIGATION FEATURES SEARCH AREA Prior to select from seven different screen viewing options. If the incorrect Search Area is the second fastest route; SCREEN PREFERENCES One of three routes may take longer to reach the destination.
... traffic flow. The system does not account for the trip. ADDITIONAL NAVIGATION FEATURES SEARCH AREA Prior to select from seven different screen viewing options. If the incorrect Search Area is the second fastest route; SCREEN PREFERENCES One of three routes may take longer to reach the destination.
Navigation Manual
Page 17
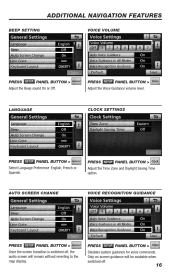
... VOICE VOLUME PRESS SETUP PANEL BUTTON > PRESS SETUP PANEL BUTTON > Adjust the Beep sound On or Off. Adjust the Time Zone and Daylight Saving Time option.
... VOICE VOLUME PRESS SETUP PANEL BUTTON > PRESS SETUP PANEL BUTTON > Adjust the Beep sound On or Off. Adjust the Time Zone and Daylight Saving Time option.
Navigation Manual
Page 20
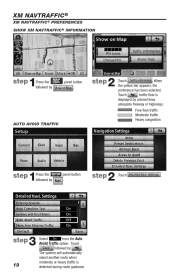
... TRAFFIC step 1 Press the SETUP panel button followed by MAP panel button . step 2 Touch . step 2 Touch . step 3 19 from the Auto Select Avoid Traffic option. When the yellow bar appears, the preference has been selected. XM NAVTRAFFIC ® XM NAVTRAFFIC ® PREFERENCES SHOW XM NAVTRAFFIC ® INFORMATION step 1 Press the...
... TRAFFIC step 1 Press the SETUP panel button followed by MAP panel button . step 2 Touch . step 2 Touch . step 3 19 from the Auto Select Avoid Traffic option. When the yellow bar appears, the preference has been selected. XM NAVTRAFFIC ® XM NAVTRAFFIC ® PREFERENCES SHOW XM NAVTRAFFIC ® INFORMATION step 1 Press the...
Navigation Manual
Page 21
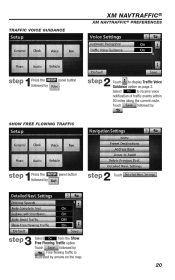
... the map. 20 step 3 Select from the Show Free Flowing Traffic option. Free flowing traffic is illustrated by . step 2 to receive voice notification of traffic events within 20 miles along the current ...
... the map. 20 step 3 Select from the Show Free Flowing Traffic option. Free flowing traffic is illustrated by . step 2 to receive voice notification of traffic events within 20 miles along the current ...
Navigation Manual
Page 63
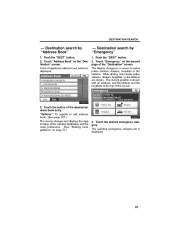
DESTINATION SEARCH - Touch the button of the "Destination" screen 3. "Options 107 71.) 3. Destination search by "Address Book" 1. Destination search by "Emergency" 1. Touch "Emergency" on the "Destination" screen - Push the "DEST" button. 2. Push the "DEST" button. 2. Touch "Address Book" on the second page of the desired address book entry. Touch the desired emergency category 65
DESTINATION SEARCH - Touch the button of the "Destination" screen 3. "Options 107 71.) 3. Destination search by "Address Book" 1. Destination search by "Emergency" 1. Touch "Emergency" on the "Destination" screen - Push the "DEST" button. 2. Push the "DEST" button. 2. Touch "Address Book" on the second page of the desired address book entry. Touch the desired emergency category 65
Navigation Manual
Page 154
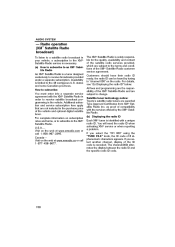
... subscription rates and terms, or to subscribe to the terms and conditions of 8 alphanumeric characters appears. Satellite tuner technology notice: Toyota's satellite radio tuners are the responsibility of the vehicle and optional digital satellite tuner. You will need the radio ID when activating XMr service or when reporting a problem. How to a satellite...
... subscription rates and terms, or to subscribe to the terms and conditions of 8 alphanumeric characters appears. Satellite tuner technology notice: Toyota's satellite radio tuners are the responsibility of the vehicle and optional digital satellite tuner. You will need the radio ID when activating XMr service or when reporting a problem. How to a satellite...
Navigation Manual
Page 273
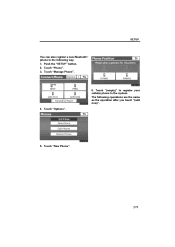
Touch "Manage Phone". 6. Touch "New Phone". 275 Push the "SETUP" button. 2. The following way. 1. Touch "Phone". 3. Touch "Options". 5. Touch "(empty)" to register your cellular phone to the system. SETUP You can also register a new Bluetoothr phone in the following operations are the same as the operation after you touch "(add new)". 4.
Touch "Manage Phone". 6. Touch "New Phone". 275 Push the "SETUP" button. 2. The following way. 1. Touch "Phone". 3. Touch "Options". 5. Touch "(empty)" to register your cellular phone to the system. SETUP You can also register a new Bluetoothr phone in the following operations are the same as the operation after you touch "(add new)". 4.

Navigation Manual
Page 276
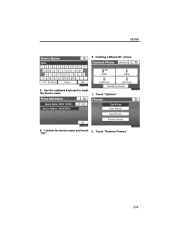
... phone on the screen. Touch "Edit Phones". 278 If you have registered two Bluetoothr phones with the same device name and you change it . Touch "Options". 2. This screen is displayed. You cannot change the device name, touch "Edit". 1. SETUP D Editing the Bluetoothr phone You can change a device name, the name registered...
... phone on the screen. Touch "Edit Phones". 278 If you have registered two Bluetoothr phones with the same device name and you change it . Touch "Options". 2. This screen is displayed. You cannot change the device name, touch "Edit". 1. SETUP D Editing the Bluetoothr phone You can change a device name, the name registered...
Navigation Manual
Page 277
SETUP D Deleting a Bluetoothr phone 5. Use the software keyboard to input the device name. 1. Touch "Remove Phones". 279 Touch "Options". 6. Confirm the device name and touch "OK". 2.
SETUP D Deleting a Bluetoothr phone 5. Use the software keyboard to input the device name. 1. Touch "Remove Phones". 279 Touch "Options". 6. Confirm the device name and touch "OK". 2.
Navigation Manual
Page 280
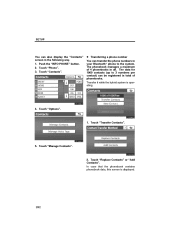
... Contacts". 2. Touch "Replace Contacts" or "Add Contacts". Touch "Contacts". In case that the phonebook contains phonebook data, this screen is operating. 4. Touch "Transfer Contacts". 5. Touch "Options". 1. Touch "Phone". 3. Transfer it while the hybrid system is displayed. 282 Push the "INFO·PHONE" button. 2. SETUP You can be registered in total of...
... Contacts". 2. Touch "Replace Contacts" or "Add Contacts". Touch "Contacts". In case that the phonebook contains phonebook data, this screen is operating. 4. Touch "Transfer Contacts". 5. Touch "Options". 1. Touch "Phone". 3. Transfer it while the hybrid system is displayed. 282 Push the "INFO·PHONE" button. 2. SETUP You can be registered in total of...
Navigation Manual
Page 285
... "Phone". 3. Touch "Add Contact" or "Update Contact". 5. From "Call History" screen 1. From "Contact Data" screen 1. Touch "Call History". 4. Push the "INFO·PHONE" button. 2. Touch "Options". 6. Touch "Phone". 3. Touch "Edit Contact". 6. Select the desired data from the list. 287 Push the "INFO·PHONE" button. 2. SETUP You can also display the...
... "Phone". 3. Touch "Add Contact" or "Update Contact". 5. From "Call History" screen 1. From "Contact Data" screen 1. Touch "Call History". 4. Push the "INFO·PHONE" button. 2. Touch "Options". 6. Touch "Phone". 3. Touch "Edit Contact". 6. Select the desired data from the list. 287 Push the "INFO·PHONE" button. 2. SETUP You can also display the...
Navigation Manual
Page 287
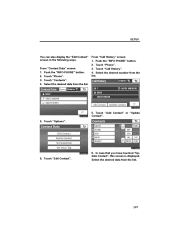
Select the desired data from the list. 7. SETUP You can also delete it in the following way. 1. Touch "Yes". Touch "Options". 6. INFORMATION When you delete a Bluetoothr phone, the phonebook data will be deleted at the same time. 5. Push the "INFO·PHONE" button. 2. Touch "Delete Contact". 289 Touch "Phone". 3. Touch "Contacts". 4.
Select the desired data from the list. 7. SETUP You can also delete it in the following way. 1. Touch "Yes". Touch "Options". 6. INFORMATION When you delete a Bluetoothr phone, the phonebook data will be deleted at the same time. 5. Push the "INFO·PHONE" button. 2. Touch "Delete Contact". 289 Touch "Phone". 3. Touch "Contacts". 4.
Navigation Manual
Page 288
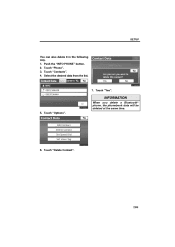
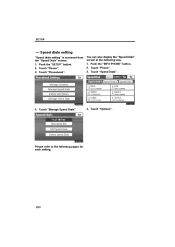
You can also display the "Speed Dials" screen in the following pages for each setting. 290 Touch "Manage Speed Dials". 4. Please refer to the following way. 1. Touch "Options". Speed dials setting "Speed dials setting" is accessed from the "Speed Dials" screen. 1. Touch "Speed Dials". 4. Touch "Phone". 3. Touch "Phone". 3. Push the "INFO·PHONE" button. 2. SETUP - Touch "Phonebook". Push the "SETUP" button. 2.
You can also display the "Speed Dials" screen in the following pages for each setting. 290 Touch "Manage Speed Dials". 4. Please refer to the following way. 1. Touch "Options". Speed dials setting "Speed dials setting" is accessed from the "Speed Dials" screen. 1. Touch "Speed Dials". 4. Touch "Phone". 3. Touch "Phone". 3. Push the "INFO·PHONE" button. 2. SETUP - Touch "Phonebook". Push the "SETUP" button. 2.
Navigation Manual
Page 291
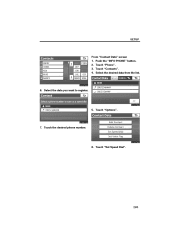
Touch "Phone". 3. Select the desired data from the list. 6. Touch "Options". 7. Touch "Contacts". 4. Push the "INFO·PHONE" button. 2. Select the data you want to register. 5. Touch the desired phone number. 6. Touch "Set Speed Dial". 293 SETUP From "Contact Data" screen 1.
Touch "Phone". 3. Select the desired data from the list. 6. Touch "Options". 7. Touch "Contacts". 4. Push the "INFO·PHONE" button. 2. Select the data you want to register. 5. Touch the desired phone number. 6. Touch "Set Speed Dial". 293 SETUP From "Contact Data" screen 1.
Navigation Manual
Page 296
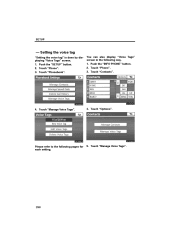
Setting the voice tag "Setting the voice tag" is done by displaying "Voice Tags" screen. 1. Touch "Phonebook". Touch "Manage Voice Tags". 298 Push the "SETUP" button. 2. You can also display "Voice Tags" screen in the following pages for each setting. 5. Touch "Contacts". 4. Touch "Options". Touch "Phone". 3. Push the "INFO·PHONE" button. 2. Please refer to the following way. 1. Touch "Manage Voice Tags". 4. Touch "Phone". 3. SETUP -
Setting the voice tag "Setting the voice tag" is done by displaying "Voice Tags" screen. 1. Touch "Phonebook". Touch "Manage Voice Tags". 298 Push the "SETUP" button. 2. You can also display "Voice Tags" screen in the following pages for each setting. 5. Touch "Contacts". 4. Touch "Options". Touch "Phone". 3. Push the "INFO·PHONE" button. 2. Please refer to the following way. 1. Touch "Manage Voice Tags". 4. Touch "Phone". 3. SETUP -
