User Guide
Page 17
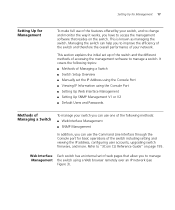
...Port ■ Setting Up Web Interface Management ■ Setting Up SNMP Management V1 or V2 ■ Default Users and Passwords Methods of Managing a Switch To manage your switch you can use one of the following methods: ■ Web Interface Management ■ SNMP Management In ...Managing a Switch ■ Switch Setup Overview ■ Manually set of web pages that resides on page 195. Web Interface Each switch has an internal set the IP Address using the Console Port ■ Viewing IP Information using a Web browser remotely over an IP network (see Figure 3). Refer to "3Com CLI ...
...Port ■ Setting Up Web Interface Management ■ Setting Up SNMP Management V1 or V2 ■ Default Users and Passwords Methods of Managing a Switch To manage your switch you can use one of the following methods: ■ Web Interface Management ■ SNMP Management In ...Managing a Switch ■ Switch Setup Overview ■ Manually set of web pages that resides on page 195. Web Interface Each switch has an internal set the IP Address using the Console Port ■ Viewing IP Information using a Web browser remotely over an IP network (see Figure 3). Refer to "3Com CLI ...

User Guide
Page 18
... what you can manage a switch using SNMP Switch Setup Overview Refer to : ■ Configure IP information manually for your switch or view the automatically configured IP information ■ Prepare for your switch set up and ready for management when it is summarized in its default state. 18 CHAPTER 1: GETTING...section gives an overview of management The whole setup process is in Figure 5. SNMP Management You can use the 3Com Network Director software, available from the 3Com website. For example, you need to "Setting Up SNMP Management V1 or V2" on page 25. Figure ...
... what you can manage a switch using SNMP Switch Setup Overview Refer to : ■ Configure IP information manually for your switch or view the automatically configured IP information ■ Prepare for your switch set up and ready for management when it is summarized in its default state. 18 CHAPTER 1: GETTING...section gives an overview of management The whole setup process is in Figure 5. SNMP Management You can use the 3Com Network Director software, available from the 3Com website. For example, you need to "Setting Up SNMP Management V1 or V2" on page 25. Figure ...

User Guide
Page 19
... Interface (basic setup only) Connect using DHCP See page 20 The switch uses its default IP information See page 20 Initial IP Information Setup Do you do you want to connect to view the automatically configured IP information? See page 21 Connect to the console port and use the... Web Interface. For more information on default users and changing default passwords, see "Default Users and Passwords" on the rear of the switch which details the default IP address. Plug and Play Setup Is a DHCP server present? See page 25 Refer to...
... Interface (basic setup only) Connect using DHCP See page 20 The switch uses its default IP information See page 20 Initial IP Information Setup Do you do you want to connect to view the automatically configured IP information? See page 21 Connect to the console port and use the... Web Interface. For more information on default users and changing default passwords, see "Default Users and Passwords" on the rear of the switch which details the default IP address. Plug and Play Setup Is a DHCP server present? See page 25 Refer to...

User Guide
Page 20
... server is deployed onto a different subnet, it again. Refer to obtain an IP address from a DHCP server on your network uses DHCP to configure its default IP information. 20 CHAPTER 1: GETTING STARTED IP Configuration The switch's IP configuration is needed. Work through the "Viewing IP Information using values you can change it will be difficult to discover...
... server is deployed onto a different subnet, it again. Refer to obtain an IP address from a DHCP server on your network uses DHCP to configure its default IP information. 20 CHAPTER 1: GETTING STARTED IP Configuration The switch's IP configuration is needed. Work through the "Viewing IP Information using values you can change it will be difficult to discover...

User Guide
Page 22
...switch. The Switch 2916 and 2924 takes approximately one minute to boot. b Attach the other end of the switch. The Power on Self Test (POST) will be set to match the default settings for more information. 3 Power up the switch with terminal emulation software installed) Switch...Refer to the documentation that accompanies the terminal emulation software for the switch, which you have the following information: ■ IP address ■ subnet mask ■ default gateway Figure 6 Connecting a Workstation to the Switch using the console cable as shown in Figure 6. 22 CHAPTER ...
...switch. The Switch 2916 and 2924 takes approximately one minute to boot. b Attach the other end of the switch. The Power on Self Test (POST) will be set to match the default settings for more information. 3 Power up the switch with terminal emulation software installed) Switch...Refer to the documentation that accompanies the terminal emulation software for the switch, which you have the following information: ■ IP address ■ subnet mask ■ default gateway Figure 6 Connecting a Workstation to the Switch using the console cable as shown in Figure 6. 22 CHAPTER ...

User Guide
Page 24
.... 24 CHAPTER 1: GETTING STARTED 5 Enter Summary to view a summary of Managing a Switch" on page 195. Select menu option# summary IP Method: default IP address: 169.254.99.51 Subnet mask: 255.255.0.0 Runtime version: 00_00_38 (date 01-Apr-2007 time 15:31:29) Bootcode version: 1.0.0.12 (date...The initial set up of your chosen management method. If you do not intend to use the command line interface using the console port to "3Com CLI Reference Guide" on page 17. The following is ready for you can logout, disconnect the serial cable and close the terminal emulator software. ...
.... 24 CHAPTER 1: GETTING STARTED 5 Enter Summary to view a summary of Managing a Switch" on page 195. Select menu option# summary IP Method: default IP address: 169.254.99.51 Subnet mask: 255.255.0.0 Runtime version: 00_00_38 (date 01-Apr-2007 time 15:31:29) Bootcode version: 1.0.0.12 (date...The initial set up of your chosen management method. If you do not intend to use the command line interface using the console port to "3Com CLI Reference Guide" on page 17. The following is ready for you can logout, disconnect the serial cable and close the terminal emulator software. ...

User Guide
Page 25
... a browser by default. Prerequisites ■ Ensure you have already set up the switch with RJ-45 connectors. ■ A suitable Web browser. Choosing a Browser To display the web interface correctly, use one of Managing a Switch" on page 17. ■ Ensure that the switch is connected to... the network using a Category 5 twisted pair Ethernet cable with IP information as described in "Methods of the following Web browser and platform combinations:...
... a browser by default. Prerequisites ■ Ensure you have already set up the switch with RJ-45 connectors. ■ A suitable Web browser. Choosing a Browser To display the web interface correctly, use one of Managing a Switch" on page 17. ■ Ensure that the switch is connected to... the network using a Category 5 twisted pair Ethernet cable with IP information as described in "Methods of the following Web browser and platform combinations:...

User Guide
Page 26
...been entered correctly and the switch is displayed. By default, all sizes and complexity. 26 CHAPTER 1: GETTING STARTED Web Management To manage a switch using the web interface over an IP network: Over the Network 1 Be sure that you wish to "Configuring SNMP" on page 135. See "3Com Network Management" on the... same subnet as your user name and press Return at the DOS or CMD prompt in VLAN 1 (the Default VLAN). The main Web interface page is powered up. 4 Open your web browser and enter the IP address of your switch's IP address. To display...
...been entered correctly and the switch is displayed. By default, all sizes and complexity. 26 CHAPTER 1: GETTING STARTED Web Management To manage a switch using the web interface over an IP network: Over the Network 1 Be sure that you wish to "Configuring SNMP" on page 135. See "3Com Network Management" on the... same subnet as your user name and press Return at the DOS or CMD prompt in VLAN 1 (the Default VLAN). The main Web interface page is powered up. 4 Open your web browser and enter the IP address of your switch's IP address. To display...

User Guide
Page 27
...source runtime filename. 2 To download the bootcode file, enter: upgrade aaa.aaa.aaa.aaa bbb bootcode where aaa.aaa.aaa.aaa is the IP address of the TFTP server and bbb is listed in with a valid user name and password. Note: You can only be a new ...bootcode file to download. 3 To set the switch to boot from the Command Line Interface (CLI). Table 5 Default Users Default User Name Password admin (no password) Access Level Management - Default Users and Passwords 27 Default Users and Passwords If you intend to manage the switch or to change all manageable parameters Use the...
...source runtime filename. 2 To download the bootcode file, enter: upgrade aaa.aaa.aaa.aaa bbb bootcode where aaa.aaa.aaa.aaa is the IP address of the TFTP server and bbb is listed in with a valid user name and password. Note: You can only be a new ...bootcode file to download. 3 To set the switch to boot from the Command Line Interface (CLI). Table 5 Default Users Default User Name Password admin (no password) Access Level Management - Default Users and Passwords 27 Default Users and Passwords If you intend to manage the switch or to change all manageable parameters Use the...

User Guide
Page 29
Passwords are case sensitive. 4 Click Login. The Enter Network Password Page opens: Figure 7 Enter Network Password Page 3 Enter your user name and password. The 3Com Web Interface Home Page opens: Web Interface To access the 3Com user interface: 1 Open an Internet browser. 2 Enter the device IP address in the address bar and press Enter. The device default factory settings is configured with a User Name that is admin and a password that is blank. Starting the 3Com Web Interface 29 Accessing the 3Com This section contains information on starting the 3Com Web interface.
Passwords are case sensitive. 4 Click Login. The Enter Network Password Page opens: Figure 7 Enter Network Password Page 3 Enter your user name and password. The 3Com Web Interface Home Page opens: Web Interface To access the 3Com user interface: 1 Open an Internet browser. 2 Enter the device IP address in the address bar and press Enter. The device default factory settings is configured with a User Name that is admin and a password that is blank. Starting the 3Com Web Interface 29 Accessing the 3Com This section contains information on starting the 3Com Web interface.

User Guide
Page 39
... opens: Figure 18 Reset Page The Reset Page contains the following fields: ■ Initialize with Default IP Address - The Restore option restores device factory defaults. Restoring Factory Defaults 39 Restoring Factory Defaults The Restore option appears on the Reset Page. Resets the device with the factory default settings, including the factory default IP Address. 2 Click the Initialize button.
... opens: Figure 18 Reset Page The Reset Page contains the following fields: ■ Initialize with Default IP Address - The Restore option restores device factory defaults. Restoring Factory Defaults 39 Restoring Factory Defaults The Restore option appears on the Reset Page. Resets the device with the factory default settings, including the factory default IP Address. 2 Click the Initialize button.

User Guide
Page 50
...authentication fields. ■ Backup Server - RADIUS servers provide a centralized authentication method for networks. If new default parameters are not defined, the system default values are applied to newly defined RADIUS servers. Monitor users have no access to newly defined RADIUS servers.... Defines the RADIUS Backup Server authentication fields. ■ Host IP Address - To configure the RADIUS client: 1 Click Security > RADIUS Client > Setup. Defines the RADIUS Server IP address. The default parameters are user-defined, and are applied to this page.
...authentication fields. ■ Backup Server - RADIUS servers provide a centralized authentication method for networks. If new default parameters are not defined, the system default values are applied to newly defined RADIUS servers. Monitor users have no access to newly defined RADIUS servers.... Defines the RADIUS Backup Server authentication fields. ■ Host IP Address - To configure the RADIUS client: 1 Click Security > RADIUS Client > Setup. Defines the RADIUS Server IP address. The default parameters are user-defined, and are applied to this page.

User Guide
Page 109
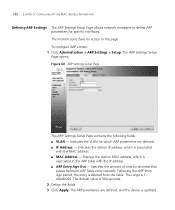
.... 1 Click Administration > IP Setup. 9 CONFIGURING IP AND MAC ADDRESS INFORMATION Defining IP Addressing This section contains information for defining IP interfaces, and includes the following sections: ■ Defining IP Addressing ■ Configuring ARP Settings ■ Configuring Address Tables The IP Setup Page contains fields for assigning an IP address. The default gateway is erased when the Default IP address is...
.... 1 Click Administration > IP Setup. 9 CONFIGURING IP AND MAC ADDRESS INFORMATION Defining IP Addressing This section contains information for defining IP interfaces, and includes the following sections: ■ Defining IP Addressing ■ Configuring ARP Settings ■ Configuring Address Tables The IP Setup Page contains fields for assigning an IP address. The default gateway is erased when the Default IP address is...

User Guide
Page 110
.... 2 Select Manual or DHCP mode. 3 If Manual has been selected, configure the IP Address, Subnet Mask and Default Gateway. 4 Click Apply. Indicates that the IP Interface is dynamically created. ■ IP Address - 110 CHAPTER 9: CONFIGURING IP AND MAC ADDRESS INFORMATION The IP Setup Page contains the following sections: ■ Viewing ARP Settings ■ Defining ARP Settings...
.... 2 Select Manual or DHCP mode. 3 If Manual has been selected, configure the IP Address, Subnet Mask and Default Gateway. 4 Click Apply. Indicates that the IP Interface is dynamically created. ■ IP Address - 110 CHAPTER 9: CONFIGURING IP AND MAC ADDRESS INFORMATION The IP Setup Page contains the following sections: ■ Viewing ARP Settings ■ Defining ARP Settings...
User Guide
Page 112
... the MAC address. ■ MAC Address - Following the ARP Entry Age period, the entry is updated. The ARP parameters are defined. ■ IP Address - The default value is associated with the IP address. ■ ARP Entry Age Out - To configure ARP entries: 1 Click Administration > ARP Settings > Setup. The ARP Settings Setup Page opens...
... the MAC address. ■ MAC Address - Following the ARP Entry Age period, the entry is updated. The ARP parameters are defined. ■ IP Address - The default value is associated with the IP address. ■ ARP Entry Age Out - To configure ARP entries: 1 Click Administration > ARP Settings > Setup. The ARP Settings Setup Page opens...

User Guide
Page 116
... Settings assigned to the port. ■ Static - Displays the current port settings. ■ State - Possible values are: ■ All - 116 CHAPTER 9: CONFIGURING IP AND MAC ADDRESS INFORMATION ■ Config Dynamic - Indicates the Port through which the address was learned. ■ Aging Time - The Port Summary Page opens: Figure...source is 300 seconds. Specifies the amount of MAC Address configuration. Displays static MAC Addresses assigned to the port. ■ Dynamic - The default value is detected. Indicates the MAC address is dynamically configured. ■ Port Index -
... Settings assigned to the port. ■ Static - Displays the current port settings. ■ State - Possible values are: ■ All - 116 CHAPTER 9: CONFIGURING IP AND MAC ADDRESS INFORMATION ■ Config Dynamic - Indicates the Port through which the address was learned. ■ Aging Time - The Port Summary Page opens: Figure...source is 300 seconds. Specifies the amount of MAC Address configuration. Displays static MAC Addresses assigned to the port. ■ Dynamic - The default value is detected. Indicates the MAC address is dynamically configured. ■ Port Index -

User Guide
Page 118
...current MAC Address state. Indicates that the Address Table entry assigned by the user is 300 seconds. 2 Define the fields. 3 Click Apply. The default value is not aged out. ■ Checked - Indicates that the Address Table entry assigned by the user is updated. 118 CHAPTER 9: CONFIGURING... IP AND MAC ADDRESS INFORMATION The Address Table Add Page contains the following fields: ■ VLAN ID - Assigns a VLAN ID to the user-...
...current MAC Address state. Indicates that the Address Table entry assigned by the user is 300 seconds. 2 Define the fields. 3 Click Apply. The default value is not aged out. ■ Checked - Indicates that the Address Table entry assigned by the user is updated. 118 CHAPTER 9: CONFIGURING... IP AND MAC ADDRESS INFORMATION The Address Table Add Page contains the following fields: ■ VLAN ID - Assigns a VLAN ID to the user-...

User Guide
Page 122
... MAC addresses are removed from the source is detected. Indicates the MAC address is 300 seconds. 2 Select the MAC addresses to remove. 3 Click Remove. The default value is dynamically configured. ■ Port Index - Specifies the amount of time the MAC Address remains in the Dynamic MAC Address before it is timed... no traffic from the MAC address table, and the device is statically configured. ■ Config Dynamic - Indicates the MAC address is updated. 122 CHAPTER 9: CONFIGURING IP AND MAC ADDRESS INFORMATION ■ Config Static -
... MAC addresses are removed from the source is detected. Indicates the MAC address is 300 seconds. 2 Select the MAC addresses to remove. 3 Click Remove. The default value is dynamically configured. ■ Port Index - Specifies the amount of time the MAC Address remains in the Dynamic MAC Address before it is timed... no traffic from the MAC address table, and the device is statically configured. ■ Config Dynamic - Indicates the MAC address is updated. 122 CHAPTER 9: CONFIGURING IP AND MAC ADDRESS INFORMATION ■ Config Static -

User Guide
Page 154
... VLAN is the default value. ■ Voice VLAN ID - This is enabled on defining MAC address age out time, see Defining Aging Time. ■ Ports Enabled for a specific port. The port will age out after the MAC Address is one day. Indicates the amount of time after the last IP phone's OUI...
... VLAN is the default value. ■ Voice VLAN ID - This is enabled on defining MAC address age out time, see Defining Aging Time. ■ Ports Enabled for a specific port. The port will age out after the MAC Address is one day. Indicates the amount of time after the last IP phone's OUI...

User Guide
Page 200
200 APPENDIX E: 3COM CLI REFERENCE GUIDE ipSetup The ipSetup command allows the user to be the same as multicast, experimental or broadcast addresses. If a default gateway is acquired automatically from the Dynamic Host Configuration Protocol (DHCP) server. ■ ip-address mask- User Guidelines IP Addresses configured beyond the range of 224.0.0.0 are configured manually by...
200 APPENDIX E: 3COM CLI REFERENCE GUIDE ipSetup The ipSetup command allows the user to be the same as multicast, experimental or broadcast addresses. If a default gateway is acquired automatically from the Dynamic Host Configuration Protocol (DHCP) server. ■ ip-address mask- User Guidelines IP Addresses configured beyond the range of 224.0.0.0 are configured manually by...

