

Getting Started Guide
Page 18
... to connect to and manage the Switch: ■ IP Address ■ Subnet Mask ■ Default Router All ports set to "best effort" for the Switch 4200 Series: Table 5 Default Settings Feature Switch 4200 Series Automatic IP Configuration Enabled Port Status Enabled Port Speed...the untagged Default VLAN (VLAN 1) with 802.1Q learning operational IP Multicast Filtering Filtering enabled Rapid Spanning Tree Protocol Enabled Fast Start: Enabled on all other traffic. 18 CHAPTER 1: INTRODUCING THE SUPERSTACK 3 SWITCH 4200 SERIES Default Settings Table 5 shows the default settings ...
... to connect to and manage the Switch: ■ IP Address ■ Subnet Mask ■ Default Router All ports set to "best effort" for the Switch 4200 Series: Table 5 Default Settings Feature Switch 4200 Series Automatic IP Configuration Enabled Port Status Enabled Port Speed...the untagged Default VLAN (VLAN 1) with 802.1Q learning operational IP Multicast Filtering Filtering enabled Rapid Spanning Tree Protocol Enabled Fast Start: Enabled on all other traffic. 18 CHAPTER 1: INTRODUCING THE SUPERSTACK 3 SWITCH 4200 SERIES Default Settings Table 5 shows the default settings ...
Getting Started Guide
Page 23
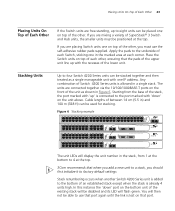
...3Com recommends that when you add a new unit to a stack, you are placing Switch units one in a single stack. You will be used for stacking. Place the Switch units on top of each other, ensuring that the pads of the upper unit line up with 'down ' port on the bottom unit of SuperStack® 3 Switch...one IP address. If you should first initialize it to factory default settings Stack renumbering occurs when another Switch ...24 Power/ Self Test 1 25 / Up 26 / Down 2 3 Alert 4 Unit 27 27 28 3C17304 Superstack 3 Switch 4228G 28 1 13 2 14 3 15 4 16 5 17 6 18 7 19 8 20 9 21 10 22...
...3Com recommends that when you add a new unit to a stack, you are placing Switch units one in a single stack. You will be used for stacking. Place the Switch units on top of each other, ensuring that the pads of the upper unit line up with 'down ' port on the bottom unit of SuperStack® 3 Switch...one IP address. If you should first initialize it to factory default settings Stack renumbering occurs when another Switch ...24 Power/ Self Test 1 25 / Up 26 / Down 2 3 Alert 4 Unit 27 27 28 3C17304 Superstack 3 Switch 4228G 28 1 13 2 14 3 15 4 16 5 17 6 18 7 19 8 20 9 21 10 22...
Getting Started Guide
Page 33
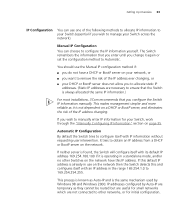
... the IP address changing. If neither server is found, the Switch will configure itself with its default IP address 169.254.100.100 if it is always allocated the same IP information.) For most installations, 3Com recommends that you do not have this IP address. You should use the Manual IP configuration method if: ■ you configure the Switch IP information manually. IP addresses configured...
... the IP address changing. If neither server is found, the Switch will configure itself with its default IP address 169.254.100.100 if it is always allocated the same IP information.) For most installations, 3Com recommends that you do not have this IP address. You should use the Manual IP configuration method if: ■ you configure the Switch IP information manually. IP addresses configured...
Getting Started Guide
Page 35
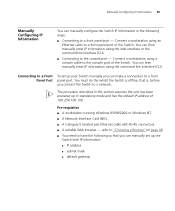
... unit has been powered up in standalone mode and has the default IP address of 169.254.100.100. refer to "Choosing a Browser"on page 48. ■ You need to have the following ways: ■ Connecting to a front panel port of the Switch. Connect a workstation using a console cable to the console port of the...
... unit has been powered up in standalone mode and has the default IP address of 169.254.100.100. refer to "Choosing a Browser"on page 48. ■ You need to have the following ways: ■ Connecting to a front panel port of the Switch. Connect a workstation using a console cable to the console port of the...
Getting Started Guide
Page 36
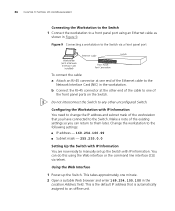
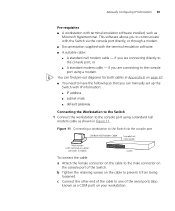
... Connecting the Workstation to the Switch 1 Connect the workstation to any other end of the cable to one of the existing settings so you have connected to the Network Interface Card (NIC) in the Location Address field. This is the default IP address that you can do this... using an Ethernet cable as shown in Figure 9. Configuring the Workstation with IP information. Using the Web Interface 1 Power-up the Switch with IP Information You need to change the IP address and subnet mask of...
... Connecting the Workstation to the Switch 1 Connect the workstation to any other end of the cable to one of the existing settings so you have connected to the Network Interface Card (NIC) in the Location Address field. This is the default IP address that you can do this... using an Ethernet cable as shown in Figure 9. Configuring the Workstation with IP information. Using the Web Interface 1 Power-up the Switch with IP Information You need to change the IP address and subnet mask of...
Getting Started Guide
Page 37
... send line feeds with line feeds is no response, wait for one minute then re-enter the default IP address. 3 At the login and password prompts, enter admin as your Switch is now complete and the Switch is : Telnet 169.254.100.100 c Click OK. 2 Press Enter to the network. To... page displays a summary of Managing a Switch" on some platforms unless it starts. 3 At the login and password prompts, enter admin as your chosen management method. b In the dialogue box that appears type the default IP address of Getting Started pages are using TCP/IP may not work correctly on page 45....
... send line feeds with line feeds is no response, wait for one minute then re-enter the default IP address. 3 At the login and password prompts, enter admin as your Switch is now complete and the Switch is : Telnet 169.254.100.100 c Click OK. 2 Press Enter to the network. To... page displays a summary of Managing a Switch" on some platforms unless it starts. 3 At the login and password prompts, enter admin as your chosen management method. b In the dialogue box that appears type the default IP address of Getting Started pages are using TCP/IP may not work correctly on page 45....
Getting Started Guide
Page 39
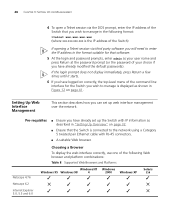
... on the cable to the console port using a modem. You can manually set up the Switch with IP information: ■ IP address ■ subnet mask ■ default gateway Connecting the Workstation to the Switch 1 Connect the workstation to prevent it from being loosened. b Tighten the retaining screws on .... This software allows you are connecting directly to one of the Switch. Figure 11 Connecting a workstation to the Switch via the console port directly, or through a modem. ■ Documentation supplied with the Switch via the console port To connect the cable: a Attach the...
... on the cable to the console port using a modem. You can manually set up the Switch with IP information: ■ IP address ■ subnet mask ■ default gateway Connecting the Workstation to the Switch 1 Connect the workstation to prevent it from being loosened. b Tighten the retaining screws on .... This software allows you are connecting directly to one of the Switch. Figure 11 Connecting a workstation to the Switch via the console port directly, or through a modem. ■ Documentation supplied with the Switch via the console port To connect the cable: a Attach the...
Getting Started Guide
Page 44
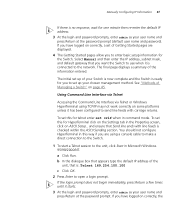
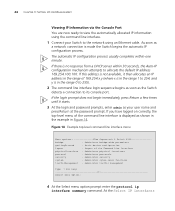
... command line interface menu Menu options 3Com Superstack 3 Switch 4200 bridge - Administer physical interfaces protocol - Administer security system - The automatic IP configuration process usually completes within 30 seconds, the Auto-IP configuration mechanism attempts to allocate the default IP address 169.254.100.100. If there is made the Switch begins the automatic IP configuration process. Basic device configuration logout...
... command line interface menu Menu options 3Com Superstack 3 Switch 4200 bridge - Administer physical interfaces protocol - Administer security system - The automatic IP configuration process usually completes within 30 seconds, the Auto-IP configuration mechanism attempts to allocate the default IP address 169.254.100.100. If there is made the Switch begins the automatic IP configuration process. Basic device configuration logout...
Getting Started Guide
Page 48
... line interface for the Switch you wish to manage is displayed as shown in Figure 12 on page 32. ■ Ensure that the Switch is the IP address of the Switch) If opening a Telnet session via third party software you have already modified the default passwords). Pre-requisites ■...; Ensure you have already set up the Switch with RJ-45 connectors. ■ A suitable Web ...
... line interface for the Switch you wish to manage is displayed as shown in Figure 12 on page 32. ■ Ensure that the Switch is the IP address of the Switch) If opening a Telnet session via third party software you have already modified the default passwords). Pre-requisites ■...; Ensure you have already set up the Switch with RJ-45 connectors. ■ A suitable Web ...
Getting Started Guide
Page 49
....xxx (where xxx.xxx.xxx.xxx is the IP address of your choice if you have changed your management workstation. You can manage a Switch if: ■ The correct Management Information Bases (MIBs) are in VLAN 1 (the Default VLAN). Setting Up SNMP Management Any network management ...IP protocol is installed. 2 Check you use the 3Com Network Supervisor application that is powered up. 3 Open your web browser and enter the IP address of the Switch that you have the IP protocol correctly installed on the Switch are installed on your Switch. If you can communicate with the Switch...
....xxx (where xxx.xxx.xxx.xxx is the IP address of your choice if you have changed your management workstation. You can manage a Switch if: ■ The correct Management Information Bases (MIBs) are in VLAN 1 (the Default VLAN). Setting Up SNMP Management Any network management ...IP protocol is installed. 2 Check you use the 3Com Network Supervisor application that is powered up. 3 Open your web browser and enter the IP address of the Switch that you have the IP protocol correctly installed on the Switch are installed on your Switch. If you can communicate with the Switch...
Getting Started Guide
Page 55
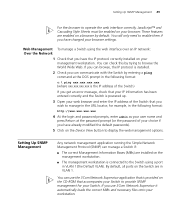
... fan fail trap hardware failure In the rare event of your Switch unit experiencing an SNMP fan fail trap hardware failure, refer to the suggested solution below. 1 Power off the unit. 2 Check that the default gateway IP address within the Switch is the same as 3Com Network Supervisor). To do this problem, completely remove the GBIC...
... fan fail trap hardware failure In the rare event of your Switch unit experiencing an SNMP fan fail trap hardware failure, refer to the suggested solution below. 1 Power off the unit. 2 Check that the default gateway IP address within the Switch is the same as 3Com Network Supervisor). To do this problem, completely remove the GBIC...
Getting Started Guide
Page 81
INDEX Numbers 10/100/1000BASE-T ports 14 3C number 22 3Com Knowledgebase Web Services 76 3Com URL 75 A access levels of default users 50 automatic setup 42 3Com Network Supervisor 42 console port 42 B browsers choosing 48 C cable choosing the correct 25 fiber 26 maximum length 14 pin... GBIC ports 14 transceivers 27 GBIC ports 14 H hardware features 12 I installing the Switch 19 prerequisites 20 IP addressing registered 56 IP configuration 33 L LEDs 15 logging in as a default user 50 M MAC address of the Switch 22 management methods 45 preparing for 34 setting up 31, 32 manual setup console port ...
INDEX Numbers 10/100/1000BASE-T ports 14 3C number 22 3Com Knowledgebase Web Services 76 3Com URL 75 A access levels of default users 50 automatic setup 42 3Com Network Supervisor 42 console port 42 B browsers choosing 48 C cable choosing the correct 25 fiber 26 maximum length 14 pin... GBIC ports 14 transceivers 27 GBIC ports 14 H hardware features 12 I installing the Switch 19 prerequisites 20 IP addressing registered 56 IP configuration 33 L LEDs 15 logging in as a default user 50 M MAC address of the Switch 22 management methods 45 preparing for 34 setting up 31, 32 manual setup console port ...


