
Operation Guide
Page 2
...5 1.4 What's Next? ...5 Section 2: Product Description 6 2.1 Machine Characteristics 6 2.2 Main Unit Identification 7 2.3 System Setup ...8 2.4 Remote Control Transmitter Identification 9 Section 3: Basic Operations 10 3.1 Installation ...10 3.2 Using the Projector ...11 3.3 Turn Off Power ...12 Section 4: Adjustments and Functions 13 4.1 Menu ...13 4.2 How To Use Foot Adjusters 14 4.3 ... Think Something Is Wrong 25 Section 7: Technical Specifications 26 7.1 Specifications ...26 7.2 Accessories ...26 7.3 Dimension Diagram ...27 3M™ Multimedia Projector MP8640 2 © 3M 1997
...5 1.4 What's Next? ...5 Section 2: Product Description 6 2.1 Machine Characteristics 6 2.2 Main Unit Identification 7 2.3 System Setup ...8 2.4 Remote Control Transmitter Identification 9 Section 3: Basic Operations 10 3.1 Installation ...10 3.2 Using the Projector ...11 3.3 Turn Off Power ...12 Section 4: Adjustments and Functions 13 4.1 Menu ...13 4.2 How To Use Foot Adjusters 14 4.3 ... Think Something Is Wrong 25 Section 7: Technical Specifications 26 7.1 Specifications ...26 7.2 Accessories ...26 7.3 Dimension Diagram ...27 3M™ Multimedia Projector MP8640 2 © 3M 1997

Operation Guide
Page 5
... in the event the MP8640 should require shipping to set up the projector. © 3M 1997 3M™ Multimedia Projector MP8640 5 After you are also included, but not shown here. In addition, the following items are ready to a 3M Service Center for standard VCR, PC, MAC™ II or laptop computer connections. MP8640 Multimedia Projector Remote Control Transmitter (batteries included...
... in the event the MP8640 should require shipping to set up the projector. © 3M 1997 3M™ Multimedia Projector MP8640 5 After you are also included, but not shown here. In addition, the following items are ready to a 3M Service Center for standard VCR, PC, MAC™ II or laptop computer connections. MP8640 Multimedia Projector Remote Control Transmitter (batteries included...

Operation Guide
Page 6
... brightness) • SVGA resolution (3 separate 800 x 600 LCD panels are used for the R, G and B signals) • XGA compression (60 Hz and 70 Hz) • Compact size, light weight for maximum remote control range • RS232 control capability • Optional ceiling mount kit 3M™ Multimedia Projector MP8640 6 © 3M 1997 Switching your presentation from two different computer...
... brightness) • SVGA resolution (3 separate 800 x 600 LCD panels are used for the R, G and B signals) • XGA compression (60 Hz and 70 Hz) • Compact size, light weight for maximum remote control range • RS232 control capability • Optional ceiling mount kit 3M™ Multimedia Projector MP8640 6 © 3M 1997 Switching your presentation from two different computer...

Operation Guide
Page 7
...terminal (RGB/VIDEO) Stereo mini jack CONTROL terminal D-sub 15pin terminal © 3M 1997 3M™ Multimedia Projector MP8640 7 ZOOM button Adjusts picture size. INPUT button To select the input source. ...OFF sets the unit in sequence as shown below. 2.2 Main Unit Identification LAMP indicator Handle Speakers Remote control sensor ON indicator STANDBY / ON button Power ON/OFF button. TEMP Indicator Cooling fan (exhaust) Lens Lens shutter Remote...
...terminal (RGB/VIDEO) Stereo mini jack CONTROL terminal D-sub 15pin terminal © 3M 1997 3M™ Multimedia Projector MP8640 7 ZOOM button Adjusts picture size. INPUT button To select the input source. ...OFF sets the unit in sequence as shown below. 2.2 Main Unit Identification LAMP indicator Handle Speakers Remote control sensor ON indicator STANDBY / ON button Power ON/OFF button. TEMP Indicator Cooling fan (exhaust) Lens Lens shutter Remote...

Operation Guide
Page 9
... Insert the provided batteries (AA or R6P) into the remote control transmitter. 1. left on screen, button resets menu to reveal screen. Slide the battery compartment cover in standby mode. Replace the cover. © 3M 1997 3M™ Multimedia Projector MP8640 9 TIMER ON / OFF button Displays or removes TIMER.... When the blank screen is on -screen menus. STICK SWITCH If Menu is displayed, TIMER can not be displayed. 2.4 Remote Control Transmitter Identification STANDBY / ON button Power ON/OFF button. OFF sets the unit in the direction of the arrow while pressing...
... Insert the provided batteries (AA or R6P) into the remote control transmitter. 1. left on screen, button resets menu to reveal screen. Slide the battery compartment cover in standby mode. Replace the cover. © 3M 1997 3M™ Multimedia Projector MP8640 9 TIMER ON / OFF button Displays or removes TIMER.... When the blank screen is on -screen menus. STICK SWITCH If Menu is displayed, TIMER can not be displayed. 2.4 Remote Control Transmitter Identification STANDBY / ON button Power ON/OFF button. OFF sets the unit in the direction of the arrow while pressing...

Operation Guide
Page 11
The method of connecting various equipment, see section 2.3. 7 Press the INPUT button on the projector or the INPUT SELECT (VIDEO or RGB) button on the remote to select the source of the signal to open. 3 Press the STANDBY/ON button. • The ON indicator blinks (...will light up orange. 2 Open the lens shutter. • Push down lens shutter switch to be projected on -screen display © 3M 1997 3M™ Multimedia Projector MP8640 11 3.2 Using the Projector 3 7 45 2 4 5 17 2 Note: Make all connected equipment. Example on the screen. • The selected signal input ...
The method of connecting various equipment, see section 2.3. 7 Press the INPUT button on the projector or the INPUT SELECT (VIDEO or RGB) button on the remote to select the source of the signal to open. 3 Press the STANDBY/ON button. • The ON indicator blinks (...will light up orange. 2 Open the lens shutter. • Push down lens shutter switch to be projected on -screen display © 3M 1997 3M™ Multimedia Projector MP8640 11 3.2 Using the Projector 3 7 45 2 4 5 17 2 Note: Make all connected equipment. Example on the screen. • The selected signal input ...
Operation Guide
Page 13
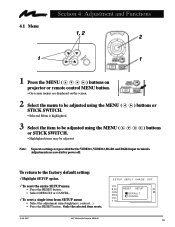
...INPUT IMAGE OPT. VOL BRI CON SHA COL TIN RESET 'SETUP' DEFAULT CANCEL © 3M 1997 3M™ Multimedia Projector MP8640 13 To return to be adjusted using the MENU ( or STICK SWITCH. • Highlighted ...items may be adjusted. ) buttons or ) buttons Note: Separate settings are saved after power off. Only the selected item resets. 4.1 Menu Section 4: Adjustment and Functions 1, 2 2 1 MENU RESET 1 1 Press the MENU ( ) buttons on projector or remote...
...INPUT IMAGE OPT. VOL BRI CON SHA COL TIN RESET 'SETUP' DEFAULT CANCEL © 3M 1997 3M™ Multimedia Projector MP8640 13 To return to be adjusted using the MENU ( or STICK SWITCH. • Highlighted ...items may be adjusted. ) buttons or ) buttons Note: Separate settings are saved after power off. Only the selected item resets. 4.1 Menu Section 4: Adjustment and Functions 1, 2 2 1 MENU RESET 1 1 Press the MENU ( ) buttons on projector or remote...
Operation Guide
Page 22
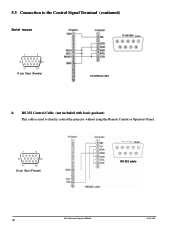
D-sub 15pin (Female) (male) RS-232 cable 3M™ Multimedia Projector MP8640 22 © 3M 1997 5.3 Connection to directly control the projector without using the Remote Control or Operator's Panel. RS 232 Control Cable (not included with basic packout) This cable is used to the Control Signal Terminal (continued) Serial mouse (male) D-sub 15pin (Female) Serial Mouse cable b.
D-sub 15pin (Female) (male) RS-232 cable 3M™ Multimedia Projector MP8640 22 © 3M 1997 5.3 Connection to directly control the projector without using the Remote Control or Operator's Panel. RS 232 Control Cable (not included with basic packout) This cable is used to the Control Signal Terminal (continued) Serial mouse (male) D-sub 15pin (Female) Serial Mouse cable b.

Operation Guide
Page 24
...• LAMP indicator lights up if the timer is reset. Allow the projector to determine the lamp operation hours, follow these steps: a) While the projector is running, press and hold the timer button on the remote control for at least 30 minutes before replacing the lamp. 6.3.1 Remove lamp ... retaining screws. Note: There are self-containing screws that must be removed from the lamp module. 3M™ Multimedia Projector MP8640 24 © 3M 1997 Note: After 2000 hours, the projector will only run for 10 minute intervals when restarted until 0 hour is reached, then power will be...
...• LAMP indicator lights up if the timer is reset. Allow the projector to determine the lamp operation hours, follow these steps: a) While the projector is running, press and hold the timer button on the remote control for at least 30 minutes before replacing the lamp. 6.3.1 Remove lamp ... retaining screws. Note: There are self-containing screws that must be removed from the lamp module. 3M™ Multimedia Projector MP8640 24 © 3M 1997 Note: After 2000 hours, the projector will only run for 10 minute intervals when restarted until 0 hour is reached, then power will be...

Operation Guide
Page 25
...lamp module. BRIGHTNESS. Picture is out of the projector or the remote control. •RGB/Video/Audio wiring to be replaced. • Adjust the brightness and contrast correctly. • Replace the lamp with a new one hand and the projector body opening with the other hand. Picture is ... side of case is open. • Ensure air filter door is set to projector is not correct. • Press the MENU button and increase • The brightness is closed. © 3M 1997 3M™ Multimedia Projector MP8640 25 on . • Insert the power cord into an AC socket. Ensure...
...lamp module. BRIGHTNESS. Picture is out of the projector or the remote control. •RGB/Video/Audio wiring to be replaced. • Adjust the brightness and contrast correctly. • Replace the lamp with a new one hand and the projector body opening with the other hand. Picture is ... side of case is open. • Ensure air filter door is set to projector is not correct. • Press the MENU button and increase • The brightness is closed. © 3M 1997 3M™ Multimedia Projector MP8640 25 on . • Insert the power cord into an AC socket. Ensure...