
Operation Guide
Page 2
... 6 2.2 Main Unit Identification 7 2.3 System Setup ...8 2.4 Remote Control Transmitter Identification 9 Section 3: Basic Operations 10 3.1 Installation ...10 3.2 Using the Projector ...11 3.3 Turn Off Power ...12 Section 4: Adjustments and Functions 13 4.1 Menu ...13 4.2 How To Use Foot Adjusters 14 4.3 SETUP ...15 4.4...the Air Filter 23 6.2 Message Table ...23 6.3 Lamp ...24 6.4 When You Think Something Is Wrong 25 Section 7: Technical Specifications 26 7.1 Specifications ...26 7.2 Accessories ...26 7.3 Dimension Diagram ...27 3M™ Multimedia Projector MP8640 2 © 3M 1997
... 6 2.2 Main Unit Identification 7 2.3 System Setup ...8 2.4 Remote Control Transmitter Identification 9 Section 3: Basic Operations 10 3.1 Installation ...10 3.2 Using the Projector ...11 3.3 Turn Off Power ...12 Section 4: Adjustments and Functions 13 4.1 Menu ...13 4.2 How To Use Foot Adjusters 14 4.3 SETUP ...15 4.4...the Air Filter 23 6.2 Message Table ...23 6.3 Lamp ...24 6.4 When You Think Something Is Wrong 25 Section 7: Technical Specifications 26 7.1 Specifications ...26 7.2 Accessories ...26 7.3 Dimension Diagram ...27 3M™ Multimedia Projector MP8640 2 © 3M 1997

Operation Guide
Page 3
... peripheral equipment and/or create a potentially unsafe operating condition. The metal halide lamp produces a strong light which , if not avoided, could damage your 3M MP8640 Multimedia Projector. © 3M 1997 3M™ Multimedia Projector MP8640 3 To reduce the risk of electric shock, do not immerse this projector to that it to a grounded outlet. 12. Indicates a potentially hazardous situation which...
... peripheral equipment and/or create a potentially unsafe operating condition. The metal halide lamp produces a strong light which , if not avoided, could damage your 3M MP8640 Multimedia Projector. © 3M 1997 3M™ Multimedia Projector MP8640 3 To reduce the risk of electric shock, do not immerse this projector to that it to a grounded outlet. 12. Indicates a potentially hazardous situation which...

Operation Guide
Page 6
...lamp ensures high brightness) • SVGA resolution (3 separate 800 x 600 LCD panels are used for the R, G and B signals) • XGA compression (60 Hz and 70 Hz) • Compact size, light weight for maximum remote control range • RS232 control capability • Optional ceiling mount kit 3M™ Multimedia Projector MP8640 6 © 3M... control panel keypad. Section 2: Product Description 2.1 Machine Characteristics The MP8640 Multimedia Projector integrates metal halide lamp and polysilicon LCD display technology into a single unit. Switching your presentation from two ...
...lamp ensures high brightness) • SVGA resolution (3 separate 800 x 600 LCD panels are used for the R, G and B signals) • XGA compression (60 Hz and 70 Hz) • Compact size, light weight for maximum remote control range • RS232 control capability • Optional ceiling mount kit 3M™ Multimedia Projector MP8640 6 © 3M... control panel keypad. Section 2: Product Description 2.1 Machine Characteristics The MP8640 Multimedia Projector integrates metal halide lamp and polysilicon LCD display technology into a single unit. Switching your presentation from two ...

Operation Guide
Page 7
... mini jack RGB output terminal RGB output terminal AUDIO output terminal (RGB/VIDEO) Stereo mini jack CONTROL terminal D-sub 15pin terminal © 3M 1997 3M™ Multimedia Projector MP8640 7 2.2 Main Unit Identification LAMP indicator Handle Speakers Remote control sensor ON indicator STANDBY / ON button Power ON/OFF button. RGB1 RGB2 VIDEO1 VIDEO2 AC IN socket...
... mini jack RGB output terminal RGB output terminal AUDIO output terminal (RGB/VIDEO) Stereo mini jack CONTROL terminal D-sub 15pin terminal © 3M 1997 3M™ Multimedia Projector MP8640 7 2.2 Main Unit Identification LAMP indicator Handle Speakers Remote control sensor ON indicator STANDBY / ON button Power ON/OFF button. RGB1 RGB2 VIDEO1 VIDEO2 AC IN socket...

Operation Guide
Page 11
The RGB 1 display will blink green during warm-up and lamp ignition. 4 Adjust the screen size using the ZOOM button. 5 Adjust the focus using the FOCUS button. 6 Turn on the right appears. (2) Adjust the focus so ... the INPUT SELECT (VIDEO or RGB) button on the remote to select the source of the projector on -screen display © 3M 1997 3M™ Multimedia Projector MP8640 11 The on-screen display shown on all cable connections and line hookups FIRST. 1 Turn the MAIN POWER switch of the signal to open. 3 Press ...
The RGB 1 display will blink green during warm-up and lamp ignition. 4 Adjust the screen size using the ZOOM button. 5 Adjust the focus using the FOCUS button. 6 Turn on the right appears. (2) Adjust the focus so ... the INPUT SELECT (VIDEO or RGB) button on the remote to select the source of the projector on -screen display © 3M 1997 3M™ Multimedia Projector MP8640 11 The on-screen display shown on all cable connections and line hookups FIRST. 1 Turn the MAIN POWER switch of the signal to open. 3 Press ...

Operation Guide
Page 12
...orange and the lamp turns off . 3.3 Turn Off the Power 1 1 2 3 1 Hold the STANDBY/ON button for about 1 minute to cool the projector. 3 Close the lens shutter. • Push up on the lens cover switch to close. 4 Disconnect cables. 3M™ Multimedia Projector MP8640 12 © 3M 1997 After ...approximately 1 minute, the fan stops and the indicator stays orange. 2 Turn the MAIN POWER switch of the projector off . Caution: Do not turn off the MAIN POWER switch...
...orange and the lamp turns off . 3.3 Turn Off the Power 1 1 2 3 1 Hold the STANDBY/ON button for about 1 minute to cool the projector. 3 Close the lens shutter. • Push up on the lens cover switch to close. 4 Disconnect cables. 3M™ Multimedia Projector MP8640 12 © 3M 1997 After ...approximately 1 minute, the fan stops and the indicator stays orange. 2 Turn the MAIN POWER switch of the projector off . Caution: Do not turn off the MAIN POWER switch...
Operation Guide
Page 23
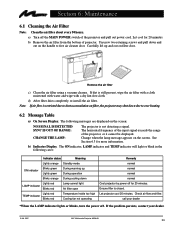
... detecting a signal. Check air flow and filter. call your dealer. © 3M 1997 3M™ Multimedia Projector MP8640 23 b) Remove the air filter from the bottom of the projector, or it cannot be displayed. If the problem persists, contact your dealer *When the LAMP indicator lights or blinks, turn the power off the MAIN POWER switch...
... detecting a signal. Check air flow and filter. call your dealer. © 3M 1997 3M™ Multimedia Projector MP8640 23 b) Remove the air filter from the bottom of the projector, or it cannot be displayed. If the problem persists, contact your dealer *When the LAMP indicator lights or blinks, turn the power off the MAIN POWER switch...

Operation Guide
Page 24
... button and select 0 (or CANCEL). The "CHANGE THE LAMP" message will be removed from the lamp module. 3M™ Multimedia Projector MP8640 24 © 3M 1997 Note: After 2000 hours, the projector will only run for 3 seconds. These screws are three lamp module screws that cannot be displayed. Warning: Lamp and adjacent metal parts become extremely hot and can...
... button and select 0 (or CANCEL). The "CHANGE THE LAMP" message will be removed from the lamp module. 3M™ Multimedia Projector MP8640 24 © 3M 1997 Note: After 2000 hours, the projector will only run for 3 seconds. These screws are three lamp module screws that cannot be displayed. Warning: Lamp and adjacent metal parts become extremely hot and can...

Operation Guide
Page 25
.... • Press the MUTE button. Picture is not clear • Projector is closed. © 3M 1997 3M™ Multimedia Projector MP8640 25 LAMP indicator lights red. • Lamp will not ignite. • Turn off power and let cool for service. LAMP indicator blinks red. • Temperature inside projector is too hot. • Do not block the ventilation holes. •...
.... • Press the MUTE button. Picture is not clear • Projector is closed. © 3M 1997 3M™ Multimedia Projector MP8640 25 LAMP indicator lights red. • Lamp will not ignite. • Turn off power and let cool for service. LAMP indicator blinks red. • Temperature inside projector is too hot. • Do not block the ventilation holes. •...

Operation Guide
Page 26
...RGB input/output RGB signal : D-sub 15pin (Female) signal terminal AUDIO : Stereo mini jack Control terminal D-sub 15pin (Male) 7.2 Accessories • Metal halide lamp module, 260 W • Power cord (US) • Power cord (UK) • Power cord (Germany) • VGA cable • MAC adapter... 3 beam poly-silicon LCD Liquid crystal panel Panel size Drive system Number of pixels 1.3 inches (33 mm) TFT active matrix 480,000 pixels (V600 × H800) per panel. 1.44 million pixels total with basic packout) 3M™ Multimedia Projector MP8640 26 © 3M 1997 Section 7: Technical ...
...RGB input/output RGB signal : D-sub 15pin (Female) signal terminal AUDIO : Stereo mini jack Control terminal D-sub 15pin (Male) 7.2 Accessories • Metal halide lamp module, 260 W • Power cord (US) • Power cord (UK) • Power cord (Germany) • VGA cable • MAC adapter... 3 beam poly-silicon LCD Liquid crystal panel Panel size Drive system Number of pixels 1.3 inches (33 mm) TFT active matrix 480,000 pixels (V600 × H800) per panel. 1.44 million pixels total with basic packout) 3M™ Multimedia Projector MP8640 26 © 3M 1997 Section 7: Technical ...