

Operation Guide
Page 1
...indicates information that may appear in this manual. • The reproduction, transmission or use of their respective owners. 1 S15/X15 Multimedia Projector Operator's Guide Thank you for future reference. NOTE • The information in personal injury or even death due to ensure...permitted without notice. • The manufacturer assumes no responsibility for any errors that , if ignored, could possibly result in this projector. All other trademarks are trademarks of the Video Electronics Standard Association. • Windows is a registered trademark of Microsoft Corporation....
...indicates information that may appear in this manual. • The reproduction, transmission or use of their respective owners. 1 S15/X15 Multimedia Projector Operator's Guide Thank you for future reference. NOTE • The information in personal injury or even death due to ensure...permitted without notice. • The manufacturer assumes no responsibility for any errors that , if ignored, could possibly result in this projector. All other trademarks are trademarks of the Video Electronics Standard Association. • Windows is a registered trademark of Microsoft Corporation....

Operation Guide
Page 2
.... . 22 Accessories 54 Using the menu function 22 Technical(English only) (Please see the end of this manual 1 EASY MENU 25 Contents 2 Projector features 3 Aspect, Zoom, Keystone, Mode, Bright, Contrast, Color, Tint, Sharpness, Whisper, Mirror, Reset, About contents of package . . ...3 Filter time, Language, Part names 4 Go to advanced menu Projector 4 PICTURE menu 27 Controls 5 Bright, Contrast, Gamma, Color temp, Remote control 5 Color, Tint, Sharpness, Progressive, Preparations 6 Fastening the ...
.... . 22 Accessories 54 Using the menu function 22 Technical(English only) (Please see the end of this manual 1 EASY MENU 25 Contents 2 Projector features 3 Aspect, Zoom, Keystone, Mode, Bright, Contrast, Color, Tint, Sharpness, Whisper, Mirror, Reset, About contents of package . . ...3 Filter time, Language, Part names 4 Go to advanced menu Projector 4 PICTURE menu 27 Controls 5 Bright, Contrast, Gamma, Color temp, Remote control 5 Color, Tint, Sharpness, Progressive, Preparations 6 Fastening the ...

Operation Guide
Page 3
.... Low Noise WHISPER mode is equipped for bottom-up use the original packing material. Projector features / About contents of package Your projector should come with two AA batteries) S15/X15 VGA cable Power cord (US, UK, EUROPE) Operator's Guide Product SafetyGuide Quick Start Guide... more flexibility and usability to use ) 3 Contact immediately your dealer if anything is missing. About contents of package Projector features This projector is used to realize quieter operation. It requires just a little space for Lens cover) VIDEO STANDBY/ON RGB SEARCH ASPECT AUTO...
.... Low Noise WHISPER mode is equipped for bottom-up use the original packing material. Projector features / About contents of package Your projector should come with two AA batteries) S15/X15 VGA cable Power cord (US, UK, EUROPE) Operator's Guide Product SafetyGuide Quick Start Guide... more flexibility and usability to use ) 3 Contact immediately your dealer if anything is missing. About contents of package Projector features This projector is used to realize quieter operation. It requires just a little space for Lens cover) VIDEO STANDBY/ON RGB SEARCH ASPECT AUTO...

Operation Guide
Page 4
Part names Part names Projector Vent (10) Lens (16, 45) Lens cover (6, 16) Front-Right side Focus ring (19) Remote sensor (8) Speaker Elevator button (...
Part names Part names Projector Vent (10) Lens (16, 45) Lens cover (6, 16) Front-Right side Focus ring (19) Remote sensor (8) Speaker Elevator button (...
Operation Guide
Page 6
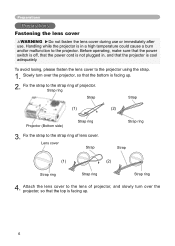
... in a high temperature could cause a burn and/or malfunction to the lens of projector, and slowly turn over the projector, so that the bottom is facing up . 2. Strap ring Strap Strap (1) (2) Projector (Bottom side) Strap ring 3. Lens cover Strap Strap ring Strap (1) (2) Strap ring Strap... ring Strap ring 4. To avoid losing, please fasten the lens cover to the strap ring of projector. Handling while the projector is cool adequately. Fix the strap to the projector using the strap. 1. Preparations Preparations Fastening the lens cover WARNING ►Do not fasten the lens...
... in a high temperature could cause a burn and/or malfunction to the lens of projector, and slowly turn over the projector, so that the bottom is facing up . 2. Strap ring Strap Strap (1) (2) Projector (Bottom side) Strap ring 3. Lens cover Strap Strap ring Strap (1) (2) Strap ring Strap... ring Strap ring 4. To avoid losing, please fasten the lens cover to the strap ring of projector. Handling while the projector is cool adequately. Fix the strap to the projector using the strap. 1. Preparations Preparations Fastening the lens cover WARNING ►Do not fasten the lens...
Operation Guide
Page 8
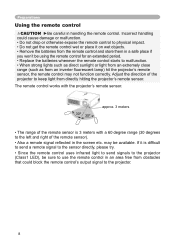
...cult to send a remote signal to the sensor directly, please try. • Since the remote control uses infrared light to send signals to the projector (Class1 LED), be sure to malfunction. • When strong lights such as direct sunlight or light from an extremely close range (such as ...from an inverter fluorescent lamp) hit the projector's remote sensor, the remote control may be using the remote control for an extended period. • Replace the batteries whenever the remote control starts...
...cult to send a remote signal to the sensor directly, please try. • Since the remote control uses infrared light to send signals to the projector (Class1 LED), be sure to malfunction. • When strong lights such as direct sunlight or light from an extremely close range (such as ...from an inverter fluorescent lamp) hit the projector's remote sensor, the remote control may be using the remote control for an extended period. • Replace the batteries whenever the remote control starts...

Operation Guide
Page 9
...64257;lter cover for bottom-up use . Please be careful for bottom-up , hold the projector. 2. While the projector is facing up. 4. Filter cover's knob Air filter's knob 3. Slowly turn the projector so that were connected to the filter cover for bottom-up use into place. Remove ...Claws Air filter (New or cleaned) Rail of air filter Filter cover for bottom-up use 5. Then slowly turn the projector so that the projector is higher than usual filter cover, to fall. Preparations About the filter cover for bottom-up . When the...
...64257;lter cover for bottom-up use . Please be careful for bottom-up , hold the projector. 2. While the projector is facing up. 4. Filter cover's knob Air filter's knob 3. Slowly turn the projector so that were connected to the filter cover for bottom-up use into place. Remove ...Claws Air filter (New or cleaned) Rail of air filter Filter cover for bottom-up use 5. Then slowly turn the projector so that the projector is higher than usual filter cover, to fall. Preparations About the filter cover for bottom-up . When the...

Operation Guide
Page 10
...64257;er, a smoking space or a kitchen. • Put nothing about lens and vents of projector. Placing the projector in a stable position horizontally. Damping the projector or inserting liquid in the projector could cause a fire, a burn and/or malfunction to ventilation. A fall or a ...turnover could result in a cool place, and pay attention enough to the projector. • Don't stop up, block and cover the projector's vents. • Keep a space of a ceiling installation or the like, contact your dealer before installation. &#...
...64257;er, a smoking space or a kitchen. • Put nothing about lens and vents of projector. Placing the projector in a stable position horizontally. Damping the projector or inserting liquid in the projector could cause a fire, a burn and/or malfunction to ventilation. A fall or a ...turnover could result in a cool place, and pay attention enough to the projector. • Don't stop up, block and cover the projector's vents. • Keep a space of a ceiling installation or the like, contact your dealer before installation. &#...
Operation Guide
Page 12
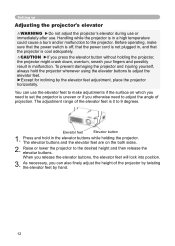
...after use the elevator feet to make sure that the power switch is off, that the power cord is not plugged in, and that the projector is cool adequately. CAUTION ►If you otherwise need to adjust the angle of the elevator feet is 0 to the desired height and ... to adjust the elevator feet. ►Except for inclining by hand. 12 The adjustment range of projection. Press and hold the projector whenever using the elevator buttons to the projector. When you can use . Before operating, make adjustments if the surface on the both sides. 2. You can also fi...
...after use the elevator feet to make sure that the power switch is off, that the power cord is not plugged in, and that the projector is cool adequately. CAUTION ►If you otherwise need to adjust the angle of the elevator feet is 0 to the desired height and ... to adjust the elevator feet. ►Except for inclining by hand. 12 The adjustment range of projection. Press and hold the projector whenever using the elevator buttons to the projector. When you can use . Before operating, make adjustments if the surface on the both sides. 2. You can also fi...

Operation Guide
Page 13
...computers may take advantage of the corresponding laptop computer. • Secure the screws on Windows. Attempting to connect a live device to the projector may generate extremely loud noises or other abnormalities that are VESA DDC (display data channel) compatible. • Please take some time and may... display screen modes. It might be completed. Plug-and-Play can be sure to change the resolution. For details on how this projector to computers that may result in malfunction and/or damage to select "Yes/No" for the connection. NOTE • Whenever attempting ...
...computers may take advantage of the corresponding laptop computer. • Secure the screws on Windows. Attempting to connect a live device to the projector may generate extremely loud noises or other abnormalities that are VESA DDC (display data channel) compatible. • Please take some time and may... display screen modes. It might be completed. Plug-and-Play can be sure to change the resolution. For details on how this projector to computers that may result in malfunction and/or damage to select "Yes/No" for the connection. NOTE • Whenever attempting ...
Operation Guide
Page 15
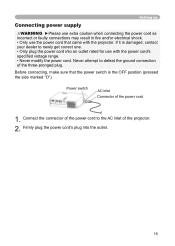
...caution when connecting the power cord as incorrect or faulty connections may result in fire and/or electrical shock. • Only use with the projector. Never attempt to defeat the ground connection of the power cord 1. Firmly plug the power cord's plug into an outlet rated for use the ...power cord that the power switch is damaged, contact your dealer to the AC inlet of the projector. 2. Power switch AC inlet Connector of the three-pronged plug. Connect the connector of the power cord to newly get correct one. • Only...
...caution when connecting the power cord as incorrect or faulty connections may result in fire and/or electrical shock. • Only use with the projector. Never attempt to defeat the ground connection of the power cord 1. Firmly plug the power cord's plug into an outlet rated for use the ...power cord that the power switch is damaged, contact your dealer to the AC inlet of the projector. 2. Power switch AC inlet Connector of the three-pronged plug. Connect the connector of the power cord to newly get correct one. • Only...

Operation Guide
Page 16
... the lens cover, and set the power switch to the section "Selecting an input signal" (18). 16 NOTE • Turn the power on the projector or remote control. Make sure that the power cord is emitted. Press the STANDBY/ON button on in right order. Then wait several seconds because... buttons may not function for these several seconds. Do not look into the lens or vents of the projector. Power on/off Power on/off Turning on the power WARNING ►When the power is on, a strong light is firmly and correctly connected...
... the lens cover, and set the power switch to the section "Selecting an input signal" (18). 16 NOTE • Turn the power on the projector or remote control. Make sure that the power cord is emitted. Press the STANDBY/ON button on in right order. Then wait several seconds because... buttons may not function for these several seconds. Do not look into the lens or vents of the projector. Power on/off Power on/off Turning on the power WARNING ►When the power is on, a strong light is firmly and correctly connected...

Operation Guide
Page 17
...position while the POWER indicator is green or blinking. Then the POWER indicator will go off ? 2. Under certain exceptional circumstances, the projector may not operate correctly even for approximately 5 seconds. Do not set the power switch to solid orange when the lamp cooling is complete...cover. will go off ?" In such a case, please push the restart switch (4) by an internal microprocessor. Please power off the projector after the connected devices. • Except for prolonged periods of time. 17 Make sure that the power indicator lights to solid orange, ...
...position while the POWER indicator is green or blinking. Then the POWER indicator will go off ? 2. Under certain exceptional circumstances, the projector may not operate correctly even for approximately 5 seconds. Do not set the power switch to solid orange when the lamp cooling is complete...cover. will go off ?" In such a case, please push the restart switch (4) by an internal microprocessor. Please power off the projector after the connected devices. • Except for prolonged periods of time. 17 Make sure that the power indicator lights to solid orange, ...
Operation Guide
Page 18
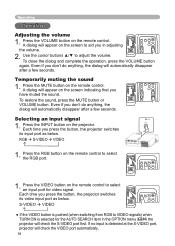
... muting the sound 1. Press the RGB button on the remote control. Even if you in the OPTION menu (38) POSITION theMENU projector will automatically disappear ENTER after a few seconds. To restore the sound, press the MUTE button or VOLUME button. RGB S-VIDEO... RESET ON MUTE OFF 2. Operating Operating Adjusting the volume VIDEO STANDBY/ON RGB SEARCH STANDBY/ON 1. Press the VOLUME button on the projector. A dialog will automatically disappear after a few seconds. Selecting an input signal 1. Press the INPUT button on the remote control. VIDEO...
... muting the sound 1. Press the RGB button on the remote control. Even if you in the OPTION menu (38) POSITION theMENU projector will automatically disappear ENTER after a few seconds. To restore the sound, press the MUTE button or VOLUME button. RGB S-VIDEO... RESET ON MUTE OFF 2. Operating Operating Adjusting the volume VIDEO STANDBY/ON RGB SEARCH STANDBY/ON 1. Press the VOLUME button on the projector. A dialog will automatically disappear after a few seconds. Selecting an input signal 1. Press the INPUT button on the remote control. VIDEO...
Operation Guide
Page 19
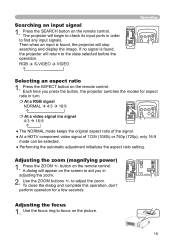
... begin to check its input ports in order to find any input signals. Press the ASPECT button on the picture. 19 The projector will stop searching and display the image. ESC RESET ● Performing the automatic adjustment initializes the aspect ratio setting. Use the ZOOM buttons +/- Searching an ...an aspect ratio 1. Each time you in turn. At a RGB signal NORMAL 4:3 16:9 At a video signal /no signal is found , the projector will appear on the screen to adjust the zoom. Press the ZOOM +/- to aid you press the button, the...
... begin to check its input ports in order to find any input signals. Press the ASPECT button on the picture. 19 The projector will stop searching and display the image. ESC RESET ● Performing the automatic adjustment initializes the aspect ratio setting. Use the ZOOM buttons +/- Searching an ...an aspect ratio 1. Each time you in turn. At a RGB signal NORMAL 4:3 16:9 At a video signal /no signal is found , the projector will appear on the screen to adjust the zoom. Press the ZOOM +/- to aid you press the button, the...
Operation Guide
Page 21
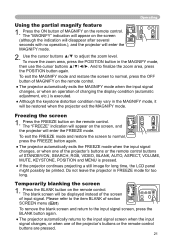
...mode and restore the screen to the item BLANK of changing the display condition (automatic adjustment, etc.) is pressed. ● If the projector continues projecting a still image for too long. Temporarily blanking the screen 1. ASPECT MAGNIFY ON OFF FREEZE POSITION AUTO BLANK VOLUME MUTE KEYSTONE ...AUTO BLANK MAGNIFY ON OFF FREEZE VOLUME MUTE KEYSTONE POSITION ZOOM -+ MENU VIDEO STANDBY/ON RGB SEARCH ASPECT AUTO BLANK of the projector's buttons or the remote control ESC RESET buttons are pressed. 21 Press the ON button of MAGNIFY on the screen (although ...
...mode and restore the screen to the item BLANK of changing the display condition (automatic adjustment, etc.) is pressed. ● If the projector continues projecting a still image for too long. Temporarily blanking the screen 1. ASPECT MAGNIFY ON OFF FREEZE POSITION AUTO BLANK VOLUME MUTE KEYSTONE ...AUTO BLANK MAGNIFY ON OFF FREEZE VOLUME MUTE KEYSTONE POSITION ZOOM -+ MENU VIDEO STANDBY/ON RGB SEARCH ASPECT AUTO BLANK of the projector's buttons or the remote control ESC RESET buttons are pressed. 21 Press the ON button of MAGNIFY on the screen (although ...

Operation Guide
Page 22
... button. The Advanced MENU or EASY MENU will appear. 2. VIDEO RGB SEARCH ASPECT AUTO BLANK Using the menu function MAGNIFY VOLUME This projector haONs the following menus: PICTURE, IMAGE, INPUT, SETUP, SCREEN, OPTION and EAMUSTE Y MENU. The basic operations of this manual, ...MY MEMORY SAVE 1 Advanced MENU EASY MENU EASY MENU 22 To choose the target menu Point at one of choices on the projector. Multifunctional settings Multifunctional settings NOTE • Regardless of SdTANeDBYs/ONcription of these menus are asLAMP follows. FREEZE KEYSTONE TEMP POWER VIDEO...
... button. The Advanced MENU or EASY MENU will appear. 2. VIDEO RGB SEARCH ASPECT AUTO BLANK Using the menu function MAGNIFY VOLUME This projector haONs the following menus: PICTURE, IMAGE, INPUT, SETUP, SCREEN, OPTION and EAMUSTE Y MENU. The basic operations of this manual, ...MY MEMORY SAVE 1 Advanced MENU EASY MENU EASY MENU 22 To choose the target menu Point at one of choices on the projector. Multifunctional settings Multifunctional settings NOTE • Regardless of SdTANeDBYs/ONcription of these menus are asLAMP follows. FREEZE KEYSTONE TEMP POWER VIDEO...
Operation Guide
Page 25
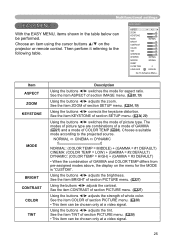
... chosen only at a video signal. 25 See the item COLOR of GAMMA and COLOR TEMP differs from pre-assigned modes above, the display on the projector or remote control. Choose an item using the cursor buttons ▲/▼ on the menu for aspect ratio.
... chosen only at a video signal. 25 See the item COLOR of GAMMA and COLOR TEMP differs from pre-assigned modes above, the display on the projector or remote control. Choose an item using the cursor buttons ▲/▼ on the menu for aspect ratio.
Operation Guide
Page 27
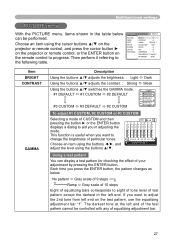
Choose an item using the buttons ◄/►, and adjust the level using the cursor buttons ▲/▼ on the projector or remote control, and press the cursor button ► on the projector or remote control, or the ENTER button on the test pattern, use the equalizing adjustment bar "1". Each time you in...
Choose an item using the buttons ◄/►, and adjust the level using the cursor buttons ▲/▼ on the projector or remote control, and press the cursor button ► on the projector or remote control, or the ENTER button on the test pattern, use the equalizing adjustment bar "1". Each time you in...
Operation Guide
Page 29
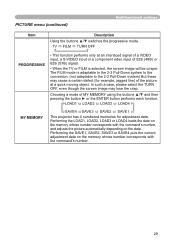
... puts the current adjustment data on the data. LOAD1 LOAD2 LOAD3 LOAD4 MY MEMORY SAVE4 SAVE3 SAVE2 SAVE1 This projector has 4 numbered memories for example, jagged line) of the picture at an interlaced signal of a VIDEO input, a S-VIDEO input or a component video input of MY...
... puts the current adjustment data on the data. LOAD1 LOAD2 LOAD3 LOAD4 MY MEMORY SAVE4 SAVE3 SAVE2 SAVE1 This projector has 4 numbered memories for example, jagged line) of the picture at an interlaced signal of a VIDEO input, a S-VIDEO input or a component video input of MY...


