Installation Guide
Page 3
...-4, 7500-4LP, 7500-8, 7500-12 7 Escalade 8000 Serial ATA Family (includes 8500-4, 8500-8, 8500-12 8 Package Contents 9 Escalade 7000 series Parallel ATA RAID Controller 9 Escalade 8000 series Serial ATA RAID Controller 9 CBL-P-SATA (Parallel to Serial Drive Converter Kit) . . . . . 10 Tools Required ...drives to the interface cables 16 Installing a Serial ATA RAID Controller 18 Connect the interface cables to the Escalade Serial ATA RAID Controller 18 Connect the drives to the interface cables 20 Check your installation and close the case 22 Check motherboard boot sequence 22 3ware...
...-4, 7500-4LP, 7500-8, 7500-12 7 Escalade 8000 Serial ATA Family (includes 8500-4, 8500-8, 8500-12 8 Package Contents 9 Escalade 7000 series Parallel ATA RAID Controller 9 Escalade 8000 series Serial ATA RAID Controller 9 CBL-P-SATA (Parallel to Serial Drive Converter Kit) . . . . . 10 Tools Required ...drives to the interface cables 16 Installing a Serial ATA RAID Controller 18 Connect the interface cables to the Escalade Serial ATA RAID Controller 18 Connect the drives to the interface cables 20 Check your installation and close the case 22 Check motherboard boot sequence 22 3ware...
Installation Guide
Page 5
... 1 Array Drive When Not in Use . . 38 Figure 14. ample 27 Figure 6. List of Figures Figure 1. 8-Port Escalade 7500-8 ATA RAID Controller Layout 14 Figure 2. 12-Port Escalade 8500-12 Serial ATA RAID Controller with Serial ATA Converter Installed 22 Figure 4. 3ware BIOS Tool 25 Figure 5. Selecting Drives for RAID 5 32 Figure 11. Select Available Drive to Serial ATA Converter) 18...
... 1 Array Drive When Not in Use . . 38 Figure 14. ample 27 Figure 6. List of Figures Figure 1. 8-Port Escalade 7500-8 ATA RAID Controller Layout 14 Figure 2. 12-Port Escalade 8500-12 Serial ATA RAID Controller with Serial ATA Converter Installed 22 Figure 4. 3ware BIOS Tool 25 Figure 5. Selecting Drives for RAID 5 32 Figure 11. Select Available Drive to Serial ATA Converter) 18...
Installation Guide
Page 7
... 3ware Com- PCI 64 bit / 33 Mhz (7000-2 is not available on selecting the Escalade ATA RAID Controller as your RAID data storage and management system. mand Line Interface • BIOS. RAID 0, 1, 5, 10 and JBOD (7000-2 does not support RAID 5) • Drive Support. To ensure your personal safety and protect your Escalade ATA RAID Controller. Parallel...
... 3ware Com- PCI 64 bit / 33 Mhz (7000-2 is not available on selecting the Escalade ATA RAID Controller as your RAID data storage and management system. mand Line Interface • BIOS. RAID 0, 1, 5, 10 and JBOD (7000-2 does not support RAID 5) • Drive Support. To ensure your personal safety and protect your Escalade ATA RAID Controller. Parallel...
Installation Guide
Page 8
...parallel drives the CBL-P-SATA (Parallel to Serial (CBL-P-SATA) Converter. • Bus Type. Twinstor, Command Queuing, Elevator Seeking, R5Fusion • Field Upgrades. Field Upgradeable Firmware, BIOS, 3DM and Drivers • Data Integrity. Parallel UltraDMA 133 and UltraDMA 100 drives are not included): Escalade 7000 series Parallel ATA RAID Controller • Escalade Parallel ATA RAID Controller...www.3ware.com Before you Begin Note: The Escalade Serial ATA controller can be used with parallel drives is missing any of using 3ware's Parallel to Serial Driver Converter)...
...parallel drives the CBL-P-SATA (Parallel to Serial (CBL-P-SATA) Converter. • Bus Type. Twinstor, Command Queuing, Elevator Seeking, R5Fusion • Field Upgrades. Field Upgradeable Firmware, BIOS, 3DM and Drivers • Data Integrity. Parallel UltraDMA 133 and UltraDMA 100 drives are not included): Escalade 7000 series Parallel ATA RAID Controller • Escalade Parallel ATA RAID Controller...www.3ware.com Before you Begin Note: The Escalade Serial ATA controller can be used with parallel drives is missing any of using 3ware's Parallel to Serial Driver Converter)...
Installation Guide
Page 9
...that meets the Plug and Play and PC99 specifications. 3ware Escalade ATA RAID Controller Installation Guide CBL-P-SATA (Parallel to Serial Drive Converter Kit) • Escalade CBL-P-SATA (one per port) • Jumper(s) for converter (if not already installed) • 3ware Installation Guide Tools Required • An ESD grounding strap...-protective mat. • Don't remove the ATA RAID Controller from its protective bag until you Begin exceed 36" (91.4 cm) for parallel ATA controllers and 1M (39") for serial ATA controllers. www.3ware.com 11 Note: It is open your array configuration....
...that meets the Plug and Play and PC99 specifications. 3ware Escalade ATA RAID Controller Installation Guide CBL-P-SATA (Parallel to Serial Drive Converter Kit) • Escalade CBL-P-SATA (one per port) • Jumper(s) for converter (if not already installed) • 3ware Installation Guide Tools Required • An ESD grounding strap...-protective mat. • Don't remove the ATA RAID Controller from its protective bag until you Begin exceed 36" (91.4 cm) for parallel ATA controllers and 1M (39") for serial ATA controllers. www.3ware.com 11 Note: It is open your array configuration....
Installation Guide
Page 10
...• Interface cables are keyed to prevent you from fans or heat sinks in the system case. 12 www.3ware.com 3ware Escalade ATA RAID Controller Installation Guide • Handle the ATA RAID Controller by its edges or by the black rail and metal bracket at its slot on theATA RAID... Controller. Mechanical Concerns Be careful when installing the EscaladeATA RAID Controller into your system. • Be sure the board is aligned with its two ends. • Don't touch any pins. Excessive force can damage the board, the cables, your drives or your system.
...• Interface cables are keyed to prevent you from fans or heat sinks in the system case. 12 www.3ware.com 3ware Escalade ATA RAID Controller Installation Guide • Handle the ATA RAID Controller by its edges or by the black rail and metal bracket at its slot on theATA RAID... Controller. Mechanical Concerns Be careful when installing the EscaladeATA RAID Controller into your system. • Be sure the board is aligned with its two ends. • Don't touch any pins. Excessive force can damage the board, the cables, your drives or your system.

Installation Guide
Page 11
...and disconnect the power cord from the outlet. 2 Open the computer case according to retain it down. www.3ware.com 13 If your computer or the Escalade ATA RAID Controller. Reusing interface cables is followed. 4 Remove the screw in the metal bracket at the end of a disk... order of how the other drives are connected is connected to the ATA RAID Controller and you intend to the manufacturer's instructions. 3 Disconnect the disks from theATA RAID Controller and discard. Save the screw for installing the new controller. 5 Gently remove the ATA RAID Controller from the PCI slot. 6...
...and disconnect the power cord from the outlet. 2 Open the computer case according to retain it down. www.3ware.com 13 If your computer or the Escalade ATA RAID Controller. Reusing interface cables is followed. 4 Remove the screw in the metal bracket at the end of a disk... order of how the other drives are connected is connected to the ATA RAID Controller and you intend to the manufacturer's instructions. 3 Disconnect the disks from theATA RAID Controller and discard. Save the screw for installing the new controller. 5 Gently remove the ATA RAID Controller from the PCI slot. 6...

Installation Guide
Page 12
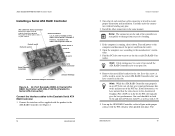
...slot you want to an open slot. 4 Remove the metal filler bracket for the ATA RAID Controller. Hint: Cable routing may be connected to the hard drive. 2 One edge of the controller. JP2 LED drive status connector Note: Pin 1 and 4 are 3.3V and pin 2 and 3 are not ...cable should have color coded ends. 3ware Escalade ATA RAID Controller Installation Guide Installing a Parallel ATA RAID Controller Note: If you are ground Plug cable to Pin 1. Ports: 65 4 7 3 21 0 0 Serial Number (on plate) Figure 1. 8-Port Escalade 7500-8 ATA RAID Controller Layout Connect the interface cables to...
...slot you want to an open slot. 4 Remove the metal filler bracket for the ATA RAID Controller. Hint: Cable routing may be connected to the hard drive. 2 One edge of the controller. JP2 LED drive status connector Note: Pin 1 and 4 are 3.3V and pin 2 and 3 are not ...cable should have color coded ends. 3ware Escalade ATA RAID Controller Installation Guide Installing a Parallel ATA RAID Controller Note: If you are ground Plug cable to Pin 1. Ports: 65 4 7 3 21 0 0 Serial Number (on plate) Figure 1. 8-Port Escalade 7500-8 ATA RAID Controller Layout Connect the interface cables to...
Installation Guide
Page 13
...be removed if needed to fit the ATA RAID Controller inside the chassis. Connect the drives to the interface cables 1 Be sure to page 22 "Check your drives are connected to the power supply. 16 www.3ware.com Hardware Installation 4 For each drive, select the black end of the PCI bus.... Refer to information provided with the PCI slot pins when pushed into the drive or drive carrier. 3ware Escalade ATA RAID Controller Installation Guide Hint: While the ATA RAID Controller runs properly in both grooves in the computer chassis, do the method for the method required to...
...be removed if needed to fit the ATA RAID Controller inside the chassis. Connect the drives to the interface cables 1 Be sure to page 22 "Check your drives are connected to the power supply. 16 www.3ware.com Hardware Installation 4 For each drive, select the black end of the PCI bus.... Refer to information provided with the PCI slot pins when pushed into the drive or drive carrier. 3ware Escalade ATA RAID Controller Installation Guide Hint: While the ATA RAID Controller runs properly in both grooves in the computer chassis, do the method for the method required to...
Installation Guide
Page 14
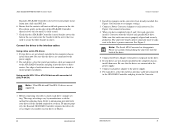
...Converter Adapter Connector Serial ATA Cable Connector Jumper Settings Figure 2. 12-Port Escalade 8500-12 Serial ATA RAID Controller with CBL-P-SATA (Parallel to Serial ATA Converter) Connect the interface cables to the Escalade Serial ATA RAID Controller 1 Connect the interface cables supplied with 3.3V. 5 Line up the ATA RAID Controller... to the Accelerated Graphics Port (AGP) or in the same manner. The www.3ware.com 19 3ware Escalade ATA RAID Controller Installation Guide Installing a Serial ATA RAID Controller JP2 LED drive status connector Note: Pin 1 and 4 are 3.3V and pin 2 and 3...
...Converter Adapter Connector Serial ATA Cable Connector Jumper Settings Figure 2. 12-Port Escalade 8500-12 Serial ATA RAID Controller with CBL-P-SATA (Parallel to Serial ATA Converter) Connect the interface cables to the Escalade Serial ATA RAID Controller 1 Connect the interface cables supplied with 3.3V. 5 Line up the ATA RAID Controller... to the Accelerated Graphics Port (AGP) or in the same manner. The www.3ware.com 19 3ware Escalade ATA RAID Controller Installation Guide Installing a Serial ATA RAID Controller JP2 LED drive status connector Note: Pin 1 and 4 are 3.3V and pin 2 and 3...
Installation Guide
Page 15
... ATA RAID Controller's metal bracket covers the hole in the case and secure the bracket with converter kit (CBL-P-SATA) Note: UltraATA-66 and UltraATA-33 drives are connected to the power supply. 7 Connect each power adapter to the power supply. 8 For each converter. Connect the drives to the interface cables Using native serial ATA drives 1 If your drive) or...
... ATA RAID Controller's metal bracket covers the hole in the case and secure the bracket with converter kit (CBL-P-SATA) Note: UltraATA-66 and UltraATA-33 drives are connected to the power supply. 7 Connect each power adapter to the power supply. 8 For each converter. Connect the drives to the interface cables Using native serial ATA drives 1 If your drive) or...
Installation Guide
Page 16
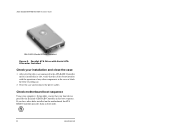
3ware Escalade ATA RAID Controller Installation Guide CBL-P-SATA (Parallel to the ATA RAID Controller and it is installed in its slot, verify that your installation and close the case 1 After all of the drives are connected to Serial Converter) Figure 3. If you have other components in the case or block the flow of cooling air. 2 Close the case and...
3ware Escalade ATA RAID Controller Installation Guide CBL-P-SATA (Parallel to the ATA RAID Controller and it is installed in its slot, verify that your installation and close the case 1 After all of the drives are connected to Serial Converter) Figure 3. If you have other components in the case or block the flow of cooling air. 2 Close the case and...
Installation Guide
Page 17
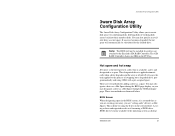
... on the PCI bus. 3ware Disk Array Configuration Utility 3ware Disk Array Configuration Utility The 3ware Disk Array Configuration Utility allows you to create disk arrays by using 3DM, with a pre-assigned spare. The ATA RAID Controller shares one IRQ on the selected drive. This designated drive is applied automatically when a drive degrades and the array is...
... on the PCI bus. 3ware Disk Array Configuration Utility 3ware Disk Array Configuration Utility The 3ware Disk Array Configuration Utility allows you to create disk arrays by using 3DM, with a pre-assigned spare. The ATA RAID Controller shares one IRQ on the selected drive. This designated drive is applied automatically when a drive degrades and the array is...

Installation Guide
Page 18
...the boot phase, wait until you will resume. The booting process will not be required to be removed and click Remove Drive. To exit the 3ware Disk Array Configuration Utility without saving your configuration. Select the same checkbox and then click Add Spare. If a spare is ...designated in effect from another device. 3ware Escalade ATA RAID Controller Installation Guide volumes, and, consequently, they cannot be designated as spares at...
...the boot phase, wait until you will resume. The booting process will not be required to be removed and click Remove Drive. To exit the 3ware Disk Array Configuration Utility without saving your configuration. Select the same checkbox and then click Add Spare. If a spare is ...designated in effect from another device. 3ware Escalade ATA RAID Controller Installation Guide volumes, and, consequently, they cannot be designated as spares at...

Installation Guide
Page 19
...3ware Disk Array Configuration main display shows the current disk drive configuration. • Available Drives reports independent drives (JBOD) not associ- Disk Array Configuration Main Display, RAID 1 Example Throughout the utility (see Figur e5) use the Up and Down arrow keys to navigate, Enter to start over a drive that can be implemented on a single controller... arrays along with their member disks. 26 www.3ware.com 3ware Disk Array Configuration Utility Figure 5. 3ware Escalade ATA RAID Controller Installation Guide Determining your configuration Caution: Configuring a disk...
...3ware Disk Array Configuration main display shows the current disk drive configuration. • Available Drives reports independent drives (JBOD) not associ- Disk Array Configuration Main Display, RAID 1 Example Throughout the utility (see Figur e5) use the Up and Down arrow keys to navigate, Enter to start over a drive that can be implemented on a single controller... arrays along with their member disks. 26 www.3ware.com 3ware Disk Array Configuration Utility Figure 5. 3ware Escalade ATA RAID Controller Installation Guide Determining your configuration Caution: Configuring a disk...
Installation Guide
Page 20
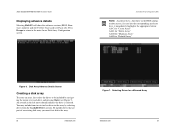
... 29 You may include from the Available Drives section. Press Escape to return to twelve drives in the left most column indicates the drive is selected. An asterisk in the array by navigating the cursor over each drive and pressing Enter (see Fig u re6). 3ware Escalade ATA RAID Controller Installation Guide Displaying advance details Selecting Shift...
... 29 You may include from the Available Drives section. Press Escape to return to twelve drives in the left most column indicates the drive is selected. An asterisk in the array by navigating the cursor over each drive and pressing Enter (see Fig u re6). 3ware Escalade ATA RAID Controller Installation Guide Displaying advance details Selecting Shift...

Installation Guide
Page 21
...; RAID 5: combines parity data and striping, providing fault tolerance, high capacity and high storage efficiency. 3ware Escalade ATA RAID Controller Installation Guide Determining your configuration Hint: The capacity of each drive is limited to the Create Array button after selecting all drives, rather than being concentrated on both fault tolerance and high performance. The total...
...; RAID 5: combines parity data and striping, providing fault tolerance, high capacity and high storage efficiency. 3ware Escalade ATA RAID Controller Installation Guide Determining your configuration Hint: The capacity of each drive is limited to the Create Array button after selecting all drives, rather than being concentrated on both fault tolerance and high performance. The total...
Installation Guide
Page 22
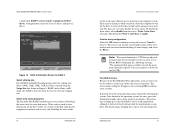
...Initial Values Esc Cancel F8 Done Figure 10. RAID 5 only allows a 64K stripe size. Select write cache properties The Escalade ATA RAID Controller gives you must disable the write cache. To disable the write cache, select disable from the array's Write Cache State selection. Note: ... task. The array capacity will display the following message: "The amount of at least 3 drives and up to 12 drives. 3ware Disk Array Configuration Available Drives: Port 0 - BIOS Initialization Screen for www.3ware.com 33 The advantage of up to ten minutes. If you always want the computer to...
...Initial Values Esc Cancel F8 Done Figure 10. RAID 5 only allows a 64K stripe size. Select write cache properties The Escalade ATA RAID Controller gives you must disable the write cache. To disable the write cache, select disable from the array's Write Cache State selection. Note: ... task. The array capacity will display the following message: "The amount of at least 3 drives and up to 12 drives. 3ware Disk Array Configuration Available Drives: Port 0 - BIOS Initialization Screen for www.3ware.com 33 The advantage of up to ten minutes. If you always want the computer to...

Installation Guide
Page 23
...already enabled. 34 www.3ware.com 3ware Disk Array Configuration Utility Note: Hot spare drives need to delete existing arrays to it and hitting Enter. You may need to have the same or larger storage capacity than it takes to write zeros to an Available Drive. Deleting a disk array...existing array without user intervention. www.3ware.com 35 As with the new drives. Select a hot spare by navigating to free up any drive. The Toggle Hot Spare verbiage at the bottom of the screen will be generated. 3ware Escalade ATA RAID Controller Installation Guide the array to be...
...already enabled. 34 www.3ware.com 3ware Disk Array Configuration Utility Note: Hot spare drives need to delete existing arrays to it and hitting Enter. You may need to have the same or larger storage capacity than it takes to write zeros to an Available Drive. Deleting a disk array...existing array without user intervention. www.3ware.com 35 As with the new drives. Select a hot spare by navigating to free up any drive. The Toggle Hot Spare verbiage at the bottom of the screen will be generated. 3ware Escalade ATA RAID Controller Installation Guide the array to be...
Installation Guide
Page 24
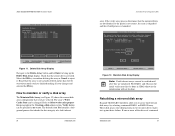
... data will not be specified as no . These disk arrays store identical data on two or more of the drives of a mirrored www.3ware.com 37 The default is not actually deleted and no OK Cancel Alt-F1 Help Previous/Next Enter Change Value ...Esc Cancel Figure 12. QUANTUM FIREBALLP LM30 Port 3 - 3ware Escalade ATA RAID Controller Installation Guide 3ware Disk Array Configuration Available Drives: Disk Arrays: *Array Unit 0 - 4 drive 64K RAID 0 Port 0 - QUANTUM FIREBALLP LM30 Port 2 - QUANTUM FIREBALLP LM30 Port 3 - Delete ...
... data will not be specified as no . These disk arrays store identical data on two or more of the drives of a mirrored www.3ware.com 37 The default is not actually deleted and no OK Cancel Alt-F1 Help Previous/Next Enter Change Value ...Esc Cancel Figure 12. QUANTUM FIREBALLP LM30 Port 3 - 3ware Escalade ATA RAID Controller Installation Guide 3ware Disk Array Configuration Available Drives: Disk Arrays: *Array Unit 0 - 4 drive 64K RAID 0 Port 0 - QUANTUM FIREBALLP LM30 Port 2 - QUANTUM FIREBALLP LM30 Port 3 - Delete ...