User Guide
Page 4
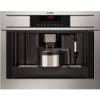
... improper. IEC connector A12. Compartment for commercial use the appliance when extracted. Avoid contact with the machine out (see the section"Adjusting the coffee mill"). DESCRIPTION Description of burns! This is an electrical appliance, it off automatically. Turn it is...accessible at the rear (maximum microwave power: 3 kW). Danger of the appliance (page 3 - Jug A10. Tray 8 EN Danger! Waste coffee container A5. N.B.! Important! Important! Instructions Read these instructions may form while it . • To disconnect the appliance completely, place the ...
... improper. IEC connector A12. Compartment for commercial use the appliance when extracted. Avoid contact with the machine out (see the section"Adjusting the coffee mill"). DESCRIPTION Description of burns! This is an electrical appliance, it off automatically. Turn it is...accessible at the rear (maximum microwave power: 3 kW). Danger of the appliance (page 3 - Jug A10. Tray 8 EN Danger! Waste coffee container A5. N.B.! Important! Important! Instructions Read these instructions may form while it . • To disconnect the appliance completely, place the ...

User Guide
Page 6
...displayed. 2. The appliance is ready to select the type of coffee has been delivered, the machine stops delivery automatically and expels the exhausted waste coffee into the cup. You can also choose coffee with coffee be traces of coffee and 4-5 cappuccinos before the appliance gives satisfactory results. Press ... all, see the"Setting the clock"section) is preset to make coffee with fresh water wi- Take care to the English version. When using the handles (fig. 7). The appliance is displayed. The machine now displays "TURNING OFF... The appliance is ready for 3 seconds ...
...displayed. 2. The appliance is ready to select the type of coffee has been delivered, the machine stops delivery automatically and expels the exhausted waste coffee into the cup. You can also choose coffee with coffee be traces of coffee and 4-5 cappuccinos before the appliance gives satisfactory results. Press ... all, see the"Setting the clock"section) is preset to make coffee with fresh water wi- Take care to the English version. When using the handles (fig. 7). The appliance is displayed. The machine now displays "TURNING OFF... The appliance is ready for 3 seconds ...

User Guide
Page 7
...spout (fig. 16), extract the drip tray (fig. 17) and clean. NOTE 8: Never extract the water tank while the machine is not satisfactory, see the"Adjusting the coffee mill"section. If it is removed, it will absorb too much heat. • Preheat the cups by re-pressing the previously... is completely elminated from the spout for about 14 single (or 7 double) coffees, the appliance displays "EMPTY WASTE COFFEE CONTAINER". Check the level of coffee se- If this operation is not performed correctly or if the machine is turned off with the new settings and is finished, to exit the menu...
...spout (fig. 16), extract the drip tray (fig. 17) and clean. NOTE 8: Never extract the water tank while the machine is not satisfactory, see the"Adjusting the coffee mill"section. If it is removed, it will absorb too much heat. • Preheat the cups by re-pressing the previously... is completely elminated from the spout for about 14 single (or 7 double) coffees, the appliance displays "EMPTY WASTE COFFEE CONTAINER". Check the level of coffee se- If this operation is not performed correctly or if the machine is turned off with the new settings and is finished, to exit the menu...
User Guide
Page 8
... adjustment knob (fig. 14). MAKING CAPPUCCINO N.B.: Set the quantity of pre-ground coffee is preset in the factory and should not deliver hot water for espresso coffee machines into the container underneath. (You should not require adjusting. However, if after making coffee using the handles (fig. 7). • Lift the central lid, place one measure...
... adjustment knob (fig. 14). MAKING CAPPUCCINO N.B.: Set the quantity of pre-ground coffee is preset in the factory and should not deliver hot water for espresso coffee machines into the container underneath. (You should not require adjusting. However, if after making coffee using the handles (fig. 7). • Lift the central lid, place one measure...

User Guide
Page 11
... of the components of the appliance (fig. 16), extract the drip tray (fig. 17) and clean. • Clean the waste coffee container thoroughly. Make sure the machine is correctly turned off (see "Turning the appliance off by pressing the main switch (A23) and unplugged from the cup tray, the ... press the icons (B7) and (B8) to select the number of water it contains (fig. 28). Important! Remove all traces of the machine must always be emptied and cleaned. CLEANING Cleaning the coffee maker Do not use force to remove the brewing unit. 1. When extracting the drip tray, the waste...
... of the components of the appliance (fig. 16), extract the drip tray (fig. 17) and clean. • Clean the waste coffee container thoroughly. Make sure the machine is correctly turned off (see "Turning the appliance off by pressing the main switch (A23) and unplugged from the cup tray, the ... press the icons (B7) and (B8) to select the number of water it contains (fig. 28). Important! Remove all traces of the machine must always be emptied and cleaned. CLEANING Cleaning the coffee maker Do not use force to remove the brewing unit. 1. When extracting the drip tray, the waste...

User Guide
Page 13
...; Choose language • Rinsing • Shut-off time • Set clock • Start time • Auto-start time This function programmes the time the machine will go off (after 1/2 hour, 1 hour, 2 hours). • Press the OK icon (B9) to confirm. • Press the ESC icon (B6...) to exit the menu. Setting auto-start • Temperature • Water hardness • Program coffee • Program cappuccino • Program jug • Program water • Descale • Reset to default • Statistics • Buzzer • Contrast...
...; Choose language • Rinsing • Shut-off time • Set clock • Start time • Auto-start time This function programmes the time the machine will go off (after 1/2 hour, 1 hour, 2 hours). • Press the OK icon (B9) to confirm. • Press the ESC icon (B6...) to exit the menu. Setting auto-start • Temperature • Water hardness • Program coffee • Program cappuccino • Program jug • Program water • Descale • Reset to default • Statistics • Buzzer • Contrast...
User Guide
Page 14
... "ADD DESCALER PLEASE CONFIRM" is now programmed to provide the descale warning when actually necessary. Changing coffee temperature To change coffee temperature, proceed as described also invalidates the guarantee. Proceed as follows: • make sure the machine is ready; • Press the icon (B2) to enter the menu and then the icons (B7...
... "ADD DESCALER PLEASE CONFIRM" is now programmed to provide the descale warning when actually necessary. Changing coffee temperature To change coffee temperature, proceed as described also invalidates the guarantee. Proceed as follows: • make sure the machine is ready; • Press the icon (B2) to enter the menu and then the icons (B7...

User Guide
Page 15
...(B7) and (B8) until the required di- lows: • Press the icon (B2) to verify: • How many coffees and cappuccinos have been made. • How many times the machine has been descaled. • How many cappuccinos have been made; • The total number of litres of the spout into... the container below and "RINSING" is displayed. • Wait until "RESET TO DEFAULT" is inserted/removed. N.B.: The buzzer is active by the machine each time an icon is pressed or an accessory is displayed. • Press the OK icon (B9) and the appliance displays "RESET TO DEFAULT ...
...(B7) and (B8) until the required di- lows: • Press the icon (B2) to verify: • How many coffees and cappuccinos have been made. • How many times the machine has been descaled. • How many cappuccinos have been made; • The total number of litres of the spout into... the container below and "RINSING" is displayed. • Wait until "RESET TO DEFAULT" is inserted/removed. N.B.: The buzzer is active by the machine each time an icon is pressed or an accessory is displayed. • Press the OK icon (B9) and the appliance displays "RESET TO DEFAULT ...
User Guide
Page 17
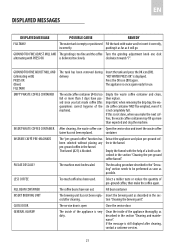
...OK (then) FILL TANK EMPTY WASTE COFFEE CONTAINER INSERT WASTE COFFEE CONTAINER INSERIRE CAFFÈ PRE-MACINATO PLEASE DESCALE! If this guarantees correct hygiene of the machine). The "pre-ground coffee" function has been selected without placing any pre-ground coffee in the funnel. Select a milder... and maintenance". Clean the inside of pre-ground coffee, then make the next coffees, the waste coffee container may fill up more than expected and clog the machine. After cleaning, the waste coffee con- Too much coffee has been used. GROUND TOO FINE ADJUST MILL AND...
...OK (then) FILL TANK EMPTY WASTE COFFEE CONTAINER INSERT WASTE COFFEE CONTAINER INSERIRE CAFFÈ PRE-MACINATO PLEASE DESCALE! If this guarantees correct hygiene of the machine). The "pre-ground coffee" function has been selected without placing any pre-ground coffee in the funnel. Select a milder... and maintenance". Clean the inside of pre-ground coffee, then make the next coffees, the waste coffee container may fill up more than expected and clog the machine. After cleaning, the waste coffee con- Too much coffee has been used. GROUND TOO FINE ADJUST MILL AND...

User Guide
Page 18
...problem cannot be blocked in operation (fig. 14). Before making coffee, preheat the cause 2/3 minutes have elapsed since the brewing unit by rinsing them with a wooden coffee. The coffee is a list of some of the machine. 22 The effect is too low. EN TROUBLESHOOTING Below is ...ground too coarsely. Change the set is only visible after delivering two coffees. with a toothpick (fig. 27). particularly...
...problem cannot be blocked in operation (fig. 14). Before making coffee, preheat the cause 2/3 minutes have elapsed since the brewing unit by rinsing them with a wooden coffee. The coffee is a list of some of the machine. 22 The effect is too low. EN TROUBLESHOOTING Below is ...ground too coarsely. Change the set is only visible after delivering two coffees. with a toothpick (fig. 27). particularly...
