
Operating Instructions
Page 5
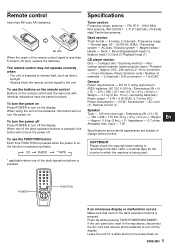
...buttons is being used. * applicable when one of channels - 2 channels / D/A conversion - 1 bit DAC General Power requirements - To use the buttons on the remote control Buttons on . Deck 1: Recording/playback head (1), Erasure head (1); Approx. 0.9 kg (2 lbs.) × 2 / Impedance - 2.7 ohms / Allowable max....V using the unit on the batteries, this button will not turn on , the function is exposed to turn off the display. The remote control may not operate correctly when: - Noncontact optical scanner (semiconductor laser) / Rotation speed - Approx. 500 - 200 rpm/CLV / ...
...buttons is being used. * applicable when one of channels - 2 channels / D/A conversion - 1 bit DAC General Power requirements - To use the buttons on the remote control Buttons on . Deck 1: Recording/playback head (1), Erasure head (1); Approx. 0.9 kg (2 lbs.) × 2 / Impedance - 2.7 ohms / Allowable max....V using the unit on the batteries, this button will not turn on , the function is exposed to turn off the display. The remote control may not operate correctly when: - Noncontact optical scanner (semiconductor laser) / Rotation speed - Approx. 500 - 200 rpm/CLV / ...
Operating Instructions
Page 6
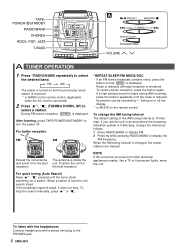
...r, t (TUNING DOWN, UP) to display the AM frequency. After listening, press TAPE/POWER/6STANDBY to turn the power off the display. * or MODE on the remote control (applicable when the AC cord is 10 kHz/ step. To listen with the headphones Connect headphones with a stereo mini plug to select the desired... band. FM AM The power is turned on and the previously tuned station is received. * or BAND on the remote control To change the interval as follows. 1 Press RADIO/BAND to display FM. 2 Press s while pressing RADIO/BAND to select a station.
...r, t (TUNING DOWN, UP) to display the AM frequency. After listening, press TAPE/POWER/6STANDBY to turn the power off the display. * or MODE on the remote control (applicable when the AC cord is 10 kHz/ step. To listen with the headphones Connect headphones with a stereo mini plug to select the desired... band. FM AM The power is turned on and the previously tuned station is received. * or BAND on the remote control To change the interval as follows. 1 Press RADIO/BAND to display FM. 2 Press s while pressing RADIO/BAND to select a station.
Operating Instructions
Page 7
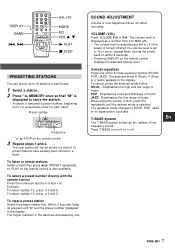
... band are decreased by one of music. ENGLISH 7 The volume level is displayed as a number from 1 in the display. c PLAY on the remote control 3 Repeat steps 1 and 2. To clear a preset station Select the preset number first. Within 4 seconds, keep s pressed until the desired mode...if a total of music. SOUND ADJUSTMENT Volume or tone adjustment does not affect recording. frequency sound. To select a preset number directly with the remote control Press the numbered buttons 0-9 and +10. A station is assigned a preset number, beginning from 0 to MAX (25). • The...
... band are decreased by one of music. ENGLISH 7 The volume level is displayed as a number from 1 in the display. c PLAY on the remote control 3 Repeat steps 1 and 2. To clear a preset station Select the preset number first. Within 4 seconds, keep s pressed until the desired mode...if a total of music. SOUND ADJUSTMENT Volume or tone adjustment does not affect recording. frequency sound. To select a preset number directly with the remote control Press the numbered buttons 0-9 and +10. A station is assigned a preset number, beginning from 0 to MAX (25). • The...
Operating Instructions
Page 8
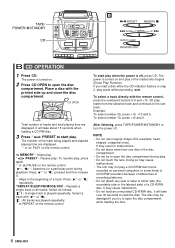
... and 0. The number of the loaded disc begins (Direct Play Function). Select as follows. [ 1 : A single track is recorded on the remote control After listening, press TAPE/POWER/6STANDBY to start play starts without pressing e. shaped, octagonal ones). It may be damaged if you load a ...a single track or all tracks. NOTE • Do not use irregular shape CDs (example: heart- Total number of a track. Place a disc with the remote control, press the numbered buttons 0-9 and +10. Select a track with r or t. [ : All tracks are played repeatedly. * or REPEAT on personal ...
... and 0. The number of the loaded disc begins (Direct Play Function). Select as follows. [ 1 : A single track is recorded on the remote control After listening, press TAPE/POWER/6STANDBY to start play starts without pressing e. shaped, octagonal ones). It may be damaged if you load a ...a single track or all tracks. NOTE • Do not use irregular shape CDs (example: heart- Total number of a track. Place a disc with the remote control, press the numbered buttons 0-9 and +10. Select a track with r or t. [ : All tracks are played repeatedly. * or REPEAT on personal ...
Operating Instructions
Page 9
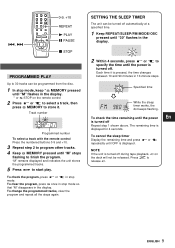
...turned off automatically at a specified time. 1 Keep REPEAT/SLEEP/FM MODE/OSC pressed until the power En is turned off during tape playback, c on the remote control 2 Press r or t to select a track, then press s MEMORY to finish the program. The remaining time is displayed. To cancel the sleep ... If the unit is pressed, the time changes between 10 and 90 minutes in the display. Track number Programmed number To select a track with the remote control Press the numbered buttons 0-9 and +10. 3 Repeat step 2 to 30 tracks can be released. Press Z to start play. "M" remains displayed ...
...turned off automatically at a specified time. 1 Keep REPEAT/SLEEP/FM MODE/OSC pressed until the power En is turned off during tape playback, c on the remote control 2 Press r or t to select a track, then press s MEMORY to finish the program. The remaining time is displayed. To cancel the sleep ... If the unit is pressed, the time changes between 10 and 90 minutes in the display. Track number Programmed number To select a track with the remote control Press the numbered buttons 0-9 and +10. 3 Repeat step 2 to 30 tracks can be released. Press Z to start play. "M" remains displayed ...


