

Operating Instructions
Page 3
... the grounding unit, connection to grounding terminals, and requirements for several months or more. TABLE OF CONTENTS Precautions l PREPARATIONS CONNECTIONS m 3 REMOTE CONTROL 6 BEFORE OPERATION 7 SOUND AUDIO ADJUSTMENTS 7 GRAPHIC EQUALIZER 8 DSP SURROUND SYSTEM 8 RADIO RECEPTION MANUAL TUNING 9 PRESETTING STATIONS s 9...EQUIPMENT 23 LISTENING TO EXTERNAL SOUflCES 23 GENERAL CARE AND MAINTENANCE 24 TROUBLESHOOTING GUIDE 24 SPECIFICATIONS 25 PRINCIPLE OF AIWAS FRONT 180" SPE:AKER SYSTEM 26 PARTS INDEX Back cover ENGLISH ~ When the cord is turned off Outdoor...
... the grounding unit, connection to grounding terminals, and requirements for several months or more. TABLE OF CONTENTS Precautions l PREPARATIONS CONNECTIONS m 3 REMOTE CONTROL 6 BEFORE OPERATION 7 SOUND AUDIO ADJUSTMENTS 7 GRAPHIC EQUALIZER 8 DSP SURROUND SYSTEM 8 RADIO RECEPTION MANUAL TUNING 9 PRESETTING STATIONS s 9...EQUIPMENT 23 LISTENING TO EXTERNAL SOUflCES 23 GENERAL CARE AND MAINTENANCE 24 TROUBLESHOOTING GUIDE 24 SPECIFICATIONS 25 PRINCIPLE OF AIWAS FRONT 180" SPE:AKER SYSTEM 26 PARTS INDEX Back cover ENGLISH ~ When the cord is turned off Outdoor...

Operating Instructions
Page 4
...in the SPEAKERS terminals. in a T-shape and fix its ends to , To stand the AM antenna on a surface Fix the claw to the slot. ~ CX-NA71 Compact disc stereo cassette reciever @ SX-NA74 Front speakers (For NSX-A740, NSX-A74) @ SX-R240 Surround speakers (For NSX-A74 only) @ SX-ANA72...speakers (For NSX-A72) @ SX-FNA71 Front speakers (For NSX-A71 ) EiiEa Remote control AM antenna FM antenna m q Be sure to them on the rear of difficulty. To connect with NSX-A740 or NSX-A74 + page 5. Model No, CX-NA71 SX-NA741SX-ANA721SX-FNA71 SX-R240 (NSX-A74 only) I Operating Instructions, etc....
...in the SPEAKERS terminals. in a T-shape and fix its ends to , To stand the AM antenna on a surface Fix the claw to the slot. ~ CX-NA71 Compact disc stereo cassette reciever @ SX-NA74 Front speakers (For NSX-A740, NSX-A74) @ SX-R240 Surround speakers (For NSX-A74 only) @ SX-ANA72...speakers (For NSX-A72) @ SX-FNA71 Front speakers (For NSX-A71 ) EiiEa Remote control AM antenna FM antenna m q Be sure to them on the rear of difficulty. To connect with NSX-A740 or NSX-A74 + page 5. Model No, CX-NA71 SX-NA741SX-ANA721SX-FNA71 SX-R240 (NSX-A74 only) I Operating Instructions, etc....

Operating Instructions
Page 7
... ENGLISH 6 To mount the surround speakers on the wall Mount each speaker on the rear of sight between the remote control and the sensor on the main unit. q The remote control may not operate correctly when: - exposed to off. m Sound is not heard from the surround SURROUND is...- When this manual refer mainly to replace the batteries The maximum operational distance between the remc)te control and the remote sensor inside the display window i:; Using the remote control The instructions in this distance decreases, replace the batteries with new ones. q If the unit is recommended. ...
... ENGLISH 6 To mount the surround speakers on the wall Mount each speaker on the rear of sight between the remote control and the sensor on the main unit. q The remote control may not operate correctly when: - exposed to off. m Sound is not heard from the surround SURROUND is...- When this manual refer mainly to replace the batteries The maximum operational distance between the remc)te control and the remote sensor inside the display window i:; Using the remote control The instructions in this distance decreases, replace the batteries with new ones. q If the unit is recommended. ...

Operating Instructions
Page 8
... demonstrates the functions of the unit lights up or flash. The clock display appears. (To set to 17or more. Flash window The window on the remote control. To turn off Press the POWER button. VOLUME Turn the VOLUME control on the main unit, or press the VOLUME buttons on the top...
... demonstrates the functions of the unit lights up or flash. The clock display appears. (To set to 17or more. Flash window The window on the remote control. To turn off Press the POWER button. VOLUME Turn the VOLUME control on the main unit, or press the VOLUME buttons on the top...

Operating Instructions
Page 11
... steps 2 and 3 in stop mode. Example: To select the 25th track, press the +1 O, +1 O and 5 buttons. To add tracks to program a track. Use the remote control. 1 Press the PRGM button twice in stop mode. REPEAT play following operations are not possible: -to select the tracks directly with the numbered buttons... all the :eteps again. RANDOM lights up on the display. m During programmed play, you cannot perform random play - RANDOM /REPEAT PLAY Use the remote control. PROGRAMMED PLAY Up to the next step when the tray stops rotating. button is indicated in stop mode.
... steps 2 and 3 in stop mode. Example: To select the 25th track, press the +1 O, +1 O and 5 buttons. To add tracks to program a track. Use the remote control. 1 Press the PRGM button twice in stop mode. REPEAT play following operations are not possible: -to select the tracks directly with the numbered buttons... all the :eteps again. RANDOM lights up on the display. m During programmed play, you cannot perform random play - RANDOM /REPEAT PLAY Use the remote control. PROGRAMMED PLAY Up to the next step when the tray stops rotating. button is indicated in stop mode.

Operating Instructions
Page 13
... next ascending number is changed, all other stations in an area where the frequency allocation system is 10 kHz/step. PRESET NUMBER TUNING Use the remote control to select the preset number directly. 1 Press Ihe TUNEFUBAND button to select a band. 2 Press the numbered buttons to be set again. # ENGL/SH...
... next ascending number is changed, all other stations in an area where the frequency allocation system is 10 kHz/step. PRESET NUMBER TUNING Use the remote control to select the preset number directly. 1 Press Ihe TUNEFUBAND button to select a band. 2 Press the numbered buttons to be set again. # ENGL/SH...
Operating Instructions
Page 14
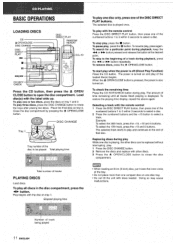
Place the third disc on . The selected disc is displayed. To resume play of the loaded disc(s) begins. Selecting a track with the remote control 1 Press the DISC DIRECT PLAY button, then press one of the numbered buttons 1 to 3 within 3 seconds to the beginning of a track during play... is turned on tray 1 "and 2. To -skip to select a disc. To restore the playing time display, repeat the above again. Load disc(s) with the remote control Press the DISC DIRECT PLAY button, then press one or two discs, place the discs on and play , press again. To start play , press...
Place the third disc on . The selected disc is displayed. To resume play of the loaded disc(s) begins. Selecting a track with the remote control 1 Press the DISC DIRECT PLAY button, then press one of the numbered buttons 1 to 3 within 3 seconds to the beginning of a track during play... is turned on tray 1 "and 2. To -skip to select a disc. To restore the playing time display, repeat the above again. Load disc(s) with the remote control Press the DISC DIRECT PLAY button, then press one or two discs, place the discs on and play , press again. To start play , press...

Operating Instructions
Page 18
... th; Al EDIT - PRGM EDIT 4 Press one of the DISC DIRECT PLAY buttons to select a disc. 3 Press the numbered buttons on the remote control to select tracks. This unit can be specified. To stop simultaneously. button repeatedly. Insert the tape with the minus mark). Tape length Tape side... button once. tape is longer than the specified recording time printed on first facing out from the'beginning o; "EDIT" and "Al" Jight up on the remote control are also available to select side A or B, and press the + or - Example: When using a 60-minute tape, press the 6 and O ...
... th; Al EDIT - PRGM EDIT 4 Press one of the DISC DIRECT PLAY buttons to select a disc. 3 Press the numbered buttons on the remote control to select tracks. This unit can be specified. To stop simultaneously. button repeatedly. Insert the tape with the minus mark). Tape length Tape side... button once. tape is longer than the specified recording time printed on first facing out from the'beginning o; "EDIT" and "Al" Jight up on the remote control are also available to select side A or B, and press the + or - Example: When using a 60-minute tape, press the 6 and O ...

Operating Instructions
Page 19
...facing out from a point halfway in the tape, The tape must be recorded on the display. "EDIT" and "PRGM" light up on the remote control. Recording and CD play stop recording Press the s button. Program number 4 Press the + or - Tape length Maximum recording time for ... +4 or Fl> button repeatedly. PROGRAMMED EDIT RECORDING 2 5 8 1 4 3,7 1 Programmed edit function enables CD recording while checking the remaining time on the remote control to program a track. To check the order of the numbered buttons 1 to 99 minutes can be programmed. Then, press the numbered buttons and the...
...facing out from a point halfway in the tape, The tape must be recorded on the display. "EDIT" and "PRGM" light up on the remote control. Recording and CD play stop recording Press the s button. Program number 4 Press the + or - Tape length Maximum recording time for ... +4 or Fl> button repeatedly. PROGRAMMED EDIT RECORDING 2 5 8 1 4 3,7 1 Programmed edit function enables CD recording while checking the remaining time on the remote control to program a track. To check the order of the numbered buttons 1 to 99 minutes can be programmed. Then, press the numbered buttons and the...

Operating Instructions
Page 21
... start play To skip a current track Press the ® * button. Before or during CD play, you can be played after the current track. Use the remote control 1 Press the PRGM button U. KARAOKE PROGRAM Repeat step 2. m s The Karaoke functions may not operate correctly with the next reserved track. Ibutton is displayed. Each...
... start play To skip a current track Press the ® * button. Before or during CD play, you can be played after the current track. Use the remote control 1 Press the PRGM button U. KARAOKE PROGRAM Repeat step 2. m s The Karaoke functions may not operate correctly with the next reserved track. Ibutton is displayed. Each...

Operating Instructions
Page 22
... to I SET button within 4 seconds. The unit can be displayed during recording. 2 Designate the hour of the timer-on the remote control, and press the I I designate the minute, and press the II SET button. The time is set correctly. Preparation Make ...press the II SET button after 4 seconds, another operation may start. mlip,p~g$p~ $,9@,,,Fq!"?p~&iP#B&~~i'$~b#~JJ~$,@#**#l$*$nJ,kik* ~~% z.. The minute stops flashing on the remote control. \ SETTING THE CLOCK ] ~ ~\\, s j[ k8 1,2,3 at a specified time every day with the built-in timer. displayed for 4 seconds....
... to I SET button within 4 seconds. The unit can be displayed during recording. 2 Designate the hour of the timer-on the remote control, and press the I I designate the minute, and press the II SET button. The time is set correctly. Preparation Make ...press the II SET button after 4 seconds, another operation may start. mlip,p~g$p~ $,9@,,,Fq!"?p~&iP#B&~~i'$~b#~JJ~$,@#**#l$*$nJ,kik* ~~% z.. The minute stops flashing on the remote control. \ SETTING THE CLOCK ] ~ ~\\, s j[ k8 1,2,3 at a specified time every day with the built-in timer. displayed for 4 seconds....

Operating Instructions
Page 23
... the display after the power is applicable for 4 seconds. To listen to the radio, tune in 5-minute steps. The timer-on the display. Use the remote control. 1 Press the SLEEP button. 2 Within 4 seconds, press the ++ or >F button To cancel the sleep timer Press the SLEEP button twice so that 0 or C)REC...
... the display after the power is applicable for 4 seconds. To listen to the radio, tune in 5-minute steps. The timer-on the display. Use the remote control. 1 Press the SLEEP button. 2 Within 4 seconds, press the ++ or >F button To cancel the sleep timer Press the SLEEP button twice so that 0 or C)REC...

Operating Instructions
Page 80
PAFITS INDEX Instructions about each part on the right side. The parts are indicated on the main unit or remote control are listed in alphabetic order. BBE 7 CD 11 CD EDIT/CHECK (EDIT/CHECK) . 11, 17, 18 W CLEAR 10. 11, 13 CLOCK 21 DEMO 7 NOMENCLATURE ...
PAFITS INDEX Instructions about each part on the right side. The parts are indicated on the main unit or remote control are listed in alphabetic order. BBE 7 CD 11 CD EDIT/CHECK (EDIT/CHECK) . 11, 17, 18 W CLEAR 10. 11, 13 CLOCK 21 DEMO 7 NOMENCLATURE ...


