
Operating Instructions
Page 1
4-252-190-11(1) USB Active Speaker System Operating Instructions UZ-US501 © 2004 Sony Corporation
4-252-190-11(1) USB Active Speaker System Operating Instructions UZ-US501 © 2004 Sony Corporation
Operating Instructions
Page 3
If you have it checked by qualified personnel before operating it any questions or problems concerning your system, please consult your nearest Aiwa dealer. On cleaning Clean the cabinet, panel and controls with a soft cloth slightly moistened with very low level input (soft sound) or no audio...continuously...Do not place magnetic objects near heat sources, or in a place subject to disconnect the system from the wall outlet. If you do, the speakers may be sure to direct sunlight, excessive dust or mechanical shock. Do not use the system for a long time, be damaged when a peak ...
If you have it checked by qualified personnel before operating it any questions or problems concerning your system, please consult your nearest Aiwa dealer. On cleaning Clean the cabinet, panel and controls with a soft cloth slightly moistened with very low level input (soft sound) or no audio...continuously...Do not place magnetic objects near heat sources, or in a place subject to disconnect the system from the wall outlet. If you do, the speakers may be sure to direct sunlight, excessive dust or mechanical shock. Do not use the system for a long time, be damaged when a peak ...

Operating Instructions
Page 4
.../ Windows 95 • An environment upgraded to the other operating systems • Multi-boot environment/ Multi-monitor environment Notes • Operations are necessary for the speaker system. You can also use the controls on the system if they have the same or similar names as those on a computer, see "Required system...
.../ Windows 95 • An environment upgraded to the other operating systems • Multi-boot environment/ Multi-monitor environment Notes • Operations are necessary for the speaker system. You can also use the controls on the system if they have the same or similar names as those on a computer, see "Required system...
Operating Instructions
Page 6
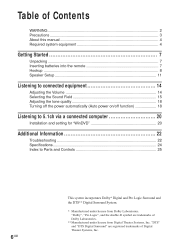
... from Digital Theater Systems, Inc. Table of Contents WARNING ...Precautions ...About this manual ...Required system equipment ...2 3 4 4 Getting Started ...7 Unpacking ...7 Inserting batteries into the remote ...7 Hookup ...8 Speaker Setup ...11 Listening to connected equipment ...14 Adjusting the Volume ...Selecting the Sound Field ...Adjusting the tone quality ...Turning off the power automatically (Auto power...
... from Digital Theater Systems, Inc. Table of Contents WARNING ...Precautions ...About this manual ...Required system equipment ...2 3 4 4 Getting Started ...7 Unpacking ...7 Inserting batteries into the remote ...7 Hookup ...8 Speaker Setup ...11 Listening to connected equipment ...14 Adjusting the Volume ...Selecting the Sound Field ...Adjusting the tone quality ...Turning off the power automatically (Auto power...

Operating Instructions
Page 7
..., point it at the remote sensor on the batteries. Doing so may cause a malfunction. • If you have the following items: • Subwoofer (1) • Satellite speakers Front/Center (Dual Center) (2) Surround (2) • USB cable 1.8 m (5.9 ft.) (1) • Remote commander (remote) RM-Z7S101 (1) • CD-ROM WinDVD (1) • Operating Instructions (this book) (1) Inserting...
..., point it at the remote sensor on the batteries. Doing so may cause a malfunction. • If you have the following items: • Subwoofer (1) • Satellite speakers Front/Center (Dual Center) (2) Surround (2) • USB cable 1.8 m (5.9 ft.) (1) • Remote commander (remote) RM-Z7S101 (1) • CD-ROM WinDVD (1) • Operating Instructions (this book) (1) Inserting...
Operating Instructions
Page 8
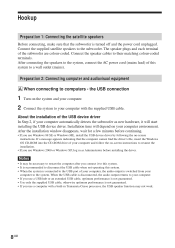
...connected to the USB port of your computer, the audio output is turned off and the power cord unplugged. After connecting the speakers to the system, connect the AC power cord (mains lead) of the subwoofer are colour-coded. Preparation 2: Connecting computer and... audiovisual equipment A When connecting to the subwoofer. Connect the supplied satellite speakers to computers - About the installation of the USB device driver In Step 2, if your computer automatically detects the subwoofer as Administrator before ...
...connected to the USB port of your computer, the audio output is turned off and the power cord unplugged. After connecting the speakers to the system, connect the AC power cord (mains lead) of the subwoofer are colour-coded. Preparation 2: Connecting computer and... audiovisual equipment A When connecting to the subwoofer. Connect the supplied satellite speakers to computers - About the installation of the USB device driver In Step 2, if your computer automatically detects the subwoofer as Administrator before ...

Operating Instructions
Page 9
... L CENTER OPTICAL IN SURROUND Green Red Gray Blue White Purple Speaker cords Speaker cords Center (R) Front (R) Hole for attaching the floor stand (not supplied) Front /Center speaker (R) Speaker cord Center (L) Front (L) Hole for attaching the floor stand (not supplied) Speaker cord Front/Center speaker (L) Surround speaker (R) Surround speaker (L) Hole for attaching the floor stand (not supplied) Hole for...
... L CENTER OPTICAL IN SURROUND Green Red Gray Blue White Purple Speaker cords Speaker cords Center (R) Front (R) Hole for attaching the floor stand (not supplied) Front /Center speaker (R) Speaker cord Center (L) Front (L) Hole for attaching the floor stand (not supplied) Speaker cord Front/Center speaker (L) Surround speaker (R) Surround speaker (L) Hole for attaching the floor stand (not supplied) Hole for...
Operating Instructions
Page 10
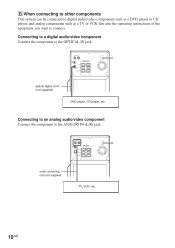
... the OPTICAL IN jack. Connecting to a digital audio/video component Connect the component to connect. ANALOG IN R L SPEAKER USB FRONT R L CENTER OPTICAL IN SURROUND audio connecting cord (not supplied) TV, VCR, etc. 10GB ANALOG IN R L SPEAKER USB FRONT R L CENTER OPTICAL IN SURROUND optical digital cord (not supplied) DVD player, CD player, etc...
... the OPTICAL IN jack. Connecting to a digital audio/video component Connect the component to connect. ANALOG IN R L SPEAKER USB FRONT R L CENTER OPTICAL IN SURROUND audio connecting cord (not supplied) TV, VCR, etc. 10GB ANALOG IN R L SPEAKER USB FRONT R L CENTER OPTICAL IN SURROUND optical digital cord (not supplied) DVD player, CD player, etc...
Operating Instructions
Page 11
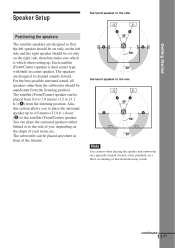
..., etc.) floor, as staining or discolouration may result. Surround speaker to the side Speaker Setup A A 45° Positioning the speakers The satellite speakers are designed to 21.1 ft.) (A) from the listening position. You can be placed anywhere in center speaker. continued 11GB Each satellite (Front/Center) speaker is which when setting up to 4.6 metres (13.8 ft...
..., etc.) floor, as staining or discolouration may result. Surround speaker to the side Speaker Setup A A 45° Positioning the speakers The satellite speakers are designed to 21.1 ft.) (A) from the listening position. You can be placed anywhere in center speaker. continued 11GB Each satellite (Front/Center) speaker is which when setting up to 4.6 metres (13.8 ft...
Operating Instructions
Page 12
...surround sound by automatically adjusting the output from your listening position. Front/Center speaker (L) Surround speaker (R) S-MODE SHIFT ?/1 (POWER) SELECT C/c Surround speaker (L) Subwoofer (the System) 1 2 3 Press ?/1 (POWER) to turn on how to the speaker's position. DRC (Dynamic Range Control) T (page 18) r APC..., press S-MODE repeatedly for the desired setting. Speaker installation For best performance, we recommend speaker placement as shown below on the system. DRC appears in the display. See each speaker according to make the initial setting. Each time ...
...surround sound by automatically adjusting the output from your listening position. Front/Center speaker (L) Surround speaker (R) S-MODE SHIFT ?/1 (POWER) SELECT C/c Surround speaker (L) Subwoofer (the System) 1 2 3 Press ?/1 (POWER) to turn on how to the speaker's position. DRC (Dynamic Range Control) T (page 18) r APC..., press S-MODE repeatedly for the desired setting. Speaker installation For best performance, we recommend speaker placement as shown below on the system. DRC appears in the display. See each speaker according to make the initial setting. Each time ...

Operating Instructions
Page 13
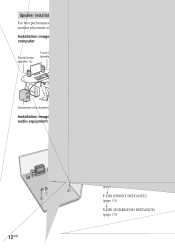
... in steps of 0.2 metres (0.6 ft.). xF-DIS (FRONT DISTANCE) Set the distance from equal to that of the satellite (Front/Center) speaker, down to the listening position. Getting Started Parameters The following are the parameters. The minimum is 3 metres (9 ft.). If you do not....).The default setting is 3 metres (9 ft.), the surround speaker can be placed at a distance of between 0.4 and 3 metres (1.2 to 9.0 ft.). The surround speaker to listening position distance can be set anywhere from the surround speakers to set the parameter using SELECT C/c. xS-DIS (SURROUND DISTANCE...
... in steps of 0.2 metres (0.6 ft.). xF-DIS (FRONT DISTANCE) Set the distance from equal to that of the satellite (Front/Center) speaker, down to the listening position. Getting Started Parameters The following are the parameters. The minimum is 3 metres (9 ft.). If you do not....).The default setting is 3 metres (9 ft.), the surround speaker can be placed at a distance of between 0.4 and 3 metres (1.2 to 9.0 ft.). The surround speaker to listening position distance can be set anywhere from the surround speakers to set the parameter using SELECT C/c. xS-DIS (SURROUND DISTANCE...
Operating Instructions
Page 14
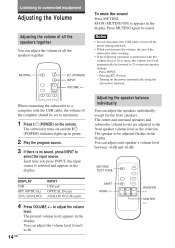
... to connected equipment Adjusting the Volume Adjusting the volume of all the speakers together You can adjust the speakers individually, except for the front speakers. You can adjust the volume level from 0 to prevent speaker damage. - WOOFER +/- When connecting the subwoofer to a computer with... jack OPTICAL IN jack ANALOG IN (L/R) jacks MUTING/ TEST TONE DISPLAY USB OPT (OPTICAL) ANA (ANALOG) SHIFT SURR +/- You can adjust each speaker's volume level between -6 dB and +6 dB. 1 2 3 Press ?/1 (POWER) on the power automatically using the auto power function. MUTING ...
... to connected equipment Adjusting the Volume Adjusting the volume of all the speakers together You can adjust the speakers individually, except for the front speakers. You can adjust the volume level from 0 to prevent speaker damage. - WOOFER +/- When connecting the subwoofer to a computer with... jack OPTICAL IN jack ANALOG IN (L/R) jacks MUTING/ TEST TONE DISPLAY USB OPT (OPTICAL) ANA (ANALOG) SHIFT SURR +/- You can adjust each speaker's volume level between -6 dB and +6 dB. 1 2 3 Press ?/1 (POWER) on the power automatically using the auto power function. MUTING ...

Operating Instructions
Page 15
Adjust the volume level so that you are in sequence. Listening to . Tip The test tone will hear the test tone from each speaker sounds the same on each sound field. See the table on page 17 for the details on the remote. To adjust the subwoofer Press WOOFER +/-.... difference in the display. Selecting the Sound Field You can enjoy surround sound simply by selecting one of the test tone from each speaker. To adjust the center speaker Press CENTER +/-. Sound field AUTO FORMAT DECODE DPLII MOVIE DPLII MUSIC CINEMA STUDIO EX A* CINEMA STUDIO EX B* CINEMA STUDIO EX C* HALL JAZZ ...
Adjust the volume level so that you are in sequence. Listening to . Tip The test tone will hear the test tone from each speaker sounds the same on each sound field. See the table on page 17 for the details on the remote. To adjust the subwoofer Press WOOFER +/-.... difference in the display. Selecting the Sound Field You can enjoy surround sound simply by selecting one of the test tone from each speaker. To adjust the center speaker Press CENTER +/-. Sound field AUTO FORMAT DECODE DPLII MOVIE DPLII MUSIC CINEMA STUDIO EX A* CINEMA STUDIO EX B* CINEMA STUDIO EX C* HALL JAZZ ...
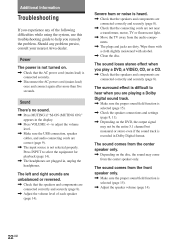
Operating Instructions
Page 22
...The surround effect is difficult to help you remedy the problem. The sound comes from the center speaker only. Should any of each speaker (page 14). Wipe them with a cloth slightly moistened with alcohol. , Clean the disc. Power...The sound loses stereo effect when you play a DVD, a VIDEO, CD, or a CD. , Check that the speakers and components are connected correctly and securely (page 8). , Adjust the volume level of the following difficulties while using the system... +/- Additional Information Troubleshooting If you experience any problem persist, consult your nearest Aiwa dealer.
...The surround effect is difficult to help you remedy the problem. The sound comes from the center speaker only. Should any of each speaker (page 14). Wipe them with a cloth slightly moistened with alcohol. , Clean the disc. Power...The sound loses stereo effect when you play a DVD, a VIDEO, CD, or a CD. , Check that the speakers and components are connected correctly and securely (page 8). , Adjust the volume level of the following difficulties while using the system... +/- Additional Information Troubleshooting If you experience any problem persist, consult your nearest Aiwa dealer.
Operating Instructions
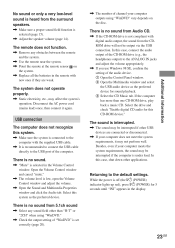
Page 23
.... In this system. , Make sure the system is connected to the computer with the supplied USB cable. , It is selected (page 15). , Adjust the speaker volume (page 14). , The number of channel your computer does not meet the system requirements, it again. While the power is under load. If the...shut down other than one CD-ROM drive, play back a music CD. No sound or only a very low-level sound is heard from the surround speakers. , Make sure a proper sound field function is recommended to connect the USB cable directly to the USB port of the computer. Open the Volume Control...
.... In this system. , Make sure the system is connected to the computer with the supplied USB cable. , It is selected (page 15). , Adjust the speaker volume (page 14). , The number of channel your computer does not meet the system requirements, it again. While the power is under load. If the...shut down other than one CD-ROM drive, play back a music CD. No sound or only a very low-level sound is heard from the surround speakers. , Make sure a proper sound field function is recommended to connect the USB cable directly to the USB port of the computer. Open the Volume Control...

Operating Instructions
Page 24
...; 12 × 12 1/4 in.) (w/h/d, not including the projecting parts) Mass (approx.) 5.8 kg (12 lb 13 oz) SS-UZ501 (Surround speakers) Speaker system Closed box type Speaker unit 58 mm (2 3/8 in .) (w/h/d, not including the projecting parts) Mass (approx.) 650g (1 lb 7 oz) × 2 24GB model:... 5 in .) dia. Design and specifications are subject to 90 % Supplied accessories See page 7. SS-UZ501 (Front/Center speakers) Speaker system Front: Closed box type Center: Uni directional type Speaker unit Front: 58 mm (2 3/8 in .) (w/h/d, not including the projecting parts) Mass (approx.) 350g (13 oz)...
...; 12 × 12 1/4 in.) (w/h/d, not including the projecting parts) Mass (approx.) 5.8 kg (12 lb 13 oz) SS-UZ501 (Surround speakers) Speaker system Closed box type Speaker unit 58 mm (2 3/8 in .) (w/h/d, not including the projecting parts) Mass (approx.) 650g (1 lb 7 oz) × 2 24GB model:... 5 in .) dia. Design and specifications are subject to 90 % Supplied accessories See page 7. SS-UZ501 (Front/Center speakers) Speaker system Front: Closed box type Center: Uni directional type Speaker unit Front: 58 mm (2 3/8 in .) (w/h/d, not including the projecting parts) Mass (approx.) 350g (13 oz)...

Operating Instructions
Page 25
... volume and select settings. VOLUME +/- continued 25GB When turned off, lights up green. S-MODE Adjust the sound field mode and select settings. Display Indicates the speaker setting, input signal, sound field mode, etc. Index to Parts and Controls Subwoofer (Front Panel) PHONES AUTO POWER INPUT VOLUME Additional Information S-MODE 1 HEADPHONE jack...
... volume and select settings. VOLUME +/- continued 25GB When turned off, lights up green. S-MODE Adjust the sound field mode and select settings. Display Indicates the speaker setting, input signal, sound field mode, etc. Index to Parts and Controls Subwoofer (Front Panel) PHONES AUTO POWER INPUT VOLUME Additional Information S-MODE 1 HEADPHONE jack...

Operating Instructions
Page 26
Subwoofer (Rear Panel) ANALOG IN R L SPEAKER USB FRONT R L CENTER OPTICAL IN SURROUND 1 ANALOG IN (L/R) jacks Connect to the audio output of a TV, VCR, etc. 2 USB jack Connect to the computer. 3 OPTICAL ... is activated. 2 Displays the current sound format. 3 Displays the volume level, sound field, etc. 4 Displays the input source. 5 Displays the signal of a DVD player, etc. 4 SPEAKER jacks Connect to the supplied satellite speakers. 5 AC power cord (mains lead) Display SW L C L.F.E.
Subwoofer (Rear Panel) ANALOG IN R L SPEAKER USB FRONT R L CENTER OPTICAL IN SURROUND 1 ANALOG IN (L/R) jacks Connect to the audio output of a TV, VCR, etc. 2 USB jack Connect to the computer. 3 OPTICAL ... is activated. 2 Displays the current sound format. 3 Displays the volume level, sound field, etc. 4 Displays the input source. 5 Displays the signal of a DVD player, etc. 4 SPEAKER jacks Connect to the supplied satellite speakers. 5 AC power cord (mains lead) Display SW L C L.F.E.

Operating Instructions
Page 27
.... 6 ?/1 (POWER) Turns on and off the system. 7 INPUT Selects the input signal. 8 VOLUME +/-, SELECT C/c Makes the speaker settings or adjusts the volume of the buttons on the remote. 4 SURR +/- Adjust the subwoofer volume. 27GB Additional Information Pressing this button while pressing SHIFT ...
.... 6 ?/1 (POWER) Turns on and off the system. 7 INPUT Selects the input signal. 8 VOLUME +/-, SELECT C/c Makes the speaker settings or adjusts the volume of the buttons on the remote. 4 SURR +/- Adjust the subwoofer volume. 27GB Additional Information Pressing this button while pressing SHIFT ...

