
User Manual
Page 7
...100/1000 Mb/s - HD Audio Jack: Line in header - Supports jumperfree - VCCM, NB Voltage Multi-adjustment - Supports PXE I /O Connector BIOS Feature Support CD Unique Feature - Supports "Plug and Play" - SMBIOS 2.3.1 Support - OEM and Trial; ASRock OC ...10 and JBOD), NCQ, AHCI and "Hot Plug" functions (see CAUTION 9) 7 Explorer, AMD Fusion, CyberLink MediaEspresso 6.5 Trial, ASRock Software Suite (CyberLink DVD Suite - Supports Wake-On-LAN - ASRock Instant Boot - ASRock MAGIX Multimedia Suite OEM) - LAN Rear Panel I /O Panel - 1 x PS/2 Mouse Port - 1 x PS/2 Keyboard...
...100/1000 Mb/s - HD Audio Jack: Line in header - Supports jumperfree - VCCM, NB Voltage Multi-adjustment - Supports PXE I /O Connector BIOS Feature Support CD Unique Feature - Supports "Plug and Play" - SMBIOS 2.3.1 Support - OEM and Trial; ASRock OC ...10 and JBOD), NCQ, AHCI and "Hot Plug" functions (see CAUTION 9) 7 Explorer, AMD Fusion, CyberLink MediaEspresso 6.5 Trial, ASRock Software Suite (CyberLink DVD Suite - Supports Wake-On-LAN - ASRock Instant Boot - ASRock MAGIX Multimedia Suite OEM) - LAN Rear Panel I /O Panel - 1 x PS/2 Mouse Port - 1 x PS/2 Keyboard...
User Manual
Page 49
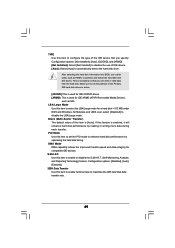
for a hard disk > 512 MB under DOS and Windows; S.M.A.R.T. Configuration options: [Disabled], [Auto], [Enabled]. 32Bit Data Transfer Use this item to enable or disable the S.M.A.R.T. (Self-Monitoring, Analysis, and Reporting ...
for a hard disk > 512 MB under DOS and Windows; S.M.A.R.T. Configuration options: [Disabled], [Auto], [Enabled]. 32Bit Data Transfer Use this item to enable or disable the S.M.A.R.T. (Self-Monitoring, Analysis, and Reporting ...
User Manual
Page 51
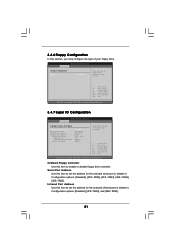
... Port Address Use this item to set the address for the onboard infrared port or disable it . BIOS SETUP UTILITY Advanced Floppy Configuration Floppy A [1.44 MB 312"] Select the type of your floppy drive. OnBoard Floppy Controller Use this item to set the address for the onboard serial port or disable...
... Port Address Use this item to set the address for the onboard infrared port or disable it . BIOS SETUP UTILITY Advanced Floppy Configuration Floppy A [1.44 MB 312"] Select the type of your floppy drive. OnBoard Floppy Controller Use this item to set the address for the onboard serial port or disable...

Quick Installation Guide
Page 6
... - OEM and Trial; ASRock Intelligent Energy Saver (see CAUTION 9) ASRock 880GM-LE FX Motherboard English LAN Rear Panel I /O Panel - 1 x PS/2 Mouse Port - 1 x PS/2 Keyboard Port - 1 x D-Sub Port - 1 x DVI-D Port - 6 x Ready-to-Use USB 2.0 Ports - 1 x RJ-45 LAN Port with LED (ACT/LINK LED and SPEED LED) - PCIE x1 Gigabit LAN 10/100/1000 Mb/s - Realtek RTL8111DL...
... - OEM and Trial; ASRock Intelligent Energy Saver (see CAUTION 9) ASRock 880GM-LE FX Motherboard English LAN Rear Panel I /O Panel - 1 x PS/2 Mouse Port - 1 x PS/2 Keyboard Port - 1 x D-Sub Port - 1 x DVI-D Port - 6 x Ready-to-Use USB 2.0 Ports - 1 x RJ-45 LAN Port with LED (ACT/LINK LED and SPEED LED) - PCIE x1 Gigabit LAN 10/100/1000 Mb/s - Realtek RTL8111DL...

RAID Installation Guide
Page 8
Two Logical Drives After selecting the logical drive in our support CD or "Quick Installation Guide". Enter the desired capacity (MB) for the first logical drive and press . The Define LD Menu displays again. 2. Press the up and down arrow keys to the first logical drive. Then please follow the steps below. 1. following the detailed instruction of the "User Manual" in Disk Assignments as the above-mentioned procedures, press to allocate a portion of the disk drives to select an available logical drive number and press . 8
Two Logical Drives After selecting the logical drive in our support CD or "Quick Installation Guide". Enter the desired capacity (MB) for the first logical drive and press . The Define LD Menu displays again. 2. Press the up and down arrow keys to the first logical drive. Then please follow the steps below. 1. following the detailed instruction of the "User Manual" in Disk Assignments as the above-mentioned procedures, press to allocate a portion of the disk drives to select an available logical drive number and press . 8


