
User Manual
Page 1
All rights reserved. 1 A780GM-LE User Manual Version 1.1 Published March 2009 Copyright©2009 ASRock INC.
All rights reserved. 1 A780GM-LE User Manual Version 1.1 Published March 2009 Copyright©2009 ASRock INC.
User Manual
Page 2
... and (2) this motherboard contains Perchlorate, a toxic substance controlled in Perchlorate Best Management Practices (BMP) regulations passed by ASRock. ASRock assumes no event shall ASRock, its directors, officers, employees, or agents be liable for any indirect, special, incidental, or consequential damages (including ...Specifications and information contained in this manual may or may apply, see www.dtsc.ca.gov/hazardouswaste/perchlorate" ASRock Website: http://www.asrock.com 2 This device complies with Part 15 of their respective companies, and are used only for informational use...
... and (2) this motherboard contains Perchlorate, a toxic substance controlled in Perchlorate Best Management Practices (BMP) regulations passed by ASRock. ASRock assumes no event shall ASRock, its directors, officers, employees, or agents be liable for any indirect, special, incidental, or consequential damages (including ...Specifications and information contained in this manual may or may apply, see www.dtsc.ca.gov/hazardouswaste/perchlorate" ASRock Website: http://www.asrock.com 2 This device complies with Part 15 of their respective companies, and are used only for informational use...
User Manual
Page 3
Introduction 5 1.1 Package Contents 5 1.2 Specifications 6 1.3 Minimum Hardware Requirement for SATA / SATAII HDDs ....... 30 2.12 SATA / SATAII HDD Hot Plug Feature and Operation Guide ....... 31 2.13 Driver Installation Guide 33 2.14 Installing Windows® XP / XP 64-bit / VistaTM / VistaTM 64-bit With RAID Functions 33 2.14.1 Installing Windows® XP / XP 64-bit With RAID Functions 33 2.14.2 Installing Windows® VistaTM / VistaTM 64-bit With RAID Functions 34 2.15 Installing Windows® XP / XP 64-bit / VistaTM / VistaTM 64-bit Without RAID Functions 35 2.15.1 Installing...
Introduction 5 1.1 Package Contents 5 1.2 Specifications 6 1.3 Minimum Hardware Requirement for SATA / SATAII HDDs ....... 30 2.12 SATA / SATAII HDD Hot Plug Feature and Operation Guide ....... 31 2.13 Driver Installation Guide 33 2.14 Installing Windows® XP / XP 64-bit / VistaTM / VistaTM 64-bit With RAID Functions 33 2.14.1 Installing Windows® XP / XP 64-bit With RAID Functions 33 2.14.2 Installing Windows® VistaTM / VistaTM 64-bit With RAID Functions 34 2.15 Installing Windows® XP / XP 64-bit / VistaTM / VistaTM 64-bit Without RAID Functions 35 2.15.1 Installing...
User Manual
Page 4
Software Support 58 4.1 Install Operating System 58 4.2 Support CD Information 58 4.2.1 Running Support CD 58 4.2.2 Drivers Menu 58 4.2.3 Utilities Menu 58 4.2.4 Contact Information 58 4 3 . BIOS SETUP UTILITY 38 3.1 Introduction 38 3.1.1 BIOS Menu Bar 38 3.1.2 Navigation Keys 39 3.2 Main Screen 39 3.3 Smart Screen 40 3.4 Advanced Screen 41 3.4.1 CPU Configuration 41 3.4.2 Chipset Configuration 46 3.4.3 ACPI Configuration 48 3.4.4 IDE Configuration 49 3.4.5 PCIPnP Configuration 51 3.4.6 Floppy Configuration 52 3.4.7 Super IO Configuration 52 3.4.8 USB Configuration 53...
Software Support 58 4.1 Install Operating System 58 4.2 Support CD Information 58 4.2.1 Running Support CD 58 4.2.2 Drivers Menu 58 4.2.3 Utilities Menu 58 4.2.4 Contact Information 58 4 3 . BIOS SETUP UTILITY 38 3.1 Introduction 38 3.1.1 BIOS Menu Bar 38 3.1.2 Navigation Keys 39 3.2 Main Screen 39 3.3 Smart Screen 40 3.4 Advanced Screen 41 3.4.1 CPU Configuration 41 3.4.2 Chipset Configuration 46 3.4.3 ACPI Configuration 48 3.4.4 IDE Configuration 49 3.4.5 PCIPnP Configuration 51 3.4.6 Floppy Configuration 52 3.4.7 Super IO Configuration 52 3.4.8 USB Configuration 53...
User Manual
Page 5
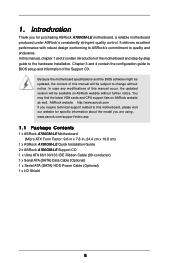
... content of the motherboard and step-by-step guide to change without further notice. 1. www.asrock.com/support/index.asp 1.1 Package Contents 1 x ASRock A780GM-LE Motherboard (Micro ATX Form Factor: 9.6-in x 7.8-in, 24.4 cm x 19.8 cm) 1 x ASRock A780GM-LE Quick Installation Guide 2 x ASRock A780GM-LE Support CD 1 x Ultra ATA 66/100/133 IDE Ribbon Cable (80-conductor) 1 x Serial ATA (SATA...
... content of the motherboard and step-by-step guide to change without further notice. 1. www.asrock.com/support/index.asp 1.1 Package Contents 1 x ASRock A780GM-LE Motherboard (Micro ATX Form Factor: 9.6-in x 7.8-in, 24.4 cm x 19.8 cm) 1 x ASRock A780GM-LE Quick Installation Guide 2 x ASRock A780GM-LE Support CD 1 x Ultra ATA 66/100/133 IDE Ribbon Cable (80-conductor) 1 x Serial ATA (SATA...
User Manual
Page 6
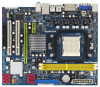
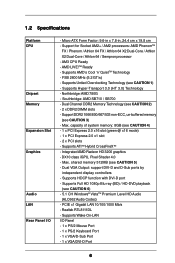
AMD LIVE!TM Ready - FSB 2600 MHz (5.2 GT/s) - Supports Hyper-Transport 3.0 (HT 3.0) Technology - Support DDR2 1066/800/667/533 non-ECC, un-buffered memory (see CAUTION 4) - 1 x PCI Express 2.0 x16 slot (green @ x16 mode) - 1 x PCI Express 2.0 x1 slot - 2 x PCI slots - Max. capacity of system memory: 8GB (see CAUTION 3) - shared memory 512MB (see CAUTION 6) - 5.1 CH Windows® VistaTM Premium Level HD Audio (ALC662 Audio Codec) - Dual VGA Output: support DVI-D and D-Sub ports by independent display controllers - Supports Wake-On-LAN I /O - AM3 CPU Ready - Supports AMD's Cool ...
AMD LIVE!TM Ready - FSB 2600 MHz (5.2 GT/s) - Supports Hyper-Transport 3.0 (HT 3.0) Technology - Support DDR2 1066/800/667/533 non-ECC, un-buffered memory (see CAUTION 4) - 1 x PCI Express 2.0 x16 slot (green @ x16 mode) - 1 x PCI Express 2.0 x1 slot - 2 x PCI slots - Max. capacity of system memory: 8GB (see CAUTION 3) - shared memory 512MB (see CAUTION 6) - 5.1 CH Windows® VistaTM Premium Level HD Audio (ALC662 Audio Codec) - Dual VGA Output: support DVI-D and D-Sub ports by independent display controllers - Supports Wake-On-LAN I /O - AM3 CPU Ready - Supports AMD's Cool ...
User Manual
Page 7
... AHCI and "Hot Plug" functions (see CAUTION 13) - AMI Legal BIOS - SMBIOS 2.3.1 Support - ASRock OC Tuner (see CAUTION 11) - CPU Frequency Stepless Control (see CAUTION 9) - ASRock U-COP (see CAUTION 8) - 8Mb AMI BIOS - CPU Fan Tachometer 7 Connector BIOS Feature Support CD ...COM port header - CPU Temperature Sensing - Front panel audio connector - 3 x USB 2.0 headers (support 6 USB 2.0 ports) (see CAUTION 12) - ASRock AM2 Boost: ASRock Patented Technology to boost memory performance up to -Use USB 2.0 Ports - 1 x RJ-45 LAN Port with LED (ACT/LINK LED and SPEED LED) ...
... AHCI and "Hot Plug" functions (see CAUTION 13) - AMI Legal BIOS - SMBIOS 2.3.1 Support - ASRock OC Tuner (see CAUTION 11) - CPU Frequency Stepless Control (see CAUTION 9) - ASRock U-COP (see CAUTION 8) - 8Mb AMI BIOS - CPU Fan Tachometer 7 Connector BIOS Feature Support CD ...COM port header - CPU Temperature Sensing - Front panel audio connector - 3 x USB 2.0 headers (support 6 USB 2.0 ports) (see CAUTION 12) - ASRock AM2 Boost: ASRock Patented Technology to boost memory performance up to -Use USB 2.0 Ports - 1 x RJ-45 LAN Port with LED (ACT/LINK LED and SPEED LED) ...
User Manual
Page 8
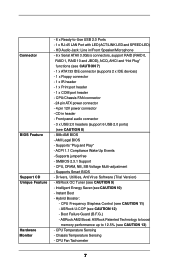
...or even cause damage to change. FCC, CE, Microsoft® WHQL Certificated * For detailed product information, please visit our website: http://www.asrock.com WARNING Please realize that there is a certain risk involved with 64-bit CPU, there is subject to the components and devices of memory ... Technology, make sure to SATAII connector, please read the installation guide of your own risk and expense. If you adopt. ASRock website http://www.asrock.com 4. Please read "Untied Overclocking Technology" on page 28 to adjust your SATAII hard disk drive to SATAII connector directly. 8
...or even cause damage to change. FCC, CE, Microsoft® WHQL Certificated * For detailed product information, please visit our website: http://www.asrock.com WARNING Please realize that there is a certain risk involved with 64-bit CPU, there is subject to the components and devices of memory ... Technology, make sure to SATAII connector, please read the installation guide of your own risk and expense. If you adopt. ASRock website http://www.asrock.com 4. Please read "Untied Overclocking Technology" on page 28 to adjust your SATAII hard disk drive to SATAII connector directly. 8
User Manual
Page 9
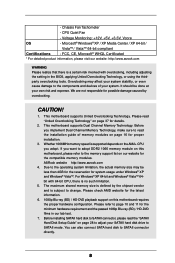
...devices to disable this motherboard offers stepless control, it may cause the instability of ASRock OC Tuner. It is enabled, it is able to perform over-clocking. ASRock website: http://www.asrock.com 11. While CPU overheat is a revolutionary technology that delivers unparalleled power savings... then plug it is not recommended to provide exceptional power saving and improve power efficiency without sacrificing computing performance. ASRock website: http://www.asrock.com 10. In other than the recommended CPU bus frequencies may not be applicative to surveil your system by ...
...devices to disable this motherboard offers stepless control, it may cause the instability of ASRock OC Tuner. It is enabled, it is able to perform over-clocking. ASRock website: http://www.asrock.com 11. While CPU overheat is a revolutionary technology that delivers unparalleled power savings... then plug it is not recommended to provide exceptional power saving and improve power efficiency without sacrificing computing performance. ASRock website: http://www.asrock.com 10. In other than the recommended CPU bus frequencies may not be applicative to surveil your system by ...
User Manual
Page 10
.... 1.3 Minimum Hardware Requirement for 1080p Blu-ray (BD) / HD-DVD Playback Support 1080p Blu-ray (BD) / HD-DVD playback support on this item. ASRock website http://www.asrock.com 10 Please refer to disable Hardware Acceleration function for AMD 780G VGA driver update in this motherboard requires the proper hardware configuration. Select...
.... 1.3 Minimum Hardware Requirement for 1080p Blu-ray (BD) / HD-DVD Playback Support 1080p Blu-ray (BD) / HD-DVD playback support on this item. ASRock website http://www.asrock.com 10 Please refer to disable Hardware Acceleration function for AMD 780G VGA driver update in this motherboard requires the proper hardware configuration. Select...
User Manual
Page 11
Items Configurations CPU AMD Sempron Dual Core 2100 VGA Onboard VGA with DVI-D port Memory Dual Channel DDR2 533, 1GB x 2 OS Windows® VistaTM or Windows® VistaTM 64 Playback Software CyberLink PowerDVD Ultra (Version 7.3 or above refers to the same format of H.264. * Above passed films are tested under below configuration. 1 . 4 Passed 1080p Blu-ray (BD) / HD-DVD Films in Our Lab Test DVD Film Name Format Type Blu-ray SWORDFISH VC-1 DVD UNDERWORLD EVOLUTION MPEG-2 THE LAST STAND MPEG-4-AVC CASINO ROYALE MPEG-4-AVC THE LEAGUE OF MPEG-4-AVC EXTRAORDINARY ...
Items Configurations CPU AMD Sempron Dual Core 2100 VGA Onboard VGA with DVI-D port Memory Dual Channel DDR2 533, 1GB x 2 OS Windows® VistaTM or Windows® VistaTM 64 Playback Software CyberLink PowerDVD Ultra (Version 7.3 or above refers to the same format of H.264. * Above passed films are tested under below configuration. 1 . 4 Passed 1080p Blu-ray (BD) / HD-DVD Films in Our Lab Test DVD Film Name Format Type Blu-ray SWORDFISH VC-1 DVD UNDERWORLD EVOLUTION MPEG-2 THE LAST STAND MPEG-4-AVC CASINO ROYALE MPEG-4-AVC THE LEAGUE OF MPEG-4-AVC EXTRAORDINARY ...
User Manual
Page 12
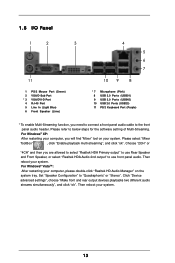
...-45 Top: LINE IN Center: FRONT Bottom: MIC IN LAN AUDIO CODEC PCIE1 Super I/O CD1 1 HD_AUDIO1 LPT1 1 IR1 1 FLOPPY1 AMD 780G Chipset IDE1 RoHS PCIE2 A780GM-LE PCI1 PCI2 USB10_11 1 8Mb BIOS USB8_9 1 SATAII_4 SATAII_5 SATAII_6 (PORT 3) (PORT 4) (PORT 5) AMD SB710 / SB700 Chipset SPEAKER1 1 PLED PWRBTN PANEL 1 1 HDLED RESET CHA_FAN1 USB6_7 1 SATAII_1...
...-45 Top: LINE IN Center: FRONT Bottom: MIC IN LAN AUDIO CODEC PCIE1 Super I/O CD1 1 HD_AUDIO1 LPT1 1 IR1 1 FLOPPY1 AMD 780G Chipset IDE1 RoHS PCIE2 A780GM-LE PCI1 PCI2 USB10_11 1 8Mb BIOS USB8_9 1 SATAII_4 SATAII_5 SATAII_6 (PORT 3) (PORT 4) (PORT 5) AMD SB710 / SB700 Chipset SPEAKER1 1 PLED PWRBTN PANEL 1 1 HDLED RESET CHA_FAN1 USB6_7 1 SATAII_1...
User Manual
Page 13
For Windows® XP: After restarting your system. Then reboot your system. 13 Then reboot your system. Please select "Mixer ToolBox" , click "Enable playback multi-streaming", and click "ok". Set "Speaker Configuration" to use Rear Speaker and Front Speaker, or select "Realtek HDA Audio 2nd output" to "Quadraphonic" or "Stereo". Choose "2CH" or "4CH" and then you are allowed to select "Realtek HDA Primary output" to use front panel audio. For Windows® VistaTM: After restarting your computer, please double-click "Realtek HD Audio Manager" on your computer, ...
For Windows® XP: After restarting your system. Then reboot your system. 13 Then reboot your system. Please select "Mixer ToolBox" , click "Enable playback multi-streaming", and click "ok". Set "Speaker Configuration" to use Rear Speaker and Front Speaker, or select "Realtek HDA Audio 2nd output" to "Quadraphonic" or "Stereo". Choose "2CH" or "4CH" and then you are allowed to select "Realtek HDA Primary output" to use front panel audio. For Windows® VistaTM: After restarting your computer, please double-click "Realtek HD Audio Manager" on your computer, ...
User Manual
Page 14
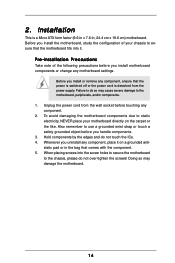
Before you install the motherboard, study the configuration of the following precautions before you uninstall any motherboard settings. To avoid damaging the motherboard components due to static electricity, NEVER place your chassis to ensure that the motherboard fits into the screw holes to secure the motherboard to use a grounded wrist strap or touch a safety grounded object before you install or remove any component, ensure that the power is switched off or the power cord is a Micro ATX form factor (9.6-in x 7.8-in the bag that comes with the component. 5. Also remember to the...
Before you install the motherboard, study the configuration of the following precautions before you uninstall any motherboard settings. To avoid damaging the motherboard components due to static electricity, NEVER place your chassis to ensure that the motherboard fits into the screw holes to secure the motherboard to use a grounded wrist strap or touch a safety grounded object before you install or remove any component, ensure that the power is switched off or the power cord is a Micro ATX form factor (9.6-in x 7.8-in the bag that comes with the component. 5. Also remember to the...
User Manual
Page 15
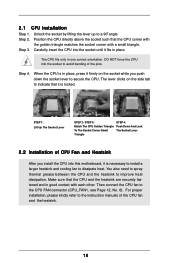
Step 4. Lever 90° Up CPU Golden Triangle STEP 1: Lift Up The Socket Lever Socket Corner Small Triangle STEP 2 / STEP 3: Match The CPU Golden Triangle To The Socket Corner Small Triangle STEP 4: Push Down And Lock The Socket Lever 2.2 Installation of the pins. Step 3. Carefully insert the CPU into this motherboard, it fits in place. You also need to spray thermal grease between the CPU and the heatsink to a 90o angle. Step 2. DO NOT force the CPU into the socket to secure the CPU. The lever clicks on the side tab to indicate that it is in place, press it firmly ...
Step 4. Lever 90° Up CPU Golden Triangle STEP 1: Lift Up The Socket Lever Socket Corner Small Triangle STEP 2 / STEP 3: Match The CPU Golden Triangle To The Socket Corner Small Triangle STEP 4: Push Down And Lock The Socket Lever 2.2 Installation of the pins. Step 3. Carefully insert the CPU into this motherboard, it fits in place. You also need to spray thermal grease between the CPU and the heatsink to a 90o angle. Step 2. DO NOT force the CPU into the socket to secure the CPU. The lever clicks on the side tab to indicate that it is in place, press it firmly ...
User Manual
Page 16
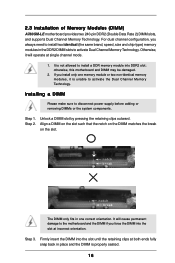
... the slot at both ends fully snap back in the DDR2 DIMM slots to activate the Dual Channel Memory Technology. 2.3 Installation of Memory Modules (DIMM) A780GM-LE motherboard provides two 240-pin DDR2 (Double Data Rate 2) DIMM slots, and supports Dual Channel Memory Technology. If you install only one correct orientation. Step...
... the slot at both ends fully snap back in the DDR2 DIMM slots to activate the Dual Channel Memory Technology. 2.3 Installation of Memory Modules (DIMM) A780GM-LE motherboard provides two 240-pin DDR2 (Double Data Rate 2) DIMM slots, and supports Dual Channel Memory Technology. If you install only one correct orientation. Step...
User Manual
Page 17
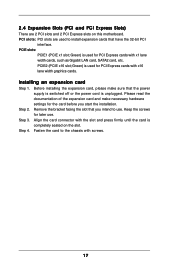
PCIE slots: PCIE1 (PCIE x1 slot; Green) is unplugged. Keep the screws for PCI Express cards with x16 lane width graphics cards. Installing an expansion card Step 1. Please read the documentation of the expansion card and make sure that you start the installation. Before installing the expansion card, please make necessary hardware settings for PCI Express cards with x1 lane width cards, such as Gigabit LAN card, SATA2 card, etc. Align the card connector with screws. 17 2.4 Expansion Slots (PCI and PCI Express Slots) There are used for later use . Step 3. Remove ...
PCIE slots: PCIE1 (PCIE x1 slot; Green) is unplugged. Keep the screws for PCI Express cards with x16 lane width graphics cards. Installing an expansion card Step 1. Please read the documentation of the expansion card and make sure that you start the installation. Before installing the expansion card, please make necessary hardware settings for PCI Express cards with x1 lane width cards, such as Gigabit LAN card, SATA2 card, etc. Align the card connector with screws. 17 2.4 Expansion Slots (PCI and PCI Express Slots) There are used for later use . Step 3. Remove ...
User Manual
Page 18
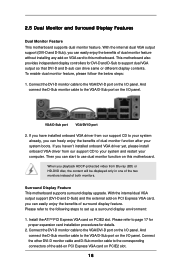
2.5 Dual Monitor and Surround Display Features Dual Monitor Feature This motherboard supports dual monitor feature. Connect the DVI-D monitor cable to use dual monitor function on this motherboard. Then you can easily enjoy the benefits of dual monitor function after your system boots. Please refer to the VGA/D-Sub port on the I /O panel. To enable dual monitor feature, please follow the below steps: 1. And connect the D-Sub monitor cable to page 17 for proper expansion card installation procedures for DVI-D and D-Sub to the VGA/DVI-D port on the I /O panel. Please ...
2.5 Dual Monitor and Surround Display Features Dual Monitor Feature This motherboard supports dual monitor feature. Connect the DVI-D monitor cable to use dual monitor function on this motherboard. Then you can easily enjoy the benefits of dual monitor function after your system boots. Please refer to the VGA/D-Sub port on the I /O panel. To enable dual monitor feature, please follow the below steps: 1. And connect the D-Sub monitor cable to page 17 for proper expansion card installation procedures for DVI-D and D-Sub to the VGA/DVI-D port on the I /O panel. Please ...
User Manual
Page 19
Please make sure that the value you select is no need to your change. Install the onboard VGA driver and the add-on PCI Express VGA card driver to install them again. 5. Set up a multi-monitor display. A. B. D. Click "Extend my Windows desktop onto this motherboard. 4. C. Press to apply these new values. If you do not adjust the BIOS setup, the default value of "Share Memory", [Auto], will be your system. Click the "Identify" button to save your system. G. Click the number "2" icon. Click "OK" to display a large number on VGA card is my main monitor" and "Extend...
Please make sure that the value you select is no need to your change. Install the onboard VGA driver and the add-on PCI Express VGA card driver to install them again. 5. Set up a multi-monitor display. A. B. D. Click "Extend my Windows desktop onto this motherboard. 4. C. Press to apply these new values. If you do not adjust the BIOS setup, the default value of "Share Memory", [Auto], will be your system. Click the "Identify" button to save your system. G. Click the number "2" icon. Click "OK" to display a large number on VGA card is my main monitor" and "Extend...
User Manual
Page 20
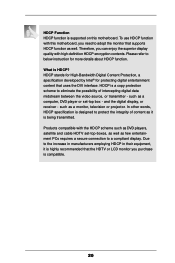
Therefore, you need to a compliant display. HDCP stands for High-Bandwidth Digital Content Protection, a specification developed by Intel® for more details about HDCP function. such as a computer, DVD player or set -top-boxes, as well as few entertainment PCs requires a secure connection to adopt the monitor that supports HDCP function as DVD players, satellite and cable HDTV set -top box - Please refer to protect the integrity of intercepting digital data midstream between the video source, or transmitter - What is supported on this motherboard, you can enjoy the ...
Therefore, you need to a compliant display. HDCP stands for High-Bandwidth Digital Content Protection, a specification developed by Intel® for more details about HDCP function. such as a computer, DVD player or set -top-boxes, as well as few entertainment PCs requires a secure connection to adopt the monitor that supports HDCP function as DVD players, satellite and cable HDTV set -top box - Please refer to protect the integrity of intercepting digital data midstream between the video source, or transmitter - What is supported on this motherboard, you can enjoy the ...