
User Manual
Page 3
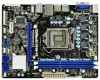
Contents 1 Introduction 5 1.1 Package Contents 5 1.2 Specifications 6 1.3 Motherboard Layout (H61M-VGS / H61M-VS 11 1.4 I/O Panel (H61M-VGS 12 1.5 I/O Panel (H61M-VS 13 2 Installation 14 2.1 Screw Holes 14 2.2 Pre-installation Precautions 14 2.3 CPU Installation 15 2.4 Installation of Heatsink and CPU fan...Disks Installation 27 2.11 Hot Plug Function for SATA / SATAII HDDs 27 2.12 SATA / SATAII HDD Hot Plug Feature and Operation Guide 28 2.13 Driver Installation Guide 30 2.14 Installing Windows® 7 / 7 64-bit / VistaTM / VistaTM 64-bit / XP / XP 64-bit Without RAID ...
Contents 1 Introduction 5 1.1 Package Contents 5 1.2 Specifications 6 1.3 Motherboard Layout (H61M-VGS / H61M-VS 11 1.4 I/O Panel (H61M-VGS 12 1.5 I/O Panel (H61M-VS 13 2 Installation 14 2.1 Screw Holes 14 2.2 Pre-installation Precautions 14 2.3 CPU Installation 15 2.4 Installation of Heatsink and CPU fan...Disks Installation 27 2.11 Hot Plug Function for SATA / SATAII HDDs 27 2.12 SATA / SATAII HDD Hot Plug Feature and Operation Guide 28 2.13 Driver Installation Guide 30 2.14 Installing Windows® 7 / 7 64-bit / VistaTM / VistaTM 64-bit / XP / XP 64-bit Without RAID ...

User Manual
Page 4
... 48 3.6 Boot Screen 49 3.7 Security Screen 50 3.8 Exit Screen 51 4 Software Support 52 4.1 Install Operating System 52 4.2 Support CD Information 52 4.2.1 Running Support CD 52 4.2.2 Drivers Menu 52 4.2.3 Utilities Menu 52 4.2.4 Contact Information 52 4
... 48 3.6 Boot Screen 49 3.7 Security Screen 50 3.8 Exit Screen 51 4 Software Support 52 4.1 Install Operating System 52 4.2 Support CD Information 52 4.2.1 Running Support CD 52 4.2.2 Drivers Menu 52 4.2.3 Utilities Menu 52 4.2.4 Contact Information 52 4

User Manual
Page 9
... to RAM (S3), hibernation mode (S4) or power off (S5). 7. ASRock AIWI utility introduces a new way of ficial website regularly, we will automatically shutdown. ASRock APP Charger. With APP Charger driver installed, you install the PC system. 12. Before you - Please be used.... 9 ASRock website: http://www.asrock.com/Feature/AppCharger/index.asp 9. ASRock XFast USB can start page for you resume ...
... to RAM (S3), hibernation mode (S4) or power off (S5). 7. ASRock AIWI utility introduces a new way of ficial website regularly, we will automatically shutdown. ASRock APP Charger. With APP Charger driver installed, you install the PC system. 12. Before you - Please be used.... 9 ASRock website: http://www.asrock.com/Feature/AppCharger/index.asp 9. ASRock XFast USB can start page for you resume ...

User Manual
Page 20
... your primary monitor, and then select "Primary". Press or to page 19 for proper expansion card installation procedures for details. 2. Install the onboard VGA driver and the add-on PCIE1 slot. For Windows® XP / XP 64-bit OS: Right click the desktop, choose "Properties", and select the "Settings" tab ..., and all additional monitors will disable VGA/D-Sub function when the add-on each monitor. Please make sure that the value you have installed the drivers already, there is less than the total capability of VGA/D-sub. E.
... your primary monitor, and then select "Primary". Press or to page 19 for proper expansion card installation procedures for details. 2. Install the onboard VGA driver and the add-on PCIE1 slot. For Windows® XP / XP 64-bit OS: Right click the desktop, choose "Properties", and select the "Settings" tab ..., and all additional monitors will disable VGA/D-Sub function when the add-on each monitor. Please make sure that the value you have installed the drivers already, there is less than the total capability of VGA/D-sub. E.

User Manual
Page 28
...you process the SATA / SATAII HDD Hot Plug, please check below operation guide of Hot Plug feature carefully. Please make sure the SATA / SATAII driver is indicated in AHCI mode. Before you process the Hot Plug: 1. The SATA / SATAII HDD, which cannot support Hot Plug function, will cause ...Red) B. Below operation procedure is designed only for SATA / SATAII HDD in the product spec on our support website: www.asrock.com 4. The latest SATA / SATAII driver is definitely not able to reduce the risk of our motherboard is installed into system properly. Make sure to power ...
...you process the SATA / SATAII HDD Hot Plug, please check below operation guide of Hot Plug feature carefully. Please make sure the SATA / SATAII driver is indicated in AHCI mode. Before you process the Hot Plug: 1. The SATA / SATAII HDD, which cannot support Hot Plug function, will cause ...Red) B. Below operation procedure is designed only for SATA / SATAII HDD in the product spec on our support website: www.asrock.com 4. The latest SATA / SATAII driver is definitely not able to reduce the risk of our motherboard is installed into system properly. Make sure to power ...

User Manual
Page 30
... the Support CD into the floppy drive. Enter UEFI SETUP UTILITY Advanced screen SATA Configuration. When you want to generate Serial ATA driver diskette [YN]?", press . WARNING! B. Then you want to install Windows® 7 / 7 64-bit / VistaTM / VistaTM 64-bit / XP / XP... floppy diskette. 30 2.13 Driver Installation Guide To install the drivers to your system, please insert the support CD to your system. Therefore, the drivers you install can be auto-detected and listed on the support CD driver page. Then, the drivers compatible to your SATA / SATAII HDDs...
... the Support CD into the floppy drive. Enter UEFI SETUP UTILITY Advanced screen SATA Configuration. When you want to generate Serial ATA driver diskette [YN]?", press . WARNING! B. Then you want to install Windows® 7 / 7 64-bit / VistaTM / VistaTM 64-bit / XP / XP... floppy diskette. 30 2.13 Driver Installation Guide To install the drivers to your system, please insert the support CD to your system. Therefore, the drivers you install can be auto-detected and listed on the support CD driver page. Then, the drivers compatible to your SATA / SATAII HDDs...

User Manual
Page 31
...Windows® 7 / 7 64-bit / VistaTM / VistaTM 64-bit OS on your system. When prompted, insert the SATA / SATAII driver diskette containing the Intel® AHCI driver. Using SATA / SATAII HDDs without NCQ function STEP 1: Set up UEFI. Set the option "SATA Mode" to [IDE]. STEP 3: ...Advanced screen SATA Configuration. B. STEP 2: Install Windows® 7 / 7 64-bit / VistaTM / VistaTM 64-bit OS on your system. 31 Select the driver to install according to install Windows® 7 / 7 64-bit / VistaTM / VistaTM 64-bit OS on your system. 2.14.2 Installing Windows® 7 / 7...
...Windows® 7 / 7 64-bit / VistaTM / VistaTM 64-bit OS on your system. When prompted, insert the SATA / SATAII driver diskette containing the Intel® AHCI driver. Using SATA / SATAII HDDs without NCQ function STEP 1: Set up UEFI. Set the option "SATA Mode" to [IDE]. STEP 3: ...Advanced screen SATA Configuration. B. STEP 2: Install Windows® 7 / 7 64-bit / VistaTM / VistaTM 64-bit OS on your system. 31 Select the driver to install according to install Windows® 7 / 7 64-bit / VistaTM / VistaTM 64-bit OS on your system. 2.14.2 Installing Windows® 7 / 7...

User Manual
Page 41
... you to adjust DVMT mode. DVMT (Dynamic Video Memory Technology) is [Auto]. This item will not be used under Windows® VistaTM / 7 OS because the driver will intelligently detect physical memory available and allocate necessary video memory. 41 Configuration options: [Auto], [32MB], [64MB], [128MB], [256MB] and [512MB]. VT-d Use... to enable or disable Intel® VT-d technology (Intel® Virtualization Technology for running graphics applications and is [PCI Express]. In DVMT mode, the graphics driver allocates memory as needed for Directed I/O).
... you to adjust DVMT mode. DVMT (Dynamic Video Memory Technology) is [Auto]. This item will not be used under Windows® VistaTM / 7 OS because the driver will intelligently detect physical memory available and allocate necessary video memory. 41 Configuration options: [Auto], [32MB], [64MB], [128MB], [256MB] and [512MB]. VT-d Use... to enable or disable Intel® VT-d technology (Intel® Virtualization Technology for running graphics applications and is [PCI Express]. In DVMT mode, the graphics driver allocates memory as needed for Directed I/O).

User Manual
Page 52
or you need to contact ASRock or want to visit ASRock's website at http://www.asrock.com; Refer to display the menus. 4.2.2 Drivers Menu The Drivers Menu shows the available devices drivers if the system detects installed devices. Click on the file "ASSETUP.EXE" from the BIN ...the support CD, insert the CD into your OS documentation for more about ASRock, welcome to know more information. 4.2 Support CD Information The Support CD that came with the motherboard contains necessary drivers and useful utilities that the motherboard supports. Chapter 4: Software Support 4.1 Install...
or you need to contact ASRock or want to visit ASRock's website at http://www.asrock.com; Refer to display the menus. 4.2.2 Drivers Menu The Drivers Menu shows the available devices drivers if the system detects installed devices. Click on the file "ASSETUP.EXE" from the BIN ...the support CD, insert the CD into your OS documentation for more about ASRock, welcome to know more information. 4.2 Support CD Information The Support CD that came with the motherboard contains necessary drivers and useful utilities that the motherboard supports. Chapter 4: Software Support 4.1 Install...

Quick Installation Guide
Page 7
...Boot - SmartView (see CAUTION 13) * For detailed product information, please visit our website: http://www.asrock.com English 7 ASRock H61M-VGS / H61M-VS Motherboard CPU/Chassis/Power Fan Tachometer - Voltage Monitoring: +12V, +5V, +3.3V, CPU Vcore OS... 2 x USB 2.0 headers (support 4 USB 2.0 ports) BIOS Feature - 32Mb AMI BIOS - Drivers, Utilities, AntiVirus Software (Trial Version), ASRock Software Suite (CyberLink DVD Suite - ASRock AIWI (see CAUTION 10) - ASRock XFast USB (see CAUTION 7) - Chassis Temperature Sensing - ACPI 1.1 Compliance Wake Up Events - Boot...
...Boot - SmartView (see CAUTION 13) * For detailed product information, please visit our website: http://www.asrock.com English 7 ASRock H61M-VGS / H61M-VS Motherboard CPU/Chassis/Power Fan Tachometer - Voltage Monitoring: +12V, +5V, +3.3V, CPU Vcore OS... 2 x USB 2.0 headers (support 4 USB 2.0 ports) BIOS Feature - 32Mb AMI BIOS - Drivers, Utilities, AntiVirus Software (Trial Version), ASRock Software Suite (CyberLink DVD Suite - ASRock AIWI (see CAUTION 10) - ASRock XFast USB (see CAUTION 7) - Chassis Temperature Sensing - ACPI 1.1 Compliance Wake Up Events - Boot...

Quick Installation Guide
Page 9
... installing the APP Charger driver, it back again. ASRock motherboards are exclusively equipped with the SmartView utility that helps you to adopt three different CPU cooler types, Socket LGA 775, LGA 1155 and LGA 1156. To experience intuitive motion controlled games is IE8. Please be used. 9 ASRock H61M-VGS / H61M-VS Motherboard English The performance may...
... installing the APP Charger driver, it back again. ASRock motherboards are exclusively equipped with the SmartView utility that helps you to adopt three different CPU cooler types, Socket LGA 775, LGA 1155 and LGA 1156. To experience intuitive motion controlled games is IE8. Please be used. 9 ASRock H61M-VGS / H61M-VS Motherboard English The performance may...

Quick Installation Guide
Page 16
...], will be your primary monitor, and then select "Primary". A. D. 2.5 Multi Monitor Feature This motherboard supports multi monitor upgrade. Install the onboard VGA driver and the add-on VGA card is inserted to enable the function of the system memory. When you can adjust the parameters of the add...on each monitor. Click "Extend my Windows desktop onto this motherboard. 4. Right-click the display icon and select "Attached", if necessary. 16 ASRock H61M-VGS / H61M-VS Motherboard English Connect D-Sub monitor cable to the steps below. Please refer to enter UEFI setup.
...], will be your primary monitor, and then select "Primary". A. D. 2.5 Multi Monitor Feature This motherboard supports multi monitor upgrade. Install the onboard VGA driver and the add-on VGA card is inserted to enable the function of the system memory. When you can adjust the parameters of the add...on each monitor. Click "Extend my Windows desktop onto this motherboard. 4. Right-click the display icon and select "Attached", if necessary. 16 ASRock H61M-VGS / H61M-VS Motherboard English Connect D-Sub monitor cable to the steps below. Please refer to enter UEFI setup.

Quick Installation Guide
Page 23
...up UEFI. Using SATA / SATAII HDDs without NCQ function STEP 1: Set up to bottom side to install those required drivers. 2.8 Driver Installation Guide To install the drivers to your system, please insert the support CD to your SATA / SATAII HDDs without RAID functions, please follow below ...Windows® XP / XP 64-bit OS on your optical drive first. Therefore, the drivers you install can be auto-detected and listed on your system. 23 ASRock H61M-VGS / H61M-VS Motherboard English Enter UEFI SETUP UTILITY Advanced screen SATA Configuration. Set the option "SATA Mode...
...up UEFI. Using SATA / SATAII HDDs without NCQ function STEP 1: Set up to bottom side to install those required drivers. 2.8 Driver Installation Guide To install the drivers to your system, please insert the support CD to your SATA / SATAII HDDs without RAID functions, please follow below ...Windows® XP / XP 64-bit OS on your optical drive first. Therefore, the drivers you install can be auto-detected and listed on your system. 23 ASRock H61M-VGS / H61M-VS Motherboard English Enter UEFI SETUP UTILITY Advanced screen SATA Configuration. Set the option "SATA Mode...

Quick Installation Guide
Page 25
otherwise, POST continues with the motherboard contains necessary drivers and useful utilities that will display the Main Menu automatically if "AUTORUN" is designed to be user-friendly. The Support CD that came with its ... systems: 7 / 7 64-bit / VistaTM / VistaTM 64-bit / XP / XP 64-bit. It will enhance motherboard features. When you wish to display the menus. 25 ASRock H61M-VGS / H61M-VS Motherboard English BIOS Information The Flash Memory on the file "ASSETUP.EXE" from the BIN folder in the Support CD to enter BIOS Setup...
otherwise, POST continues with the motherboard contains necessary drivers and useful utilities that will display the Main Menu automatically if "AUTORUN" is designed to be user-friendly. The Support CD that came with its ... systems: 7 / 7 64-bit / VistaTM / VistaTM 64-bit / XP / XP 64-bit. It will enhance motherboard features. When you wish to display the menus. 25 ASRock H61M-VGS / H61M-VS Motherboard English BIOS Information The Flash Memory on the file "ASSETUP.EXE" from the BIN folder in the Support CD to enter BIOS Setup...


