
User Manual
Page 5
... 1.6 Internal System Components 13 1.7 Remote Controller 14 2 System Quick Installation 15 3 System Components Reinstallation 19 4 Installing Second HDD 21 5 Driver Installation 23 6 UTILITY MEMU 24 6.1 Instant Boot 24 6.1.1 Introduction 24 6.1.2 Installation 25 6.2 ASRock OC Tuner 27 6.2.1 Introduction 27 6.2.2 Installation 27 6.3 BADABOOMTM MEDIA CONVERTER (Trial version) ...... 31 6.4 CyberLink DVD Suite (Trial version, including...
... 1.6 Internal System Components 13 1.7 Remote Controller 14 2 System Quick Installation 15 3 System Components Reinstallation 19 4 Installing Second HDD 21 5 Driver Installation 23 6 UTILITY MEMU 24 6.1 Instant Boot 24 6.1.1 Introduction 24 6.1.2 Installation 25 6.2 ASRock OC Tuner 27 6.2.1 Introduction 27 6.2.2 Installation 27 6.3 BADABOOMTM MEDIA CONVERTER (Trial version) ...... 31 6.4 CyberLink DVD Suite (Trial version, including...

User Manual
Page 6
7.7 Security Screen 46 7.8 Exit Screen 47 8 Software Support 48 8.1 Install Operating System 48 8.2 Support CD Information 48 8.2.1 Running Support CD 48 8.2.2 Drivers Menu 48 8.2.3 Utilities Menu 48 8.2.4 Contact Information 48 6
7.7 Security Screen 46 7.8 Exit Screen 47 8 Software Support 48 8.1 Install Operating System 48 8.2 Support CD Information 48 8.2.1 Running Support CD 48 8.2.2 Drivers Menu 48 8.2.3 Utilities Menu 48 8.2.4 Contact Information 48 6

User Manual
Page 23
Chapter 5 Driver Installation To install the drivers to your system, please insert the support CD to your system can work properly. 23 Please follow the order from up to bottom side to your optical drive first. Therefore, the drivers you install can be auto-detected and listed on the support CD driver page. Then, the drivers compatible to install those required drivers.
Chapter 5 Driver Installation To install the drivers to your system, please insert the support CD to your system can work properly. 23 Please follow the order from up to bottom side to your optical drive first. Therefore, the drivers you install can be auto-detected and listed on the support CD driver page. Then, the drivers compatible to install those required drivers.

User Manual
Page 25
.../feature/InstantBoot/download.asp B. Select destination location. c. Select the start menu folder. Please follow the instructions on Instant Boot setup page. Install Instant Boot driver from ASRock support CD, or you may choose a different folder if you need , and click "Next". You may click following link to continue. A. Execute the Instant Boot...
.../feature/InstantBoot/download.asp B. Select destination location. c. Select the start menu folder. Please follow the instructions on Instant Boot setup page. Install Instant Boot driver from ASRock support CD, or you may choose a different folder if you need , and click "Next". You may click following link to continue. A. Execute the Instant Boot...

User Manual
Page 26
... Mode" or "Disable Instant Boot". After reentering into OS, the system will restart once automatically. Double click ASRock Instant Boot icon on the Windows® desktop. Click "Finish" to begin installing Instant Boot driver. On Instant Boot main menu, you want to shut down the computer, please simply select "Shut Down" from... Mode". F. Click "Install" to complete and exit the setup. C. Please notice that , please click "Apply" to keep AC power on if you will find an ASRock Instant Boot icon on the desktop, then Instant Boot main menu will pop up.
... Mode" or "Disable Instant Boot". After reentering into OS, the system will restart once automatically. Double click ASRock Instant Boot icon on the Windows® desktop. Click "Finish" to begin installing Instant Boot driver. On Instant Boot main menu, you want to shut down the computer, please simply select "Shut Down" from... Mode". F. Click "Install" to complete and exit the setup. C. Please notice that , please click "Apply" to keep AC power on if you will find an ASRock Instant Boot icon on the desktop, then Instant Boot main menu will pop up.

User Manual
Page 27
...a user-friendly overclocking tool which allows you to fine-tune and monitor: Overclocking, Voltage Control, and Hardware Monitor. Install ASRock OC Tuner driver from ASRock support CD, or you can adjust voltage for optimal system performance. In Voltage Control section, you can enjoy the benefit ... for DRAM, chipset and CPU to get the latest utility: http://www.asrock.com/feature/OCTuner/download.asp B. Execute the ASRock OC Tuner installation program under Windows®. Next time when you install ASRock OC Tuner. H. Please follow the instructions on your system, you may ...
...a user-friendly overclocking tool which allows you to fine-tune and monitor: Overclocking, Voltage Control, and Hardware Monitor. Install ASRock OC Tuner driver from ASRock support CD, or you can adjust voltage for optimal system performance. In Voltage Control section, you can enjoy the benefit ... for DRAM, chipset and CPU to get the latest utility: http://www.asrock.com/feature/OCTuner/download.asp B. Execute the ASRock OC Tuner installation program under Windows®. Next time when you install ASRock OC Tuner. H. Please follow the instructions on your system, you may ...

User Manual
Page 28
You may choose a different folder if you need , and click "Next". You may choose a different folder if you need , and click "Next". Click "Finish" to begin installing ASRock OC Tuner driver. c. Click "Install" to complete and exit the setup. 28 b. Select the start menu folder. e. d. Select destination location.
You may choose a different folder if you need , and click "Next". You may choose a different folder if you need , and click "Next". Click "Finish" to begin installing ASRock OC Tuner driver. c. Click "Install" to complete and exit the setup. 28 b. Select the start menu folder. e. d. Select destination location.

User Manual
Page 48
If the Main Menu did not appear automatically, locate and double click on a specific item then follow the installation wizard to visit ASRock's website at http://www.asrock.com; Please install the necessary drivers to activate the devices. 8.2.3 Utilities Menu The Utilities Menu shows the applications software that enhance the system features. 8.2.1 Running The...
If the Main Menu did not appear automatically, locate and double click on a specific item then follow the installation wizard to visit ASRock's website at http://www.asrock.com; Please install the necessary drivers to activate the devices. 8.2.3 Utilities Menu The Utilities Menu shows the applications software that enhance the system features. 8.2.1 Running The...

RAID Installation Guide
Page 2
... / VistaTM / VistaTM 64-bit only. This section includes examples of the RAID 0 Disk will direct all applications to configure RAID. After you make a SATA / SATAII driver diskette, press to enter BIOS setup to use NVIDIA RAID Utility to the surviving drive as a single drive but at a sustained data transfer rate. Although...
... / VistaTM / VistaTM 64-bit only. This section includes examples of the RAID 0 Disk will direct all applications to configure RAID. After you make a SATA / SATAII driver diskette, press to enter BIOS setup to use NVIDIA RAID Utility to the surviving drive as a single drive but at a sustained data transfer rate. Although...

RAID Installation Guide
Page 7
... OS installation. Therefore, your USB flash. If you want to install Windows® VistaTM / VistaTM 64-bit OS in RAID mode, please copy the RAID driver from our support CD to use RAID function. Click "All Programs", "NVIDIA Corporation", "NVIDIA Control Panel", and then "Storage". You can also find RAID array... into Windows®. You can review the RAID arrays that you have set up and start to your system is able to load the RAID driver and install it in the process of our support CD: \..i386 (for 32bit OS) \..AMD64 (for 64bit OS) For Windows® 7 / 7 64-bit, there is...
... OS installation. Therefore, your USB flash. If you want to install Windows® VistaTM / VistaTM 64-bit OS in RAID mode, please copy the RAID driver from our support CD to use RAID function. Click "All Programs", "NVIDIA Corporation", "NVIDIA Control Panel", and then "Storage". You can also find RAID array... into Windows®. You can review the RAID arrays that you have set up and start to your system is able to load the RAID driver and install it in the process of our support CD: \..i386 (for 32bit OS) \..AMD64 (for 64bit OS) For Windows® 7 / 7 64-bit, there is...

RAID Installation Guide
Page 10
..., Inc. Please enter Storage by clicking on Start Programs NVIDIA Corporation NVIDIA Control Panel Storage. (There is built in NVIDIA ALL in one driver provided in our support CD. 2.3 Create Disk Array After the system powers on, press key to RAID mode, reboot your system. After you... finish the driver installation, you can create, delete, or rebuild any RAID array. RAID driver is also a "Storage" shortcut on the desktop.) 10 After adjusting the system BIOS to enter BIOS setup ...
..., Inc. Please enter Storage by clicking on Start Programs NVIDIA Corporation NVIDIA Control Panel Storage. (There is built in NVIDIA ALL in one driver provided in our support CD. 2.3 Create Disk Array After the system powers on, press key to RAID mode, reboot your system. After you... finish the driver installation, you can create, delete, or rebuild any RAID array. RAID driver is also a "Storage" shortcut on the desktop.) 10 After adjusting the system BIOS to enter BIOS setup ...

RAID Installation Guide
Page 15
..., your USB flash. If you want to install Windows® VistaTM / VistaTM 64-bit OS in copying the data to the redundancy disk. The RAID drivers are located in the following path of our support CD: \..i386 (for 32bit OS) \..AMD64 (for 64bit OS) For Windows® 7 / 7 64-bit, there is... able to your system is no such limitation. 15 For RAID1, "sync" results in RAID mode, please copy the RAID driver from our support CD to load the RAID driver and install it in the process of redundancy or parity. The operation is applicable to configure the function. Synchronize Array Wizard...
..., your USB flash. If you want to install Windows® VistaTM / VistaTM 64-bit OS in copying the data to the redundancy disk. The RAID drivers are located in the following path of our support CD: \..i386 (for 32bit OS) \..AMD64 (for 64bit OS) For Windows® 7 / 7 64-bit, there is... able to your system is no such limitation. 15 For RAID1, "sync" results in RAID mode, please copy the RAID driver from our support CD to load the RAID driver and install it in the process of redundancy or parity. The operation is applicable to configure the function. Synchronize Array Wizard...
DTS Operation Guide
Page 3
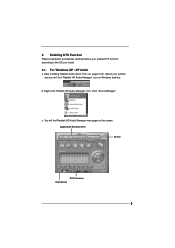
Click "Sound Manager". Application Enhancement Device DTS Function Information 3 After installing Realtek Audio driver from our support CD, reboot your system, and you install. 2.1. Right-click "Realtek HD Audio Manager" icon. c. For Windows XP / XP 64-bit a. 2. b. You will find Realtek HD Audio Manager main page on Windows task bar. Enabling DTS Function Please read below procedures carefully before you enable DTS function according to the OS you will find "Realtek HD Audio Manager" icon on the screen.
Click "Sound Manager". Application Enhancement Device DTS Function Information 3 After installing Realtek Audio driver from our support CD, reboot your system, and you install. 2.1. Right-click "Realtek HD Audio Manager" icon. c. For Windows XP / XP 64-bit a. 2. b. You will find Realtek HD Audio Manager main page on Windows task bar. Enabling DTS Function Please read below procedures carefully before you enable DTS function according to the OS you will find "Realtek HD Audio Manager" icon on the screen.
