
User Manual
Page 5
...System Components Reinstallation 19 4 Installing Second HDD 21 5 Driver Installation 23 6 UTILITY MEMU 24 6.1 Instant Boot 24 6.1.1 Introduction 24 6.1.2 Installation 25 6.2 ASRock OC Tuner 27 6.2.1 Introduction 27 6.2.2 Installation 27 6.3 BADABOOMTM MEDIA CONVERTER (Trial version) ...... 31 6.4 CyberLink DVD Suite (Trial version, including PowerDVD, ...39 7.4.1 CPU Configuration 40 7.4.2 Chipset Configuration 41 7.4.3 ACPI Configuration 42 7.4.4 SATA Configuration 43 7.4.5 USB Configuration 43 7.5 Fan Control 44 7.6 Boot Screen 44 7.6.1 Boot Settings Configuration 45 5
...System Components Reinstallation 19 4 Installing Second HDD 21 5 Driver Installation 23 6 UTILITY MEMU 24 6.1 Instant Boot 24 6.1.1 Introduction 24 6.1.2 Installation 25 6.2 ASRock OC Tuner 27 6.2.1 Introduction 27 6.2.2 Installation 27 6.3 BADABOOMTM MEDIA CONVERTER (Trial version) ...... 31 6.4 CyberLink DVD Suite (Trial version, including PowerDVD, ...39 7.4.1 CPU Configuration 40 7.4.2 Chipset Configuration 41 7.4.3 ACPI Configuration 42 7.4.4 SATA Configuration 43 7.4.5 USB Configuration 43 7.5 Fan Control 44 7.6 Boot Screen 44 7.6.1 Boot Settings Configuration 45 5

User Manual
Page 9
.... SATA connector: For second HDD SATA data cable 5. Infrared module header 8. SATA connector: For HDD SATA data cable 9 Fan connector 4. ATX5V output power connector for slim ODD & 2.5" HDD 16. Memory socket 7. LPC header 14. Fan connector 9. Clear CMOS jumper 2. 1.3 System Motherboard Components 16 15 14 13 PCIE1 RoHS 1 2 3 AMCP7AION-HT EuP Ready...
.... SATA connector: For second HDD SATA data cable 5. Infrared module header 8. SATA connector: For HDD SATA data cable 9 Fan connector 4. ATX5V output power connector for slim ODD & 2.5" HDD 16. Memory socket 7. LPC header 14. Fan connector 9. Clear CMOS jumper 2. 1.3 System Motherboard Components 16 15 14 13 PCIE1 RoHS 1 2 3 AMCP7AION-HT EuP Ready...

User Manual
Page 10
... to SATA Connector (14) Connect to ATX5V Power Connector (15) Connect to vertical direction using your forefingers between the memory module and heat sink. Fan Connection Fan connector Ground +12V Rotation 10 Disassembly 1.Lift the DIMM slot hook sideways using the slot as axis. The memory module might be damaged when it...
... to SATA Connector (14) Connect to ATX5V Power Connector (15) Connect to vertical direction using your forefingers between the memory module and heat sink. Fan Connection Fan connector Ground +12V Rotation 10 Disassembly 1.Lift the DIMM slot hook sideways using the slot as axis. The memory module might be damaged when it...

User Manual
Page 13
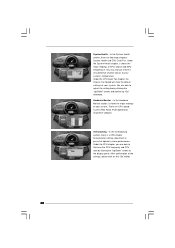
The cage can be removed by removing the top screws. 34 32 33 32. Hard Disc Drive 13 1.6 Internal System Components Optical disc & Hard disk drives The optical disc and hard disc drives are mounted in a drive cage. System Cooling Fan 33. Optical Disc Drive 34.
The cage can be removed by removing the top screws. 34 32 33 32. Hard Disc Drive 13 1.6 Internal System Components Optical disc & Hard disk drives The optical disc and hard disc drives are mounted in a drive cage. System Cooling Fan 33. Optical Disc Drive 34.
User Manual
Page 30
...by clicking the "Up/Down" arrows and confirm by clicking the "Up/Down" arrows at the display panel. Under the CPU Quiet Fan chapter, the Chassis Fan Speed will show the default settings of your system. In the Hardware Monitor section, it shows the major readings of your system. ...After confirmation of optimal system performance. There are two major chapters: System Health and CPU Quiet Fan. Under the System Health chapter, it shows the major readings of CPU, chipset and GPU Temperature. You may find out if there's any abnormal...
...by clicking the "Up/Down" arrows and confirm by clicking the "Up/Down" arrows at the display panel. Under the CPU Quiet Fan chapter, the Chassis Fan Speed will show the default settings of your system. In the Hardware Monitor section, it shows the major readings of your system. ...After confirmation of optimal system performance. There are two major chapters: System Health and CPU Quiet Fan. Under the System Health chapter, it shows the major readings of CPU, chipset and GPU Temperature. You may find out if there's any abnormal...

User Manual
Page 35
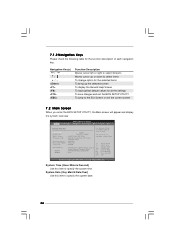
... To set up the system time/date information OC Tweaker To set up overclocking features Advanced To set up the advanced BIOS features Fan Control To display current fan speed status Boot To set up the default system device to enter the BIOS SETUP UTILITY, otherwise, POST will continue with the following...
... To set up the system time/date information OC Tweaker To set up overclocking features Advanced To set up the advanced BIOS features Fan Control To display current fan speed status Boot To set up the default system device to enter the BIOS SETUP UTILITY, otherwise, POST will continue with the following...
User Manual
Page 36
... Screen When you enter the BIOS SETUP UTILITY, the Main screen will appear and display the system overview BIOS SETUP UTILITY Main OC Tweaker Advanced Fan Control Boot Security Exit System Overview System Time System Date [14:00:09] [Mon 09/21/2009] BIOS Version : AMCP7AION-HT P1.00 Processor Type...
... Screen When you enter the BIOS SETUP UTILITY, the Main screen will appear and display the system overview BIOS SETUP UTILITY Main OC Tweaker Advanced Fan Control Boot Security Exit System Overview System Time System Date [14:00:09] [Mon 09/21/2009] BIOS Version : AMCP7AION-HT P1.00 Processor Type...
User Manual
Page 39
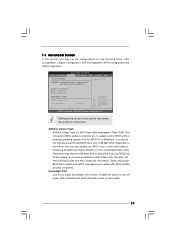
... and save the new BIOS file to turn off power LED, LAN LED and SATA LED after BIOS update process completes. ASRock Instant Flash ASRock Instant Flash is a BIOS flash utility embedded in a few clicks without entering operating systems first like MS-DOS or Windows&#...Defaults F10 Save and Exit ESC Exit v02.54 (C) Copyright 1985-2005, American Megatrends, Inc. BIOS SETUP UTILITY Main OC Tweaker Advanced Fan Control Boot Security Exit Advanced Settings Options for the following items: CPU Configuration, Chipset Configuration, ACPI Configuration, SATA Configuration and USB Configuration...
... and save the new BIOS file to turn off power LED, LAN LED and SATA LED after BIOS update process completes. ASRock Instant Flash ASRock Instant Flash is a BIOS flash utility embedded in a few clicks without entering operating systems first like MS-DOS or Windows&#...Defaults F10 Save and Exit ESC Exit v02.54 (C) Copyright 1985-2005, American Megatrends, Inc. BIOS SETUP UTILITY Main OC Tweaker Advanced Fan Control Boot Security Exit Advanced Settings Options for the following items: CPU Configuration, Chipset Configuration, ACPI Configuration, SATA Configuration and USB Configuration...
User Manual
Page 44
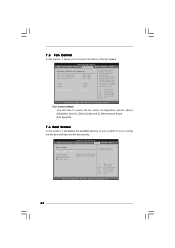
... for you get higher. CD - With default setting "Auto" , it allows you to monitor the status of the fan speed. 7.5 Fan Control In this item to control the fan mode. HDS722580VL] [CD / DVD: 3S - BIOS SETUP UTILITY Main OC Tweaker Advanced H/W Monitor Boot Security Exit Hardware... Event Monitoring CPU Core1 Temperature CPU Core2 Temperature Chipset Temperature : 58 C / 136 F : 55 C / 131 F : 65 C / 149 F Vcore +3.30V +5.00V Fan Control Mode : 1.144V : 2.544V : 5.216V [Auto] When setting option to Sub Screen F1 General Help F9 Load Defaults F10 Save and Exit ESC Exit v02...
... for you get higher. CD - With default setting "Auto" , it allows you to monitor the status of the fan speed. 7.5 Fan Control In this item to control the fan mode. HDS722580VL] [CD / DVD: 3S - BIOS SETUP UTILITY Main OC Tweaker Advanced H/W Monitor Boot Security Exit Hardware... Event Monitoring CPU Core1 Temperature CPU Core2 Temperature Chipset Temperature : 58 C / 136 F : 55 C / 131 F : 65 C / 149 F Vcore +3.30V +5.00V Fan Control Mode : 1.144V : 2.544V : 5.216V [Auto] When setting option to Sub Screen F1 General Help F9 Load Defaults F10 Save and Exit ESC Exit v02...

User Manual
Page 46
For the user password, you may also clear it. BIOS SETUP UTILITY Main OC Tweaker Advanced Fan Control Boot Security Exit Security Settings Supervisor Password : Not Installed User Password : Not Installed Change Supervisor Password Change User Password Install or Change the password. 7.7 Security Screen In this section, you may set or change the supervisor/user password for the system. Select Screen Select Item Enter Change F1 General Help F9 Load Defaults F10 Save and Exit ESC Exit v02.54 (C) Copyright 1985-2005, American Megatrends, Inc. 46
For the user password, you may also clear it. BIOS SETUP UTILITY Main OC Tweaker Advanced Fan Control Boot Security Exit Security Settings Supervisor Password : Not Installed User Password : Not Installed Change Supervisor Password Change User Password Install or Change the password. 7.7 Security Screen In this section, you may set or change the supervisor/user password for the system. Select Screen Select Item Enter Change F1 General Help F9 Load Defaults F10 Save and Exit ESC Exit v02.54 (C) Copyright 1985-2005, American Megatrends, Inc. 46
