
User Manual
Page 3
... system on a stable surface. • Openings on the chassis are for ventilation. No disassembly NOTE: The warranty does not apply to products (including HDD, ODD, memory and warranty seal) that have been damaged as a radiator. • Set up your system • Read and follow the operating instructions. • The system was...
... system on a stable surface. • Openings on the chassis are for ventilation. No disassembly NOTE: The warranty does not apply to products (including HDD, ODD, memory and warranty seal) that have been damaged as a radiator. • Set up your system • Read and follow the operating instructions. • The system was...

User Manual
Page 8
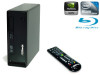
...) DVD I/O Sound DVD Super Multi (ION 330Pro / ION 330HT) BD Combo *** (ION 330HT-BD) 1xHDMI, 1xD-Sub VGA, 6xUSB 2.0, 1xS/PDIF, 1xPowered eSATA/USB **** HD Audio 7.1 channel with overclocking, including adjusting the setting in RAID / AHCI mode only. Processor Intel® AtomTM 330 (Dual-Core CPU) Chipset NVIDIA® IONTM graphics processor Memory VGA HDD Support DDR2 800MHz...
...) DVD I/O Sound DVD Super Multi (ION 330Pro / ION 330HT) BD Combo *** (ION 330HT-BD) 1xHDMI, 1xD-Sub VGA, 6xUSB 2.0, 1xS/PDIF, 1xPowered eSATA/USB **** HD Audio 7.1 channel with overclocking, including adjusting the setting in RAID / AHCI mode only. Processor Intel® AtomTM 330 (Dual-Core CPU) Chipset NVIDIA® IONTM graphics processor Memory VGA HDD Support DDR2 800MHz...

User Manual
Page 9
Fan connector 4. Memory socket 7. CPU fan 11. ATX5V output power connector for slim ODD & 2.5" HDD 16. SATA connector: For second HDD SATA data cable 5. Infrared module header 8. J1 ...
Fan connector 4. Memory socket 7. CPU fan 11. ATX5V output power connector for slim ODD & 2.5" HDD 16. SATA connector: For second HDD SATA data cable 5. Infrared module header 8. J1 ...

User Manual
Page 10
...(14) Connect to ATX5V Power Connector (15) Connect to vertical direction using your forefingers between the memory module and heat sink. System Memory Socket Connection Assembly 1.Sidelong insert the memory module to put your both sides of the DIMM are in the same way. * Remove the ...the outboard one. 3. Fan Connection Fan connector Ground +12V Rotation 10 Then push the memory module to SATA Connector (16) 2. A hock clicking sound denotes that the memory module is in place. 2.Insert the second memory module in a 30 60 angle. Ensure the hocks in both thumbs. NOTE. 1. ...
...(14) Connect to ATX5V Power Connector (15) Connect to vertical direction using your forefingers between the memory module and heat sink. System Memory Socket Connection Assembly 1.Sidelong insert the memory module to put your both sides of the DIMM are in the same way. * Remove the ...the outboard one. 3. Fan Connection Fan connector Ground +12V Rotation 10 Then push the memory module to SATA Connector (16) 2. A hock clicking sound denotes that the memory module is in place. 2.Insert the second memory module in a 30 60 angle. Ensure the hocks in both thumbs. NOTE. 1. ...
User Manual
Page 36
....00 Processor Type : Intel (R) Atom (TM) CPU 330 @ 1.60GHz (64bit) Processor Speed : 1600MHz Microcode Update : 106C2/213 Cache Size : 1024KB Total Memory DDRII1 DDRII2 : 1024MB with 128MB shared memory Single-Channel Memory Mode : 1024MB/400MHz (DDRII800) : None Use [Enter], [TAB] or [SHIFT-TAB] to select a field. System Time [Hour:Minute:Second] Use this...
....00 Processor Type : Intel (R) Atom (TM) CPU 330 @ 1.60GHz (64bit) Processor Speed : 1600MHz Microcode Update : 106C2/213 Cache Size : 1024KB Total Memory DDRII1 DDRII2 : 1024MB with 128MB shared memory Single-Channel Memory Mode : 1024MB/400MHz (DDRII800) : None Use [Enter], [TAB] or [SHIFT-TAB] to select a field. System Time [Hour:Minute:Second] Use this...

User Manual
Page 37
...Screen In the OC Tweaker screen, you can use this to select Overclock Mode. CPU Frequency (MHz) Use this item to select Memory Timings. Memory Timings Use this option to your own risk and expense. The default value is [Auo]. 37 The default value is [Auo]. ...CPU OC Setting Overclock Mode CPU Frequency (MHz) Boot Failure Guard CPU Spread Spectrum [Press Enter] [Auto] [133] [Enabled] [Auto] DRAM Frequency Memory Timings Memory Bandwidth Boost [Auto] [Auto] [Disabled] Onboard GPU clock [Auto] VCORE Voltage VCCM(DRAM) Voltage Chipset Core Voltage [Auto] [Auto] [Auto] Would...
...Screen In the OC Tweaker screen, you can use this to select Overclock Mode. CPU Frequency (MHz) Use this item to select Memory Timings. Memory Timings Use this option to your own risk and expense. The default value is [Auo]. 37 The default value is [Auo]. ...CPU OC Setting Overclock Mode CPU Frequency (MHz) Boot Failure Guard CPU Spread Spectrum [Press Enter] [Auto] [133] [Enabled] [Auto] DRAM Frequency Memory Timings Memory Bandwidth Boost [Auto] [Auto] [Disabled] Onboard GPU clock [Auto] VCORE Voltage VCCM(DRAM) Voltage Chipset Core Voltage [Auto] [Auto] [Auto] Would...

User Manual
Page 40
... Microsoft® Windows® XP. Hyper Threading Technology To enable this feature, it requires a computer system with "No Execute (NX) Memory Protection" can prevent data pages from overheated. Set to the IA-32 Intel Architecture. CPU Thermal Throttling You may select [Enabled] to ...Change Option General Help Load Defaults Save and Exit Exit v02.54 (C) Copyright 1985-2005, American Megatrends, Inc. No-Excute Memory Protection No-Execution (NX) Memory Protection Technology is an enhancement to [Enabled] if using Microsoft® Windows® XP, or Linux kernel version 2.4.18 or...
... Microsoft® Windows® XP. Hyper Threading Technology To enable this feature, it requires a computer system with "No Execute (NX) Memory Protection" can prevent data pages from overheated. Set to the IA-32 Intel Architecture. CPU Thermal Throttling You may select [Enabled] to ...Change Option General Help Load Defaults Save and Exit Exit v02.54 (C) Copyright 1985-2005, American Megatrends, Inc. No-Excute Memory Protection No-Execution (NX) Memory Protection Technology is an enhancement to [Enabled] if using Microsoft® Windows® XP, or Linux kernel version 2.4.18 or...

User Manual
Page 41
... default value is [Auto]. WiFi Radio Use this to enable or disable the "Onboard HDMI HD Audio" feature. Share Memory This allows you to set share memory feature. This appears only when you to enable or disable the "Onboard WiFi" feature. Onboard HD Audio Select [Auto],...7.4.2 Chipset Configuration BIOS SETUP UTILITY Advanced Chipset Settings Onboard LAN Onboard WiFi WiFi Radio Onboard HDMI HD Audio Onboard HD Audio Onboard CIR Port Share Memory [Enabled] [Enabled] [Enabled] [Auto] [Enabled] [Enabled] [Auto] Configure onboard LAN device. +F1 F9 F10 ESC Select Screen Select...
... default value is [Auto]. WiFi Radio Use this to enable or disable the "Onboard HDMI HD Audio" feature. Share Memory This allows you to set share memory feature. This appears only when you to enable or disable the "Onboard WiFi" feature. Onboard HD Audio Select [Auto],...7.4.2 Chipset Configuration BIOS SETUP UTILITY Advanced Chipset Settings Onboard LAN Onboard WiFi WiFi Radio Onboard HDMI HD Audio Onboard HD Audio Onboard CIR Port Share Memory [Enabled] [Enabled] [Enabled] [Auto] [Enabled] [Enabled] [Auto] Configure onboard LAN device. +F1 F9 F10 ESC Select Screen Select...