
RAID Installation Guide
Page 1
... Funtions 3 1.3.1 Installing Windows XP / XP 64-bit With RAID Funtions 3 1.3.2 Installing Windows 7 / 7 64-bit / Vista / Vista 64-bit With RAID Funtions 4 1.4 Create Disk Array 5 2. AMD BIOS RAID Installation Guide 2 1.1 Introduction to RAIDXpert from the Internet 17 2.9 Running RAIDXpert without Network Connection 17 1
... Funtions 3 1.3.1 Installing Windows XP / XP 64-bit With RAID Funtions 3 1.3.2 Installing Windows 7 / 7 64-bit / Vista / Vista 64-bit With RAID Funtions 4 1.4 Create Disk Array 5 2. AMD BIOS RAID Installation Guide 2 1.1 Introduction to RAIDXpert from the Internet 17 2.9 Running RAIDXpert without Network Connection 17 1
RAID Installation Guide
Page 2
...the disk array management software will cause data damage or data loss. WARNING!! Hot-Plug any fault tolerance. AMD BIOS RAID Installation Guide AMD BIOS RAID Installation Guide is striped across multiple drives and duplicated on another set . Data is an instruction for "...mode by using RAID 1 techniques, resulting in RAIDXpert, 2 Although RAID 0 function can be mirrored using the onboard FastBuild BIOS utility under BIOS environment. As independent physical drives, JBOD does not offer the performance or security advantages of Independent Disks", which is called data...
...the disk array management software will cause data damage or data loss. WARNING!! Hot-Plug any fault tolerance. AMD BIOS RAID Installation Guide AMD BIOS RAID Installation Guide is striped across multiple drives and duplicated on another set . Data is an instruction for "...mode by using RAID 1 techniques, resulting in RAIDXpert, 2 Although RAID 0 function can be mirrored using the onboard FastBuild BIOS utility under BIOS environment. As independent physical drives, JBOD does not offer the performance or security advantages of Independent Disks", which is called data...

RAID Installation Guide
Page 4
... Guide" to [RAID]. When prompted, insert the SATA / SATAII driver diskette containing AMD RAID driver. Then, please set RAID configuration. Insert the ASRock Support CD into the floppy drive, and press any key. Please select CD-ROM as the boot device. When you can start to configure RAID...;IDE Configuration. D. The system will be presented. STEP 4: Install Windows XP / XP 64-bit OS on your system. At the beginning of system boot-up BIOS. STEP 1: Set up , press key, and then a window for details. B. STEP 2: Make a SATA / SATAII driver diskette. B. During POST at the ...
... Guide" to [RAID]. When prompted, insert the SATA / SATAII driver diskette containing AMD RAID driver. Then, please set RAID configuration. Insert the ASRock Support CD into the floppy drive, and press any key. Please select CD-ROM as the boot device. When you can start to configure RAID...;IDE Configuration. D. The system will be presented. STEP 4: Install Windows XP / XP 64-bit OS on your system. At the beginning of system boot-up BIOS. STEP 1: Set up , press key, and then a window for details. B. STEP 2: Make a SATA / SATAII driver diskette. B. During POST at the ...

RAID Installation Guide
Page 5
... drive, and click the "Load Driver" button on the left on the bottom to load the AMD RAID drivers. page, please insert the ASRock Support CD into your system. Then, please set the RAID configuration by using the Windows RAID installation guide in this RAID installation guide for proper... Mode" to [RAID] first. B. AMD RAID drivers are no SATA / SATAII device used, please set up "SATA Operation Mode" to [non-RAID] in BIOS. 1.4 Create Disk Array Power on your system. NOTE1. NOTE2. A. When you see "Where do you still need to check this document for details. If you...
... drive, and click the "Load Driver" button on the left on the bottom to load the AMD RAID drivers. page, please insert the ASRock Support CD into your system. Then, please set the RAID configuration by using the Windows RAID installation guide in this RAID installation guide for proper... Mode" to [RAID] first. B. AMD RAID drivers are no SATA / SATAII device used, please set up "SATA Operation Mode" to [non-RAID] in BIOS. 1.4 Create Disk Array Power on your system. NOTE1. NOTE2. A. When you see "Where do you still need to check this document for details. If you...
User Manual
Page 4
... 61 4.1 Install Operating System 61 4.2 Support CD Information 61 4.2.1 Running Support CD 61 4.2.2 Drivers Menu 61 4.2.3 Utilities Menu 61 4.2.4 Contact Information 61 4 3 . BIOS SETUP UTILITY 38 3.1 Introduction 38 3.1.1 BIOS Menu Bar 38 3.1.2 Navigation Keys 39 3.2 Main Screen 39 3.3 OC Tweaker Screen 40 3.4 Advanced Screen 47 3.4.1 CPU Configuration 48 3.4.2 Chipset Configuration 49 3.4.3 ACPI...
... 61 4.1 Install Operating System 61 4.2 Support CD Information 61 4.2.1 Running Support CD 61 4.2.2 Drivers Menu 61 4.2.3 Utilities Menu 61 4.2.4 Contact Information 61 4 3 . BIOS SETUP UTILITY 38 3.1 Introduction 38 3.1.1 BIOS Menu Bar 38 3.1.2 Navigation Keys 39 3.2 Main Screen 39 3.3 OC Tweaker Screen 40 3.4 Advanced Screen 47 3.4.1 CPU Configuration 48 3.4.2 Chipset Configuration 49 3.4.3 ACPI...

User Manual
Page 5
...) 1 x I/O Shield 5 Introduction Thank you for specific information about the model you require technical support related to BIOS setup and information of this motherboard, please visit our website for purchasing ASRock M3A785GM-LE motherboard, a reliable motherboard produced under ASRock's consistently stringent quality control. Chapter 3 and 4 contain the configuration guide to this manual will be available on...
...) 1 x I/O Shield 5 Introduction Thank you for specific information about the model you require technical support related to BIOS setup and information of this motherboard, please visit our website for purchasing ASRock M3A785GM-LE motherboard, a reliable motherboard produced under ASRock's consistently stringent quality control. Chapter 3 and 4 contain the configuration guide to this manual will be available on...

User Manual
Page 7
... Saver (see CAUTION 9) - Hybrid Booster: - Instant Boot - Drivers, Utilities, AntiVirus Software (Trial Version), AMD OverDriveTM Utility, AMD Live! ASRock OC Tuner (see CAUTION 10) - Rear Panel I/O Connector BIOS Feature Support CD Unique Feature I/O Panel - 1 x PS/2 Mouse Port - 1 x PS/2 Keyboard Port - 1 x VGA/D-Sub Port ...LED) - Front panel audio connector - 3 x USB 2.0 headers (support 6 USB 2.0 ports) (see CAUTION 12) - ASRock OC DNA (see CAUTION 8) - 8Mb AMI BIOS - HD Audio Jack: Line in header - CPU/Chassis/Power FAN connector - 24 pin ATX power connector - 4 pin 12V...
... Saver (see CAUTION 9) - Hybrid Booster: - Instant Boot - Drivers, Utilities, AntiVirus Software (Trial Version), AMD OverDriveTM Utility, AMD Live! ASRock OC Tuner (see CAUTION 10) - Rear Panel I/O Connector BIOS Feature Support CD Unique Feature I/O Panel - 1 x PS/2 Mouse Port - 1 x PS/2 Keyboard Port - 1 x VGA/D-Sub Port ...LED) - Front panel audio connector - 3 x USB 2.0 headers (support 6 USB 2.0 ports) (see CAUTION 12) - ASRock OC DNA (see CAUTION 8) - 8Mb AMI BIOS - HD Audio Jack: Line in header - CPU/Chassis/Power FAN connector - 24 pin ATX power connector - 4 pin 12V...
User Manual
Page 8
... check AMD website for the minimum hardware requirement and the passed 1080p Blu-ray (BD) / HD-DVD films in the BIOS, applying Untied Overclocking Technology, or using the thirdparty overclocking tools. CPU Temperature Sensing Monitor - This motherboard supports Untied Overclocking Technology...12V, +5V, +3.3V, Vcore OS - EuP Ready (EuP ready power supply is no such limitation. 5. Chassis Temperature Sensing - FCC, CE, WHQL - ASRock website http://www.asrock.com 4. - Microsoft® Windows® 7 / 7 64-bit / VistaTM / VistaTM 64-bit / XP / XP Media Center / XP 64-bit...
... check AMD website for the minimum hardware requirement and the passed 1080p Blu-ray (BD) / HD-DVD films in the BIOS, applying Untied Overclocking Technology, or using the thirdparty overclocking tools. CPU Temperature Sensing Monitor - This motherboard supports Untied Overclocking Technology...12V, +5V, +3.3V, Vcore OS - EuP Ready (EuP ready power supply is no such limitation. 5. Chassis Temperature Sensing - FCC, CE, WHQL - ASRock website http://www.asrock.com 4. - Microsoft® Windows® 7 / 7 64-bit / VistaTM / VistaTM 64-bit / XP / XP Media Center / XP 64-bit...

User Manual
Page 9
... tool allows you can load the OC profile to their own system to access ASRock Instant Flash. Just launch this utility, you can press key during the POST or press key to BIOS setup menu to get the best system performance under Windows® environment. It helps... hard drive, then you to update system BIOS without preparing an additional floppy diskette or other words, it is a BIOS flash utility embedded in advance. Featuring an advanced proprietary hardware and software design, Intelligent Energy Saver is a user-friendly ASRock overclocking tool which allows you can only be...
... tool allows you can load the OC profile to their own system to access ASRock Instant Flash. Just launch this utility, you can press key during the POST or press key to BIOS setup menu to get the best system performance under Windows® environment. It helps... hard drive, then you to update system BIOS without preparing an additional floppy diskette or other words, it is a BIOS flash utility embedded in advance. Featuring an advanced proprietary hardware and software design, Intelligent Energy Saver is a user-friendly ASRock overclocking tool which allows you can only be...

User Manual
Page 12
... LINE IN Center: FRONT Bottom: MIC IN LAN AUDIO CODEC Super I/O CD1 1 HD_AUDIO1 LPT1 1 PCIE1 AMD 785G Chipset Hybrid CrossFire PCIE2 M3A785GM-LE IDE1 PWR_FAN1 SATAII_4 SATAII_5 SATAII_6 (PORT 3) (PORT 4) (PORT 5) RoHS PCI1 IR1 1 FLOPPY1 PCI2 USB10_11 1 AMD SB710 Chipset SPEAKER1 1 PLED PWRBTN... PANEL 1 1 HDLED RESET 8Mb BIOS USB8_9 1 CHA_FAN1 USB6_7 1 SATAII_1 SATAII_2 SATAII_3 (PORT 0) (PORT 1) (PORT 2) 27 26 25 24 23 22 21 2019 18 AT X P W R 1 ...
... LINE IN Center: FRONT Bottom: MIC IN LAN AUDIO CODEC Super I/O CD1 1 HD_AUDIO1 LPT1 1 PCIE1 AMD 785G Chipset Hybrid CrossFire PCIE2 M3A785GM-LE IDE1 PWR_FAN1 SATAII_4 SATAII_5 SATAII_6 (PORT 3) (PORT 4) (PORT 5) RoHS PCI1 IR1 1 FLOPPY1 PCI2 USB10_11 1 AMD SB710 Chipset SPEAKER1 1 PLED PWRBTN... PANEL 1 1 HDLED RESET 8Mb BIOS USB8_9 1 CHA_FAN1 USB6_7 1 SATAII_1 SATAII_2 SATAII_3 (PORT 0) (PORT 1) (PORT 2) 27 26 25 24 23 22 21 2019 18 AT X P W R 1 ...

User Manual
Page 19
... default value of the multi-monitor according to save your system. Set up a multi-monitor display. B. When you use . Click "Apply" or "OK" to enter BIOS setup. For Windows® 7 / 7 64-bit / VistaTM / VistaTM 64-bit OS: Right click the desktop, choose "Personalize", and select the "Display Settings" tab so that...
... default value of the multi-monitor according to save your system. Set up a multi-monitor display. B. When you use . Click "Apply" or "OK" to enter BIOS setup. For Windows® 7 / 7 64-bit / VistaTM / VistaTM 64-bit OS: Right click the desktop, choose "Personalize", and select the "Display Settings" tab so that...

User Manual
Page 21
... an ATITM Hybrid CrossFireXTM system include? For the future update of ATITM Hybrid CrossFireXTM Step 1. Step 5. Step 3. Then set the option "Surround View" to enter BIOS setup. 2 . 6 ATITM Hybrid CrossFireXTM Operation Guide This motherboard supports ATITM Hybrid CrossFireXTM feature. Currently, ATITM Hybrid CrossFireXTM Technology is only supported with Windows® VistaTM...
... an ATITM Hybrid CrossFireXTM system include? For the future update of ATITM Hybrid CrossFireXTM Step 1. Step 5. Step 3. Then set the option "Surround View" to enter BIOS setup. 2 . 6 ATITM Hybrid CrossFireXTM Operation Guide This motherboard supports ATITM Hybrid CrossFireXTM feature. Currently, ATITM Hybrid CrossFireXTM Technology is only supported with Windows® VistaTM...
User Manual
Page 23
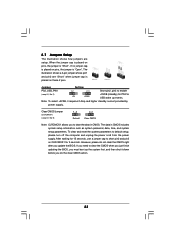
... 5 seconds. After waiting for 15 seconds, use a jumper cap to enable (see p.12, No. 9) 1_2 2_3 Default Clear CMOS Note: CLRCMOS1 allows you update the BIOS. 2.7 Jumpers Setup The illustration shows how jumpers are "Short" when jumper cap is placed on these 2 pins. Jumper Setting PS2_USB_PW1 1_2 2_3 Short pin2, pin3.... If no jumper cap is placed on pins, the jumper is "Open". If you need to clear the CMOS when you just finish updating the BIOS, you must boot up events. When the jumper cap is placed on pins, the jumper is "Short".
... 5 seconds. After waiting for 15 seconds, use a jumper cap to enable (see p.12, No. 9) 1_2 2_3 Default Clear CMOS Note: CLRCMOS1 allows you update the BIOS. 2.7 Jumpers Setup The illustration shows how jumpers are "Short" when jumper cap is placed on these 2 pins. Jumper Setting PS2_USB_PW1 1_2 2_3 Short pin2, pin3.... If no jumper cap is placed on pins, the jumper is "Open". If you need to clear the CMOS when you just finish updating the BIOS, you must boot up events. When the jumper cap is placed on pins, the jumper is "Short".

User Manual
Page 26
... front panel audio cable that allows convenient connection and control of "Playback" portion. Connect Audio_R (RIN) to OUT2_R and Audio_L (LIN) to Ground (GND). Enter BIOS Setup Utility. F. For Windows® VistaTM / VistaTM 64-bit OS: Click the right-top "Folder" icon , choose "Disable front panel jack detection", and save the...
... front panel audio cable that allows convenient connection and control of "Playback" portion. Connect Audio_R (RIN) to OUT2_R and Audio_L (LIN) to Ground (GND). Enter BIOS Setup Utility. F. For Windows® VistaTM / VistaTM 64-bit OS: Click the right-top "Folder" icon , choose "Disable front panel jack detection", and save the...

User Manual
Page 33
Enter BIOS SETUP UTILITY Advanced screen Storage Configuration. A. During POST at the beginning of 2 or more SATA / SATAII HDDs with RAID functions, ... / XP / XP 64-bit With RAID Functions If you want to install those required drivers. A. STEP 2: Make a SATA / SATAII Driver Diskette. Insert the ASRock Support CD into the floppy diskette. 33 When you want to install Windows® 7 / 7 64-bit / VistaTM / VistaTM 64-bit / XP / XP ...formatted diskette into floppy drive A: press any key. The system will see the message on a RAID disk composed of system boot-up BIOS.
Enter BIOS SETUP UTILITY Advanced screen Storage Configuration. A. During POST at the beginning of 2 or more SATA / SATAII HDDs with RAID functions, ... / XP / XP 64-bit With RAID Functions If you want to install those required drivers. A. STEP 2: Make a SATA / SATAII Driver Diskette. Insert the ASRock Support CD into the floppy diskette. 33 When you want to install Windows® 7 / 7 64-bit / VistaTM / VistaTM 64-bit / XP / XP ...formatted diskette into floppy drive A: press any key. The system will see the message on a RAID disk composed of system boot-up BIOS.

User Manual
Page 34
..., insert the SATA / SATAII driver diskette containing the AMD RAID driver. Then, please set RAID configuration. page, please insert the ASRock Support CD into the optical drive to boot your optical drive, and click the "Load Driver" button on the left on your system...for Windows® XP, or "AMD AHCI Compatible RAID Controller-x64 platform" for proper configuration. B. Select the driver to install according to the BIOS RAID installation guide part of the document in the following path in the Support CD: .. \ RAID Installation Guide 2.14.2 Installing Windows® ...
..., insert the SATA / SATAII driver diskette containing the AMD RAID driver. Then, please set RAID configuration. page, please insert the ASRock Support CD into the optical drive to boot your optical drive, and click the "Load Driver" button on the left on your system...for Windows® XP, or "AMD AHCI Compatible RAID Controller-x64 platform" for proper configuration. B. Select the driver to install according to the BIOS RAID installation guide part of the document in the following path in the Support CD: .. \ RAID Installation Guide 2.14.2 Installing Windows® ...

User Manual
Page 35
... Mode" to [IDE] in the Support CD: .. \ RAID Installation Guide NOTE2. Set the "SATA Operation Mode" option to continue the installation. Enter BIOS SETUP UTILITY Advanced screen Storage Configuration. drivers. If you install Windows® 7 / 7 64-bit / VistaTM / VistaTM 64-bit on IDE HDDs and... install Windows® XP or Windows® XP 64-bit on your SATA / SATAII HDDs without RAID functions, please follow below steps. STEP 3: Set Up BIOS. A. Set the "SATA Operation Mode" option to [RAID] in our Support CD: .. \ I386 (For Windows® 7 / VistaTM OS) .. \ AMD64 (For Windows...
... Mode" to [IDE] in the Support CD: .. \ RAID Installation Guide NOTE2. Set the "SATA Operation Mode" option to continue the installation. Enter BIOS SETUP UTILITY Advanced screen Storage Configuration. drivers. If you install Windows® 7 / 7 64-bit / VistaTM / VistaTM 64-bit on IDE HDDs and... install Windows® XP or Windows® XP 64-bit on your SATA / SATAII HDDs without RAID functions, please follow below steps. STEP 3: Set Up BIOS. A. Set the "SATA Operation Mode" option to [RAID] in our Support CD: .. \ I386 (For Windows® 7 / VistaTM OS) .. \ AMD64 (For Windows...

User Manual
Page 36
...install Windows® 7 / 7 64-bit / VistaTM / VistaTM 64-bit OS on your SATA / SATAII HDDs without NCQ and Hot Plug functions STEP 1: Set up BIOS. Set the "SATA Operation Mode" option to install Windows® 7 / 7 64-bit / VistaTM / VistaTM 64-bit on your system. STEP 2: Install Windows®... 64-bit OS on your system. STEP 4: Install Windows® XP / Windows® XP 64-bit OS on your system. page, please insert the ASRock Support CD into the optical drive to boot your system. 2.15.2 Installing Windows® 7 / 7 64-bit / VistaTM / VistaTM 64-bit Without RAID...
...install Windows® 7 / 7 64-bit / VistaTM / VistaTM 64-bit OS on your SATA / SATAII HDDs without NCQ and Hot Plug functions STEP 1: Set up BIOS. Set the "SATA Operation Mode" option to install Windows® 7 / 7 64-bit / VistaTM / VistaTM 64-bit on your system. STEP 2: Install Windows®... 64-bit OS on your system. STEP 4: Install Windows® XP / Windows® XP 64-bit OS on your system. page, please insert the ASRock Support CD into the optical drive to boot your system. 2.15.2 Installing Windows® 7 / 7 64-bit / VistaTM / VistaTM 64-bit Without RAID...

User Manual
Page 37
...-bit / VistaTM / VistaTM 64-bit OS on page 8 for the possible overclocking risk before you enable Untied Overclocking function, please enter "Overclock Mode" option of BIOS setup to set the selection from [Auto] to the warning on your system. 2.16 Untied Overclocking Technology This motherboard supports Untied Overclocking Technology, which means... [IDE]. Set the "SATA Operation Mode" option to fixed PCI / PCIE buses. Using SATA / SATAII HDDs without NCQ and Hot Plug functions STEP 1: Set up BIOS.
...-bit / VistaTM / VistaTM 64-bit OS on page 8 for the possible overclocking risk before you enable Untied Overclocking function, please enter "Overclock Mode" option of BIOS setup to set the selection from [Auto] to the warning on your system. 2.16 Untied Overclocking Technology This motherboard supports Untied Overclocking Technology, which means... [IDE]. Set the "SATA Operation Mode" option to fixed PCI / PCIE buses. Using SATA / SATAII HDDs without NCQ and Hot Plug functions STEP 1: Set up BIOS.

User Manual
Page 38
...top of the screen has a menu bar with its test routines. Please press or during the Power-On-Self-Test (POST) to enter the BIOS SETUP UTILITY, otherwise, POST will continue with the following selections: Main To set up the system time/date information OC Tweaker To set up ...overclocking features Advanced To set up the advanced BIOS features H/W Monitor To display current hardware status Boot To set up the default system device to choose among the selections on the system chassis. ...
...top of the screen has a menu bar with its test routines. Please press or during the Power-On-Self-Test (POST) to enter the BIOS SETUP UTILITY, otherwise, POST will continue with the following selections: Main To set up the system time/date information OC Tweaker To set up ...overclocking features Advanced To set up the advanced BIOS features H/W Monitor To display current hardware status Boot To set up the default system device to choose among the selections on the system chassis. ...


