
Intel Small Business Advantage Installation Guide
Page 4
Click "Finish" to exit setup. 4 Click "Finish" to complete the setup process. 6. Click "Next" again to continue. 5. 4.
Click "Finish" to exit setup. 4 Click "Finish" to complete the setup process. 6. Click "Next" again to continue. 5. 4.
User Manual
Page 3
... 18 2.5 Installation of Memory Modules (DIMM 19 2.6 Expansion Slots (PCI and PCI Express Slots 20 2.7 CrossFireXTM and Quad CrossFireXTM Operation Guide. 21 2.8 ASRock Smart Remote Installation Guide 25 2.9 Jumpers Setup 27 2.10 Onboard Headers and Connectors 28 2.11 Serial ATA (SATA) / Serial ATA2 (SATA2) / Serial ATA3 (SATA3) Hard Disks Installation 33 2.12...
... 18 2.5 Installation of Memory Modules (DIMM 19 2.6 Expansion Slots (PCI and PCI Express Slots 20 2.7 CrossFireXTM and Quad CrossFireXTM Operation Guide. 21 2.8 ASRock Smart Remote Installation Guide 25 2.9 Jumpers Setup 27 2.10 Onboard Headers and Connectors 28 2.11 Serial ATA (SATA) / Serial ATA2 (SATA2) / Serial ATA3 (SATA3) Hard Disks Installation 33 2.12...

User Manual
Page 4
3 UEFI SETUP UTILITY 38 3.1 Introduction 38 3.1.1 UEFI Menu Bar 38 3.1.2 Navigation Keys 39 3.2 Main Screen 40 3.3 OC Tweaker Screen 41 3.4 Advanced Screen 45 3.4.1 CPU Configuration 46 3.4.2 North ...
3 UEFI SETUP UTILITY 38 3.1 Introduction 38 3.1.1 UEFI Menu Bar 38 3.1.2 Navigation Keys 39 3.2 Main Screen 40 3.3 OC Tweaker Screen 41 3.4 Advanced Screen 45 3.4.1 CPU Configuration 46 3.4.2 North ...

User Manual
Page 5
...about the model you require technical support related to BIOS setup and information of this motherboard, please visit our website for purchasing ASRock P75 Pro3 motherboard, a reliable motherboard produced under ASRock's consistently stringent quality control. Because the motherboard specifications and..., it is recommended to set the BIOS option in , 30.5 cm x 17.8 cm) ASRock P75 Pro3 Quick Installation Guide ASRock P75 Pro3 Support CD 2 x Serial ATA (SATA) Data Cables (Optional) 1 x I/O Panel Shield ASRock Reminds You... It delivers excellent performance with robust design conforming to...
...about the model you require technical support related to BIOS setup and information of this motherboard, please visit our website for purchasing ASRock P75 Pro3 motherboard, a reliable motherboard produced under ASRock's consistently stringent quality control. Because the motherboard specifications and..., it is recommended to set the BIOS option in , 30.5 cm x 17.8 cm) ASRock P75 Pro3 Quick Installation Guide ASRock P75 Pro3 Support CD 2 x Serial ATA (SATA) Data Cables (Optional) 1 x I/O Panel Shield ASRock Reminds You... It delivers excellent performance with robust design conforming to...

User Manual
Page 9
... for you to enter your Windows® desktop in a few seconds, provides a much more efficient way to shorten boot up time. ASRock Instant Flash ASRock Instant Flash is an all-in-one tool to ne-tune different system functions in a user-friendly interface, which normally enable the Sleep...just a few seconds. By calling S3 and S4 at specific timing during the POST or the key to enter into the BIOS setup menu to get the same OC settings. 1.3 Unique Features ASRock Extreme Tuning Utility (AXTU) ASRock Extreme Tuning Utility (AXTU) is a BIOS flash utility embedded in Flash ROM.
... for you to enter your Windows® desktop in a few seconds, provides a much more efficient way to shorten boot up time. ASRock Instant Flash ASRock Instant Flash is an all-in-one tool to ne-tune different system functions in a user-friendly interface, which normally enable the Sleep...just a few seconds. By calling S3 and S4 at specific timing during the POST or the key to enter into the BIOS setup menu to get the same OC settings. 1.3 Unique Features ASRock Extreme Tuning Utility (AXTU) ASRock Extreme Tuning Utility (AXTU) is a BIOS flash utility embedded in Flash ROM.

User Manual
Page 11
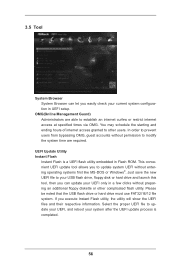
... the BIOS update procedure after regaining power. In other users. Please note that users are currently using in graphical UEFI. ASRock On/Off Play Technology ASRock On/Off Play Technology allows users to enjoy the great audio experience from the portable audio devices, such like MP3 player... on a DHCP configured computer in the root directory of internet access granted to your USB disk. ASRock UEFI System Browser ASRock UEFI system browser is turned off (or in UEFI setup. 11 Please note that ensures users the most convenient computing environment. It can easily examine the current...
... the BIOS update procedure after regaining power. In other users. Please note that users are currently using in graphical UEFI. ASRock On/Off Play Technology ASRock On/Off Play Technology allows users to enjoy the great audio experience from the portable audio devices, such like MP3 player... on a DHCP configured computer in the root directory of internet access granted to your USB disk. ASRock UEFI System Browser ASRock UEFI system browser is turned off (or in UEFI setup. 11 Please note that ensures users the most convenient computing environment. It can easily examine the current...

User Manual
Page 23
... drivers to be installed (If you have Microsoft .NET Framework installed prior to your Windows® taskbar. AMD Catalyst Control Center Step 6. 2.7.2 Driver Installation and Setup Step 1. Please check AMD's website for details. Select "2 GPUs" and click "Apply". 23 Step 2. For Windows® XP OS: A. The Catalyst Uninstaller is no need...
... drivers to be installed (If you have Microsoft .NET Framework installed prior to your Windows® taskbar. AMD Catalyst Control Center Step 6. 2.7.2 Driver Installation and Setup Step 1. Please check AMD's website for details. Select "2 GPUs" and click "Apply". 23 Step 2. For Windows® XP OS: A. The Catalyst Uninstaller is no need...
User Manual
Page 25
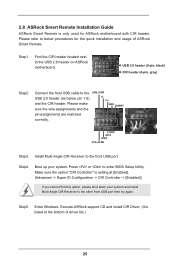
... Remote is setting at the bottom of ASRock Smart Remote. Step1. Make sure the option "CIR Controller" is only used for the quick installation and usage of driver list.) 25 Find the CIR header located next to enter BIOS Setup Utility. Connect the front USB cable to the front USB... port. Install Multi-Angle CIR Receiver to the USB_PWR USB 2.0 header (as below procedures for ASRock motherboard with CIR header.
... Remote is setting at the bottom of ASRock Smart Remote. Step1. Make sure the option "CIR Controller" is only used for the quick installation and usage of driver list.) 25 Find the CIR header located next to enter BIOS Setup Utility. Connect the front USB cable to the front USB... port. Install Multi-Angle CIR Receiver to the USB_PWR USB 2.0 header (as below procedures for ASRock motherboard with CIR header.
User Manual
Page 27
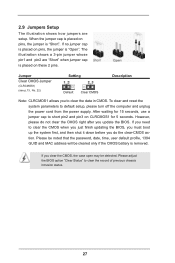
...is placed on pins, the jumper is "Short". Please adjust the BIOS option "Clear Status" to default setup, please turn off the computer and unplug the power cord from the power supply. 2.9 Jumpers Setup The illustration shows how jumpers are "Short" when jumper cap is placed on these 2 pins. The ...illustration shows a 3-pin jumper whose pin1 and pin2 are setup. After waiting for 15 seconds, use a jumper cap to clear the data in CMOS. Please be noted that the password, date, time, user default ...
...is placed on pins, the jumper is "Short". Please adjust the BIOS option "Clear Status" to default setup, please turn off the computer and unplug the power cord from the power supply. 2.9 Jumpers Setup The illustration shows how jumpers are "Short" when jumper cap is placed on these 2 pins. The ...illustration shows a 3-pin jumper whose pin1 and pin2 are setup. After waiting for 15 seconds, use a jumper cap to clear the data in CMOS. Please be noted that the password, date, time, user default ...

User Manual
Page 36
B. Please follow the order from top to bottom to your optical drive first. Therefore, the drivers you want to [IDE]. Enter UEFI SETUP UTILITY Advanced screen Storage Configuration. Then, the drivers compatible to your system can work properly. 2.15 Installing Windows® 7 / 7 64-bit / VistaTM / VistaTM 64-bit / ...
B. Please follow the order from top to bottom to your optical drive first. Therefore, the drivers you want to [IDE]. Enter UEFI SETUP UTILITY Advanced screen Storage Configuration. Then, the drivers compatible to your system can work properly. 2.15 Installing Windows® 7 / 7 64-bit / VistaTM / VistaTM 64-bit / ...
User Manual
Page 37
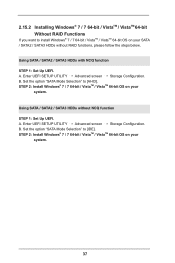
Enter UEFI SETUP UTILITY Advanced screen Storage Configuration. B. Using SATA / SATA2 / SATA3 HDDs without RAID functions, please follow the steps below. Using SATA / SATA2 / SATA3 HDDs with NCQ ...]. STEP 2: Install Windows® 7 / 7 64-bit / VistaTM / VistaTM 64-bit OS on your system. 37 Set the option "SATA Mode Selection" to [AHCI]. A. Enter UEFI SETUP UTILITY Advanced screen Storage Configuration. B. 2.15.2 Installing Windows® 7 / 7 64-bit / VistaTM / VistaTM 64-bit Without RAID Functions If you want to install Windows®...
Enter UEFI SETUP UTILITY Advanced screen Storage Configuration. B. Using SATA / SATA2 / SATA3 HDDs without RAID functions, please follow the steps below. Using SATA / SATA2 / SATA3 HDDs with NCQ ...]. STEP 2: Install Windows® 7 / 7 64-bit / VistaTM / VistaTM 64-bit OS on your system. 37 Set the option "SATA Mode Selection" to [AHCI]. A. Enter UEFI SETUP UTILITY Advanced screen Storage Configuration. B. 2.15.2 Installing Windows® 7 / 7 64-bit / VistaTM / VistaTM 64-bit Without RAID Functions If you want to install Windows®...

User Manual
Page 38
... button on your screen. 3.1.1 UEFI Menu Bar The top of the screen has a menu bar with its test routines. You can also use the UEFI SETUP UTILITY to configure your required item. 38 If you start up the security features Exit To exit the current screen or the UEFI... after POST, restart the system by pressing + + , or by turning the system off and then back on the motherboard stores the UEFI SETUP UTILITY. Because the UEFI software is constantly being updated, the following selections: Main To set up the system time/date information OC Tweaker To set ...
... button on your screen. 3.1.1 UEFI Menu Bar The top of the screen has a menu bar with its test routines. You can also use the UEFI SETUP UTILITY to configure your required item. 38 If you start up the security features Exit To exit the current screen or the UEFI... after POST, restart the system by pressing + + , or by turning the system off and then back on the motherboard stores the UEFI SETUP UTILITY. Because the UEFI software is constantly being updated, the following selections: Main To set up the system time/date information OC Tweaker To set ...
User Manual
Page 39
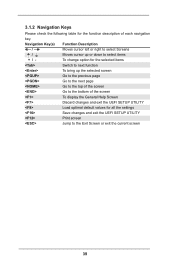
... Exit Screen or exit the current screen 39 3.1.2 Navigation Keys Please check the following table for all the settings Save changes and exit the UEFI SETUP UTILITY Print screen Jump to select items + / - Navigation Key(s) Function Description / Moves cursor left or right to select Screens / Moves cursor up the selected screen... to the top of the screen Go to the bottom of the screen To display the General Help Screen Discard changes and exit the UEFI SETUP UTILITY Load optimal default values for the function description of each navigation key.
... Exit Screen or exit the current screen 39 3.1.2 Navigation Keys Please check the following table for all the settings Save changes and exit the UEFI SETUP UTILITY Print screen Jump to select items + / - Navigation Key(s) Function Description / Moves cursor left or right to select Screens / Moves cursor up the selected screen... to the top of the screen Go to the bottom of the screen To display the General Help Screen Discard changes and exit the UEFI SETUP UTILITY Load optimal default values for the function description of each navigation key.
User Manual
Page 40
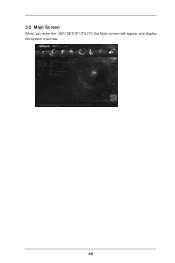
3.2 Main Screen When you enter the UEFI SETUP UTILITY, the Main screen will appear and display the system overview. 40
3.2 Main Screen When you enter the UEFI SETUP UTILITY, the Main screen will appear and display the system overview. 40
User Manual
Page 55
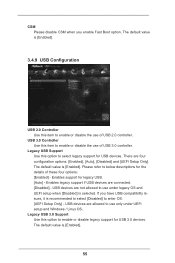
...options: [Enabled] - CSM Please disable CSM when you have USB compatibility issues, it is recommended to select [Disabled] to enter OS. [UEFI Setup Only] - Please refer to select legacy support for USB 3.0 devices. Legacy USB Support Use this option to below descriptions for legacy USB. [Auto]...] - The default value is [Enabled]. 55 USB 3.0 Controller Use this item to enable or disable the use only under legacy OS and UEFI setup when [Disabled] is [Enabled]. 3.4.9 USB Configuration USB 2.0 Controller Use this option to use of USB 2.0 controller. USB devices are allowed to...
...options: [Enabled] - CSM Please disable CSM when you have USB compatibility issues, it is recommended to select [Disabled] to enter OS. [UEFI Setup Only] - Please refer to select legacy support for USB 3.0 devices. Legacy USB Support Use this option to below descriptions for legacy USB. [Auto]...] - The default value is [Enabled]. 55 USB 3.0 Controller Use this item to enable or disable the use only under legacy OS and UEFI setup when [Disabled] is [Enabled]. 3.4.9 USB Configuration USB 2.0 Controller Use this option to use of USB 2.0 controller. USB devices are allowed to...
User Manual
Page 56
... and launch this tool, then you can let you easily check your system after the UEFI update process is a UEFI flash utility embedded in UEFI setup. In order to prevent users from bypassing OMG, guest accounts without permission to update system UEFI without preparing an additional floppy diskette or other users...
... and launch this tool, then you can let you easily check your system after the UEFI update process is a UEFI flash utility embedded in UEFI setup. In order to prevent users from bypassing OMG, guest accounts without permission to update system UEFI without preparing an additional floppy diskette or other users...

User Manual
Page 59
...card, the VBIOS must support UEFI GOP in Widows® to enter BIOS Setup). 3. Only supports Windows® 8 UEFI operating system. 2. If you are using an USB flash drive. [Ultra Fast] - Setup Prompt Timeout This shows the number of seconds to wait for the details of...are a few restrictions. 1. Disable Fast Boot. [Fast] - You will not be able to enter BIOS Setup (Clear CMOS or run XXX utility in order to boot. Please refer to below descriptions for setup activation key. 65535(0XFFFF) means indefinite waiting. There are three configuration options: [Disabled], [Fast] and [...
...card, the VBIOS must support UEFI GOP in Widows® to enter BIOS Setup). 3. Only supports Windows® 8 UEFI operating system. 2. If you are using an USB flash drive. [Ultra Fast] - Setup Prompt Timeout This shows the number of seconds to wait for the details of...are a few restrictions. 1. Disable Fast Boot. [Fast] - You will not be able to enter BIOS Setup (Clear CMOS or run XXX utility in order to boot. Please refer to below descriptions for setup activation key. 65535(0XFFFF) means indefinite waiting. There are three configuration options: [Disabled], [Fast] and [...
User Manual
Page 61
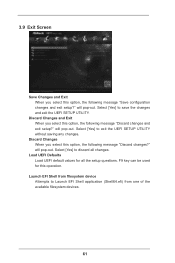
... pop-out. Select [Yes] to Launch EFI Shell application (Shell64.efi) from filesystem device Attempts to exit the UEFI SETUP UTILITY without saving any changes. will pop-out. will pop-out. Launch EFI Shell from one of the available filesystem devices. 61 3.9 Exit Screen ...Save Changes and Exit When you select this option, the following message "Discard changes?" Select [Yes] to discard all the setup questions. F9 key can be used for all changes. Discard Changes and Exit When you select this operation. Select [Yes] to save the changes and...
... pop-out. Select [Yes] to Launch EFI Shell application (Shell64.efi) from filesystem device Attempts to exit the UEFI SETUP UTILITY without saving any changes. will pop-out. will pop-out. Launch EFI Shell from one of the available filesystem devices. 61 3.9 Exit Screen ...Save Changes and Exit When you select this option, the following message "Discard changes?" Select [Yes] to discard all the setup questions. F9 key can be used for all changes. Discard Changes and Exit When you select this operation. Select [Yes] to save the changes and...

User Manual
Page 62
...CD-ROM drive. Click on the file "ASRSETUP.EXE" in this chapter for more about ASRock, welcome to display the menu. 4.2.2 Drivers Menu The Drivers Menu shows the available device's...support CD, insert the CD into your OS documentation for general reference only. or you need to contact ASRock or want to know more information. 4.2 Support CD Information The Support CD that came with the motherboard contains... / VistaTM 64-bit / XP / XP 64-bit. Because motherboard settings and hardware options vary, use the setup procedures in the Support CD to visit ASRock's website at http://www...
...CD-ROM drive. Click on the file "ASRSETUP.EXE" in this chapter for more about ASRock, welcome to display the menu. 4.2.2 Drivers Menu The Drivers Menu shows the available device's...support CD, insert the CD into your OS documentation for general reference only. or you need to contact ASRock or want to know more information. 4.2 Support CD Information The Support CD that came with the motherboard contains... / VistaTM 64-bit / XP / XP 64-bit. Because motherboard settings and hardware options vary, use the setup procedures in the Support CD to visit ASRock's website at http://www...

User Manual
Page 63
...® 7 64-bit (with SP1 or above). 2. Start Windows® installation. 63 Set AHCI Mode in UEFI Setup Utility > Boot > Boot Option #1. ("xxx" is an optical drive.) You can also press to boot in UEFI Setup Utility > Advanced > Storage Configuration > SATA Mode. 3. Normally it is the device which contains your Windows®...
...® 7 64-bit (with SP1 or above). 2. Start Windows® installation. 63 Set AHCI Mode in UEFI Setup Utility > Boot > Boot Option #1. ("xxx" is an optical drive.) You can also press to boot in UEFI Setup Utility > Advanced > Storage Configuration > SATA Mode. 3. Normally it is the device which contains your Windows®...


