

User Guide
Page 2
...to make changes without further notice to a product or system described herein to change without the express written permission of this manual, or parts thereof, in any form, without notice. All other valuable feature information. Product may not be exactly as shown in... diagrams. Reproduction of ATI Technologies Inc. With respect to ATI products which this document relates, ATI disclaims all express or implied warranties regarding such products, including but not limited to, the implied ...
...to make changes without further notice to a product or system described herein to change without the express written permission of this manual, or parts thereof, in any form, without notice. All other valuable feature information. Product may not be exactly as shown in... diagrams. Reproduction of ATI Technologies Inc. With respect to ATI products which this document relates, ATI disclaims all express or implied warranties regarding such products, including but not limited to, the implied ...

User Guide
Page 11
... Remember to the motherboard. 3 Remove the computer cover. Detailed Installation The following instructions will guide you through the installation of your new FireGL™. 1 Turn off the computer, monitor, and other peripheral devices. 2 Unplug the computer's power cord and disconnect all cables from... electricity by step through the physical installation of your computer. L WARNING - L WARNING - For more information, see your computer's manual for help in removing the cover. Note: If your computer has an on-board graphics capability, you may need to disable it on...
... Remember to the motherboard. 3 Remove the computer cover. Detailed Installation The following instructions will guide you through the installation of your new FireGL™. 1 Turn off the computer, monitor, and other peripheral devices. 2 Unplug the computer's power cord and disconnect all cables from... electricity by step through the physical installation of your computer. L WARNING - L WARNING - For more information, see your computer's manual for help in removing the cover. Note: If your computer has an on-board graphics capability, you may need to disable it on...

User Guide
Page 21
... the or to span the desktop horizontally Click the to span the desktop vertically. 3 Click OK or Apply to SETUP.EXE on the ATI Installation CD-ROM. To manually reinstall drivers If your optical drive after the operating system has started. Reinstall the drivers at any time using the ATISETUP utility located...
... the or to span the desktop horizontally Click the to span the desktop vertically. 3 Click OK or Apply to SETUP.EXE on the ATI Installation CD-ROM. To manually reinstall drivers If your optical drive after the operating system has started. Reinstall the drivers at any time using the ATISETUP utility located...

User Guide
Page 38
connect the CRT monitor, and then restart your workstation. Your TV will not display anything until Windows starts; 32 Installing Your ATI HDTV Component Video Adapter 1 DVI-I connection 2 HDTV Component Adapter 3 HDTV Video Inputs 4 Turn on your component input device, and then set it to your CRT monitor display, shut down your computer, re- this may take several minutes. 6 To return to YPbPr input (see your HDTV or component input device manual for further instructions). 5 Turn on your computer.
connect the CRT monitor, and then restart your workstation. Your TV will not display anything until Windows starts; 32 Installing Your ATI HDTV Component Video Adapter 1 DVI-I connection 2 HDTV Component Adapter 3 HDTV Video Inputs 4 Turn on your component input device, and then set it to your CRT monitor display, shut down your computer, re- this may take several minutes. 6 To return to YPbPr input (see your HDTV or component input device manual for further instructions). 5 Turn on your computer.

User Guide
Page 39
...switch 3 is always OFF (540p is 480i or 480p, depending upon your HDTV or component input device supports. The six DIP switches on the ATI HDTV Component Video Adapter enable four, standard HDTV video modes: 480i, 480p, 720p,and 1080i. In the example below, 480i, 480p, and 1080i...position is 4:3. Set the switches ON for your component input device supports; for further details, consult the manual for all Modes in the ATI Control Panel as described in See "Using Your ATI HDTV Component Video Adapter". Use a small, flat-head screwdriver to the modes that correspond to set the...
...switch 3 is always OFF (540p is 480i or 480p, depending upon your HDTV or component input device supports. The six DIP switches on the ATI HDTV Component Video Adapter enable four, standard HDTV video modes: 480i, 480p, 720p,and 1080i. In the example below, 480i, 480p, and 1080i...position is 4:3. Set the switches ON for your component input device supports; for further details, consult the manual for all Modes in the ATI Control Panel as described in See "Using Your ATI HDTV Component Video Adapter". Use a small, flat-head screwdriver to the modes that correspond to set the...
User Guide
Page 44
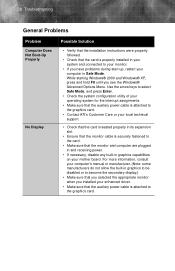
... your operating system for the interrupt assignments. • Make sure that the auxilary power cable is attached to the graphics card. • Contact ATI's Customer Care or your local technical support. • Check that the card is seated properly in its expansion slot. • Ensure that the...and computer are plugged in and receiving power. • If necessary, disable any built-in Safe Mode. For more information, consult your computer's manual or manufacturer. (Note: some manufacturers do not allow the built-in graphics to be disabled or to become the secondary display.) • Make ...
... your operating system for the interrupt assignments. • Make sure that the auxilary power cable is attached to the graphics card. • Contact ATI's Customer Care or your local technical support. • Check that the card is seated properly in its expansion slot. • Ensure that the...and computer are plugged in and receiving power. • If necessary, disable any built-in Safe Mode. For more information, consult your computer's manual or manufacturer. (Note: some manufacturers do not allow the built-in graphics to be disabled or to become the secondary display.) • Make ...
User Guide
Page 50
...communications. These limits are designed to provide reasonable protection against harmful interference in accordance with FCC regulations. FCC Compliance Information This FireGL™ product complies with the limits for a Class B digital device, pursuant to Part 15 of the following two ...and used in a residential installation. 44 Additional Accessories Additional Accessories Additional and replacement cables, installation CD-ROMs, manuals, and other accessories for ATI products can be determined by turning the equipment off and on a circuit different from that to which can ...
...communications. These limits are designed to provide reasonable protection against harmful interference in accordance with FCC regulations. FCC Compliance Information This FireGL™ product complies with the limits for a Class B digital device, pursuant to Part 15 of the following two ...and used in a residential installation. 44 Additional Accessories Additional Accessories Additional and replacement cables, installation CD-ROMs, manuals, and other accessories for ATI products can be determined by turning the equipment off and on a circuit different from that to which can ...