

User Guide
Page 2
..., incidental or consequential damages in the preparation of this document relates, ATI disclaims all express or implied warranties regarding such products, including but not limited to ATI products which this document, ATI Technologies Inc. Macrovision Apparatus Claims of ATI Technologies Inc. ATI, the ATI logo, and ATI product and product-feature names are trademarks and/or registered trademarks...
..., incidental or consequential damages in the preparation of this document relates, ATI disclaims all express or implied warranties regarding such products, including but not limited to ATI products which this document, ATI Technologies Inc. Macrovision Apparatus Claims of ATI Technologies Inc. ATI, the ATI logo, and ATI product and product-feature names are trademarks and/or registered trademarks...

User Guide
Page 5
1 Table of Contents Introduction 1 Radeon® X1800 Series Features 1 Graphic Features 1 System Requirements 4 External Connectors 4 Before You Begin 4 Record Your Serial and Part Numbers 4 Uninstall Previous Graphics Card Drivers 5 Installing Your ATI Graphics Card 7 Graphics Card Bus Types 7 Basic Graphics Card Installation 7 Advanced Installation: AGP 9 Advanced Installation: PCIe™ 11 Connecting Devices 13 Using Multiple Displays 15 Connecting Your Monitors 15 Display Configurations...
1 Table of Contents Introduction 1 Radeon® X1800 Series Features 1 Graphic Features 1 System Requirements 4 External Connectors 4 Before You Begin 4 Record Your Serial and Part Numbers 4 Uninstall Previous Graphics Card Drivers 5 Installing Your ATI Graphics Card 7 Graphics Card Bus Types 7 Basic Graphics Card Installation 7 Advanced Installation: AGP 9 Advanced Installation: PCIe™ 11 Connecting Devices 13 Using Multiple Displays 15 Connecting Your Monitors 15 Display Configurations...

User Guide
Page 7
Using TV Display 96 Viewing Text on a TV 95 Connecting to HDTV 97 Using Your ATI HDTV Video Cable 99 CrossFire™ FAQ 101 Using the Radeon® X1800 Series with CrossFire™ 107 CrossFire™ Overview 107 Allowable CrossFire™ System Components 107 CrossFire™ Rendering Modes 107 SuperTiling 108 Scissor Mode 109...
Using TV Display 96 Viewing Text on a TV 95 Connecting to HDTV 97 Using Your ATI HDTV Video Cable 99 CrossFire™ FAQ 101 Using the Radeon® X1800 Series with CrossFire™ 107 CrossFire™ Overview 107 Allowable CrossFire™ System Components 107 CrossFire™ Rendering Modes 107 SuperTiling 108 Scissor Mode 109...

User Guide
Page 9
... Graphic Features • Native PCI Express® X16 bus support. • Four parallel rendering pipelines. • 256MB or 512 MB GDDR3 on the purchase of 6:1 at all resolutions. • 2x/4x//8x/16x Anisotropic Filtering modes with up to 128-tap texture filtering. We hope that is not visible to a ratio of your ATI Radeon® X1800 Series graphics card...
... Graphic Features • Native PCI Express® X16 bus support. • Four parallel rendering pipelines. • 256MB or 512 MB GDDR3 on the purchase of 6:1 at all resolutions. • 2x/4x//8x/16x Anisotropic Filtering modes with up to 128-tap texture filtering. We hope that is not visible to a ratio of your ATI Radeon® X1800 Series graphics card...

User Guide
Page 12
...; Compatibility • Intel® Pentium® 4 or AMD Athlon®. • 512MB of these components can be found within the CrossFire™ FAQ. Consult your new graphics card, please do the following is designed to ensure the power supply is required: • ...In/Video Out (VIVO) connection. If you begin installing your computer system manual to accommodate a high-end graphics card with a peak dissipation above 75 watts. • Windows® XP with two (2) PCI Express® X16 slots and correct PCIe™ chipset driver. (See ati.com/crossfire for registration.
...; Compatibility • Intel® Pentium® 4 or AMD Athlon®. • 512MB of these components can be found within the CrossFire™ FAQ. Consult your new graphics card, please do the following is designed to ensure the power supply is required: • ...In/Video Out (VIVO) connection. If you begin installing your computer system manual to accommodate a high-end graphics card with a peak dissipation above 75 watts. • Windows® XP with two (2) PCI Express® X16 slots and correct PCIe™ chipset driver. (See ati.com/crossfire for registration.

User Guide
Page 13
... new Radeon® X1800 Series card, you remove your current display drivers. The wizard will help you must uninstall the drivers for the existing graphics card before installing your computer. Note: If the previously installed graphics card has any additional software installed, it from your new ATI product. To uninstall previous drivers With your current graphics card still... Begin 5 X Serial number (S/N) Y 102 part number (P/N) Write these numbers down before removing it should also be removed at this point. 4 Restart your current graphics card drivers and select Add/Remove.
... new Radeon® X1800 Series card, you remove your current display drivers. The wizard will help you must uninstall the drivers for the existing graphics card before installing your computer. Note: If the previously installed graphics card has any additional software installed, it from your new ATI product. To uninstall previous drivers With your current graphics card still... Begin 5 X Serial number (S/N) Y 102 part number (P/N) Write these numbers down before removing it should also be removed at this point. 4 Restart your current graphics card drivers and select Add/Remove.
User Guide
Page 15
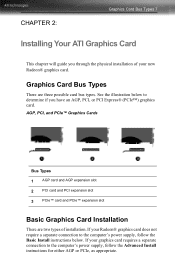
.... AGP, PCI, and PCIe™ Graphics Cards Bus Types 1 AGP card and AGP expansion slot 2 PCI card and PCI expansion slot 3 PCIe™ card and PCIe™ expansion slot Basic Graphics Card Installation There are three possible card bus types. If your new Radeon® graphics card. CHAPTER 2: Graphics Card Bus Types 7 Installing Your ATI Graphics Card This chapter will guide you have an AGP, PCI, or PCI Express® (PCIe™) graphics card.
.... AGP, PCI, and PCIe™ Graphics Cards Bus Types 1 AGP card and AGP expansion slot 2 PCI card and PCI expansion slot 3 PCIe™ card and PCIe™ expansion slot Basic Graphics Card Installation There are three possible card bus types. If your new Radeon® graphics card. CHAPTER 2: Graphics Card Bus Types 7 Installing Your ATI Graphics Card This chapter will guide you have an AGP, PCI, or PCI Express® (PCIe™) graphics card.

User Guide
Page 16
...and, if necessary, remove the metal back- Note: If your computer has an on-board graphics capability, you have a power cable connected to them. Installing the Radeon® graphics card 1 Turn off the computer, monitor, and other peripheral devices. 2 Unplug the computer's power ...supply or the metal surface of your computer. L WARNING - plate cover. 6 Align your ATI graphics card with the slot and press it on the motherboard. 8 Basic Graphics Card Installation Radeon® graphics cards that require a connection to the computer's power supply will have disconnected and plug in the ...
...and, if necessary, remove the metal back- Note: If your computer has an on-board graphics capability, you have a power cable connected to them. Installing the Radeon® graphics card 1 Turn off the computer, monitor, and other peripheral devices. 2 Unplug the computer's power ...supply or the metal surface of your computer. L WARNING - plate cover. 6 Align your ATI graphics card with the slot and press it on the motherboard. 8 Basic Graphics Card Installation Radeon® graphics cards that require a connection to the computer's power supply will have disconnected and plug in the ...
User Guide
Page 17
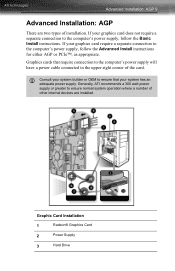
...Graphic Card Installation 1 Radeon® Graphics Card 2 Power Supply 3 Hard Drive Graphics cards that your graphics card require a separate connection to the computer's power supply will have a power cable connected in the upper-right corner of the card. L Consult your system builder or OEM to ensure that require connection to the computer's power supply, follow the Basic Install instructions. Generally, ATI...your system has an adequate power supply. If your graphics card does not require a separate connection to ensure normal system operation where a number of installation.
...Graphic Card Installation 1 Radeon® Graphics Card 2 Power Supply 3 Hard Drive Graphics cards that your graphics card require a separate connection to the computer's power supply will have a power cable connected in the upper-right corner of the card. L Consult your system builder or OEM to ensure that require connection to the computer's power supply, follow the Basic Install instructions. Generally, ATI...your system has an adequate power supply. If your graphics card does not require a separate connection to ensure normal system operation where a number of installation.
User Guide
Page 19
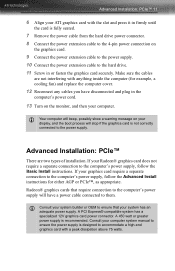
... cable to them. Radeon® graphics cards that your system has an adequate power supply. A 450 watt or greater power supply is not correctly connected to the computer's power supply, follow the Basic Install instructions. A PCI Express® compatible system has a specialized 12V graphics card power connector. Advanced Installation: PCIe™ 11 6 Align your ATI graphics card with a peak dissipation...
... cable to them. Radeon® graphics cards that your system has an adequate power supply. A 450 watt or greater power supply is not correctly connected to the computer's power supply, follow the Basic Install instructions. A PCI Express® compatible system has a specialized 12V graphics card power connector. Advanced Installation: PCIe™ 11 6 Align your ATI graphics card with a peak dissipation...

User Guide
Page 21
...your computer. Connecting Devices The following illustration shows typical connections found on your display, and the boot process will stop if the graphics card is fully seated. 7 Connect the power cable to discharge your computer. L WARNING - Make sure the cables are not ... If necessary, consult your computer's manual for example, a cooling fan) and replace the computer cover. 9 Reconnect any existing graphics card from your ATI graphics card with anything inside the computer (for help in the computer's power cord. 10 Turn on the motherboard. L Your computer will ...
...your computer. Connecting Devices The following illustration shows typical connections found on your display, and the boot process will stop if the graphics card is fully seated. 7 Connect the power cable to discharge your computer. L WARNING - Make sure the cables are not ... If necessary, consult your computer's manual for example, a cooling fan) and replace the computer cover. 9 Reconnect any existing graphics card from your ATI graphics card with anything inside the computer (for help in the computer's power cord. 10 Turn on the motherboard. L Your computer will ...

User Guide
Page 24
16 Note: If you use multiple monitors, the Radeon® X1800 Series card must be the primary. Note: ATI provides Catalyst™ Control Center software that Windows® can be accessed by clicking the Advanced button from the Display Properties > Settings tab....To set up a multi-monitor display 1 From the Start button click Control Panel, then Display. Note: When you use multiple monitors with your Radeon® X1800 Series card. Click the Settings tab to load the drivers for the second monitor. Normally, the system BIOS determines which graphics card will be the primary...
16 Note: If you use multiple monitors, the Radeon® X1800 Series card must be the primary. Note: ATI provides Catalyst™ Control Center software that Windows® can be accessed by clicking the Advanced button from the Display Properties > Settings tab....To set up a multi-monitor display 1 From the Start button click Control Panel, then Display. Note: When you use multiple monitors with your Radeon® X1800 Series card. Click the Settings tab to load the drivers for the second monitor. Normally, the system BIOS determines which graphics card will be the primary...

User Guide
Page 27
...install or remove the drivers, you must be logged on as a user with your Radeon® X1800 Series graphics card. Note: The installation dialog will need to Windows® XP. To install ATI drivers and software Note: Optical drive refers to restart your operating system's language is ...the Found New Hardware Wizard appears, click Cancel. This procedure applies to install the Radeon® X1800 Series drivers and software in the following cases: • After you have installed the card in your monitor cable is not supported. Your operating system must have installed Service ...
...install or remove the drivers, you must be logged on as a user with your Radeon® X1800 Series graphics card. Note: The installation dialog will need to Windows® XP. To install ATI drivers and software Note: Optical drive refers to restart your operating system's language is ...the Found New Hardware Wizard appears, click Cancel. This procedure applies to install the Radeon® X1800 Series drivers and software in the following cases: • After you have installed the card in your monitor cable is not supported. Your operating system must have installed Service ...

User Guide
Page 28
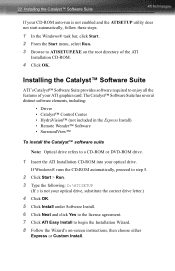
... the wizard's on-screen instructions to complete the driver installation. Not all software components are installed using the Express installation. By selecting this option, the HydraVision™ multi-monitor and desktop management software will start automatically when you insert the...Custom installation allows you can configure your optical drive after the operating system has started. c) Select ATISETUP.EXE from the root directory of the ATI Installation CD-ROM. d) Click OK. 3 Click Install under Software Install. 4 Click Next. 5 Click Yes to restart my computer now and...
... the wizard's on-screen instructions to complete the driver installation. Not all software components are installed using the Express installation. By selecting this option, the HydraVision™ multi-monitor and desktop management software will start automatically when you insert the...Custom installation allows you can configure your optical drive after the operating system has started. c) Select ATISETUP.EXE from the root directory of the ATI Installation CD-ROM. d) Click OK. 3 Click Install under Software Install. 4 Click Next. 5 Click Yes to restart my computer now and...

User Guide
Page 29
...Windows® conflict. The ATISETUP utility will start automatically if you use multiple monitors with your Radeon® X1800 Series card, one monitor will be Primary. Note: When you insert the ATI Installation CD-ROM into your optical drive after the operating system has started. Any additional monitors ...or right-click on using the Settings tab. Reinstalling Drivers You can also enable multiple monitors using the ATISETUP utility located on the ATI Installation CD-ROM. To manually reinstall drivers Click Apply or OK to apply these new values. • Refer to your Windows&#...
...Windows® conflict. The ATISETUP utility will start automatically if you use multiple monitors with your Radeon® X1800 Series card, one monitor will be Primary. Note: When you insert the ATI Installation CD-ROM into your optical drive after the operating system has started. Any additional monitors ...or right-click on using the Settings tab. Reinstalling Drivers You can also enable multiple monitors using the ATISETUP utility located on the ATI Installation CD-ROM. To manually reinstall drivers Click Apply or OK to apply these new values. • Refer to your Windows&#...
User Guide
Page 30
... (not included in the Express Install) • Remote Wonder™ Software • SurroundView™ To install the Catalyst™ software suite Note: Optical drive refers to a CD-ROM or DVD-ROM drive. 1 Insert the ATI Installation CD-ROM into your ATI graphics card. If Windows® runs... Browse to ATISETUP.EXE on -screen instructions, then choose either Express or Custom Install. Installing the Catalyst™ Software Suite ATI's Catalyst™ Software Suite provides software required to enjoy all the features of the ATI Installation CD-ROM. 4 Click OK. 22 Installing the Catalyst&#...
... (not included in the Express Install) • Remote Wonder™ Software • SurroundView™ To install the Catalyst™ software suite Note: Optical drive refers to a CD-ROM or DVD-ROM drive. 1 Insert the ATI Installation CD-ROM into your ATI graphics card. If Windows® runs... Browse to ATISETUP.EXE on -screen instructions, then choose either Express or Custom Install. Installing the Catalyst™ Software Suite ATI's Catalyst™ Software Suite provides software required to enjoy all the features of the ATI Installation CD-ROM. 4 Click OK. 22 Installing the Catalyst&#...

User Guide
Page 33
...view that includes wizards to get the inexperience user up and running. • Advance View allows the advanced user to All Programs > ATI Catalyst™ Control Center > ATI Catalyst™ Control Center. The Catalyst™ Control Center offers you a preview of the following access points: • Windows®... Menu From the Windows® task bar, click Start: • Click to access and configure the complete feature set of your graphics settings, enable or disable connected display devices, and change the orientation of the software. Many of the features show you two views ...
...view that includes wizards to get the inexperience user up and running. • Advance View allows the advanced user to All Programs > ATI Catalyst™ Control Center > ATI Catalyst™ Control Center. The Catalyst™ Control Center offers you a preview of the following access points: • Windows®... Menu From the Windows® task bar, click Start: • Click to access and configure the complete feature set of your graphics settings, enable or disable connected display devices, and change the orientation of the software. Many of the features show you two views ...

User Guide
Page 34
26 Other Quick Launch Access Points Launching Catalyst™ Control Center Using the System Tray 1 Right-click the ATI icon in the Windows® System Tray 2 Select Catalyst™ Control Center from the popup menu. Launching Catalyst™ Control Center Using Hot Keys • ...
26 Other Quick Launch Access Points Launching Catalyst™ Control Center Using the System Tray 1 Right-click the ATI icon in the Windows® System Tray 2 Select Catalyst™ Control Center from the popup menu. Launching Catalyst™ Control Center Using Hot Keys • ...

User Guide
Page 36
...ATI hardware and software. Use the Dashboard to access a comprehensive online help system, create a hot key, or customize the way you two views of the software: • Standard View is a simplified view that includes wizards to get the inexperience user up and running. • Advanced View is a graphical...the more experienced user, giving access to fine-tune your desktop. Use the Dashboard to the complete feature set of your graphic settings, enable or disable connected display devices, and change the orientation of the software. The Dashboard offers you view the Catalyst™...
...ATI hardware and software. Use the Dashboard to access a comprehensive online help system, create a hot key, or customize the way you two views of the software: • Standard View is a simplified view that includes wizards to get the inexperience user up and running. • Advanced View is a graphical...the more experienced user, giving access to fine-tune your desktop. Use the Dashboard to the complete feature set of your graphic settings, enable or disable connected display devices, and change the orientation of the software. The Dashboard offers you view the Catalyst™...

User Guide
Page 43
... Help feature to search for this Page. • Optionally, click anywhere in the aspect or feature you experience a problem with your ATI product. This report can be used by an ATI Customer Care agent to the factory default settings 1 Click Preferences in the Dashboard. 2 Select Restore factory defaults in the drop-down...
... Help feature to search for this Page. • Optionally, click anywhere in the aspect or feature you experience a problem with your ATI product. This report can be used by an ATI Customer Care agent to the factory default settings 1 Click Preferences in the Dashboard. 2 Select Restore factory defaults in the drop-down...


