
User Guide
Page 5
1 Table of Contents Introduction 1 Radeon® X1800 Series Features 1 Graphic Features 1 System Requirements 4 External Connectors 4 Before You Begin 4 Record Your Serial and Part Numbers 4 Uninstall Previous Graphics Card Drivers 5 Installing Your ATI Graphics Card 7 Graphics Card Bus Types 7 Basic Graphics Card Installation 7 Advanced Installation: AGP 9 Advanced Installation: PCIe™ 11 Connecting Devices 13 Using Multiple Displays 15 Connecting Your Monitors 15 Display Configurations 17...
1 Table of Contents Introduction 1 Radeon® X1800 Series Features 1 Graphic Features 1 System Requirements 4 External Connectors 4 Before You Begin 4 Record Your Serial and Part Numbers 4 Uninstall Previous Graphics Card Drivers 5 Installing Your ATI Graphics Card 7 Graphics Card Bus Types 7 Basic Graphics Card Installation 7 Advanced Installation: AGP 9 Advanced Installation: PCIe™ 11 Connecting Devices 13 Using Multiple Displays 15 Connecting Your Monitors 15 Display Configurations 17...

User Guide
Page 12
...® 4 or AMD Athlon®. • 512MB of a CrossFire™ system, the following . If you begin installing your computer system manual to accommodate a high-end graphics card with a peak dissipation above 75 watts. • Windows® XP with two (2) PCI Express® X16 slots and correct PCIe™ chipset driver. (See ati.com/crossfire for a list of CrossFire...
...® 4 or AMD Athlon®. • 512MB of a CrossFire™ system, the following . If you begin installing your computer system manual to accommodate a high-end graphics card with a peak dissipation above 75 watts. • Windows® XP with two (2) PCI Express® X16 slots and correct PCIe™ chipset driver. (See ati.com/crossfire for a list of CrossFire...

User Guide
Page 13
... running. 2 Navigate to the Control Panel and select Add/Remove Programs. 3 Select your system after the drivers have been removed. Uninstall Previous Graphics Card Drivers To ensure the successful installation of your new Radeon® X1800 Series card, you remove your new ATI product. Before You Begin 5 X Serial number (S/N) Y 102 part number (P/N) Write these numbers down before removing...
... running. 2 Navigate to the Control Panel and select Add/Remove Programs. 3 Select your system after the drivers have been removed. Uninstall Previous Graphics Card Drivers To ensure the successful installation of your new Radeon® X1800 Series card, you remove your new ATI product. Before You Begin 5 X Serial number (S/N) Y 102 part number (P/N) Write these numbers down before removing...

User Guide
Page 24
... Wizard appears, at the appropriate prompt insert the ATI Installation CD to load the drivers for the second monitor. Normally, the system BIOS determines which graphics card will be designated as appropriate for your Radeon® X1800 Series card. 16 Note: If you use multiple monitors, the Radeon® X1800 Series card must be the primary. Click Apply or OK...
... Wizard appears, at the appropriate prompt insert the ATI Installation CD to load the drivers for the second monitor. Normally, the system BIOS determines which graphics card will be designated as appropriate for your Radeon® X1800 Series card. 16 Note: If you use multiple monitors, the Radeon® X1800 Series card must be the primary. Click Apply or OK...

User Guide
Page 27
... English if your system. When the System Settings Change window asks you can install the Radeon® X1800 Series drivers. Your operating system must have reinstalled or upgraded your Radeon® X1800 Series graphics card. Also, make sure that you begin. To install ATI drivers and software Note: Optical drive refers to CD-ROM or DVD-ROM drive. 1 Start...
... English if your system. When the System Settings Change window asks you can install the Radeon® X1800 Series drivers. Your operating system must have reinstalled or upgraded your Radeon® X1800 Series graphics card. Also, make sure that you begin. To install ATI drivers and software Note: Optical drive refers to CD-ROM or DVD-ROM drive. 1 Start...

User Guide
Page 28
...Click Next. 5 Click Yes to complete the driver installation. ATI Easy Install will automatically be installed, along with the ATI driver. Custom installation allows you insert the ATI Installation CD-ROM into your optical drive after ...the operating system has started. Click Yes or Continue to the license agreement. Choosing a refresh rate unsupported by your monitor may damage your monitor's documentation if necessary. Not all software components are installed using the Express...
...Click Next. 5 Click Yes to complete the driver installation. ATI Easy Install will automatically be installed, along with the ATI driver. Custom installation allows you insert the ATI Installation CD-ROM into your optical drive after ...the operating system has started. Click Yes or Continue to the license agreement. Choosing a refresh rate unsupported by your monitor may damage your monitor's documentation if necessary. Not all software components are installed using the Express...

User Guide
Page 29
...there was a Windows® conflict. The ATISETUP utility will always be designated as appropriate for further information on the ATI Installation CD-ROM. Reinstalling Drivers You can also enable multiple monitors using the Settings tab. Click Apply or OK to apply these new values. ... 1 From the Start menu click Control Panel, then Display. Note: When you use multiple monitors with your Radeon® X1800 Series card, one monitor will start automatically if you insert the ATI Installation CD-ROM into your monitor's performance. 3 Click Advanced and select the Monitor tab. 4 Choose a ...
...there was a Windows® conflict. The ATISETUP utility will always be designated as appropriate for further information on the ATI Installation CD-ROM. Reinstalling Drivers You can also enable multiple monitors using the Settings tab. Click Apply or OK to apply these new values. ... 1 From the Start menu click Control Panel, then Display. Note: When you use multiple monitors with your Radeon® X1800 Series card, one monitor will start automatically if you insert the ATI Installation CD-ROM into your monitor's performance. 3 Click Advanced and select the Monitor tab. 4 Choose a ...
User Guide
Page 30
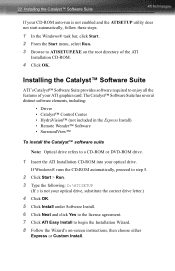
...Driver • Catalyst™ Control Center • HydraVision™ (not included in the Express Install) • Remote Wonder™ Software • SurroundView™ To install the Catalyst™ software suite Note: Optical drive refers to a CD-ROM or DVD-ROM drive. 1 Insert the ATI Installation CD-ROM into your ATI graphics card... click Start. 2 From the Start menu, select Run. 3 Browse to ATISETUP.EXE on -screen instructions, then choose either Express or Custom Install. 22 Installing the Catalyst™ Software Suite If your CD-ROM auto-run is not your optical drive, ...
...Driver • Catalyst™ Control Center • HydraVision™ (not included in the Express Install) • Remote Wonder™ Software • SurroundView™ To install the Catalyst™ software suite Note: Optical drive refers to a CD-ROM or DVD-ROM drive. 1 Insert the ATI Installation CD-ROM into your ATI graphics card... click Start. 2 From the Start menu, select Run. 3 Browse to ATISETUP.EXE on -screen instructions, then choose either Express or Custom Install. 22 Installing the Catalyst™ Software Suite If your CD-ROM auto-run is not your optical drive, ...

User Guide
Page 44
... Information Center provides detailed information about the installed graphics hardware and associated software. • Graphics Software includes information such as installed 2D and 3D driver versions, OpenGL® version, and Catalyst™ Control Center version. • Graphics Hardware includes information about each installed graphics card, such as the installed graphics chipset, device ID, bus type, memory size...
... Information Center provides detailed information about the installed graphics hardware and associated software. • Graphics Software includes information such as installed 2D and 3D driver versions, OpenGL® version, and Catalyst™ Control Center version. • Graphics Hardware includes information about each installed graphics card, such as the installed graphics chipset, device ID, bus type, memory size...

User Guide
Page 55
...) uses the information provided by the attached monitor to place a check mark in Advanced View. 2 Click Attributes. 3 Select Use Extended Display Identification Data (EDID) or driver defaults to determine the limits for the resolution and refresh rate. Enable Extended Display Identification Data (EDID) 1 Expand Monitor Properties in the check box.
...) uses the information provided by the attached monitor to place a check mark in Advanced View. 2 Click Attributes. 3 Select Use Extended Display Identification Data (EDID) or driver defaults to determine the limits for the resolution and refresh rate. Enable Extended Display Identification Data (EDID) 1 Expand Monitor Properties in the check box.

User Guide
Page 70
...the defaults for various games and games engines such as Doom 3, the Half Life 2 engine, Unreal Tournament 2003, Unreal Tournament 2004, Splinter Cell, Race Driver, Prince of Persia, and Crazy Taxi 3. Use the Standard slider setting to place a check mark in 3D applications while maintaining or even improving image ... display them. 62 Catalyst™ A.I . Previous settings are loaded to determine the best and fastest way to the bottom right-hand corner of ATI's new texture analyzer technology to achieve even better results with minimal impact on performance. Catalyst™ A.I.
...the defaults for various games and games engines such as Doom 3, the Half Life 2 engine, Unreal Tournament 2003, Unreal Tournament 2004, Splinter Cell, Race Driver, Prince of Persia, and Crazy Taxi 3. Use the Standard slider setting to place a check mark in 3D applications while maintaining or even improving image ... display them. 62 Catalyst™ A.I . Previous settings are loaded to determine the best and fastest way to the bottom right-hand corner of ATI's new texture analyzer technology to achieve even better results with minimal impact on performance. Catalyst™ A.I.

User Guide
Page 88
... Defaults will be saved once you click OK. Select one of five options for deinterlacing video for better viewing. • Auto Detect lets the multimedia driver to save your changes and exit the Catalyst™ Control Center. Apply your settings 1 Click Apply to save your changes and leave the Catalyst™...
... Defaults will be saved once you click OK. Select one of five options for deinterlacing video for better viewing. • Auto Detect lets the multimedia driver to save your changes and exit the Catalyst™ Control Center. Apply your settings 1 Click Apply to save your changes and leave the Catalyst™...

User Guide
Page 93
...settings • Click Discard to ignore any work in the current view. VPU Recover VPU Recover enables the ATI display driver to detect when the graphics processor stops responding to all features of an aspect, not just the feature in progress before restarting the ...will switch the computer to software rendering mode, allowing you click OK. Clicking Discard applies to display-driver instructions. When this happens, the display driver attempts to reset the graphics processor without requiring a system restart. Discard does not close the Catalyst™ Control Center. VPU ...
...settings • Click Discard to ignore any work in the current view. VPU Recover VPU Recover enables the ATI display driver to detect when the graphics processor stops responding to all features of an aspect, not just the feature in progress before restarting the ...will switch the computer to software rendering mode, allowing you click OK. Clicking Discard applies to display-driver instructions. When this happens, the display driver attempts to reset the graphics processor without requiring a system restart. Discard does not close the Catalyst™ Control Center. VPU ...

User Guide
Page 94
Prepare an error report You can chose to send an error report to ATI Technologies. 3 Click Send Error Report button in Advanced View. 2 Click Enable VPU Recover. This information is then used to develop more stable graphic drivers. 1 Click VPU Recover in Advanced View. 2 Click Prepare an error report if VPU Recover is activated for submission to ATI if VPU Recover is activated. 86 VPU Recover Catalyst™ Control Center: VPU Recover Enable VPU Recover 1 Click VPU Recover in the error report email. This report assists ATI in determining the cause of the problem.
Prepare an error report You can chose to send an error report to ATI Technologies. 3 Click Send Error Report button in Advanced View. 2 Click Enable VPU Recover. This information is then used to develop more stable graphic drivers. 1 Click VPU Recover in Advanced View. 2 Click Prepare an error report if VPU Recover is activated for submission to ATI if VPU Recover is activated. 86 VPU Recover Catalyst™ Control Center: VPU Recover Enable VPU Recover 1 Click VPU Recover in the error report email. This report assists ATI in determining the cause of the problem.

User Guide
Page 106
L You must be used in place of the ATI Graphics Card Z Male RCA Patch Cables - ATI HDTV Cable X ATI HDTV Video Output Cable Y Backplate of the standard A/V Output cable to connect to an HDTV or other component input device, using component video cables. ...Input Connections Note: Input and output cables lengths should not exceed 50 feet (15m). Installing your ATI HDTV video cable 1 Turn on your component input device, and set it to your ATI Component Video Adapter, ATI display drivers must have a monitor attached to YPbPr input. 98 Connecting to HDTV The HDTV Component Video ...
L You must be used in place of the ATI Graphics Card Z Male RCA Patch Cables - ATI HDTV Cable X ATI HDTV Video Output Cable Y Backplate of the standard A/V Output cable to connect to an HDTV or other component input device, using component video cables. ...Input Connections Note: Input and output cables lengths should not exceed 50 feet (15m). Installing your ATI HDTV video cable 1 Turn on your component input device, and set it to your ATI Component Video Adapter, ATI display drivers must have a monitor attached to YPbPr input. 98 Connecting to HDTV The HDTV Component Video ...

User Guide
Page 112
... a fine-grained checkerboard pattern. neither card is attached from the Slave graphics card's DVI-I . 104 The two cards are used to convey information from the Slave graphics card to the Master graphics card and transmit the combined signal to a display device. 9 Which games/applications work ? CrossFire™ is automatically selected. 10 Is a driver profile required to make CrossFire™...
... a fine-grained checkerboard pattern. neither card is attached from the Slave graphics card's DVI-I . 104 The two cards are used to convey information from the Slave graphics card to the Master graphics card and transmit the combined signal to a display device. 9 Which games/applications work ? CrossFire™ is automatically selected. 10 Is a driver profile required to make CrossFire™...
User Guide
Page 116
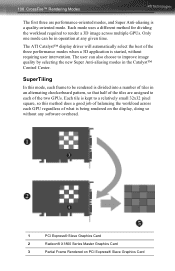
...any software overhead. 1 PCI Express® Slave Graphics Card 2 Radeon® X1800 Series Master Graphics Card 3 Partial Frame Rendered on the display, doing so without requiring user intervention. Each tile is being rendered on PCI Express® Slave Graphics Card SuperTiling In this method ...does a good job of balancing the workload across multiple GPUs. Each mode uses a different method for dividing the workload required to be in the Catalyst™ Control Center. The ATI Catalyst™ display driver...
...any software overhead. 1 PCI Express® Slave Graphics Card 2 Radeon® X1800 Series Master Graphics Card 3 Partial Frame Rendered on the display, doing so without requiring user intervention. Each tile is being rendered on PCI Express® Slave Graphics Card SuperTiling In this method ...does a good job of balancing the workload across multiple GPUs. Each mode uses a different method for dividing the workload required to be in the Catalyst™ Control Center. The ATI Catalyst™ display driver...

User Guide
Page 124
...system and applications. • Re-install the ATI drivers for the appropriate cable and connector to plug into the DVI-I connector on the graphics card. • Check the driver installation and make sure that all software is securely fastened to the card. • Make sure that the monitor and...-in graphics capabilities on the screen • Set the monitor's RGB inputs (and sync switches, if this option is available) to 75 Ohms, with the sync set to external. • Digital Flat Panel (DFP) monitor users: refer to your monitor's documentation for your Radeon® X1800 Series card.
...system and applications. • Re-install the ATI drivers for the appropriate cable and connector to plug into the DVI-I connector on the graphics card. • Check the driver installation and make sure that all software is securely fastened to the card. • Make sure that the monitor and...-in graphics capabilities on the screen • Set the monitor's RGB inputs (and sync switches, if this option is available) to 75 Ohms, with the sync set to external. • Digital Flat Panel (DFP) monitor users: refer to your monitor's documentation for your Radeon® X1800 Series card.
User Guide
Page 126
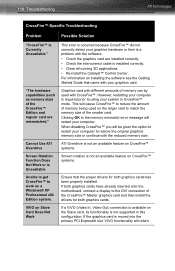
...Currently Unavailable." VIVO on a Windows® XP Professional x64 Edition system. However, restarting your system in this configuration. Cannot Use ATI Overdrive Screen Rotation Function Does Not Work or is not supported in CrossFire™ mode. If a VIVO (Video In, Video Out... PCI Express® slot, VIVO functionality will restart your graphics card. This will be given the option to restart your computer to reduce the amount of memory being used with different amounts of the CrossFire™ Master graphics card and then install the drivers for both graphics cards....
...Currently Unavailable." VIVO on a Windows® XP Professional x64 Edition system. However, restarting your system in this configuration. Cannot Use ATI Overdrive Screen Rotation Function Does Not Work or is not supported in CrossFire™ mode. If a VIVO (Video In, Video Out... PCI Express® slot, VIVO functionality will restart your graphics card. This will be given the option to restart your computer to reduce the amount of memory being used with different amounts of the CrossFire™ Master graphics card and then install the drivers for both graphics cards....

User Guide
Page 151
...designed to the user's perspective, or by problems occurring with the graphics hardware. It accelerates noise removal, de-blocking, adaptive de-interlacing, frame-rate conversion, color-space conversion, and more. If the display driver detects that keeps track of system crashes caused by another 3D object.... Z-buffer The portion of video memory that the graphics processor has hung, VPU Recover will attempt to reset the graphics processor, eliminating the need for a ...
...designed to the user's perspective, or by problems occurring with the graphics hardware. It accelerates noise removal, de-blocking, adaptive de-interlacing, frame-rate conversion, color-space conversion, and more. If the display driver detects that keeps track of system crashes caused by another 3D object.... Z-buffer The portion of video memory that the graphics processor has hung, VPU Recover will attempt to reset the graphics processor, eliminating the need for a ...