User Guide
Page 2
... copyright protection technology that is intended for a particular purpose, and noninfringement. ATI, the ATI logo, and ATI product and product-feature names are subject to the operation or use of ATI hardware, software or other products and documentation described herein, for any act or... or for limited viewing uses only. Reverse engineering or disassembly is strictly prohibited. With respect to ATI products which this document, ATI Technologies Inc. All other products and documentation provided herein. is prohibited. Macrovision Apparatus Claims of this document relates...
... copyright protection technology that is intended for a particular purpose, and noninfringement. ATI, the ATI logo, and ATI product and product-feature names are subject to the operation or use of ATI hardware, software or other products and documentation described herein, for any act or... or for limited viewing uses only. Reverse engineering or disassembly is strictly prohibited. With respect to ATI products which this document, ATI Technologies Inc. All other products and documentation provided herein. is prohibited. Macrovision Apparatus Claims of this document relates...

User Guide
Page 3
This option card is for this accessory should be adhered to. • Compatibility - When installing an outside antenna system should be located in products equipped with compatible UL Listed personal computers that have Installation Instructions detailing user installation of overhead power lines or other light or power circuits, or where it can fall into such power lines or circuits. • Antenna Installation - This is operated. • Retain Instructions - All card securement pins shall be installed only in the vicinity of card cage accessories. For added ...
This option card is for this accessory should be adhered to. • Compatibility - When installing an outside antenna system should be located in products equipped with compatible UL Listed personal computers that have Installation Instructions detailing user installation of overhead power lines or other light or power circuits, or where it can fall into such power lines or circuits. • Antenna Installation - This is operated. • Retain Instructions - All card securement pins shall be installed only in the vicinity of card cage accessories. For added ...

User Guide
Page 5
v Table of Contents Introduction 1 Radeon® X1900 GT Features 1 Graphic Features 1 System Requirements 4 External Connectors 4 Using Multiple Displays 5 Connecting Your Monitors 5 Display Configurations 7 Catalyst™ Control Center 9 Launching Catalyst™ Control Center 9 Launching Catalyst™ Control Center Using the Start Menu 9
v Table of Contents Introduction 1 Radeon® X1900 GT Features 1 Graphic Features 1 System Requirements 4 External Connectors 4 Using Multiple Displays 5 Connecting Your Monitors 5 Display Configurations 7 Catalyst™ Control Center 9 Launching Catalyst™ Control Center 9 Launching Catalyst™ Control Center Using the Start Menu 9

User Guide
Page 6
...™ A.I. 46 Mipmap Detail Level 48 All Settings 50 API Specific 53 Color 55 Color Desktop 56 Color - FullScreen 3D 59 Avivo™ Video for Radeon® Series starting from 9500 60 Standard Settings 61 Adjustments 62 Video Overlay Theater Mode 64 Deinterlacing 65 VPU Recover 70 Using TV Display and...
...™ A.I. 46 Mipmap Detail Level 48 All Settings 50 API Specific 53 Color 55 Color Desktop 56 Color - FullScreen 3D 59 Avivo™ Video for Radeon® Series starting from 9500 60 Standard Settings 61 Adjustments 62 Video Overlay Theater Mode 64 Deinterlacing 65 VPU Recover 70 Using TV Display and...

User Guide
Page 7
Using Games and Applications Windows® Volume Control Capturing Video Using Windows® Movie Maker vii 83 83 84
Using Games and Applications Windows® Volume Control Capturing Video Using Windows® Movie Maker vii 83 83 84

User Guide
Page 9
... GT Features Graphic Features • Native PCI Express® X16 bus support. • 256MB or 512 MB GDDR4\GDDR3 on the purchase of your ATI Radeon® X1900 GT graphics card. SmoothVision™ • Full-scene anti-aliasing method that smooths uneven edges and ...all resolutions. • 2x/4x//8x/16x Anisotropic Filtering modes with a loss-less compression up to a ratio of trouble-free computing. CHAPTER 1: Radeon® X1900 GT Features 1 Introduction Congratulations on -board memory. • Full support for Microsoft® DirectX® Shader Model 3.0. • High...
... GT Features Graphic Features • Native PCI Express® X16 bus support. • 256MB or 512 MB GDDR4\GDDR3 on the purchase of your ATI Radeon® X1900 GT graphics card. SmoothVision™ • Full-scene anti-aliasing method that smooths uneven edges and ...all resolutions. • 2x/4x//8x/16x Anisotropic Filtering modes with a loss-less compression up to a ratio of trouble-free computing. CHAPTER 1: Radeon® X1900 GT Features 1 Introduction Congratulations on -board memory. • Full support for Microsoft® DirectX® Shader Model 3.0. • High...
User Guide
Page 10
... for Microsoft® DirectX® 9.0 Shader Model 3.0 programmable vertex and pixel shaders in real time. • All format DTV/HDTV decoding. • Adaptive Per-Pixel- 2 Radeon® X1900 GT Features • Z Cache optimized for performance at high display resolutions, including widescreen HDTV resolutions. De-interlacing and Frame Rate Conversion. 512-bit...
... for Microsoft® DirectX® 9.0 Shader Model 3.0 programmable vertex and pixel shaders in real time. • All format DTV/HDTV decoding. • Adaptive Per-Pixel- 2 Radeon® X1900 GT Features • Z Cache optimized for performance at high display resolutions, including widescreen HDTV resolutions. De-interlacing and Frame Rate Conversion. 512-bit...

User Guide
Page 11
Radeon® X1900 GT Features 3 High Dynamic Range (HDR) Rendering • 64-bit floating point HDR supported throughout the pipeline • Includes support for blending and ...
Radeon® X1900 GT Features 3 High Dynamic Range (HDR) Rendering • 64-bit floating point HDR supported throughout the pipeline • Includes support for blending and ...

User Guide
Page 12
... a high-end graphics card with a peak dissipation above 75 watts. • Windows® XP with two (2) PCI Express® X16 slots and correct PCIe™ chipset driver. (See ati.com/crossfire for installation software (CD-ROM or DVD-ROM drive). • Specialized PCI Express® 450 watt or greater power supply recommended.
... a high-end graphics card with a peak dissipation above 75 watts. • Windows® XP with two (2) PCI Express® X16 slots and correct PCIe™ chipset driver. (See ati.com/crossfire for installation software (CD-ROM or DVD-ROM drive). • Specialized PCI Express® 450 watt or greater power supply recommended.
User Guide
Page 13
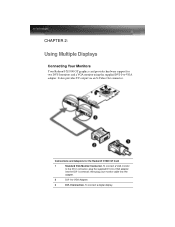
... DVI-I Connection. It also provides TV output via an S-Video Out connector. 5 CHAPTER 2: Using Multiple Displays Connecting Your Monitors Your Radeon® X1900 GT graphics card provides hardware support for the Radeon® X1900 GT Card 1 Standard VGA Monitor Connector. To connect a VGA monitor to the DVI-I connector, plug the supplied DVI...
... DVI-I Connection. It also provides TV output via an S-Video Out connector. 5 CHAPTER 2: Using Multiple Displays Connecting Your Monitors Your Radeon® X1900 GT graphics card provides hardware support for the Radeon® X1900 GT Card 1 Standard VGA Monitor Connector. To connect a VGA monitor to the DVI-I connector, plug the supplied DVI...

User Guide
Page 14
...the basic multi-monitor configuration settings. To set up a multi-monitor display 1 From the Start button click Control Panel, then Display. Note: ATI provides Catalyst™ Control Center software that Windows® can be accessed by clicking the Advanced button from the Display Properties > Settings tab. .... 3 Power on using the Settings tab. Any additional monitors will be the primary. 6 Note: If you use multiple monitors, the Radeon® X1900 GT card must be the primary graphics card. Normally, the system BIOS determines which graphics card will be designated as appropriate ...
...the basic multi-monitor configuration settings. To set up a multi-monitor display 1 From the Start button click Control Panel, then Display. Note: ATI provides Catalyst™ Control Center software that Windows® can be accessed by clicking the Advanced button from the Display Properties > Settings tab. .... 3 Power on using the Settings tab. Any additional monitors will be the primary. 6 Note: If you use multiple monitors, the Radeon® X1900 GT card must be the primary graphics card. Normally, the system BIOS determines which graphics card will be designated as appropriate ...

User Guide
Page 15
... compatible with single-link DVI flat panel displays as well as ultra-high resolution dual-link DVI flat panel displays. Display Configurations 7 Display Configurations Your Radeon® X1900 GT graphics card provides dual display functionality.
... compatible with single-link DVI flat panel displays as well as ultra-high resolution dual-link DVI flat panel displays. Display Configurations 7 Display Configurations Your Radeon® X1900 GT graphics card provides dual display functionality.

User Guide
Page 17
...Center Using the Start Menu From the Windows® task bar, click Start: • Click to Programs > Catalyst™ Control Center > ATI Catalyst™ Control Center. Use the Catalyst™ Control Center to access a comprehensive online help system, or connect to the features you use...offers you a preview of the changes before they are applied. The Catalyst™ Control Center can be customized for easy access to the ATI Web site. Launching Catalyst™ Control Center Launch Catalyst™ Control Center from one of your desktop. CHAPTER 3: Launching Catalyst™ ...
...Center Using the Start Menu From the Windows® task bar, click Start: • Click to Programs > Catalyst™ Control Center > ATI Catalyst™ Control Center. Use the Catalyst™ Control Center to access a comprehensive online help system, or connect to the features you use...offers you a preview of the changes before they are applied. The Catalyst™ Control Center can be customized for easy access to the ATI Web site. Launching Catalyst™ Control Center Launch Catalyst™ Control Center from one of your desktop. CHAPTER 3: Launching Catalyst™ ...

User Guide
Page 18
10 Launching Catalyst™ Control Center Other Quick Launch Access Points Launching Catalyst™ Control Center Using the System Tray 1 Right-click the ATI icon in the Windows® System Tray. 2 Select Catalyst™ Control Center from the popup menu. Launching Catalyst™ Control Center Using Hot Keys • ...
10 Launching Catalyst™ Control Center Other Quick Launch Access Points Launching Catalyst™ Control Center Using the System Tray 1 Right-click the ATI icon in the Windows® System Tray. 2 Select Catalyst™ Control Center from the popup menu. Launching Catalyst™ Control Center Using Hot Keys • ...

User Guide
Page 19
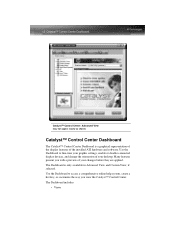
Launching Catalyst™ Control Center 11 Catalyst™ Control Center Dialog (may not appear exactly as shown)
Launching Catalyst™ Control Center 11 Catalyst™ Control Center Dialog (may not appear exactly as shown)
User Guide
Page 20
The Dashboard is a graphical representation of the display features of the installed ATI hardware and software. Many features present you view the Catalyst™ Control Center. 12 Catalyst™ Control Center Dashboard Catalyst™ Control Center: Advanced View (...
The Dashboard is a graphical representation of the display features of the installed ATI hardware and software. Many features present you view the Catalyst™ Control Center. 12 Catalyst™ Control Center Dashboard Catalyst™ Control Center: Advanced View (...
User Guide
Page 21
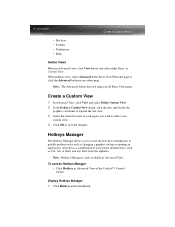
Create a Custom View 13 • Hot keys • Profiles • Preferences • Help Switch Views When in all Basic View pages. Note: The Advanced button does not appear in Advanced view, click View button and select either Basic, or Custom View. Note: Hotkeys Manager is a combination of the Catalyst™ Control Center. Display Hotkeys Manager 1 Click Hotkeys in any letter from the alphabet. Hotkeys Manager The Hotkeys Manager allows you wish to add to your custom view. 4 Click OK to quickly perform tasks such as Ctrl, Alt, or Shift, and any other page. A hot key is...
Create a Custom View 13 • Hot keys • Profiles • Preferences • Help Switch Views When in all Basic View pages. Note: The Advanced button does not appear in Advanced view, click View button and select either Basic, or Custom View. Note: Hotkeys Manager is a combination of the Catalyst™ Control Center. Display Hotkeys Manager 1 Click Hotkeys in any letter from the alphabet. Hotkeys Manager The Hotkeys Manager allows you wish to add to your custom view. 4 Click OK to quickly perform tasks such as Ctrl, Alt, or Shift, and any other page. A hot key is...
User Guide
Page 22
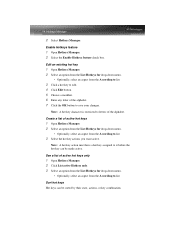
14 Hotkeys Manager 2 Select Hotkeys Manager. Edit an existing hot key 1 Open Hotkeys Manager. 2 Select an option from the List Hotkeys for drop-down menu. • Optionally, select an aspect from the According to list. 3 Click a hot key to edit. 4 Click Edit button. 5 Choose a modifier. 6 Enter any letter of active hot keys only 1 Open Hotkeys Manager. 2 Click List active Hotkeys only. 3 Select an option from the List Hotkeys for drop-down menu. • Optionally, select an aspect from the According to save your changes. See a list of the alphabet. 7 Click the OK button to list. 3 ...
14 Hotkeys Manager 2 Select Hotkeys Manager. Edit an existing hot key 1 Open Hotkeys Manager. 2 Select an option from the List Hotkeys for drop-down menu. • Optionally, select an aspect from the According to list. 3 Click a hot key to edit. 4 Click Edit button. 5 Choose a modifier. 6 Enter any letter of active hot keys only 1 Open Hotkeys Manager. 2 Click List active Hotkeys only. 3 Select an option from the List Hotkeys for drop-down menu. • Optionally, select an aspect from the According to save your changes. See a list of the alphabet. 7 Click the OK button to list. 3 ...

User Guide
Page 23
Define and save into a profile your own personal video settings that can be included in your profile. 2 Open the Profiles Manager. 3 Enter a name for your desktop, video, and 3D applications. Apply a hot key • Press and hold down the modifier(s) keys, then press the assigned keyboard key. Profiles Manager 15 1 Open Hotkeys Manager • Click Active button to sort by state. • Click Hotkeys Actions button to sort by action. • Click Hotkeys button to sort by file association. Note: A profile applies to create customized environments for your computer, you ...
Define and save into a profile your own personal video settings that can be included in your profile. 2 Open the Profiles Manager. 3 Enter a name for your desktop, video, and 3D applications. Apply a hot key • Press and hold down the modifier(s) keys, then press the assigned keyboard key. Profiles Manager 15 1 Open Hotkeys Manager • Click Active button to sort by state. • Click Hotkeys Actions button to sort by action. • Click Hotkeys button to sort by file association. Note: A profile applies to create customized environments for your computer, you ...

User Guide
Page 24
Activate a profile 1 Open the Profiles Manager. 2 Select a profile from Create or Edit a Profile drop-down menu. 3 Click the Activation tab. 4 Set a profile to activate manually: • Click Manually by then select your desktop. • If you choose Hotkeys assignment, select a Hot key modifier and a keyboard key. Save a profile 1 Open the Profiles Manager. For example, a shortcut on the file name, then click Open to select the file. Activate an application, file, or shortcut when a profile is started 1 Open the Profiles Manager. 2 Click the Applications tab. 3 Click opens the ...
Activate a profile 1 Open the Profiles Manager. 2 Select a profile from Create or Edit a Profile drop-down menu. 3 Click the Activation tab. 4 Set a profile to activate manually: • Click Manually by then select your desktop. • If you choose Hotkeys assignment, select a Hot key modifier and a keyboard key. Save a profile 1 Open the Profiles Manager. For example, a shortcut on the file name, then click Open to select the file. Activate an application, file, or shortcut when a profile is started 1 Open the Profiles Manager. 2 Click the Applications tab. 3 Click opens the ...
