AL1721 User's Guide
Page 1
TABLE OF CONTENTS FOR YOUR SAFETY 1 SAFETY PRECAUTIONS 2 SPECIAL NOTES ON LCD MONITORS 3 BEFORE YOU OPERATE THE MONITOR 3 FEATURES 3 PACKING LIST 3 INSTALLATION INSTRUCTIONS 4 CONTROLS AND CONNECTORS 5 ADJUSTING THE VIEWING ANGLE 6 OPERATING INSTRUCTIONS 7 GENERAL INSTRUCTIONS 7 HOW TO ADJUST A SETTING 9 ADJUSTING THE PICTURE 10-11 PLUG AND PLAY 12 TECHNICAL SUPPORT(FAQ 13-14 ERROR MESSAGE & POSSIBLE SOLUTION ------- 15 APPENDIX 16 SPECIFICATIONS 16-17 FACTORY PRESET TIMING TABLE 18 CONNECTOR PIN ASSIGNMENT 19 41L1700-786-7A 英文 .
TABLE OF CONTENTS FOR YOUR SAFETY 1 SAFETY PRECAUTIONS 2 SPECIAL NOTES ON LCD MONITORS 3 BEFORE YOU OPERATE THE MONITOR 3 FEATURES 3 PACKING LIST 3 INSTALLATION INSTRUCTIONS 4 CONTROLS AND CONNECTORS 5 ADJUSTING THE VIEWING ANGLE 6 OPERATING INSTRUCTIONS 7 GENERAL INSTRUCTIONS 7 HOW TO ADJUST A SETTING 9 ADJUSTING THE PICTURE 10-11 PLUG AND PLAY 12 TECHNICAL SUPPORT(FAQ 13-14 ERROR MESSAGE & POSSIBLE SOLUTION ------- 15 APPENDIX 16 SPECIFICATIONS 16-17 FACTORY PRESET TIMING TABLE 18 CONNECTOR PIN ASSIGNMENT 19 41L1700-786-7A 英文 .
AL1721 User's Guide
Page 2
... receiving antenna. 2. The changes or modifications not expressly approved by unauthorized modification to radio communications. These limits are present inside the monitor. Increase the separation between the equipment and receiver. 3. Consult the dealer or an experienced radio/TV technician for any , must ...be used in a particular installation. WARNING: To prevent fire or shock hazard, do not expose the monitor to qualified personnel only. 41L1700-786-7A 英文 1 Do not open the cabinet. If this equipment. Refer servicing to ...
... receiving antenna. 2. The changes or modifications not expressly approved by unauthorized modification to radio communications. These limits are present inside the monitor. Increase the separation between the equipment and receiver. 3. Consult the dealer or an experienced radio/TV technician for any , must ...be used in a particular installation. WARNING: To prevent fire or shock hazard, do not expose the monitor to qualified personnel only. 41L1700-786-7A 英文 1 Do not open the cabinet. If this equipment. Refer servicing to ...

AL1721 User's Guide
Page 3
... the three-wire plug, have an electrician install the correct outlet, or ground the appliance safely. z Do not place the monitor on the monitor. Do not defeat the safety purpose of the cabinet are not blocked or covered. Overloading can expose you are not sure of... Min. 5A. z Slots and openings in a bookcase or cabinet unless proper ventilation is equipped with a three-pronged grounded plug, a plug with the monitor. To ensure reliable operation of power source indicated on a wall or shelf, use a mounting kit approved by the manufacturer or sold with a third (grounding...
... the three-wire plug, have an electrician install the correct outlet, or ground the appliance safely. z Do not place the monitor on the monitor. Do not defeat the safety purpose of the cabinet are not blocked or covered. Overloading can expose you are not sure of... Min. 5A. z Slots and openings in a bookcase or cabinet unless proper ventilation is equipped with a three-pronged grounded plug, a plug with the monitor. To ensure reliable operation of power source indicated on a wall or shelf, use a mounting kit approved by the manufacturer or sold with a third (grounding...

AL1721 User's Guide
Page 4
... The product package should include the following symptoms are normal with LCD monitor and do not indicate a problem. SPECIAL NOTES ON LCD MONITORS The following items: 1. LCD Monitor 2. Power Cord 4. BEFORE YOU OPERATE THE MONITOR FEATURES • 43.2cm(17") TFT Color LCD Monitor • Crisp, Clear Display for hours. It may include blemishes of...
... The product package should include the following symptoms are normal with LCD monitor and do not indicate a problem. SPECIAL NOTES ON LCD MONITORS The following items: 1. LCD Monitor 2. Power Cord 4. BEFORE YOU OPERATE THE MONITOR FEATURES • 43.2cm(17") TFT Color LCD Monitor • Crisp, Clear Display for hours. It may include blemishes of...

AL1721 User's Guide
Page 5
Connect the AC-power cord into your LCD monitor. The relevant national installation and/or equipment regulations shall be used. A certified power supply cord not lighter than ordinary polyvinyl chloride flexible cord according to ... outlet or the power outlet socket on your PC, depending on the type of synthetic rubber according to be used with your LCD monitor's DC-power-input. This LCD monitor has an External universal power supply that the power cord is required.) 3. Alternative a flexible cord be of power cord supplied with this...
Connect the AC-power cord into your LCD monitor. The relevant national installation and/or equipment regulations shall be used. A certified power supply cord not lighter than ordinary polyvinyl chloride flexible cord according to ... outlet or the power outlet socket on your PC, depending on the type of synthetic rubber according to be used with your LCD monitor's DC-power-input. This LCD monitor has an External universal power supply that the power cord is required.) 3. Alternative a flexible cord be of power cord supplied with this...

AL1721 User's Guide
Page 6
... Cable 6. D-SUB Cable 2. Plug the power cable of the power cord into a nearby outlet. Plug the other end of your monitor into the power adapter. 6. Turn on the back of the monitor and connect the other end to the computer's D-Sub port. 3. (only Dual-Input Model)Connect one end of the 24... DC-In port on your computer before performing the procedure below. 1. Connect one end of the 15-pin D-Sub cable to the back of the monitor and connect the other end to the back of the monitor. 2. DC-Jack Power Cable 3. Audio cable 41L1700-786-7A 英文 5
... Cable 6. D-SUB Cable 2. Plug the power cable of the power cord into a nearby outlet. Plug the other end of your monitor into the power adapter. 6. Turn on the back of the monitor and connect the other end to the computer's D-Sub port. 3. (only Dual-Input Model)Connect one end of the 24... DC-In port on your computer before performing the procedure below. 1. Connect one end of the 15-pin D-Sub cable to the back of the monitor and connect the other end to the back of the monitor. 2. DC-Jack Power Cable 3. Audio cable 41L1700-786-7A 英文 5
AL1721 User's Guide
Page 7
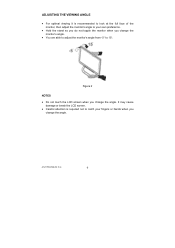
It may cause damage or break the LCD screen. • Careful attention is recommended to look at the full face of the monitor, then adjust the monitor's angle to 15°. Figure 2 NOTES • Do not touch the LCD screen when you change the angle. ADJUSTING THE VIEWING ANGLE • ...viewing it is required not to catch your own preference. • Hold the stand so you do not topple the monitor when you change the monitor's angle. • You are able to adjust the monitor's angle from -5° to your fingers or hands when you change the angle. 41L1700-786-7A 英文...
It may cause damage or break the LCD screen. • Careful attention is recommended to look at the full face of the monitor, then adjust the monitor's angle to 15°. Figure 2 NOTES • Do not touch the LCD screen when you change the angle. ADJUSTING THE VIEWING ANGLE • ...viewing it is required not to catch your own preference. • Hold the stand so you do not topple the monitor when you change the monitor's angle. • You are able to adjust the monitor's angle from -5° to your fingers or hands when you change the angle. 41L1700-786-7A 英文...

AL1721 User's Guide
Page 8
The power indicator will light up. OPERATING INSTRUCTIONS GENERAL INSTRUCTIONS Press the power button to turn the monitor on the monitor position. Figure 3 External Control Button EXTERNAL CONTROLS 1. >/ Volume 2. The other control buttons are located at front panel of the monitor (See Figure 3). By changing these settings, the picture can be adjusted to your personal preferences. • The power cord should be connected. • Connect the video cable from the monitor to the video card. • Press the power button to turn on or off.
The power indicator will light up. OPERATING INSTRUCTIONS GENERAL INSTRUCTIONS Press the power button to turn the monitor on the monitor position. Figure 3 External Control Button EXTERNAL CONTROLS 1. >/ Volume 2. The other control buttons are located at front panel of the monitor (See Figure 3). By changing these settings, the picture can be adjusted to your personal preferences. • The power cord should be connected. • Connect the video cable from the monitor to the video card. • Press the power button to turn on or off.

AL1721 User's Guide
Page 9
... function when OSD is activated. • /Auto Adjust button / Exit: 1. When OSD menu is used to turn the monitor ON or OFF, And display the monitor's state. • Power Indicator: Blue - The Auto Adjustment function is in active status, this button will act as thinner...benzene, or abrasive cleaners, since these will come in a place subject to ship your monitor. • For maximum protection, repackage your monitor as it was originally packed at the factory. • To keep the monitor looking new, periodically clean it . 41L1700-786-7A 英文 8 FRONT PANEL ...
... function when OSD is activated. • /Auto Adjust button / Exit: 1. When OSD menu is used to turn the monitor ON or OFF, And display the monitor's state. • Power Indicator: Blue - The Auto Adjustment function is in active status, this button will act as thinner...benzene, or abrasive cleaners, since these will come in a place subject to ship your monitor. • For maximum protection, repackage your monitor as it was originally packed at the factory. • To keep the monitor looking new, periodically clean it . 41L1700-786-7A 英文 8 FRONT PANEL ...

AL1721 User's Guide
Page 13
... capabilities according to the VESA DDC STANDARD. This feature is designed to an OFF mode. When there is no video input signal this monitor, following a time-out period, will automatically switch to conserve electrical energy by the Video Electronics Standards Association (VESA) and/or the...Supplied with a molded-on the level of a minimum No. 18 AWG, type SJT or SVT three conductors flexible cord. This reduces the monitor's internal power supply consumption. The DDC1 is automatically redrawn. After the video input signal is restored, full power is restored and the display is...
... capabilities according to the VESA DDC STANDARD. This feature is designed to an OFF mode. When there is no video input signal this monitor, following a time-out period, will automatically switch to conserve electrical energy by the Video Electronics Standards Association (VESA) and/or the...Supplied with a molded-on the level of a minimum No. 18 AWG, type SJT or SVT three conductors flexible cord. This reduces the monitor's internal power supply consumption. The DDC1 is automatically redrawn. After the video input signal is restored, full power is restored and the display is...
AL1721 User's Guide
Page 14
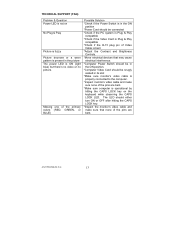
The LED should either turn ON or OFF after hitting the CAPS LOCK key. *Inspect the monitor's video cable and make sure that may cause electrical interference. *Computer Power Switch should be in the ON position. *Computer Video Card should be connected *... *Check if the Power Switch is in the ON position *Power Cord should be snugly seated in its slot *Make sure monitor's video cable is properly connected to the computer. *Inspect monitor's video cable and make sure none of the pins are bent. *Make sure computer is ON (light blue) but there...
The LED should either turn ON or OFF after hitting the CAPS LOCK key. *Inspect the monitor's video cable and make sure that may cause electrical interference. *Computer Power Switch should be in the ON position. *Computer Video Card should be connected *... *Check if the Power Switch is in the ON position *Power Cord should be snugly seated in its slot *Make sure monitor's video cable is properly connected to the computer. *Inspect monitor's video cable and make sure none of the pins are bent. *Make sure computer is ON (light blue) but there...


