
Acer Altos 1100e User's Guide
Page 8
... Board 1-25 1.10.1 BPL3 LVD SCSI Backplane Board 1-25 1.10.2 BPL5 LVD SCSI Backplane Board 1-27 Chapter 2 System Board 2.1 Features...2-1 2.2 Major Components 2-3 2.3 System Board Layout 2-4 2.4 Jumpers and Connectors 2-5 2.4.1 Jumper and Connector Locations 2-5 2.4.2 Jumper Settings 2-6 viii Altos 1100E Series User's Guide
... Board 1-25 1.10.1 BPL3 LVD SCSI Backplane Board 1-25 1.10.2 BPL5 LVD SCSI Backplane Board 1-27 Chapter 2 System Board 2.1 Features...2-1 2.2 Major Components 2-3 2.3 System Board Layout 2-4 2.4 Jumpers and Connectors 2-5 2.4.1 Jumper and Connector Locations 2-5 2.4.2 Jumper Settings 2-6 viii Altos 1100E Series User's Guide
Acer Altos 1100e User's Guide
Page 13
...Jumper and Connector Locations 2-5 2-3 Front Panel Connectors 2-9 2-4 Installing a Pentium III Processor 2-16 2-5 Unlocking the Module Latches 2-17 2-6 Installing the Termination Board 2-18 2-7 Installing a DIMM 2-20 2-8 Removing a DIMM 2-21 2-9 Installing a PCI Card 2-22 2-10 Installing an AGP Card 2-23 2-11 Installing the RDM Module 2-25 4-1 Options Menu Screen 4-4 4-2 Configure/View Host Adapter Settings... Screen (1 of 2 4-5 4-3 Configure/View Host Adapter Settings Screen (2 of 2 4-6 4-4 Host Adapter SCSI ID ...
...Jumper and Connector Locations 2-5 2-3 Front Panel Connectors 2-9 2-4 Installing a Pentium III Processor 2-16 2-5 Unlocking the Module Latches 2-17 2-6 Installing the Termination Board 2-18 2-7 Installing a DIMM 2-20 2-8 Removing a DIMM 2-21 2-9 Installing a PCI Card 2-22 2-10 Installing an AGP Card 2-23 2-11 Installing the RDM Module 2-25 4-1 Options Menu Screen 4-4 4-2 Configure/View Host Adapter Settings... Screen (1 of 2 4-5 4-3 Configure/View Host Adapter Settings Screen (2 of 2 4-6 4-4 Host Adapter SCSI ID ...

Acer Altos 1100e User's Guide
Page 14
List of Tables 2-1 System Board Jumper Settings 2-6 2-2 Connector Functions 2-7 2-3 Memory Configurations 2-19 2-4 System Error Messages 2-27 3-1 Parallel Port Operation Mode Settings 3-27 3-2 Drive Control Settings 3-40 4-1 Default Settings for SCSI Controller and all Devices 4-2 xiv Altos 1100E Series User's Guide
List of Tables 2-1 System Board Jumper Settings 2-6 2-2 Connector Functions 2-7 2-3 Memory Configurations 2-19 2-4 System Error Messages 2-27 3-1 Parallel Port Operation Mode Settings 3-27 3-2 Drive Control Settings 3-40 4-1 Default Settings for SCSI Controller and all Devices 4-2 xiv Altos 1100E Series User's Guide
Acer Altos 1100e User's Guide
Page 15
...corrective measures. It also describes the IDM BPL3 and BPL5 LVD SCSI backplane subsystems, which allows you to configure the system by setting the BIOS parameters. Chapter 2 System Board This chapter describes the system board and all its major components. Chapter 4 SCSISelect ... explanation of four chapters and an index. Chapter 3 BIOS Utility This chapter gives information about the system board layout, jumper and connector locations, jumper settings, connector functions, and information on installing optional components. About This Manual This user's guide aims to give you the ...
...corrective measures. It also describes the IDM BPL3 and BPL5 LVD SCSI backplane subsystems, which allows you to configure the system by setting the BIOS parameters. Chapter 2 System Board This chapter describes the system board and all its major components. Chapter 4 SCSISelect ... explanation of four chapters and an index. Chapter 3 BIOS Utility This chapter gives information about the system board layout, jumper and connector locations, jumper settings, connector functions, and information on installing optional components. About This Manual This user's guide aims to give you the ...

Acer Altos 1100e User's Guide
Page 42
Jumpers and Connectors BPL3 Backplane Board Jumper Setting JP1 1-2 2-3 JP4 Short Open Function I2C Buffer ID 21h 23h Terminator Power Source Both from Backplane and Host Only from Host 1-26 Altos 1100E Series User's Guide
Jumpers and Connectors BPL3 Backplane Board Jumper Setting JP1 1-2 2-3 JP4 Short Open Function I2C Buffer ID 21h 23h Terminator Power Source Both from Backplane and Host Only from Host 1-26 Altos 1100E Series User's Guide
Acer Altos 1100e User's Guide
Page 44
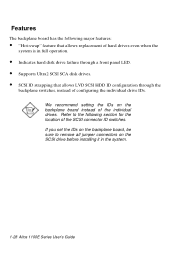
Refer to remove all jumper connectors on the backplane board instead of the individual drives. We recommend setting the IDs on the SCSI drive before installing it in full operation. • Indicates hard disk drive failure through a front panel LED. • Supports Ultra2..., instead of configuring the individual drive IDs. If you set the IDs on the backplane board, be sure to the following major features: • "Hot-swap" feature that allows replacement of hard drives even when the system is in the system. 1-28 Altos 1100E Series User's Guide Features The backplane board has the...
Refer to remove all jumper connectors on the backplane board instead of the individual drives. We recommend setting the IDs on the SCSI drive before installing it in full operation. • Indicates hard disk drive failure through a front panel LED. • Supports Ultra2..., instead of configuring the individual drive IDs. If you set the IDs on the backplane board, be sure to the following major features: • "Hot-swap" feature that allows replacement of hard drives even when the system is in the system. 1-28 Altos 1100E Series User's Guide Features The backplane board has the...
Acer Altos 1100e User's Guide
Page 45
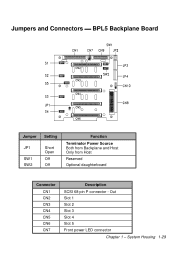
Out Slot 1 Slot 2 Slot 3 Slot 4 Slot 5 Front power LED connector Chapter 1 - Jumpers and Connectors BPL5 Backplane Board Jumper Setting JP1 SW1 SW2 Short Open Off Off Function Terminator Power Source Both from Backplane and Host Only from Host Reserved Optional daughterboard Connector CN1 CN2 CN3 CN4 CN5 CN6 CN7 Description SCSI 68-pin P connector - System Housing 1-29
Out Slot 1 Slot 2 Slot 3 Slot 4 Slot 5 Front power LED connector Chapter 1 - Jumpers and Connectors BPL5 Backplane Board Jumper Setting JP1 SW1 SW2 Short Open Off Off Function Terminator Power Source Both from Backplane and Host Only from Host Reserved Optional daughterboard Connector CN1 CN2 CN3 CN4 CN5 CN6 CN7 Description SCSI 68-pin P connector - System Housing 1-29

Acer Altos 1100e User's Guide
Page 46
... LVD SCSI hot-swap cage to arrange your system hard drives, please remove all the jumpers on each SCSI hard drive and use the switches on the backplane board (S1-S5) to set the hard drive's ID. 1-30 Altos 1100E Series User's Guide Connector CN8 CN9 CN10 JP2 JP31 JP4 JP5 S12 S2 S3...
... LVD SCSI hot-swap cage to arrange your system hard drives, please remove all the jumpers on each SCSI hard drive and use the switches on the backplane board (S1-S5) to set the hard drive's ID. 1-30 Altos 1100E Series User's Guide Connector CN8 CN9 CN10 JP2 JP31 JP4 JP5 S12 S2 S3...
Acer Altos 1100e User's Guide
Page 51
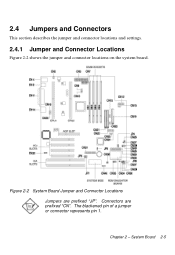
Figure 2-2 System Board Jumper and Connector Locations Jumpers are prefixed "CN". Chapter 2 - Connectors are prefixed "JP". 2.4 Jumpers and Connectors This section describes the jumper and connector locations and settings. 2.4.1 Jumper and Connector Locations Figure 2-2 shows the jumper and connector locations on the system board. The blackened pin of a jumper or connector represents pin 1. System Board 2-5
Figure 2-2 System Board Jumper and Connector Locations Jumpers are prefixed "CN". Chapter 2 - Connectors are prefixed "JP". 2.4 Jumpers and Connectors This section describes the jumper and connector locations and settings. 2.4.1 Jumper and Connector Locations Figure 2-2 shows the jumper and connector locations on the system board. The blackened pin of a jumper or connector represents pin 1. System Board 2-5
Acer Altos 1100e User's Guide
Page 52
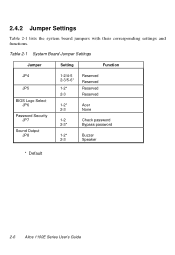
2.4.2 Jumper Settings Table 2-1 lists the system board jumpers with their corresponding settings and functions. Table 2-1 System Board Jumper Settings Jumper Setting Function JP4 JP5 BIOS Logo Select JP6 Password Security JP7 Sound Output JP8 1-2/4-5 2-3/5-6* 1-2* 2-3 Reserved Reserved Reserved Reserved 1-2* Acer 2-3 None 1-2 Check password 2-3* Bypass password 1-2* Buzzer 2-3 Speaker * Default 2-6 Altos 1100E Series User's Guide
2.4.2 Jumper Settings Table 2-1 lists the system board jumpers with their corresponding settings and functions. Table 2-1 System Board Jumper Settings Jumper Setting Function JP4 JP5 BIOS Logo Select JP6 Password Security JP7 Sound Output JP8 1-2/4-5 2-3/5-6* 1-2* 2-3 Reserved Reserved Reserved Reserved 1-2* Acer 2-3 None 1-2 Check password 2-3* Bypass password 1-2* Buzzer 2-3 Speaker * Default 2-6 Altos 1100E Series User's Guide
Acer Altos 1100e User's Guide
Page 58
Make sure you removed earlier. 4. Connect the necessary cables and turn on the system. 2-12 Altos 1100E Series User's Guide See section 2.4 for the correct jumper settings. 3. Replace the system cover. 5. 2.6.3 Post-installation Instructions Observe the following procedures after installing a system component: 1. Replace any expansion boards or peripherals that the components are installed according to the instructions in their respective sections. 2. Check that you have set all the required jumpers.
Make sure you removed earlier. 4. Connect the necessary cables and turn on the system. 2-12 Altos 1100E Series User's Guide See section 2.4 for the correct jumper settings. 3. Replace the system cover. 5. 2.6.3 Post-installation Instructions Observe the following procedures after installing a system component: 1. Replace any expansion boards or peripherals that the components are installed according to the instructions in their respective sections. 2. Check that you have set all the required jumpers.
Acer Altos 1100e User's Guide
Page 75
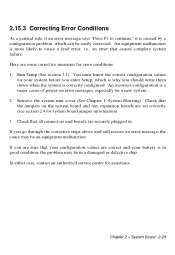
... (See section 3.1). Remove the system unit cover (See Chapter 1, System Housing). Check that all connectors and boards are set correctly (see section 2.4 for system board jumper information). 3. If you go through the corrective steps above and still receive an error message, the cause may lie in... corrective measures for your battery is in good condition, the problem may be easily corrected. System Board 2-29 Check that the jumpers on error messages, especially for assistance. Here are correct and your system before you enter Setup, which can be an equipment ...
... (See section 3.1). Remove the system unit cover (See Chapter 1, System Housing). Check that all connectors and boards are set correctly (see section 2.4 for system board jumper information). 3. If you go through the corrective steps above and still receive an error message, the cause may lie in... corrective measures for your battery is in good condition, the problem may be easily corrected. System Board 2-29 Check that the jumpers on error messages, especially for assistance. Here are correct and your system before you enter Setup, which can be an equipment ...
Acer Altos 1100e User's Guide
Page 127
... Overview The SCSISelect configuration utility allows you to change SCSI controller settings without opening the computer or changing jumpers. 4.1.1 Default Values The following table lists the settings you can change with a dual SCSI channel controller that enhances your system's performance and flexibility. The Altos 1100E Series system is equipped with the SCSISelect utility and the...
... Overview The SCSISelect configuration utility allows you to change SCSI controller settings without opening the computer or changing jumpers. 4.1.1 Default Values The following table lists the settings you can change with a dual SCSI channel controller that enhances your system's performance and flexibility. The Altos 1100E Series system is equipped with the SCSISelect utility and the...
Acer Altos 1100e User's Guide
Page 141
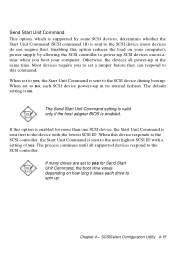
... the Start Unit Command is sent first to the device with a setting of yes. The process continues until all power-up . SCSISelect Configuration Utility 4-15 When set to yes for more than one -at the same time. If many drives are set a jumper before they can respond to this device responds to the SCSI... controller, the Start Unit Command is no , each drive to spin up at -atime when you to set to no . The default setting is sent to yes, the Start Unit Command is...
... the Start Unit Command is sent first to the device with a setting of yes. The process continues until all power-up . SCSISelect Configuration Utility 4-15 When set to yes for more than one -at the same time. If many drives are set a jumper before they can respond to this device responds to the SCSI... controller, the Start Unit Command is no , each drive to spin up at -atime when you to set to no . The default setting is sent to yes, the Start Unit Command is...
Acer Altos 1100e User's Guide
Page 157
...-installation, 2-11 Installing the RDM module, 2-25 Installing the termination board, 2-18 Internal cache, 3-5, 3-33 Internal structure, 1-4 J Jumper and connector locations, 2-5 Jumper settings, 2-6 Jumpers and connectors, 1-26, 2-5 Connector functions, 2-7 Jumper settings, 2-6 Locations, 2-5 L Leaving setup, 3-49 Left panel, 1-6 Load setup default settings, 3-48 M Main board ID, 3-9 Main board s/n, 3-9 Major components, 2-3 Memory configurations, 2-19 Memory parity mode, 3-7 Memory test...
...-installation, 2-11 Installing the RDM module, 2-25 Installing the termination board, 2-18 Internal cache, 3-5, 3-33 Internal structure, 1-4 J Jumper and connector locations, 2-5 Jumper settings, 2-6 Jumpers and connectors, 1-26, 2-5 Connector functions, 2-7 Jumper settings, 2-6 Locations, 2-5 L Leaving setup, 3-49 Left panel, 1-6 Load setup default settings, 3-48 M Main board ID, 3-9 Main board s/n, 3-9 Major components, 2-3 Memory configurations, 2-19 Memory parity mode, 3-7 Memory test...