
Acer Altos G610 User's Guide
Page 6
Maximum length is located on the drive. Laser compliance statement The CD-ROM drive in your accessories box) for this computer is a laser product. AVOID EXPOSURE TO BEAM. The CD-ROM drive's classification label (shown below) is 15 feet (4.6 meters). CLASS 1 LASER PRODUCT CAUTION: INVISIBLE LASER RADIATION WHEN OPEN. vi 14 Use only the proper type of power supply cord set (provided in this unit. It should be a detachable type: UL listed/CSA certified, type SPT-2, rated 7A 125V minimum, VDE approved or its equivalent.
Maximum length is located on the drive. Laser compliance statement The CD-ROM drive in your accessories box) for this computer is a laser product. AVOID EXPOSURE TO BEAM. The CD-ROM drive's classification label (shown below) is 15 feet (4.6 meters). CLASS 1 LASER PRODUCT CAUTION: INVISIBLE LASER RADIATION WHEN OPEN. vi 14 Use only the proper type of power supply cord set (provided in this unit. It should be a detachable type: UL listed/CSA certified, type SPT-2, rated 7A 125V minimum, VDE approved or its equivalent.
Acer Altos G610 User's Guide
Page 8
... installing memory modules 58 Removing a DIMM 58 Installing a DIMM 59 Installing expansion cards 61 Hot-swappable redundant power supply module 63 Removing a 337-watt hot-swappable redundant power supply module 63 Installing a 337-watts hot-swappable redundant power supply module 64 Installing an external redundant system fan 66 4 BIOS Setup utility 67 BIOS Setup utility 69...
... installing memory modules 58 Removing a DIMM 58 Installing a DIMM 59 Installing expansion cards 61 Hot-swappable redundant power supply module 63 Removing a 337-watt hot-swappable redundant power supply module 63 Installing a 337-watts hot-swappable redundant power supply module 64 Installing an external redundant system fan 66 4 BIOS Setup utility 67 BIOS Setup utility 69...
Acer Altos G610 User's Guide
Page 17
... socket that accept 64-, 128-, 256-, 512-, and 1024-MB SDRAMs with battery backup • IDE hard disk and diskette drive interfaces • Auxiliary power connector for ATX power supply • Super I/O, Advanced Server Management (ASM), and Remote Diagnostic Management (RDM) controller chipsets • External ports: • USB connector • PS/2-compatible mouse...
... socket that accept 64-, 128-, 256-, 512-, and 1024-MB SDRAMs with battery backup • IDE hard disk and diskette drive interfaces • Auxiliary power connector for ATX power supply • Super I/O, Advanced Server Management (ASM), and Remote Diagnostic Management (RDM) controller chipsets • External ports: • USB connector • PS/2-compatible mouse...
Acer Altos G610 User's Guide
Page 24
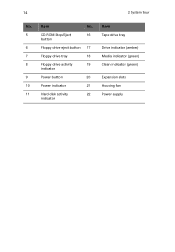
Item 5 CD-ROM Stop/Eject button 16 Tape drive tray 6 Floppy drive eject button 17 Drive indicator (amber) 7 Floppy drive tray 18 Media indicator (green) 8 Floppy drive activity indicator 19 Clean indicator (green) 9 Power button 20 Expansion slots 10 Power indicator 21 Housing fan 11 Hard disk activity indicator 22 Power supply 14 2 System tour No. Item No.
Item 5 CD-ROM Stop/Eject button 16 Tape drive tray 6 Floppy drive eject button 17 Drive indicator (amber) 7 Floppy drive tray 18 Media indicator (green) 8 Floppy drive activity indicator 19 Clean indicator (green) 9 Power button 20 Expansion slots 10 Power indicator 21 Housing fan 11 Hard disk activity indicator 22 Power supply 14 2 System tour No. Item No.
Acer Altos G610 User's Guide
Page 37
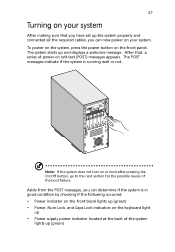
...the system is in good condition by checking if the following occurred: • Power indicator on the front bezel lights up (green) • Power, Num Lock, and Caps Lock indicators on the keyboard light up • Power supply power indicator located at the back of the boot failure. The system starts up (...green) To power on the system, press the power button on or boot after pressing the On/Off button, go to the next section ...
...the system is in good condition by checking if the following occurred: • Power indicator on the front bezel lights up (green) • Power, Num Lock, and Caps Lock indicators on the keyboard light up • Power supply power indicator located at the back of the boot failure. The system starts up (...green) To power on the system, press the power button on or boot after pressing the On/Off button, go to the next section ...
Acer Altos G610 User's Guide
Page 38
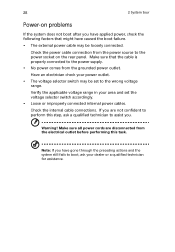
...be loosely connected. Verify the applicable voltage range in your area and set to the wrong voltage range. Make sure all power cords are not confident to perform this task. Make sure that might have gone through the preceding actions and the system ... be set the voltage selector switch accordingly. • Loose or improperly connected internal power cables. Note: If you have applied power, check the following factors that the cable is properly connected to the power supply. • No power comes from the grounded power outlet. 28 2 System tour Power-on the rear panel.
...be loosely connected. Verify the applicable voltage range in your area and set to the wrong voltage range. Make sure all power cords are not confident to perform this task. Make sure that might have gone through the preceding actions and the system ... be set the voltage selector switch accordingly. • Loose or improperly connected internal power cables. Note: If you have applied power, check the following factors that the cable is properly connected to the power supply. • No power comes from the grounded power outlet. 28 2 System tour Power-on the rear panel.
Acer Altos G610 User's Guide
Page 51
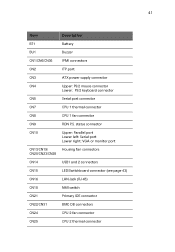
41 Item Description BT1 Battery BU1 Buzzer CN1/CN6/CN36 IPMI connectors CN2 ITP port CN3 ATX power supply connector CN4 Upper: PS/2 mouse connector Lower: PS/2 keyboard connector CN5 Serial port connector CN7 CPU 1 thermal connector CN8 CPU 1 fan connector CN9 RDN P.S. status ...
41 Item Description BT1 Battery BU1 Buzzer CN1/CN6/CN36 IPMI connectors CN2 ITP port CN3 ATX power supply connector CN4 Upper: PS/2 mouse connector Lower: PS/2 keyboard connector CN5 Serial port connector CN7 CPU 1 thermal connector CN8 CPU 1 fan connector CN9 RDN P.S. status ...
Acer Altos G610 User's Guide
Page 73
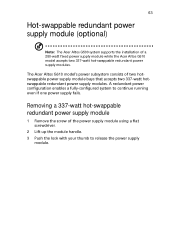
... one power supply fails. 63 Hot-swappable redundant power supply module (optional) Note: The Acer Altos G500 system supports the installation of two hotswappable power supply module bays that accepts two 337-watt hotswappable redundant power supply modules. A redundant power configuration enables a fully-configured system to release the power supply module. The Acer Altos G610 model's power subsystem consists of a 280-watt fixed power supply module while the Acer Altos G610 model...
... one power supply fails. 63 Hot-swappable redundant power supply module (optional) Note: The Acer Altos G500 system supports the installation of two hotswappable power supply module bays that accepts two 337-watt hotswappable redundant power supply modules. A redundant power configuration enables a fully-configured system to release the power supply module. The Acer Altos G610 model's power subsystem consists of a 280-watt fixed power supply module while the Acer Altos G610 model...
Acer Altos G610 User's Guide
Page 74
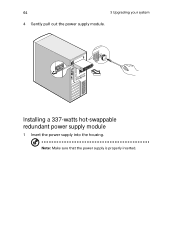
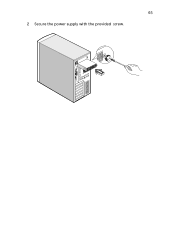
Installing a 337-watts hot-swappable redundant power supply module 1 Insert the power supply into the housing. Note: Make sure that the power supply is properly inserted. 64 3 Upgrading your system 4 Gently pull out the power supply module.
Installing a 337-watts hot-swappable redundant power supply module 1 Insert the power supply into the housing. Note: Make sure that the power supply is properly inserted. 64 3 Upgrading your system 4 Gently pull out the power supply module.
Acer Altos G610 User's Guide
Page 75
65 2 Secure the power supply with the provided screw.
65 2 Secure the power supply with the provided screw.
Acer Altos G610 User's Guide
Page 125
... file. To install the SCO UnixWare Server Agent: 1 Prepare the ASM Pro installation diskette from the DD file on how to use only UPS (Uninterruptible Power Supply) or RDM functions. Choose Reinstall to overwrite the previously installed SCO Server Agent, or choose Upgrade if you are using ASM Pro Console to the...
... file. To install the SCO UnixWare Server Agent: 1 Prepare the ASM Pro installation diskette from the DD file on how to use only UPS (Uninterruptible Power Supply) or RDM functions. Choose Reinstall to overwrite the previously installed SCO Server Agent, or choose Upgrade if you are using ASM Pro Console to the...
Acer Altos G610 User's Guide
Page 156
146 ratchet wheel 18 N Novell Netware Agent installation 112 P power supply module installing 64 removing 63 S SCO Openserver Agent configuring for ASM Agent 115 installation 114 SCO Unixware Agent installation 115 Server system board 40 BPL5M board 44 mainboard layout 40 SAF-TE card layout 46 system memory 58 reconfiguring 60 T turning off your system 29 turning on your system 27 power-on problems 28 U upgrade installation precautions 35 ESD 35 post-installation 36 preinstallation 35
146 ratchet wheel 18 N Novell Netware Agent installation 112 P power supply module installing 64 removing 63 S SCO Openserver Agent configuring for ASM Agent 115 installation 114 SCO Unixware Agent installation 115 Server system board 40 BPL5M board 44 mainboard layout 40 SAF-TE card layout 46 system memory 58 reconfiguring 60 T turning off your system 29 turning on your system 27 power-on problems 28 U upgrade installation precautions 35 ESD 35 post-installation 36 preinstallation 35

