
Acer Altos G610 User's Guide
Page 2
... Number Serial Number Purchase Date Place of Purchase Acer and the Acer Logo are recorded on the label affixed to notify any means, electronic, mechanical, photocopy, recording, or otherwise, without obligation to your unit should include the serial number, model number, and purchase information. Acer Altos G610 User's guide Changes may be made periodically to the information...
... Number Serial Number Purchase Date Place of Purchase Acer and the Acer Logo are recorded on the label affixed to notify any means, electronic, mechanical, photocopy, recording, or otherwise, without obligation to your unit should include the serial number, model number, and purchase information. Acer Altos G610 User's guide Changes may be made periodically to the information...
Acer Altos G610 User's Guide
Page 31
... and dust-free • Sturdy surface free from vibration • Well-ventilated and away from sources of heat • Secluded from the package: • Acer Altos G610 system • Acer Altos G610 User's guide (with system binder) • CD-ROM driver kits • System keys (hung inside the front panel door) If any of the above items are...
... and dust-free • Sturdy surface free from vibration • Well-ventilated and away from sources of heat • Secluded from the package: • Acer Altos G610 system • Acer Altos G610 User's guide (with system binder) • CD-ROM driver kits • System keys (hung inside the front panel door) If any of the above items are...
Acer Altos G610 User's Guide
Page 80
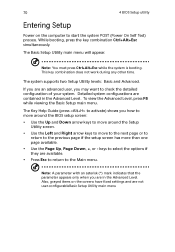
... press Ctrl+Alt+Esc while the system is booting. If you may want to activate) shows you are in the Advanced Level. The Key Help Guide (press to check the detailed configuration of your system. Note: A parameter with an asterisk (*) mark indicates that the parameter appears only when you how to... F8 while viewing the Basic Setup main menu. 70 4 BIOS Setup utility Entering Setup Power on the screens have fixed settings and are an advanced user, you are not user-configurableBasic Setup Utility main menu
... press Ctrl+Alt+Esc while the system is booting. If you may want to activate) shows you are in the Advanced Level. The Key Help Guide (press to check the detailed configuration of your system. Note: A parameter with an asterisk (*) mark indicates that the parameter appears only when you how to... F8 while viewing the Basic Setup main menu. 70 4 BIOS Setup utility Entering Setup Power on the screens have fixed settings and are an advanced user, you are not user-configurableBasic Setup Utility main menu
Acer Altos G610 User's Guide
Page 81
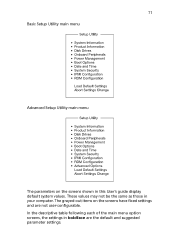
These values may not be the same as those in this User's guide display default system values. 71 Basic Setup Utility main menu Advanced Setup Utility main menu The parameters on the screens have fixed settings and are the default and suggested parameter settings. In the descriptive table following each of the main menu option screens, the settings in boldface are not user-configurable. The grayed-out items on the screens shown in your computer.
These values may not be the same as those in this User's guide display default system values. 71 Basic Setup Utility main menu Advanced Setup Utility main menu The parameters on the screens have fixed settings and are the default and suggested parameter settings. In the descriptive table following each of the main menu option screens, the settings in boldface are not user-configurable. The grayed-out items on the screens shown in your computer.
Acer Altos G610 User's Guide
Page 124
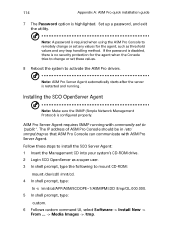
... Console should be in /etc/ snmpd.trap so that ASM Pro Console can communicate with community set to 'public' . 114 Appendix A: ASM Pro quick installation guide 7 The Password option is required when using the ASM Pro Console to remotely change or set any values for the agent, such as a super... user. 3 In shell prompt, type the following to mount CD-ROM: mount /dev/cd0 /mnt/cd. 4 In shell prompt, type: ln -s /mnt/cd/APP/ASM/SCOOPE~1/...
... Console should be in /etc/ snmpd.trap so that ASM Pro Console can communicate with community set to 'public' . 114 Appendix A: ASM Pro quick installation guide 7 The Password option is required when using the ASM Pro Console to remotely change or set any values for the agent, such as a super... user. 3 In shell prompt, type the following to mount CD-ROM: mount /dev/cd0 /mnt/cd. 4 In shell prompt, type: ln -s /mnt/cd/APP/ASM/SCOOPE~1/...
Acer Altos G610 User's Guide
Page 128
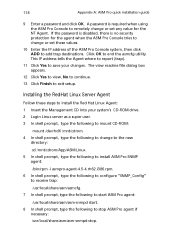
... Enter the IP address of the ASM Pro Console system, then click ADD to save your system's CD-ROM drive. 2 Login Linux server as a super user. 3 In shell prompt, type the following to mount CD-ROM: mount /dev/hdX /mnt/cdrom. 4 In shell prompt, type the following to change to the... change or set these steps to install the Red Hat Linux Agent: 1 Insert the Management CD into your changes. 118 Appendix A: ASM Pro quick installation guide 9 Enter a password and click OK.
... Enter the IP address of the ASM Pro Console system, then click ADD to save your system's CD-ROM drive. 2 Login Linux server as a super user. 3 In shell prompt, type the following to mount CD-ROM: mount /dev/hdX /mnt/cdrom. 4 In shell prompt, type the following to change to the... change or set these steps to install the Red Hat Linux Agent: 1 Insert the Management CD into your changes. 118 Appendix A: ASM Pro quick installation guide 9 Enter a password and click OK.
Acer Altos G610 User's Guide
Page 130
Note: Use only modems that supports such switches. If this is not the case, refer to the modem's user's guide and check the section on DIP switches for information on the front panel must have a DIP switch, then we recommend that you need...in the telephone connector to the modem line port. Then, insert the telephone line connector to the telephone outlet. 120 Appendix A: ASM Pro quick installation guide Software • Microsoft Windows 98, Microsoft NT Workstation 4.0, or Windows 2000 • ASM Pro 4.5 Console Connecting communication peripherals Modem The Server and ...
Note: Use only modems that supports such switches. If this is not the case, refer to the modem's user's guide and check the section on DIP switches for information on the front panel must have a DIP switch, then we recommend that you need...in the telephone connector to the modem line port. Then, insert the telephone line connector to the telephone outlet. 120 Appendix A: ASM Pro quick installation guide Software • Microsoft Windows 98, Microsoft NT Workstation 4.0, or Windows 2000 • ASM Pro 4.5 Console Connecting communication peripherals Modem The Server and ...