
Acer Altos G610 User's Guide
Page 7
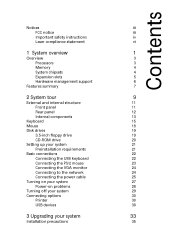
... 18 Disk drives 19 3.5-inch floppy drive 19 CD-ROM drive 20 Setting up your system 21 Preinstallation requirements 21 Basic connections 22 Connecting the USB keyboard 22 Connecting the PS/2 mouse 23 Connecting the VGA monitor 24 Connecting to the network 24 Connecting the power cable 25 Turning on your...
... 18 Disk drives 19 3.5-inch floppy drive 19 CD-ROM drive 20 Setting up your system 21 Preinstallation requirements 21 Basic connections 22 Connecting the USB keyboard 22 Connecting the PS/2 mouse 23 Connecting the VGA monitor 24 Connecting to the network 24 Connecting the power cable 25 Turning on your...
Acer Altos G610 User's Guide
Page 13
... bus based dual processor system board built on LAN) for each channel. 3 Overview The Acer Altos G610 server model is fully compatible with bandwidth of up to a maximum of Pentium processors, too. For connectivity, the system board supports two USB (Universal Serial Bus) connectors, PS/2 interface for Pentium III processors running at 600 to...
... bus based dual processor system board built on LAN) for each channel. 3 Overview The Acer Altos G610 server model is fully compatible with bandwidth of up to a maximum of Pentium processors, too. For connectivity, the system board supports two USB (Universal Serial Bus) connectors, PS/2 interface for Pentium III processors running at 600 to...
Acer Altos G610 User's Guide
Page 14
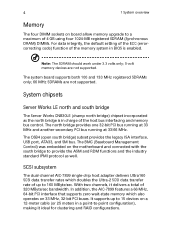
... (or 25 meters in charge of the host bus interfacing and memory bus control. The OSB4 (open south bridge) subset provides the legacy ISA interface, USB port, ATA33, and SM bus. The system board supports both 100 and 133 MHz registered SDRAMs only; 66 MHz SDRAMs are not supported.
... (or 25 meters in charge of the host bus interfacing and memory bus control. The OSB4 (open south bridge) subset provides the legacy ISA interface, USB port, ATA33, and SM bus. The system board supports both 100 and 133 MHz registered SDRAMs only; 66 MHz SDRAMs are not supported.
Acer Altos G610 User's Guide
Page 17
... • Auxiliary power connector for ATX power supply • Super I/O, Advanced Server Management (ASM), and Remote Diagnostic Management (RDM) controller chipsets • External ports: • USB connector • PS/2-compatible mouse and keyboard port • Serial port • RJ-45 jack • Video port • Parallel port
... • Auxiliary power connector for ATX power supply • Super I/O, Advanced Server Management (ASM), and Remote Diagnostic Management (RDM) controller chipsets • External ports: • USB connector • PS/2-compatible mouse and keyboard port • Serial port • RJ-45 jack • Video port • Parallel port
Acer Altos G610 User's Guide
Page 25
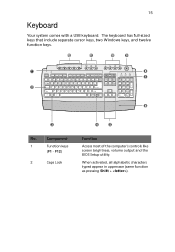
Component 1 Function keys (F1 - When activated, all alphabetic characters typed appear in uppercase (same function as pressing Shift + ). The keyboard has full-sized keys that include separate cursor keys, two Windows keys, and twelve function keys. F12) 2 Caps Lock Function Access most of the computer's controls like screen brightness, volume output and the BIOS Setup utility. 15 Keyboard Your system comes with a USB keyboard. No.
Component 1 Function keys (F1 - When activated, all alphabetic characters typed appear in uppercase (same function as pressing Shift + ). The keyboard has full-sized keys that include separate cursor keys, two Windows keys, and twelve function keys. F12) 2 Caps Lock Function Access most of the computer's controls like screen brightness, volume output and the BIOS Setup utility. 15 Keyboard Your system comes with a USB keyboard. No.
Acer Altos G610 User's Guide
Page 32
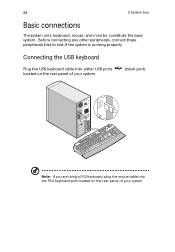
Before connecting any other peripherals, connect these peripherals first to test if the system is running properly. 22 2 System tour Basic connections The system unit, keyboard, mouse, and monitor constitute the basic system. Connecting the USB keyboard Plug the USB keyboard cable into either USB ports located on the rear panel of your system. (black port) Note: If you are using a PS/2 keyboard, plug the mouse cable into the PS/2 keyboard port located on the rear panel of your system.
Before connecting any other peripherals, connect these peripherals first to test if the system is running properly. 22 2 System tour Basic connections The system unit, keyboard, mouse, and monitor constitute the basic system. Connecting the USB keyboard Plug the USB keyboard cable into either USB ports located on the rear panel of your system. (black port) Note: If you are using a PS/2 keyboard, plug the mouse cable into the PS/2 keyboard port located on the rear panel of your system.
Acer Altos G610 User's Guide
Page 33
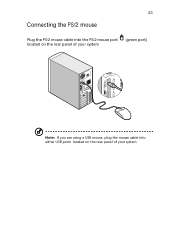
23 Connecting the PS/2 mouse Plug the PS/2 mouse cable into the PS/2 mouse port located on the rear panel of your system (green port) Note: If you are using a USB mouse, plug the mouse cable into either USB ports located on the rear panel of your system.
23 Connecting the PS/2 mouse Plug the PS/2 mouse cable into the PS/2 mouse port located on the rear panel of your system (green port) Note: If you are using a USB mouse, plug the mouse cable into either USB ports located on the rear panel of your system.
Acer Altos G610 User's Guide
Page 40
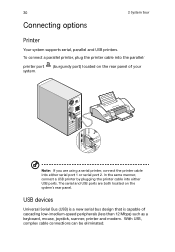
... mouse, joystick, scanner, printer and modem. In the same manner, connect a USB printer by plugging the printer cable into either USB ports. With USB, complex cable connections can be eliminated. The serial and USB ports are using a serial printer, connect the printer cable into either serial port... 1 or serial port 2. 30 Connecting options 2 System tour Printer Your system supports serial, parallel and USB printers. To connect a parallel printer, plug the printer cable into the parallel/ printer port system. (burgundy port) located on the system's...
... mouse, joystick, scanner, printer and modem. In the same manner, connect a USB printer by plugging the printer cable into either USB ports. With USB, complex cable connections can be eliminated. The serial and USB ports are using a serial printer, connect the printer cable into either serial port... 1 or serial port 2. 30 Connecting options 2 System tour Printer Your system supports serial, parallel and USB printers. To connect a parallel printer, plug the printer cable into the parallel/ printer port system. (burgundy port) located on the system's...
Acer Altos G610 User's Guide
Page 41
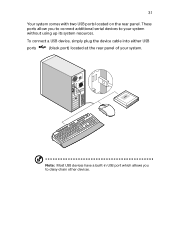
To connect a USB device, simply plug the device cable into either USB ports (black port) located at the rear panel of your system without using up its system resources. These ports allow you to your system. 31 Your system comes with two USB ports located on the rear panel. Note: Most USB devices have a built-in USB port which allows you to connect additional serial devices to daisy-chain other devices.
To connect a USB device, simply plug the device cable into either USB ports (black port) located at the rear panel of your system without using up its system resources. These ports allow you to your system. 31 Your system comes with two USB ports located on the rear panel. Note: Most USB devices have a built-in USB port which allows you to connect additional serial devices to daisy-chain other devices.
Acer Altos G610 User's Guide
Page 92
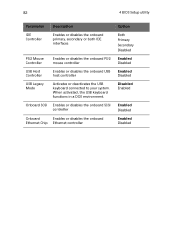
When activated, the USB keyboard functions in a DOS environment. Onboard SCSI Enables or disables the onboard SCSI controller Onboard Enables or disables the onboard Ethernet Chip Ethernet controller Option ... IDE Controller Description Enables or disables the onboard primary, secondary or both IDE interfaces PS/2 Mouse Controller Enables or disables the onboard PS/2 mouse controller USB Host Controller Enables or disables the onboard USB host controller USB Legacy Mode Activates or deactivates the USB keyboard connected to your system.
When activated, the USB keyboard functions in a DOS environment. Onboard SCSI Enables or disables the onboard SCSI controller Onboard Enables or disables the onboard Ethernet Chip Ethernet controller Option ... IDE Controller Description Enables or disables the onboard primary, secondary or both IDE interfaces PS/2 Mouse Controller Enables or disables the onboard PS/2 mouse controller USB Host Controller Enables or disables the onboard USB host controller USB Legacy Mode Activates or deactivates the USB keyboard connected to your system.
Acer Altos G610 User's Guide
Page 155
... 90 User password 90 BPL5M hotswap cage components 48 installing 48 installing hard disk 51 removing 50 C computer maintenance diskettes 19 connecting options printer 30 USB devices 25 CPU 55 installing 55 removing 55 D DIMM installing 59 removing 58 disk drives 19 CD-ROM drive 20 inserting 20 taking care CDs...
... 90 User password 90 BPL5M hotswap cage components 48 installing 48 installing hard disk 51 removing 50 C computer maintenance diskettes 19 connecting options printer 30 USB devices 25 CPU 55 installing 55 removing 55 D DIMM installing 59 removing 58 disk drives 19 CD-ROM drive 20 inserting 20 taking care CDs...
