
Service Guide
Page 7
Table of Contents System Specifications 1 Features 1 System Block Diagram 6 UMA 6 Discrete (nVidia 7 Discrete (ATI 8 Your Acer Notebook tour 9 Top View 9 Rear view 10 Left View 11 Right View 12 Base view 13 Indicators 14 Touch Pad Basics 15 Using ... 16 Windows Keys 17 Hot Keys 18 Hardware Specifications and Configurations 19 System Utilities 31 BIOS Setup Utility 31 Navigating the BIOS Utility 31 Aspire 5742/5742G/5742Z/5742ZG BIOS 32 Information 32 Main 33 Security 34 Boot 37 Exit 38 BIOS Flash Utilities 39 DOS Flash Utility 40 WinFlash Utility 41 Remove HDD...
Table of Contents System Specifications 1 Features 1 System Block Diagram 6 UMA 6 Discrete (nVidia 7 Discrete (ATI 8 Your Acer Notebook tour 9 Top View 9 Rear view 10 Left View 11 Right View 12 Base view 13 Indicators 14 Touch Pad Basics 15 Using ... 16 Windows Keys 17 Hot Keys 18 Hardware Specifications and Configurations 19 System Utilities 31 BIOS Setup Utility 31 Navigating the BIOS Utility 31 Aspire 5742/5742G/5742Z/5742ZG BIOS 32 Information 32 Main 33 Security 34 Boot 37 Exit 38 BIOS Flash Utilities 39 DOS Flash Utility 40 WinFlash Utility 41 Remove HDD...

Service Guide
Page 9
Table of Contents Troubleshooting 159 Common Problems 159 Power On Issue 160 No Display Issue 161 Random Loss of BIOS Settings 162 LCD Failure 163 Internal Keyboard Failure 163 Touch Pad Failure 164 Internal Speaker Failure 164 Microphone Record Failure 166 ...Clear CMOS Jumper 195 BIOS Recovery by Crisis Disk 197 FRU (Field Replaceable Unit) List 199 Aspire Exploded Diagrams 200 Main Assembly 200 Lower Cover 202 LCD Assembly 203 LED Assembly 204 Aspire FRU List 205 Screw List 229 Model Definition and Configuration 231 Aspire 5742/5742G 231 Aspire 5742Z/5742ZG 257 ...
Table of Contents Troubleshooting 159 Common Problems 159 Power On Issue 160 No Display Issue 161 Random Loss of BIOS Settings 162 LCD Failure 163 Internal Keyboard Failure 163 Touch Pad Failure 164 Internal Speaker Failure 164 Microphone Record Failure 166 ...Clear CMOS Jumper 195 BIOS Recovery by Crisis Disk 197 FRU (Field Replaceable Unit) List 199 Aspire Exploded Diagrams 200 Main Assembly 200 Lower Cover 202 LCD Assembly 203 LED Assembly 204 Aspire FRU List 205 Screw List 229 Model Definition and Configuration 231 Aspire 5742/5742G 231 Aspire 5742Z/5742ZG 257 ...
Service Guide
Page 13
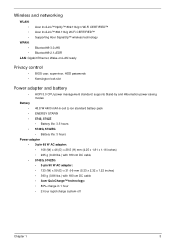
...CERTIFIED™ • Acer InviLink™ 802.11b/g Wi-Fi CERTIFIED™ • Supporting Acer SignalUp™ wireless technology WPAN: • Bluetooth® 3.0+HS • Bluetooth® 2.1+EDR LAN: Gigabit Ethernet, Wake-on-LAN ready Privacy control • BIOS user, supervisor, HDD ...passwords • Kensington lock slot Power adapter and battery • ACPI 3.0 CPU power management standard: supports Stand-by and Hibernation power-saving modes Battery • 48.8 W 4400 mAh 6-cell Li-ion standard battery pack • ENERGY STAR® • 5742...
...CERTIFIED™ • Acer InviLink™ 802.11b/g Wi-Fi CERTIFIED™ • Supporting Acer SignalUp™ wireless technology WPAN: • Bluetooth® 3.0+HS • Bluetooth® 2.1+EDR LAN: Gigabit Ethernet, Wake-on-LAN ready Privacy control • BIOS user, supervisor, HDD ...passwords • Kensington lock slot Power adapter and battery • ACPI 3.0 CPU power management standard: supports Stand-by and Hibernation power-saving modes Battery • 48.8 W 4400 mAh 6-cell Li-ion standard battery pack • ENERGY STAR® • 5742...

Service Guide
Page 28
... and off . Hot Keys The computer employs hotkeys or key combinations to access most of the computer's controls like screen brightness, volume output and the BIOS utility. Hotkey + + + + + + + + < Y> + + + + + + Icon Function Communication Sleep Description Enables/disables the computer's communication devices...
... and off . Hot Keys The computer employs hotkeys or key combinations to access most of the computer's controls like screen brightness, volume output and the BIOS utility. Hotkey + + + + + + + + < Y> + + + + + + Icon Function Communication Sleep Description Enables/disables the computer's communication devices...

Service Guide
Page 31
... reversed. You may combine DIMMs with Intel Speed Step Support C1, C2, C3, C4 and S3, S4 for mobile CPU DMI utility for BIOS serial number configurable/asset tag Support PXE Support Y2K solution Support Win Flash Wake on LAN from S3, Wake on LAN from S4 in AC... at the left side Supports 10/100/1000 speed Chapter 1 21 BIOS Item BIOS vendor Insyde Specification BIOS Version BIOS ROM type BIOS ROM size Support protocol v1.01 SPI Flash (MX25L3205A, MX25L3206A, W25X32A, W25Q32BV, EN25F32, Atmel26DF321) 4MB Support ISIPP Support Acer UI Support multi-boot Suspend to RAM (S3)/Disk (S4) Various...
... reversed. You may combine DIMMs with Intel Speed Step Support C1, C2, C3, C4 and S3, S4 for mobile CPU DMI utility for BIOS serial number configurable/asset tag Support PXE Support Y2K solution Support Win Flash Wake on LAN from S3, Wake on LAN from S4 in AC... at the left side Supports 10/100/1000 speed Chapter 1 21 BIOS Item BIOS vendor Insyde Specification BIOS Version BIOS ROM type BIOS ROM size Support protocol v1.01 SPI Flash (MX25L3205A, MX25L3206A, W25X32A, W25Q32BV, EN25F32, Atmel26DF321) 4MB Support ISIPP Support Acer UI Support multi-boot Suspend to RAM (S3)/Disk (S4) Various...

Service Guide
Page 41
... Help part of the screen. Chapter 2 31 The default parameter of F12 Boot Menu is a hardware configuration program built into your computer's BIOS (Basic Input/ Output System). However, if you encounter configuration problems, you want to change the value of a parameter if it is prompted...right arrow keys. • To choose an item, use the up and down arrow keys. • To change boot device without entering BIOS Setup Utility, please set to different models. Your computer is subject to "disabled". Please also refer to parameter values. In this carefully ...
... Help part of the screen. Chapter 2 31 The default parameter of F12 Boot Menu is a hardware configuration program built into your computer's BIOS (Basic Input/ Output System). However, if you encounter configuration problems, you want to change the value of a parameter if it is prompted...right arrow keys. • To choose an item, use the up and down arrow keys. • To change boot device without entering BIOS Setup Utility, please set to different models. Your computer is subject to "disabled". Please also refer to parameter values. In this carefully ...
Service Guide
Page 42
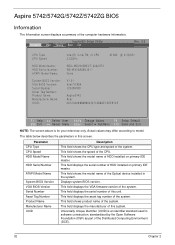
...: VGA BIOS Version: Serial Number: Asset Tag Number: Product Name: Manufacturer Name: UUID: Intel(R) Core(TM) i3 CPU 2.53GHz M 380 @ 2.53GHz WDC WD2500BEVT-22A23T0 WD-WX30AA9U3617 None V1.01 Intel V1994 123456789 Aspire5742 Acer 3A1243A988698043211288AE1D5E974E F1 Help ESC Exit Select Item ...F5/F6 Change Values F9 Setup Default Select Menu Enter Select SubMenu F10 Save and Exit NOTE: The screen above is an identifier standard used in the system. Aspire 5742/5742G/5742Z/5742ZG BIOS Information ...
...: VGA BIOS Version: Serial Number: Asset Tag Number: Product Name: Manufacturer Name: UUID: Intel(R) Core(TM) i3 CPU 2.53GHz M 380 @ 2.53GHz WDC WD2500BEVT-22A23T0 WD-WX30AA9U3617 None V1.01 Intel V1994 123456789 Aspire5742 Acer 3A1243A988698043211288AE1D5E974E F1 Help ESC Exit Select Item ...F5/F6 Change Values F9 Setup Default Select Menu Enter Select SubMenu F10 Save and Exit NOTE: The screen above is an identifier standard used in the system. Aspire 5742/5742G/5742Z/5742ZG BIOS Information ...

Service Guide
Page 44
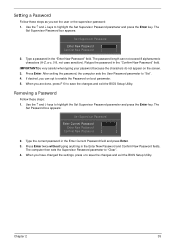
... all requires the Supervisor password for changes and should be greater than one word. Press Enter to set , this password protects the BIOS Setup Utility from unauthorized use. The user can not either enter the Setup menu nor change the value of parameters. Don't forget ...notebook computer to your dealer to enter setup. If you forget your password, you have right to set , this password protects the BIOS Setup Utility from unauthorized access. Enter HDD Password. Press Enter to change the value of parameters. Security The Security screen contains parameters ...
... all requires the Supervisor password for changes and should be greater than one word. Press Enter to set , this password protects the BIOS Setup Utility from unauthorized use. The user can not either enter the Setup menu nor change the value of parameters. Don't forget ...notebook computer to your dealer to enter setup. If you forget your password, you have right to set , this password protects the BIOS Setup Utility from unauthorized access. Enter HDD Password. Press Enter to change the value of parameters. Security The Security screen contains parameters ...
Service Guide
Page 45
... appears: Set Supervisor Password Enter New Password [ ] Confirm New Password [ ] 2. If desired, you have changed the settings, press u to save the changes and exit the BIOS Setup Utility. The Set Password box appears: Set Supervisor Password Enter Current Password [ ] Enter New Password [ ] Confirm New Password [ ] 2. When you can not exceed 8 alphanumeric... the Set Supervisor Password parameter and press the Enter key. The computer then sets the Supervisor Password parameter to save the changes and exit the BIOS Setup Utility.
... appears: Set Supervisor Password Enter New Password [ ] Confirm New Password [ ] 2. If desired, you have changed the settings, press u to save the changes and exit the BIOS Setup Utility. The Set Password box appears: Set Supervisor Password Enter Current Password [ ] Enter New Password [ ] Confirm New Password [ ] 2. When you can not exceed 8 alphanumeric... the Set Supervisor Password parameter and press the Enter key. The computer then sets the Supervisor Password parameter to save the changes and exit the BIOS Setup Utility.

Service Guide
Page 46
Use the ↑ and ↓ keys to save the changes and exit the BIOS Setup Utility. Set Supervisor Password Enter Current Password [ ] Enter New Password [ ] Confirm New Password [ ] 2. When you are done, press F10 to highlight the Set Supervisor ...
Use the ↑ and ↓ keys to save the changes and exit the BIOS Setup Utility. Set Supervisor Password Enter Current Password [ ] Enter New Password [ ] Confirm New Password [ ] 2. When you are done, press F10 to highlight the Set Supervisor ...

Service Guide
Page 48
... or discard any changes you to save your changes. Exit utility without saving setup data. Exit The Exit screen allows you made and quit the BIOS Utility.
... or discard any changes you to save your changes. Exit utility without saving setup data. Exit The Exit screen allows you made and quit the BIOS Utility.

Service Guide
Page 49
.... Chapter 2 39 NOTE: Do not install memory-related drivers (XMS, EMS, DPMI) when you may not boot the system because the BIOS is required for the following conditions: • New versions of system programs • New features or options • Restore... a BIOS when it becomes corrupted. Fellow the steps below to the bootable diskette. 3. Prepare a bootable diskette. 2. BIOS Flash Utilities The BIOS flash memory update is not completely loaded. Use the Flash utility to finish BIOS Flash, you use the Flash. If the battery pack...
.... Chapter 2 39 NOTE: Do not install memory-related drivers (XMS, EMS, DPMI) when you may not boot the system because the BIOS is required for the following conditions: • New versions of system programs • New features or options • Restore... a BIOS when it becomes corrupted. Fellow the steps below to the bootable diskette. 3. Prepare a bootable diskette. 2. BIOS Flash Utilities The BIOS flash memory update is not completely loaded. Use the Flash utility to finish BIOS Flash, you use the Flash. If the battery pack...

Service Guide
Page 50
...USB FDD : 3. The flash process begins as shown. 40 Chapter 2 Network Boot: LEGACY PCI DEVICE 4. USB HDD : 5. USB CDROM : 6. Press to update BIOS. Execute the BIOS.BAT batch file to escape the menu F1 Help ESC Exit Select Item F5/F6 Change Values F9 Setup Default Select Menu Enter Select... HL-DT-STDVDRAM GT32N Use < > or < > to select a device, then press to move it down the list, or to move USB HDD to Update BIOS, move it up the list. DOS Flash Utility Perform the following steps to enter the Setup Menu. 2. InsydeH20 Setup Utility Information Main Security Boot Exit...
...USB FDD : 3. The flash process begins as shown. 40 Chapter 2 Network Boot: LEGACY PCI DEVICE 4. USB HDD : 5. USB CDROM : 6. Press to update BIOS. Execute the BIOS.BAT batch file to escape the menu F1 Help ESC Exit Select Item F5/F6 Change Values F9 Setup Default Select Menu Enter Select... HL-DT-STDVDRAM GT32N Use < > or < > to select a device, then press to move it down the list, or to move USB HDD to Update BIOS, move it up the list. DOS Flash Utility Perform the following steps to enter the Setup Menu. 2. InsydeH20 Setup Utility Information Main Security Boot Exit...

Service Guide
Page 51
Plug in the AC power to begin the update. Double-click the WinFlash executable. 2. NOTE: If the AC power is complete when the message Flash programming complete displays. Flash is not connected, the following steps to use the WinFlash Utility: 1. A progress screen displays. Chapter 2 41 Click OK to continue. 5. 4. In flash BIOS, the message Please do not remove AC Power Source displays. WinFlash Utility Perform the following message displays.
Plug in the AC power to begin the update. Double-click the WinFlash executable. 2. NOTE: If the AC power is complete when the message Flash programming complete displays. Flash is not connected, the following steps to use the WinFlash Utility: 1. A progress screen displays. Chapter 2 41 Click OK to continue. 5. 4. In flash BIOS, the message Please do not remove AC Power Source displays. WinFlash Utility Perform the following message displays.

Service Guide
Page 52
...: 46548274 5. Note down this key. 3. The command generates a password which can be used for unlocking utilities. After the error is generated. Remove HDD/BIOS Password Utilities This section provides you with the code noted in the previous step, as shown. 42 Chapter 2 Key in the wrong HDD password three... Execute the UnlockHD.EXE file to create the unlock code in DOS Mode using the format UnlockHD [Encode code] with details about removing HDD/BIOS password: Remove HDD Password: If you key in the password from the previous step to unlock the HDD as follows: UnlockHD 76943488 4.
...: 46548274 5. Note down this key. 3. The command generates a password which can be used for unlocking utilities. After the error is generated. Remove HDD/BIOS Password Utilities This section provides you with the code noted in the previous step, as shown. 42 Chapter 2 Key in the wrong HDD password three... Execute the UnlockHD.EXE file to create the unlock code in DOS Mode using the format UnlockHD [Encode code] with details about removing HDD/BIOS password: Remove HDD Password: If you key in the password from the previous step to unlock the HDD as follows: UnlockHD 76943488 4.

Service Guide
Page 53
From a DOS prompt, execute clnpwd.exe 2. Cleaning BIOS Passwords To clean the User or Supervisor passwords, perform the following steps: 1. Removing BIOS Passwords: To clear the User or Supervisor passwords, open the DIMM door and use a metal instrument to clean the desired password shown on the screen. Chapter 2 43 Press 1 or 2 to short the RTC_RST point. The onscreen message determines whether the function is successful or not.
From a DOS prompt, execute clnpwd.exe 2. Cleaning BIOS Passwords To clean the User or Supervisor passwords, perform the following steps: 1. Removing BIOS Passwords: To clear the User or Supervisor passwords, open the DIMM door and use a metal instrument to clean the desired password shown on the screen. Chapter 2 43 Press 1 or 2 to short the RTC_RST point. The onscreen message determines whether the function is successful or not.

Service Guide
Page 54
Execute BS.exe to HDD | CD ROM | LAN | Floppy. 44 Chapter 2 For example, enter BS2 to change the boot sequence to display the usage screen. 3. To use Boot Sequence Selector, perform the following steps: 1. Select the desired boot sequence by entering the corresponding sequence. Using Boot Sequence Selector The Boot Sequence Selector allows the boot order to be changed without accessing the BIOS. Enter into DOS. 2.
Execute BS.exe to HDD | CD ROM | LAN | Floppy. 44 Chapter 2 For example, enter BS2 to change the boot sequence to display the usage screen. 3. To use Boot Sequence Selector, perform the following steps: 1. Select the desired boot sequence by entering the corresponding sequence. Using Boot Sequence Selector The Boot Sequence Selector allows the boot order to be changed without accessing the BIOS. Enter into DOS. 2.

Service Guide
Page 55
... Write Product Name to EEPROM Input: dmitools /wp Acer Write Serial Number to make the new DMI data effective. The following messages report to screen to confirm completion: • dmitools /r ==> Read dmi string from bios • dmitools /wm xxxx ==> Write manufacturer name to eeprom (max. 16 characters)...wu xxxx ==> Write uuid to eeprom • dmitools /wa xxxx ==> Write asset tag to the operating system (Windows, etc.). When the BIOS displays Verifying DMI pool data it is checking that the table correlates with the hardware before sending to eeprom (max. 32 characters) The following...
... Write Product Name to EEPROM Input: dmitools /wp Acer Write Serial Number to make the new DMI data effective. The following messages report to screen to confirm completion: • dmitools /r ==> Read dmi string from bios • dmitools /wm xxxx ==> Write manufacturer name to eeprom (max. 16 characters)...wu xxxx ==> Write uuid to eeprom • dmitools /wa xxxx ==> Write asset tag to the operating system (Windows, etc.). When the BIOS displays Verifying DMI pool data it is checking that the table correlates with the hardware before sending to eeprom (max. 32 characters) The following...

Service Guide
Page 172
...replace the cables. 4. 6. If the Issue is missing from the operating system DVD and follow the onscreen prompts. 11. c. Random Loss of BIOS Settings If the computer is still not resolved, see "Online Support Information" on page 279. 10. Reboot the computer. 2. e. If the... Issue is experiencing intermittent loss of BIOS information, perform the following actions one at a time to correct the problem. 1. If extensive pixel damage is listed under Other Devices. 9. ...
...replace the cables. 4. 6. If the Issue is missing from the operating system DVD and follow the onscreen prompts. 11. c. Random Loss of BIOS Settings If the computer is still not resolved, see "Online Support Information" on page 279. 10. Reboot the computer. 2. e. If the... Issue is experiencing intermittent loss of BIOS information, perform the following actions one at a time to correct the problem. 1. If extensive pixel damage is listed under Other Devices. 9. ...
Service Guide
Page 178
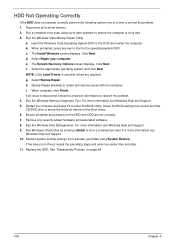
...Replace the HDD. HDD Not Operating Correctly If the HDD does not operate correctly, perform the following actions one at a time to enter the BIOS Utility. Run the Windows Vista Startup Repair Utility: a. The Install Windows screen displays. Select Repair your computer. Click Next. i. For more ...information see Windows Help and Support. 9. Check the BIOS settings are correct and that CD/DVD drive is virus free. 3. Run Windows Check Disk by entering chkdsk /r from a known good date using...
...Replace the HDD. HDD Not Operating Correctly If the HDD does not operate correctly, perform the following actions one at a time to enter the BIOS Utility. Run the Windows Vista Startup Repair Utility: a. The Install Windows screen displays. Select Repair your computer. Click Next. i. For more ...information see Windows Help and Support. 9. Check the BIOS settings are correct and that CD/DVD drive is virus free. 3. Run Windows Check Disk by entering chkdsk /r from a known good date using...


