
Aspire 9300 / 7000 User's Guide ES
Page 110
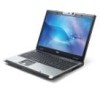
90 LCD panel ergonomic specifications Español Design viewing distance Design inclination angle Design azimuth angle Viewing direction range class Screen tilt angle Design screen illuminance Reflection class of LCD panel (positive and negative polarity) Image polarity Reference white: Pre-setting of luminance and color temperature @ 6500K (tested ...; • Illuminance level: [250 + (250cosα)] lx where α = 85° • Color: Source D65 • Ordinary LCD: Class I • Protective or Acer CrystalBrite™ LCD: Class III Both • Yn • u'n • v'n Class II
90 LCD panel ergonomic specifications Español Design viewing distance Design inclination angle Design azimuth angle Viewing direction range class Screen tilt angle Design screen illuminance Reflection class of LCD panel (positive and negative polarity) Image polarity Reference white: Pre-setting of luminance and color temperature @ 6500K (tested ...; • Illuminance level: [250 + (250cosα)] lx where α = 85° • Color: Source D65 • Ordinary LCD: Class I • Protective or Acer CrystalBrite™ LCD: Class III Both • Yn • u'n • v'n Class II
Aspire 9300 / 7000 User's Guide FR
Page 111
... panel ergonomic specifications English Français Français Design viewing distance Design inclination angle Design azimuth angle Viewing direction range class Screen tilt angle Design screen illuminance Reflection class of LCD panel (positive and negative polarity) Image polarity Reference white: Pre-setting of luminance and color temperature @...8226; Illuminance level: [250 + (250cosα)] lx where α = 85° • Color: Source D65 • Ordinary LCD: Class I • Protective or Acer CrystalBrite™ LCD: Class III Both • Yn • u'n • v'n Class II
... panel ergonomic specifications English Français Français Design viewing distance Design inclination angle Design azimuth angle Viewing direction range class Screen tilt angle Design screen illuminance Reflection class of LCD panel (positive and negative polarity) Image polarity Reference white: Pre-setting of luminance and color temperature @...8226; Illuminance level: [250 + (250cosα)] lx where α = 85° • Color: Source D65 • Ordinary LCD: Class I • Protective or Acer CrystalBrite™ LCD: Class III Both • Yn • u'n • v'n Class II
Aspire 9300 / 7000 User's Guide PT
Page 108
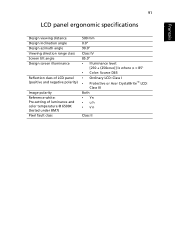
88 LCD panel ergonomic specifications Portuguêss Design viewing distance Design inclination angle Design azimuth angle Viewing direction range class Screen tilt angle Design screen illuminance Reflection class of LCD panel (positive and negative polarity) Image polarity Reference white: Pre-setting of luminance and color temperature @ 6500K (... • Illuminance level: [250 + (250cosα)] lx where α = 85° • Color: Source D65 • Ordinary LCD: Class I • Protective or Acer CrystalBrite™ LCD: Class III Both • Yn • u'n • v'n Class II
88 LCD panel ergonomic specifications Portuguêss Design viewing distance Design inclination angle Design azimuth angle Viewing direction range class Screen tilt angle Design screen illuminance Reflection class of LCD panel (positive and negative polarity) Image polarity Reference white: Pre-setting of luminance and color temperature @ 6500K (... • Illuminance level: [250 + (250cosα)] lx where α = 85° • Color: Source D65 • Ordinary LCD: Class I • Protective or Acer CrystalBrite™ LCD: Class III Both • Yn • u'n • v'n Class II
Aspire 9300 / Aspire 7000 Service Guide
Page 5
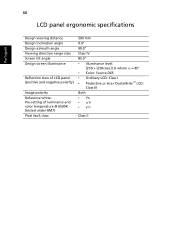
Gives precautionary measures to avoid possible hardware or software problems. Reminds you to the current topic. V NOTE WARNING CAUTION IMPORTANT Gives bits and pieces of procedures. Alerts you to do specific actions relevant to the accomplishment of additional information related to any damage that appear on screen. Conventions The following conventions are used in this manual: SCREEN MESSAGES Denotes actual messages that might result from doing or not doing specific actions.
Gives precautionary measures to avoid possible hardware or software problems. Reminds you to the current topic. V NOTE WARNING CAUTION IMPORTANT Gives bits and pieces of procedures. Alerts you to do specific actions relevant to the accomplishment of additional information related to any damage that appear on screen. Conventions The following conventions are used in this manual: SCREEN MESSAGES Denotes actual messages that might result from doing or not doing specific actions.
Aspire 9300 / Aspire 7000 Service Guide
Page 14
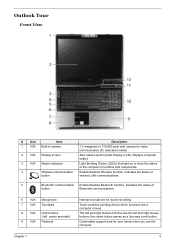
... mouse buttons; Chapter 1 5 Indicates the status of button Bluetooth communications. 6 N/A Microphone 7 N/A Touchpad 8 N/A Click buttons (left, center and right) 9 N/A Palmrest Internal microphone for selected models) 2 N/A Display screen Also called Liquid-Crystal Display (LCD), displays computer output. 3 N/A Status indicators Light-Emitting Diodes (LEDs) that light up to show the status of button wireless...
... mouse buttons; Chapter 1 5 Indicates the status of button Bluetooth communications. 6 N/A Microphone 7 N/A Touchpad 8 N/A Click buttons (left, center and right) 9 N/A Palmrest Internal microphone for selected models) 2 N/A Display screen Also called Liquid-Crystal Display (LCD), displays computer output. 3 N/A Status indicators Light-Emitting Diodes (LEDs) that light up to show the status of button wireless...
Aspire 9300 / Aspire 7000 Service Guide
Page 19
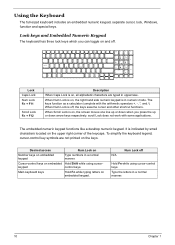
... when you can toggle on , all alphabetic characters are not printed on embedded keypad. Hold Fn while using cursor- When Num Lock is on, the screen moves one line up or down arrow keys respectively. keypad control ke. When Scroll Lock is off Number keys on embedded keypad Type numbers in...
... when you can toggle on , all alphabetic characters are not printed on embedded keypad. Hold Fn while using cursor- When Num Lock is on, the screen moves one line up or down arrow keys respectively. keypad control ke. When Scroll Lock is off Number keys on embedded keypad Type numbers in...

Aspire 9300 / Aspire 7000 Service Guide
Page 20
Thot+keynd+hol key before pressing the other keDyessctroipptrioonvide a variety of the computer's controls like screen brightness, volume output and the BIOS utility. Application key < > + : < +>F+1n: s Help and Support. < +>F+: e: ns the Find (All Files... Windows Start button. Hotkey Icon Function Description HotkeHHeHe+yo+yt IcIIccooonnnIconFFuunFnccuttioinonncFtuinocntioDnDesecsrcirpitpiotinoDnescriptiDoenscription Hot key help Displays help on Acer ePower Launches the Acer ePower Management in the hotkey bination. It opens the application's context menu. + : Hotkeys < ...
Thot+keynd+hol key before pressing the other keDyessctroipptrioonvide a variety of the computer's controls like screen brightness, volume output and the BIOS utility. Application key < > + : < +>F+1n: s Help and Support. < +>F+: e: ns the Find (All Files... Windows Start button. Hotkey Icon Function Description HotkeHHeHe+yo+yt IcIIccooonnnIconFFuunFnccuttioinonncFtuinocntioDnDesecsrcirpitpiotinoDnescriptiDoenscription Hot key help Displays help on Acer ePower Launches the Acer ePower Management in the hotkey bination. It opens the application's context menu. + : Hotkeys < ...
Aspire 9300 / Aspire 7000 Service Guide
Page 21
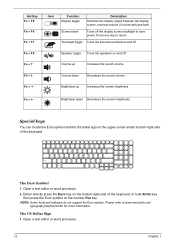
... on and off. +n++ + + < > n++ > Speaker toggle Turns the speakers on and off the display screen backlight to save power. Volume down Decreases the screen brightness. + < > SY+o+pueckateeythse Euro symbol and the US dollar sign on the number five key. Open a...faq/faq12.htm The US Dollar Sign 1. ++ ++ n+H+++ + n+ + > Icon Function Display toggle Description Switches the display output between the display screen, external monitor (if connected) and both. n+++ + < > ++ > Brightness down Decreases the sound volume. Either directly press the Euro keon...
... on and off. +n++ + + < > n++ > Speaker toggle Turns the speakers on and off the display screen backlight to save power. Volume down Decreases the screen brightness. + < > SY+o+pueckateeythse Euro symbol and the US dollar sign on the number five key. Open a...faq/faq12.htm The US Dollar Sign 1. ++ ++ n+H+++ + n+ + > Icon Function Display toggle Description Switches the display output between the display screen, external monitor (if connected) and both. n+++ + < > ++ > Brightness down Decreases the sound volume. Either directly press the Euro keon...
Aspire 9300 / Aspire 7000 Service Guide
Page 40
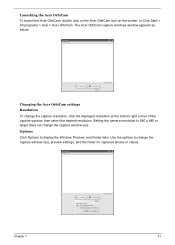
... capture windows window appears as below: Changing the Acer OrbiCam settings Resolution To change the capture window sizOep,tiponres view settingsW, iannddowth, Perefoviledwer for Fcoalpdetur red photos or videos. Options Click Options to 640 x ... of the capture window, then select the desired resolution. Setting the camera resolution to display the Window, Preview, and Folder tabs. Chapter 1 31 Launching the Acer OrbiCam To launch the Acer OrbiCam, double click on the Acer OrbiCam icon on the screen. or Click Start > All programs...
... capture windows window appears as below: Changing the Acer OrbiCam settings Resolution To change the capture window sizOep,tiponres view settingsW, iannddowth, Perefoviledwer for Fcoalpdetur red photos or videos. Options Click Options to 640 x ... of the capture window, then select the desired resolution. Setting the camera resolution to display the Window, Preview, and Folder tabs. Chapter 1 31 Launching the Acer OrbiCam To launch the Acer OrbiCam, double click on the Acer OrbiCam icon on the screen. or Click Start > All programs...
Aspire 9300 / Aspire 7000 Service Guide
Page 44
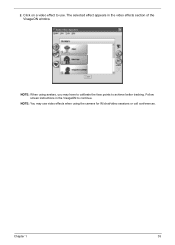
Follow screen instructions in the video effects section of the VisageON window. NOTE: You may use . 2. NOTE: When using the camera for IM chat/video sessions or call conferences. Click on a video effect to use video effects when using avatars, you may have to calibrate the face points to continue. Chapter 1 35 The selected effect appears in the VisageON to achieve better tracking.
Follow screen instructions in the video effects section of the VisageON window. NOTE: You may use . 2. NOTE: When using the camera for IM chat/video sessions or call conferences. Click on a video effect to use video effects when using avatars, you may have to calibrate the face points to continue. Chapter 1 35 The selected effect appears in the VisageON to achieve better tracking.
Aspire 9300 / Aspire 7000 Service Guide
Page 45
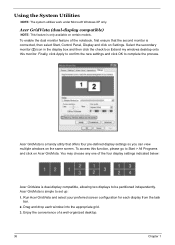
...two displays to be partitioned independently. To access this monitor. Acer GridVista is only available on the same screen. Drag and drop each display from the task bar. 2. Run Acer GridVista and select your preferred screen configuration for each window into the appropriate grid. 3. To... enable the dual monitor feature of a well-organized desktop. 36 Chapter 1 Acer GridVista (dual-display compatible) NOTE: This feature is...
...two displays to be partitioned independently. To access this monitor. Acer GridVista is only available on the same screen. Drag and drop each display from the task bar. 2. Run Acer GridVista and select your preferred screen configuration for each window into the appropriate grid. 3. To... enable the dual monitor feature of a well-organized desktop. 36 Chapter 1 Acer GridVista (dual-display compatible) NOTE: This feature is...

Aspire 9300 / Aspire 7000 Service Guide
Page 52
LCD Item Vendor and Model name Screen Diagonal (mm) Active area Display resolution Display mode Samsung LTN170WX-L05H 17.1" WXGA 367.20 (W) x 229.50 (H) 1440 x 3 (RGB) x 900 normally white Specification QDI QD17TL02-... length • Hotkey controls • Embedded numeric keypad • Multi-language support • Spill-proof • Four easy-launch buttons: Internet browser, E-mail with LED, Acer Empowering, one user-programmable button Battery Item Vendor & model name Battery Type Pack capacity Specification Panasonic / Sanyo / Sony Li-Ion 8-cell: 2400 mAh 6-cell: 2000...
LCD Item Vendor and Model name Screen Diagonal (mm) Active area Display resolution Display mode Samsung LTN170WX-L05H 17.1" WXGA 367.20 (W) x 229.50 (H) 1440 x 3 (RGB) x 900 normally white Specification QDI QD17TL02-... length • Hotkey controls • Embedded numeric keypad • Multi-language support • Spill-proof • Four easy-launch buttons: Internet browser, E-mail with LED, Acer Empowering, one user-programmable button Battery Item Vendor & model name Battery Type Pack capacity Specification Panasonic / Sanyo / Sony Li-Ion 8-cell: 2400 mAh 6-cell: 2000...

Aspire 9300 / Aspire 7000 Service Guide
Page 57
...into your computer's BIOS (Basic Input/ Output System). NOTE: You can change the value of a parameter, press p or q. Chapter 2 48 The setup screen displays BIOS as follows:Navigating the BIOS Utility Function Information Main Advanced Security Boot Exit Item Display the system informations Allows the user to specify... setting and exit Setup During setup,all Fn function keys and power saving functions are found in the Item Specific Help part of the screen. Chapter 2 System Utilities BIOS Setup Utility The BIOS Setup Utility is enclosed in any of the menu options to go to the Exit...
...into your computer's BIOS (Basic Input/ Output System). NOTE: You can change the value of a parameter, press p or q. Chapter 2 48 The setup screen displays BIOS as follows:Navigating the BIOS Utility Function Information Main Advanced Security Boot Exit Item Display the system informations Allows the user to specify... setting and exit Setup During setup,all Fn function keys and power saving functions are found in the Item Specific Help part of the screen. Chapter 2 System Utilities BIOS Setup Utility The BIOS Setup Utility is enclosed in any of the menu options to go to the Exit...

Aspire 9300 / Aspire 7000 Service Guide
Page 59
The values set in CRT (or projector) only mode. The size is enabled. Both: Simultaneously enable both the integrated LCD screen and the system's external video port (for an external CRT or projector). This field reports the memory size of the extended memory in LCD only ...
The values set in CRT (or projector) only mode. The size is enabled. Both: Simultaneously enable both the integrated LCD screen and the system's external video port (for an external CRT or projector). This field reports the memory size of the extended memory in LCD only ...

Aspire 9300 / Aspire 7000 Service Guide
Page 61
... F9 Setup Defaults F10 Save and Exit The table below describes the parameters in boldface are the default and suggested parameter settings. Security The Security screen contains parameters that help safeguard and protect your computer from unauthorized access. [Set]: System password is set [Clear]: System password is not set Option ...Parameter Supervisor Password Is User Password Is HDD Password Is Set Supervisor Password Set User Password Description N/A N/A N/A Press Enter to set , this screen. No more than 8 characters Characters -- 0-9, A-Z (not case sensitive) Chapter 2 52
... F9 Setup Defaults F10 Save and Exit The table below describes the parameters in boldface are the default and suggested parameter settings. Security The Security screen contains parameters that help safeguard and protect your computer from unauthorized access. [Set]: System password is set [Clear]: System password is not set Option ...Parameter Supervisor Password Is User Password Is HDD Password Is Set Supervisor Password Set User Password Description N/A N/A N/A Press Enter to set , this screen. No more than 8 characters Characters -- 0-9, A-Z (not case sensitive) Chapter 2 52
Aspire 9300 / Aspire 7000 Service Guide
Page 65
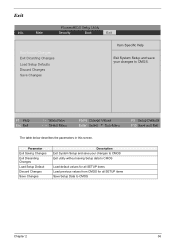
...; Select Menu F5/F6 Change Values Enter Select 4 Sub-Menu F9 Setup Defaults F10 Save and Exit The table below describes the parameters in this screen. Parameter Exit Saving Changes Exit Discarding Changes Load Setup Default Discard Changes Save Changes Description Exit System Setup and save your changes to CMOS Exit...
...; Select Menu F5/F6 Change Values Enter Select 4 Sub-Menu F9 Setup Defaults F10 Save and Exit The table below describes the parameters in this screen. Parameter Exit Saving Changes Exit Discarding Changes Load Setup Default Discard Changes Save Changes Description Exit System Setup and save your changes to CMOS Exit...

Aspire 9300 / Aspire 7000 Service Guide
Page 89
... still does not light up, replace the AC/DC charger board. Check the Battery Pack Follow the procedures below . 3. Check the Power Management in the screen for both battery and adaptor. For example, run Tracking Pad PS2 Mode Driver. Repeat the step 1 and step 2 for Current Power Source and Total Battery...
... still does not light up, replace the AC/DC charger board. Check the Battery Pack Follow the procedures below . 3. Check the Power Management in the screen for both battery and adaptor. For example, run Tracking Pad PS2 Mode Driver. Repeat the step 1 and step 2 for Current Power Source and Total Battery...
Aspire 9300 / Aspire 7000 Service Guide
Page 90
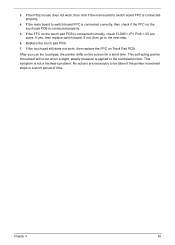
... PCB. 7. This symptom is connected properly. 4. If yes, then replace switch board. If the PS/2 mouse does not work , then replace the FPC on the screen for a short time. This self-acting pointer movement will occur when a slight, steady pressure is connected properly. 5. No actions are pules. If the touch pad...
... PCB. 7. This symptom is connected properly. 4. If yes, then replace switch board. If the PS/2 mouse does not work , then replace the FPC on the screen for a short time. This self-acting pointer movement will occur when a slight, steady pressure is connected properly. 5. No actions are pules. If the touch pad...

Aspire 9300 / Aspire 7000 Service Guide
Page 91
... lists the error message and their possible causes. Enter Setup and install Setup defaults to "Undetermined Problems". If the symptom is not included on the screen and the error symptoms classified by functions. NOTE: If the system fails after you make changes in the computer. NOTE: Perform the FRU replacement or...
... lists the error message and their possible causes. Enter Setup and install Setup defaults to "Undetermined Problems". If the symptom is not included on the screen and the error symptoms classified by functions. NOTE: If the system fails after you make changes in the computer. NOTE: Perform the FRU replacement or...

Aspire 9300 / Aspire 7000 Service Guide
Page 96
...) B7h Initialize ACPI BIOS B9h Prepare Boot BAh Initialize SMBIOS BBh Initialize PnP Option ROMs BCh Clear parity checkers BDh Display MultiBoot menu BEh Clear screen (optional) BFh Check virus and backup reminders C0h Try to boot with INT 19 C1h Initialize POST Error Manager (PEM) C2h Initialize error logging C3h...
...) B7h Initialize ACPI BIOS B9h Prepare Boot BAh Initialize SMBIOS BBh Initialize PnP Option ROMs BCh Clear parity checkers BDh Display MultiBoot menu BEh Clear screen (optional) BFh Check virus and backup reminders C0h Try to boot with INT 19 C1h Initialize POST Error Manager (PEM) C2h Initialize error logging C3h...


